In diesem kurzen Tutorial zeigen wir Ihnen, wie Sie VirtualBox Guest Additions auf dem Gnome-Desktop von RHEL 7 installieren. Starten Sie einfach das virtuelle RHEL 7-System. Zuerst werden wir alle Voraussetzungen installieren. Öffnen Sie dazu das Terminal und geben Sie die folgenden Linux-Befehle ein:
[root@rhel7 ~]# yum groupinstall 'Development Tools'
Außerdem benötigen wir das Kernel-Entwicklungspaket:
[root@rhel7 ~]# yum install kernel-devel
Navigieren Sie nach der Installation zum VirtualBox-Menü:Virtual box menu -> Devices -> Insert Guest Additions CD image Dadurch wird das folgende Bild angezeigt:
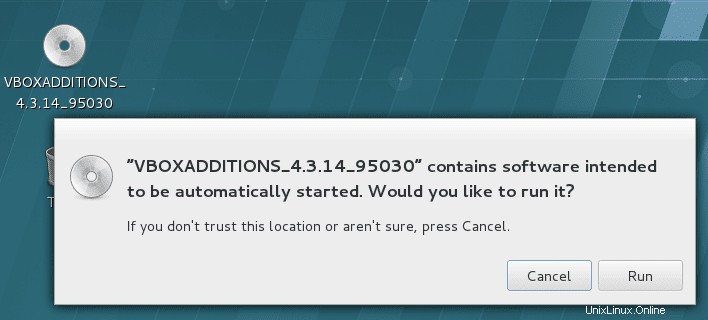
Wenn Sie „RUN“ drücken, starten Sie die eigentliche Installation der Virtualbox Guest Additions:
Verifying archive integrity... All good.
Uncompressing VirtualBox 4.3.14 Guest Additions for Linux............
VirtualBox Guest Additions installer
Copying additional installer modules ...
Installing additional modules ...
Removing existing VirtualBox non-DKMS kernel modules       [  OK  ]
Building the VirtualBox Guest Additions kernel modules
Building the main Guest Additions module                   [  OK  ]
Building the shared folder support module                  [  OK  ]
Building the OpenGL support module                         [  OK  ]
Doing non-kernel setup of the Guest Additions              [  OK  ]
Starting the VirtualBox Guest Additions                    [  OK  ]
Installing the Window System drivers
Installing X.Org Server 1.15 modules                       [  OK  ]
Setting up the Window System to use the Guest Additions    [  OK  ]
You may need to restart the hal service and the Window System (or just restart
the guest system) to enable the Guest Additions.

Installing graphics libraries and desktop services componen[  OK  ]
Starten Sie Ihr System neu, damit die Virtualbox Guest-Hinzufügungen stattfinden.