In diesem Tutorial zeige ich Ihnen, wie Sie Oracle Weblogic auf dem CentOS 7-Betriebssystem einrichten und installieren. Oracle Weblogic ist ein Middleware-Tool, das von großen Unternehmen häufig verwendet wird, um Anwendungen bereitzustellen, die Java EE als Programmiersprache verwenden. Mit seiner coolen Benutzeroberfläche, bewährten Funktionen wie dem Kohärenzmodul (für Caching-Zwecke) und Datenbank-Clustering (zur Handhabung mehrerer Datenbankverbindungen) zeigt Oracle Weblogic ziemlich beeindruckende Vorteile im Vergleich zu anderen ähnlichen Tools wie Apache Tomcat, JBoss und WebSphere. Wie von Oracle selbst angegeben, bietet WebLogic einen vollständigen Satz von Diensten für diese Module und verarbeitet viele Details des Anwendungsverhaltens automatisch, ohne dass eine Programmierung erforderlich ist. Unten sehen Sie ein Beispiel dafür, wo sich Oracle Weblogic in einem High-Level-Design befindet:

1. Vorbemerkung
Für dieses Tutorial verwende ich CentOS 7.4 in der 64-Bit-Version. Bitte beachten Sie, dass, obwohl die Konfiguration unter CentOS 7 vorgenommen wird, die Schritte und Änderungen bei Verwendung von RedHat oder Oracle Linux Flavor im Wesentlichen gleich sind. Der Grund, warum ich dies erwähnt habe, ist, dass die meisten Produktionsinstallationen für Oracle Weblogic Oracle Linux selbst als Betriebssystem verwenden.
Am Ende dieses Lernprogramms haben wir es geschafft, 2 Serverknoten aufzurufen, die als verwaltete Weblogic-Server fungieren, die von einem Weblogic-Admin-Server erstellt wurden. Abgesehen davon werden wir das Admin-Server-Dashboard verwenden, um beide Managed Server in einer Clustergruppe zusammenzufassen.
2. Installationsphase
Da der Zweck von Oracle Weblogic darin besteht, hochleistungsfähigen Anwendungscode in der Programmiersprache JAVA bereitzustellen, ist es ziemlich offensichtlich, dass die Installation für den Middleware-Server selbst eine integrierte Java-Laufzeitumgebung erfordern würde. Daher müssen wir als Installationsvoraussetzung JAVA installieren Paket in unseren Admin-Server und die beiden verwalteten Knoten. Die Schritte sind wie folgt:
 [[email protected]_mgr opt]# wget --no-cookies --no-check-certificate --header "Cookie: gpw_e24=http%3A%2F%2Fwww.oracle.com%2F; oraclelicense=accept-securebackup-cookie" "http://download.oracle.com/otn-pub/java/jdk/8u131-b11/d54c1d3a095b4ff2b6607d096fa80163/jdk-8u131-linux-x64.rpm"
--2018-06-09 12:57:05-- http://download.oracle.com/otn-pub/java/jdk/8u131-b11/d54c1d3a095b4ff2b6607d096fa80163/jdk-8u131-linux-x64.rpm
Resolving download.oracle.com (download.oracle.com)... 23.49.16.62
Connecting to download.oracle.com (download.oracle.com)|23.49.16.62|:80... connected.
HTTP request sent, awaiting response... 302 Moved Temporarily
Location: https://edelivery.oracle.com/otn-pub/java/jdk/8u131-b11/d54c1d3a095b4ff2b6607d096fa80163/jdk-8u131-linux-x64.rpm [following]
--2018-06-09 12:57:10-- https://edelivery.oracle.com/otn-pub/java/jdk/8u131-b11/d54c1d3a095b4ff2b6607d096fa80163/jdk-8u131-linux-x64.rpm
Resolving edelivery.oracle.com (edelivery.oracle.com)... 104.103.48.174, 2600:1417:58:181::2d3e, 2600:1417:58:188::2d3e
Connecting to edelivery.oracle.com (edelivery.oracle.com)|104.103.48.174|:443... connected.
HTTP request sent, awaiting response... 302 Moved Temporarily
Location: http://download.oracle.com/otn-pub/java/jdk/8u131-b11/d54c1d3a095b4ff2b6607d096fa80163/jdk-8u131-linux-x64.rpm?AuthParam=1528549151_b1fd01d854bc0423600a83c36240028e [following]
--2018-06-09 12:57:11-- http://download.oracle.com/otn-pub/java/jdk/8u131-b11/d54c1d3a095b4ff2b6607d096fa80163/jdk-8u131-linux-x64.rpm?AuthParam=1528549151_b1fd01d854bc0423600a83c36240028e
Connecting to download.oracle.com (download.oracle.com)|23.49.16.62|:80... connected.
HTTP request sent, awaiting response... 200 OK
Length: 169983496 (162M) [application/x-redhat-package-manager]
Saving to: ‘jdk-8u131-linux-x64.rpm’

100%[==============================================================================>] 169,983,496 2.56MB/s in 64s

2018-06-09 12:58:15 (2.54 MB/s) - ‘jdk-8u131-linux-x64.rpm’ saved [169983496/169983496]

[[email protected]_mgr opt]# yum localinstall -y jdk-8u131-linux-x64.rpm
Sobald dies erledigt ist, nehmen wir weitere Änderungen am Umgebungspfad vor, um die Variable JAVA_HOME in jedem Serverknoten zu erstellen. Unten sind die Schritte:
 [[email protected]_mgr opt]# vi /root/.bash_profile
export JAVA_HOME=/usr/java/jdk1.8.0_131
PATH=$JAVA_HOME/bin:$PATH:$HOME/bin
export PATH
 [[email protected]_mgr opt]# source /root/.bash_profile
[[email protected]_mgr opt]# java -version
java version "1.8.0_131"
Java(TM) SE Runtime Environment (build 1.8.0_131-b11)
Java HotSpot(TM) 64-Bit Server VM (build 25.131-b11, mixed mode)
Für die Installation der Oracle-Datenbank ist es erforderlich, dass die Installation mit einem Nicht-Root-Benutzer durchgeführt wird. Dies gilt auch für die Installation von Oracle Weblogic. Um fortzufahren, erstellen wir für diese Richtlinie einen zusätzlichen Benutzer als Eigentümer für Oracle Weblogic. Unten sind die Schritte:
[[email protected]_mgr opt]# useradd -s /bin/bash shahril
 [[email protected]_mgr opt]# passwd shahril
Changing password for user shahril.
New password:
BAD PASSWORD: The password fails the dictionary check - it is too simplistic/systematic
Retype new password:
passwd: all authentication tokens updated successfully.

[[email protected]_mgr opt]# su - shahril
[[email protected]_mgr ~]$ pwd
/home/shahril
Bevor wir fortfahren, konfigurieren wir die Umgebungsvariablen für den Weblogic-Eigentümerbenutzer für die erforderlichen Variablen. Nachfolgend sind die Best-Practice-Variablen aufgeführt, die zugewiesen werden müssen:
- ORACLE_BASE ::Standardspeicherort für das Oracle-Installationsprogramm
- ORACLE_HOME ::Standardspeicherort für das Oracle-Datenbankverzeichnis / optional, wenn der Oracle-Client darin vorhanden ist
- MW_HOME ::Standardverzeichnis für das Middleware-Installationsprogramm
- WLS_HOME ::Standardspeicherort des von Oracle Weblogic verwalteten Serververzeichnisses
- WL_HOME ::Standardspeicherort des Oracle Weblogic-Verwaltungsserververzeichnisses
- DOMAIN_BASE ::Globale Standarddomäne von Oracle Weblogic
- DOMAIN_HOME ::Standardmäßige Oracle Weblogic-spezifische Domäne
 [shahr[email protected]_mgr wls]$ vi /home/shahril/.bash_profile

export ORACLE_BASE=/home/shahril/wls/oracle
export ORACLE_HOME=$ORACLE_BASE/product/fmw12
export MW_HOME=$ORACLE_HOME
export WLS_HOME=$MW_HOME/wlserver
export WL_HOME=$WLS_HOME
export DOMAIN_BASE=$ORACLE_BASE/config/domains
export DOMAIN_HOME=$DOMAIN_BASE/TEST

export JAVA_HOME=/usr/java/jdk1.8.0_131
PATH=$JAVA_HOME/bin:$PATH:$HOME/bin
export PATH

[[email protected]_mgr wls]$ source /home/shahril/.bash_profile
[[email protected]_mgr wls]$ mkdir -p $ORACLE_BASE
[[email protected]_mgr wls]$ mkdir -p $DOMAIN_BASE
[[email protected]_mgr wls]$ mkdir -p $ORACLE_HOME
[[email protected]_mgr wls]$ mkdir -p $ORACLE_BASE/config/applications
[[email protected]_mgr wls]$ mkdir -p /home/shahril/wls/oraInventory
Sobald dies erledigt ist, erstellen wir eine Datei namens oraInst.loc und wls.rsp . Für den Dateinamen oraInst.loc:Diese Datei wird benötigt, um während der Installation von Oracle Weblogic einen Inventarspeicherort zu definieren. Für den Dateinamen wls.rsp ist er optional, da er als Antwortdatei fungiert, die während der Installation verwendet wird. Im weiteren Verlauf werden wir jedoch die Installation über die Befehlszeilenschnittstelle (CLI) vornehmen, wls.rsp wäre für uns obligatorisch. Lassen Sie uns nun mit den folgenden Schritten fortfahren:
 [[email protected]_mgr wls]$ pwd
/home/shahril/wls
[[email protected]_mgr wls]$ vi oraInst.loc

inventory_loc=/home/shahril/wls/oraInventory
inst_group=shahril

[[email protected]_mgr wls]$ vi wls.rsp

[ENGINE]
Response File Version=1.0.0.0.0
[GENERIC]
ORACLE_HOME=/home/shahril/wls/oracle/product/fmw12
INSTALL_TYPE=WebLogic Server
DECLINE_SECURITY_UPDATES=true
SECURITY_UPDATES_VIA_MYORACLESUPPORT=false
Da alles vorhanden ist, fahren wir mit dem Herunterladen des Oracle Weblogic-Installationsprogramms fort. Sie können hier zur Website-URL gehen und Ihre bevorzugte Version von Oracle Weblogic auswählen.
In unserem Fall werden wir mit dem Herunterladen von Oracle Weblogic Version 12.1.3 fortfahren, da es sich bei weitem um die aktuellste und stabilste Version handelt (basierend auf meiner aktuellen Erfahrung). Unten sind die Schritte:
 [[email protected]_mgr ~]$ cd $ORACLE_BASE
[[email protected]_mgr oracle]$ wget http://download.oracle.com/otn/nt/middleware/12c/wls/1213/fmw_12.1.3.0.0_wls.jar?AuthParam=1530174357_1de6ededa212d8bc86524a0fb78ac0df
--2018-06-28 16:24:15-- http://download.oracle.com/otn/nt/middleware/12c/wls/1213/fmw_12.1.3.0.0_wls.jar?AuthParam=1530174357_1de6ededa212d8bc86524a0fb78ac0df
Resolving download.oracle.com (download.oracle.com)... 23.74.208.198
Connecting to download.oracle.com (download.oracle.com)|23.74.208.198|:80... connected.
HTTP request sent, awaiting response... 200 OK
Length: 923179081 (880M) [application/x-jar]
Saving to: ‘fmw_12.1.3.0.0_wls.jar?AuthParam=1530174357_1de6ededa212d8bc86524a0fb78ac0df’

100%[=================================================================>] 923,179,081 1.05MB/s in 16m 4s

2018-06-28 16:40:24 (935 KB/s) - ‘fmw_12.1.3.0.0_wls.jar?AuthParam=1530174357_1de6ededa212d8bc86524a0fb78ac0df’ saved [923179081/923179081]

[[email protected]_mgr oracle]$ mv fmw_12.1.3.0.0_wls.jar?AuthParam=1530174357_1de6ededa212d8bc86524a0fb78ac0df fmw_12.1.3.0.0_wls.jar
Als nächstes fahren Sie mit der Installation fort. Die Schritte sind wie unten gezeigt:
 [[email protected]_mgr wls]$ java -jar /home/shahril/wls/oracle/fmw_12.1.3.0.0_wls.jar -silent -responseFile /home/shahril/wls/wls.rsp -invPtrLoc /home/shahril/wls/oraInst.loc
Launcher log file is /tmp/OraInstall2018-06-10_12-44-24PM/launcher2018-06-10_12-44-24PM.log.
Extracting files.......
Starting Oracle Universal Installer

Checking if CPU speed is above 300 MHz. Actual 3199.968 MHz Passed
Checking swap space: must be greater than 512 MB. Actual 7815164 MB Passed
Checking if this platform requires a 64-bit JVM. Actual 64 Passed (64-bit not required)
Checking temp space: must be greater than 300 MB. Actual 393285 MB Passed


Preparing to launch the Oracle Universal Installer from /tmp/OraInstall2018-06-10_12-44-24PM
Java HotSpot(TM) 64-Bit Server VM warning: ignoring option MaxPermSize=512m; support was removed in 8.0
Log: /tmp/OraInstall2018-06-10_12-44-24PM/install2018-06-10_12-44-24PM.log
Copyright (c) 1996, 2014, Oracle and/or its affiliates. All rights reserved.
Reading response file..
Starting check : CertifiedVersions
/bin/cat: /proc/sys/net/core/wmem_default: No such file or directory
Starting check : CheckJDKVersion
Expected result: 1.7.0_15
Actual Result: 1.8.0_131
Check complete. The overall result of this check is: Passed
CheckJDKVersion Check: Success.
Validations are enabled for this session.
Verifying data......
Copying Files...
You can find the log of this install session at:
/tmp/OraInstall2018-06-10_12-44-24PM/install2018-06-10_12-44-24PM.log
-----------20%----------40%----------60%----------80%--------100%

The installation of Oracle Fusion Middleware 12c WebLogic Server and Coherence 12.1.3.0.0 completed successfully.
Logs successfully copied to /home/shahril/wls/oraInventory/logs.
Exzellent! Jetzt haben wir Oracle Weblogic erfolgreich auf unserem CentOS 7-Server installiert. Als nächstes werden wir mit der Konfigurationsphase fortfahren.
3. Konfigurationsphase
Jetzt sind wir im Konfigurationsteil, es gibt 2 Konfigurationsebenen, die vorgenommen werden müssen, und zwar:
- Weblogic-Konfiguration
- Domänenkonfiguration
Für einen Weblogic-Administrationsserver müssen wir beide Konfigurationen vornehmen, da sich der Hauptbefehl von Weblogic unter der Weblogic-Konfiguration befindet. Aber für jeden von Weblogic verwalteten Server, der als Instanzknoten fungiert, muss er nur für die Weblogic-Konfiguration eingerichtet werden, da der Administrator während der Initialisierung der Domäne entscheiden kann, welcher Instanzknoten für welche Projektdomäne verwendet wird. Unten sehen Sie ein einfaches Beispiel dafür, wie die Weblogic-Domain funktioniert:

Für jeden von Weblogic verwalteten Server können Sie so viele Instanzknoten erstellen, wie Sie benötigen. Dies hängt von Ihrer Serverressourcenzuweisung ab, da jeder Instanzknoten auf seine dedizierte Projektdomäne verweist. Welche Domäne auf welchen Instanzknoten verweisen kann, kann einfach über das Administrationsserver-Dashboard erfolgen.
Lassen Sie uns nun die Konfiguration für die Weblogik und die Domänenkonfiguration für den Admin-Server-Teil einrichten. Um den Lernprozess zu vereinfachen, erstellen wir nur eine Domain namens TEST. Unten sind die Schritte:-
 [[email protected]_mgr wls]$ cd $WL_HOME
[[email protected]_mgr wlserver]$ cd common/bin/
[[email protected]_mgr bin]$ ./commEnv.sh
[[email protected]_mgr bin]$ ./wlst.sh
Java HotSpot(TM) 64-Bit Server VM warning: ignoring option MaxPermSize=256m; support was removed in 8.0
Initializing WebLogic Scripting Tool (WLST) ...
Jython scans all the jar files it can find at first startup. Depending on the system, this process may take a few minutes to complete, and WLST may not return a prompt right away.

Welcome to WebLogic Server Administration Scripting Shell

Type help() for help on available commands

wls:/offline> readTemplate('/home/shahril/wls/oracle/product/fmw12/wlserver/common/templates/wls/wls.jar')
wls:/offline/base_domain>cd('Servers/AdminServer')
wls:/offline/base_domain/Server/AdminServer>set('ListenAddress','172.17.0.6')
wls:/offline/base_domain/Server/AdminServer>set('ListenPort',7001) ## Port that will be assign to each domain

wls:/offline/base_domain/Server/AdminServer>create('AdminServer','SSL')
Proxy for AdminServer: Name=AdminServer, Type=SSL

wls:/offline/base_domain/Server/AdminServer>cd('SSL/AdminServer')
wls:/offline/base_domain/Server/AdminServer/SSL/AdminServer>set('Enabled','True')
wls:/offline/base_domain/Server/AdminServer/SSL/AdminServer>set('ListenPort',7002)

wls:/offline/base_domain/Server/AdminServer/SSL/AdminServer>cd('/')
wls:/offline/base_domain>cd('Security/base_domain/User/weblogic')
wls:/offline/base_domain/Security/base_domain/User/weblogic>cmo.setPassword('Test1234')
wls:/offline/base_domain/Security/base_domain/User/weblogic>setOption('OverwriteDomain','true')
wls:/offline/base_domain/Security/base_domain/User/weblogic>writeDomain('/home/shahril/wls/oracle/config/domains/TEST')

wls:/offline/TEST/Security/TEST/User/weblogic>closeTemplate()
wls:/offline>exit()

Exiting WebLogic Scripting Tool.
Großartig, jetzt haben wir die Konfiguration für beide durchgeführt, jetzt starten wir die Weblogic- und TEST-Dienste auf dem Admin-Server. Unten sind die Schritte:
 [[email protected]_mgr bin]$ cd $DOMAIN_HOME
[[email protected]_mgr TEST]$ cd bin/
[[email protected]_mgr bin]$ pwd
/home/shahril/wls/oracle/config/domains/TEST/bin

[[email protected]_mgr bin]$ ./startWebLogic.sh &
[1] 19303
[[email protected]_mgr bin]$ .
.
JAVA Memory arguments: -Xms256m -Xmx512m -XX:CompileThreshold=8000 -XX:PermSize=128m -XX:MaxPermSize=256m
.
CLASSPATH=/usr/java/jdk1.8.0_131/lib/tools.jar:/home/shahril/wls/oracle/product/fmw12/wlserver/server/lib/weblogic_sp.jar:/home/shahril/wls/oracle/product/fmw12/wlserver/server/lib/weblogic.jar:/home/shahril/wls/oracle/product/fmw12/oracle_common/modules/net.sf.antcontrib_1.1.0.0_1-0b3/lib/ant-contrib.jar:/home/shahril/wls/oracle/product/fmw12/wlserver/modules/features/oracle.wls.common.nodemanager_2.0.0.0.jar:/home/shahril/wls/oracle/product/fmw12/oracle_common/modules/com.oracle.cie.config-wls-online_8.1.0.0.jar:/home/shahril/wls/oracle/product/fmw12/wlserver/common/derby/lib/derbyclient.jar:/home/shahril/wls/oracle/product/fmw12/wlserver/common/derby/lib/derby.jar:/home/shahril/wls/oracle/product/fmw12/wlserver/server/lib/xqrl.jar .
PATH=/home/shahril/wls/oracle/product/fmw12/wlserver/server/bin:/home/shahril/wls/oracle/product/fmw12/oracle_common/modules/org.apache.ant_1.9.2/bin:/usr/java/jdk1.8.0_131/jre/bin:/usr/java/jdk1.8.0_131/bin:/usr/java/jdk1.8.0_131/bin:/usr/java/jdk1.8.0_131/bin:/usr/java/jdk1.8.0_131/bin:/usr/local/bin:/bin:/usr/bin:/usr/local/sbin:/usr/sbin:/home/shahril/bin:/home/shahril/bin:/home/shahril/bin .
***************************************************
* To start WebLogic Server, use a username and *
* password assigned to an admin-level user. For *
* server administration, use the WebLogic Server *
* console at http://hostname:port/console *
***************************************************
starting weblogic with Java version:
java version "1.8.0_131"
Java(TM) SE Runtime Environment (build 1.8.0_131-b11)
Java HotSpot(TM) 64-Bit Server VM (build 25.131-b11, mixed mode)
Starting WLS with line:
/usr/java/jdk1.8.0_131/bin/java -server -Xms256m -Xmx512m -XX:CompileThreshold=8000 -XX:PermSize=128m -XX:MaxPermSize=256m -Dweblogic.Name=AdminServer -Djava.security.policy=/home/shahril/wls/oracle/product/fmw12/wlserver/server/lib/weblogic.policy -Xverify:none -Djava.endorsed.dirs=/usr/java/jdk1.8.0_131/jre/lib/endorsed:/home/shahril/wls/oracle/product/fmw12/oracle_common/modules/endorsed -da -Dwls.home=/home/shahril/wls/oracle/product/fmw12/wlserver/server -Dweblogic.home=/home/shahril/wls/oracle/product/fmw12/wlserver/server -Dweblogic.utils.cmm.lowertier.ServiceDisabled=true weblogic.Server
Java HotSpot(TM) 64-Bit Server VM warning: ignoring option PermSize=128m; support was removed in 8.0
Java HotSpot(TM) 64-Bit Server VM warning: ignoring option MaxPermSize=256m; support was removed in 8.0
Jun 10, 2018 1:11:46 PM UTC Info Security BEA-090905 Disabling the CryptoJ JCE Provider self-integrity check for better startup performance. To enable this check, specify -Dweblogic.security.allowCryptoJDefaultJCEVerification=true.
Jun 10, 2018 1:11:46 PM UTC Info Security BEA-090906 Changing the default Random Number Generator in RSA CryptoJ from ECDRBG128 to FIPS186PRNG. To disable this change, specify -Dweblogic.security.allowCryptoJDefaultPRNG=true.
Jun 10, 2018 1:11:47 PM UTC Info WebLogicServer BEA-000377 Starting WebLogic Server with Java HotSpot(TM) 64-Bit Server VM Version 25.131-b11 from Oracle Corporation.
Jun 10, 2018 1:11:47 PM UTC Info Management BEA-141107 Version: WebLogic Server 12.1.3.0.0 Wed May 21 18:53:34 PDT 2014 1604337
Jun 10, 2018 1:11:48 PM UTC Notice WebLogicServer BEA-000365 Server state changed to STARTING.
Jun 10, 2018 1:11:48 PM UTC Info WorkManager BEA-002900 Initializing self-tuning thread pool.
Jun 10, 2018 1:11:48 PM UTC Info WorkManager BEA-002942 CMM memory level becomes 0. Setting standby thread pool size to 256.
Jun 10, 2018 1:11:48 PM UTC Notice Log Management BEA-170019 The server log file /home/shahril/wls/oracle/config/domains/TEST/servers/AdminServer/logs/AdminServer.log is opened. All server side log events will be written to this file.
Jun 10, 2018 1:11:50 PM UTC Notice Security BEA-090082 Security initializing using security realm myrealm.
Jun 10, 2018 1:11:51 PM UTC Notice WebLogicServer BEA-000365 Server state changed to STANDBY.
Jun 10, 2018 1:11:51 PM UTC Notice WebLogicServer BEA-000365 Server state changed to STARTING.
Jun 10, 2018 1:11:51 PM weblogic.wsee.WseeCoreMessages logWseeServiceStarting

INFO: The Wsee Service is starting

Jun 10, 2018 1:11:51 PM UTC Notice Log Management BEA-170027 The server has successfully established a connection with the Domain level Diagnostic Service.
Jun 10, 2018 1:11:51 PM UTC Notice WebLogicServer BEA-000365 Server state changed to ADMIN.
Jun 10, 2018 1:11:51 PM UTC Notice WebLogicServer BEA-000365 Server state changed to RESUMING.
Jun 10, 2018 1:11:51 PM UTC Notice Security BEA-090171 Loading the identity certificate and private key stored under the alias DemoIdentity from the jks keystore file /home/shahril/wls/oracle/config/domains/TEST/security/DemoIdentity.jks.
Jun 10, 2018 1:11:51 PM UTC Notice Security BEA-090169 Loading trusted certificates from the jks keystore file /home/shahril/wls/oracle/product/fmw12/wlserver/server/lib/DemoTrust.jks.
Jun 10, 2018 1:11:51 PM UTC Notice Security BEA-090169 Loading trusted certificates from the jks keystore file /usr/java/jdk1.8.0_131/jre/lib/security/cacerts.
Jun 10, 2018 1:11:51 PM UTC Notice Server BEA-002613 Channel "DefaultSecure" is now listening on 172.17.0.6:7002 for protocols iiops, t3s, ldaps, https.
Jun 10, 2018 1:11:51 PM UTC Notice Server BEA-002613 Channel "Default" is now listening on 172.17.0.6:7001 for protocols iiop, t3, ldap, snmp, http.
Jun 10, 2018 1:11:51 PM UTC Notice WebLogicServer BEA-000331 Started the WebLogic Server Administration Server "AdminServer" for domain "TEST" running in development mode.
Jun 10, 2018 1:11:51 PM UTC Notice WebLogicServer BEA-000360 The server started in RUNNING mode.
Jun 10, 2018 1:11:52 PM UTC Notice WebLogicServer BEA-000365 Server state changed to RUNNING.

[[email protected]_mgr bin]$ netstat -apn|grep -i :70
(Not all processes could be identified, non-owned process info
will not be shown, you would have to be root to see it all.)
tcp 0 0 172.17.0.6:7001 0.0.0.0:* LISTEN 19360/java
tcp 0 0 172.17.0.6:7002 0.0.0.0:* LISTEN 19360/java
Exzellent! Jetzt haben wir die komplette Konfiguration auf dem Admin-Server-Teil vorgenommen. Jetzt, da die komplizierten Teile erledigt sind, können Sie sich entspannen, eine Tasse Kaffee trinken und dann einfach NUR eine Kopie der Weblogic-Konfiguration erstellen und sie auf jedem verwalteten Serverknoten einfügen. Unten sind die Schritte:-
 [[email protected]_mgr bin]$ $WL_HOME/common/bin/pack.sh -domain=$DOMAIN_HOME -template=$WL_HOME/common/templates/domains/TEST_template.jar -template_name=TEST -managed=true
Java HotSpot(TM) 64-Bit Server VM warning: ignoring option MaxPermSize=256m; support was removed in 8.0
<< read domain from "/home/shahril/wls/oracle/config/domains/TEST"
>> succeed: read domain from "/home/shahril/wls/oracle/config/domains/TEST"
<< set config option Managed to "true"
>> succeed: set config option Managed to "true"
<< write template to "/home/shahril/wls/oracle/product/fmw12/wlserver/common/templates/domains/TEST_template.jar"
..........................................................................................
>> succeed: write template to "/home/shahril/wls/oracle/product/fmw12/wlserver/common/templates/domains/TEST_template.jar"
<< close template
>> succeed: close template

[[email protected]_mgr ~]$ ls -lh $WL_HOME/common/templates/domains/TEST_template.jar
-rw-r----- 1 shahril shahril 51K Jun 10 14:11 /home/shahril/wls/oracle/product/fmw12/wlserver/common/templates/domains/TEST_template.jar
Wie oben gezeigt, haben wir eine Kopie der Weblogic-Konfiguration in einer JAR-Datei erstellt. Wir werden nur diese JAR-Datei auf jeden von Weblogic verwalteten Server übertragen und von dort aus einrichten.
 [[email protected]_mgr ~]$ scp -r /home/shahril/wls/oracle/product/fmw12/wlserver/common/templates/domains/TEST_template.jar 172.17.0.7:/home/shahril/wls/
[email protected]'s password:
TEST_template.jar 100% 50KB 58.2MB/s 00:00
Gehen Sie nun zum verwalteten Server und extrahieren Sie die kopierte JAR-Datei. Es ist keine Konfiguration erforderlich, da die von uns erstellte verwandte Domain übernommen wird. Unten sind die Schritte:
 [[email protected]_node1 ~]$ cd $WL_HOME
[[email protected]_node1 wlserver]$ pwd
/home/shahril/wls/oracle/product/fmw12/wlserver
[[email protected]_node1 wlserver]$ $WL_HOME/common/bin/unpack.sh -template=/home/shahril/wls/TEST_template.jar -domain=$DOMAIN_HOME
Java HotSpot(TM) 64-Bit Server VM warning: ignoring option MaxPermSize=256m; support was removed in 8.0
<< read template from "/home/shahril/wls/TEST_template.jar"
>> succeed: read template from "/home/shahril/wls/TEST_template.jar"
<< set config option DomainName to "TEST"
>> succeed: set config option DomainName to "TEST"
<< write Domain to "/home/shahril/wls/oracle/config/domains/TEST"
....................................................................................................
>> succeed: write Domain to "/home/shahril/wls/oracle/config/domains/TEST"
<< close template
>> succeed: close template
Exzellent! Wir haben die kopierte Weblogic-Konfiguration erfolgreich extrahiert. Im nächsten Schritt starten wir den Weblogic-Dienst auf dem verwalteten Server. Unten sind die Schritte:
 [[email protected]_node1 wlserver]$ cd $DOMAIN_HOME
[[email protected]_node1 TEST]$ cd bin/
[[email protected]_node1 bin]$ ./stopManagedWebLogic.sh Node_Server01 t3://172.17.0.6:7001 weblogic Test1234
Stopping Weblogic Server...
Java HotSpot(TM) 64-Bit Server VM warning: ignoring option PermSize=128m; support was removed in 8.0
Java HotSpot(TM) 64-Bit Server VM warning: ignoring option MaxPermSize=256m; support was removed in 8.0
Initializing WebLogic Scripting Tool (WLST) ...
Jython scans all the jar files it can find at first startup. Depending on the system, this process may take a few minutes to complete, and WLST may not return a prompt right away.

Welcome to WebLogic Server Administration Scripting Shell

Type help() for help on available commands

Connecting to t3://172.17.0.6:7001 with userid weblogic ...
Successfully connected to Admin Server "AdminServer" that belongs to domain "TEST".

Warning: An insecure protocol was used to connect to the
server. To ensure on-the-wire security, the SSL port or
Admin port should be used instead.

Shutting down the server Node_Server01 with force=false while connected to AdminServer ...
No stack trace available.
Problem invoking WLST - Traceback (innermost last):
File "/home/shahril/wls/oracle/config/domains/TEST/shutdown-Node_Server01.py", line 4, in ?
File "", line 1199, in shutdown
File "", line 552, in raiseWLSTException
WLSTException: Error occurred while performing shutdown : No Server with name "Node_Server01" configured in the domain

Done
Stopping Derby Server...


[[email protected]_node1 bin]$ ./startManagedWebLogic.sh Node_Server01 t3://172.17.0.6:7001 &
[1] 5378
[[email protected]_node1 bin]$ .
.
JAVA Memory arguments: -Xms256m -Xmx512m -XX:CompileThreshold=8000 -XX:PermSize=128m -XX:MaxPermSize=256m
.
CLASSPATH=/usr/java/jdk1.8.0_131/lib/tools.jar:/home/shahril/wls/oracle/product/fmw12/wlserver/server/lib/weblogic_sp.jar:/home/shahril/wls/oracle/product/fmw12/wlserver/server/lib/weblogic.jar:/home/shahril/wls/oracle/product/fmw12/oracle_common/modules/net.sf.antcontrib_1.1.0.0_1-0b3/lib/ant-contrib.jar:/home/shahril/wls/oracle/product/fmw12/wlserver/modules/features/oracle.wls.common.nodemanager_2.0.0.0.jar:/home/shahril/wls/oracle/product/fmw12/wlserver/common/derby/lib/derbyclient.jar:/home/shahril/wls/oracle/product/fmw12/wlserver/common/derby/lib/derby.jar:/home/shahril/wls/oracle/product/fmw12/wlserver/server/lib/xqrl.jar
.
PATH=/home/shahril/wls/oracle/product/fmw12/wlserver/server/bin:/home/shahril/wls/oracle/product/fmw12/oracle_common/modules/org.apache.ant_1.9.2/bin:/usr/java/jdk1.8.0_131/jre/bin:/usr/java/jdk1.8.0_131/bin:/usr/java/jdk1.8.0_131/bin:/usr/local/bin:/bin:/usr/bin:/usr/local/sbin:/usr/sbin:/home/shahril/bin
.
***************************************************
* To start WebLogic Server, use a username and *
* password assigned to an admin-level user. For *
* server administration, use the WebLogic Server *
* console at http://hostname:port/console *
***************************************************
starting weblogic with Java version:
java version "1.8.0_131"
Java(TM) SE Runtime Environment (build 1.8.0_131-b11)
Java HotSpot(TM) 64-Bit Server VM (build 25.131-b11, mixed mode)
Starting WLS with line:
/usr/java/jdk1.8.0_131/bin/java -server -Xms256m -Xmx512m -XX:CompileThreshold=8000 -XX:PermSize=128m -XX:MaxPermSize=256m -Dweblogic.Name=Node_Server01 -Djava.security.policy=/home/shahril/wls/oracle/product/fmw12/wlserver/server/lib/weblogic.policy -Dweblogic.security.SSL.trustedCAKeyStore=/home/shahril/wls/oracle/product/fmw12/wlserver/server/lib/cacerts -Xverify:none -Djava.endorsed.dirs=/usr/java/jdk1.8.0_131/jre/lib/endorsed:/home/shahril/wls/oracle/product/fmw12/oracle_common/modules/endorsed -da -Dwls.home=/home/shahril/wls/oracle/product/fmw12/wlserver/server -Dweblogic.home=/home/shahril/wls/oracle/product/fmw12/wlserver/server -Dweblogic.management.server=t3://172.17.0.6:7001 -Dweblogic.utils.cmm.lowertier.ServiceDisabled=true weblogic.Server
Java HotSpot(TM) 64-Bit Server VM warning: ignoring option PermSize=128m; support was removed in 8.0
Java HotSpot(TM) 64-Bit Server VM warning: ignoring option MaxPermSize=256m; support was removed in 8.0
Jun 10, 2018 3:29:41 PM UTC Info Security BEA-090905 Disabling the CryptoJ JCE Provider self-integrity check for better startup performance. To enable this check, specify -Dweblogic.security.allowCryptoJDefaultJCEVerification=true.
Jun 10, 2018 3:29:41 PM UTC Info Security BEA-090906 Changing the default Random Number Generator in RSA CryptoJ from ECDRBG128 to FIPS186PRNG. To disable this change, specify -Dweblogic.security.allowCryptoJDefaultPRNG=true.
Jun 10, 2018 3:29:42 PM UTC Info WebLogicServer BEA-000377 Starting WebLogic Server with Java HotSpot(TM) 64-Bit Server VM Version 25.131-b11 from Oracle Corporation.
Jun 10, 2018 3:29:42 PM UTC Info Management BEA-141107 Version: WebLogic Server 12.1.3.0.0 Wed May 21 18:53:34 PDT 2014 1604337
Jun 10, 2018 3:29:43 PM UTC Notice WebLogicServer BEA-000365 Server state changed to STARTING.
Jun 10, 2018 3:29:43 PM UTC Info WorkManager BEA-002900 Initializing self-tuning thread pool.
Jun 10, 2018 3:29:43 PM UTC Info WorkManager BEA-002942 CMM memory level becomes 0. Setting standby thread pool size to 256.
Jun 10, 2018 3:29:43 PM UTC Notice Log Management BEA-170019 The server log file /home/shahril/wls/oracle/config/domains/TEST/servers/Node_Server01/logs/Node_Server01.log is opened. All server side log events will be written to this file.
Jun 10, 2018 3:29:45 PM UTC Notice Security BEA-090082 Security initializing using security realm myrealm.
Jun 10, 2018 3:29:46 PM UTC Notice WebLogicServer BEA-000365 Server state changed to STANDBY.
Jun 10, 2018 3:29:46 PM UTC Notice WebLogicServer BEA-000365 Server state changed to STARTING.
Jun 10, 2018 3:29:46 PM weblogic.wsee.WseeCoreMessages logWseeServiceStarting
INFO: The Wsee Service is starting

Jun 10, 2018 3:29:48 PM UTC Notice Log Management BEA-170027 The server has successfully established a connection with the Domain level Diagnostic Service.
Jun 10, 2018 3:29:48 PM UTC Notice Cluster BEA-000197 Listening for announcements from cluster using unicast cluster messaging
Jun 10, 2018 3:29:48 PM UTC Notice WebLogicServer BEA-000365 Server state changed to ADMIN.
Jun 10, 2018 3:29:48 PM UTC Notice WebLogicServer BEA-000365 Server state changed to RESUMING.
Jun 10, 2018 3:29:48 PM UTC Notice Cluster BEA-000162 Starting "async" replication service with remote cluster address "null"
Jun 10, 2018 3:29:48 PM UTC Notice Server BEA-002613 Channel "Default" is now listening on 172.17.0.7:8001 for protocols iiop, t3, CLUSTER-BROADCAST, ldap, snmp, http.
Jun 10, 2018 3:29:48 PM UTC Notice WebLogicServer BEA-000332 Started the WebLogic Server Managed Server "Node_Server01" for domain "TEST" running in development mode.
Jun 10, 2018 3:29:48 PM UTC Notice WebLogicServer BEA-000360 The server started in RUNNING mode.
Jun 10, 2018 3:29:48 PM UTC Notice WebLogicServer BEA-000365 Server state changed to RUNNING.
Toll! Now we have successfully configured the weblogic services on the managed servers. You can do the process to other managed server and later we will define the cluster grouping from administration server dashboard.
4. Testphase
To ensure that our Weblogic architecture works as expected, we'll just apply a simple test configuration on our servers. For this test, we will open the Weblogic admin server dashboard and from the dashboard console itself we will add our 2 managed servers into the environment and define them as a cluster.
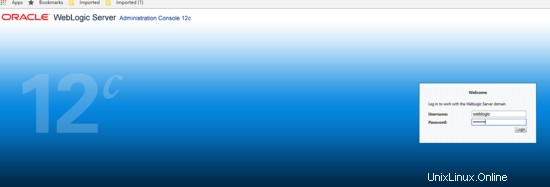
Now, let's open up our admin dashboard via http://172.17.0.6:7001/console . As mentioned before, for this test, we are've just creating only 1 DOMAIN which is TEST therefore the default port 7001 are dedicated for this domain. For multiple domains, the configuration can be seperated by its own dedicated port. Once you have launched the URL in the browser, you should see the console like below, enter the username and password that we've defined during configuration above. For this test, it's weblogic/Test1234 :-
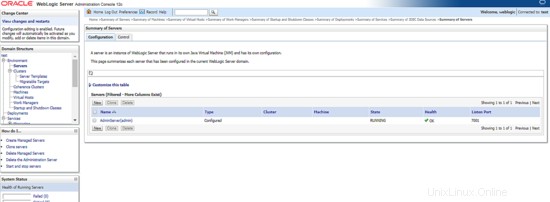
Once you have login successfully, you will see a complete dashboard like shown below:

To proceed with our test, from the dashboard click on Environment -> Servers tab . You will see the results as shown like below which automatically the Weblogic Admin server already included inside TEST domain.
Next, click on the button  , it will forward you to page below. Fill in the Weblogic Managed Server information like it's IP addresses and the weblogic port as per shown then click next.
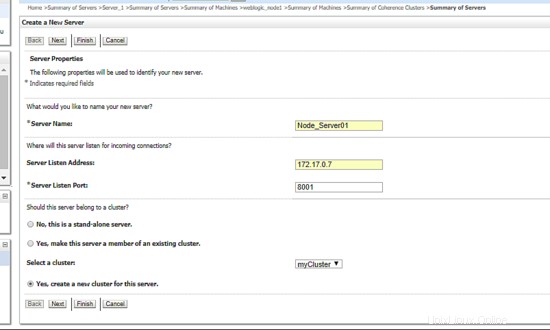
After that, define the new cluster name you want to the click next. Remain others as per default like example below:
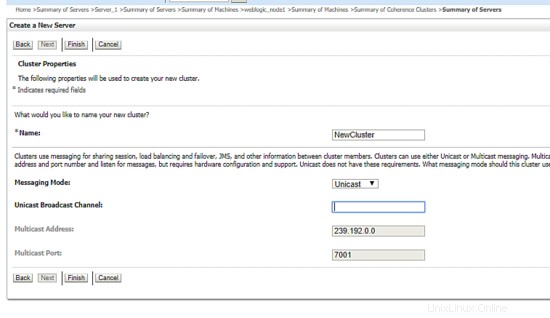
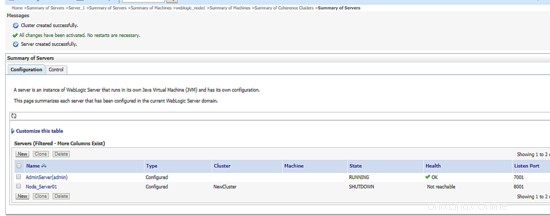
Great, now you've include an instance node inside your newly created weblogic cluster. Below are the example snapshot:
Now, let's bring up the instance node. For this case, we'll go back to CLI shell and start up the weblogic managed server like command we use before like below:
 [[email protected]_node1 wlserver]$ cd $DOMAIN_HOME
[[email protected]_node1 TEST]$ cd bin/
[[email protected]_node1 bin]$ ./startManagedWebLogic.sh Node_Server01 t3://172.17.0.6:7001 &
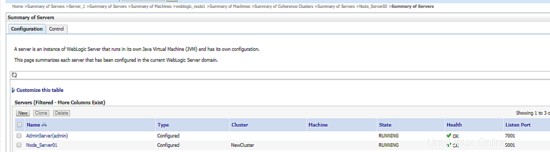
Once done, go back to admin URL and refresh the dashboard. You will see that now the instance node you've established are up and running. Below is the example screenshot:
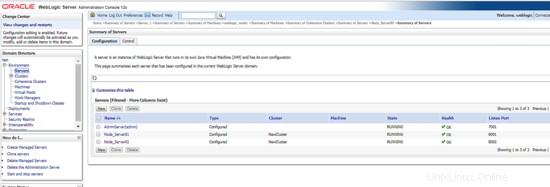
Next, use the same process to add another Weblogic Managed Server into the defined cluster. As the final result, you will see all instance nodes you've added are up and running and in load balancing mode. Below is the example result:
Herzliche Glückwünsche! Now you've successfully created a new weblogic cluster architecture.