Einführung
ONLYOFFICE ist eine kostenlose Open-Source-Software, mit der Teams Projekte, Kundenbeziehungen und Dokumente an einem Ort verwalten können. Obwohl Ubuntu die bekannteste Linux-Distribution ist, möchten wir nicht, dass sich Benutzer anderer Distributionen im Stich gelassen fühlen. Diese Anleitung zeigt, welche Schritte zu unternehmen sind, um das kollaborative System ONLYOFFICE auf Red Hat/CentOS zu installieren.
Systemanforderungen
Damit ONLYOFFICE korrekt funktioniert, sollte Ihr Computer einige Systemanforderungen erfüllen und einige zusätzliche Komponenten installiert haben:
- RAM:2 GB oder mehr
- Auslagerungsdatei:mindestens 2 GB
- Festplatte:mindestens 2 GB freier Speicherplatz
- Mono:Version 3.2 oder höher
- MySQL:Version 5.6 oder höher
- nginx
Installieren Sie einige Voraussetzungen und aktivieren Sie zusätzliche Repositories für (für CentOS 7):
yum -y install nano yum-utils
yum -y install epel-release
yum install http://dev.mysql.com/get/mysql-community-release-el7-5.noarch.rpm
Die im System-Repository gefundenen Komponenten werden automatisch bei der Installation von ONLYOFFICE mit dem Befehl yum install installiert.
Falls einige dieser Komponenten fehlen, befolgen Sie die Anweisungen auf den offiziellen Websites.
Aktivieren Sie den MySQL-Dienst und starten Sie mysql:
systemctl enable mysqld.service
systemctl start mysqld.service
Legen Sie ein MySQL-Passwort fest (das anfängliche Passwort ist leer) und entfernen Sie die Testdatenbank:
mysql_secure_installation
Der Befehl führt Sie interaktiv durch den mysql-Sicherungsprozess, wie unten beschrieben:
[[email protected] ~]# mysql_secure_installation
NOTE: RUNNING ALL PARTS OF THIS SCRIPT IS RECOMMENDED FOR ALL MySQL
 SERVERS IN PRODUCTION USE! PLEASE READ EACH STEP CAREFULLY!
In order to log into MySQL to secure it, we'll need the current
password for the root user. If you've just installed MySQL, and
you haven't set the root password yet, the password will be blank,
so you should just press enter here.
Enter current password for root (enter for none):
OK, successfully used password, moving on...
Setting the root password ensures that nobody can log into the MySQL
root user without the proper authorisation.
Set root password? [Y/n] Y
New password:
Re-enter new password:
Password updated successfully!
Reloading privilege tables..
 ... Success!
By default, a MySQL installation has an anonymous user, allowing anyone
to log into MySQL without having to have a user account created for
them. This is intended only for testing, and to make the installation
go a bit smoother. You should remove them before moving into a
production environment.
Remove anonymous users? [Y/n] y
 ... Success!
Normally, root should only be allowed to connect from 'localhost'. This
ensures that someone cannot guess at the root password from the network.
Disallow root login remotely? [Y/n] y
 ... Success!
By default, MySQL comes with a database named 'test' that anyone can
access. This is also intended only for testing, and should be removed
before moving into a production environment.
Remove test database and access to it? [Y/n] y
 - Dropping test database...
ERROR 1008 (HY000) at line 1: Can't drop database 'test'; database doesn't exist
 ... Failed! Not critical, keep moving...
 - Removing privileges on test database...
 ... Success!
Reloading the privilege tables will ensure that all changes made so far
will take effect immediately.
Reload privilege tables now? [Y/n] y
 ... Success!
All done! If you've completed all of the above steps, your MySQL
installation should now be secure.
Thanks for using MySQL!
Cleaning up...
Installation von ONLYOFFICE
Schritt 1. Öffnen Sie das Terminal mit Strg+Alt+T
Schritt 2. Fügen Sie das yum ONLYOFFICE-Repository hinzu.
Erstellen Sie dazu die Datei /etc/yum.repos.d /onlyoffice.repo Datei mit folgendem Inhalt:
nano /etc/yum.repos.d/onlyoffice.repo
[onlyoffice]
name=onlyoffice repo
baseurl=http://download.onlyoffice.com/repo/centos/noarch/
gpgcheck=0
enabled=1
Schritt 3. Installieren Sie ONLYOFFICE aus dem Repository
Führen Sie einfach den folgenden Befehl aus:
sudo yum install onlyoffice
ONLYOFFICE konfigurieren
Bevor Sie ONLYOFFICE zum ersten Mal starten, müssen Sie die Datenbank erstellen und die Verbindung zu ihr konfigurieren.
Führen Sie dazu das Konfigurationsskript aus:
chmod +x /var/www/onlyoffice/configure.sh
/var/www/onlyoffice/configure.sh
Es fordert Sie interaktiv auf, die MySQL-Verbindungsparameter einzugeben, die Datenbank zu erstellen, Konfigurationsdateien zu aktualisieren und alle Dienste auszuführen.
Bitte beachten Sie:Das Skript erstellt keine Benutzer für die Datenbank und ändert keine Passwörter für bestehende Benutzer.
[[email protected] ~]# /var/www/onlyoffice/configure.sh
-bash: /var/www/onlyoffice/configure.sh: Permission denied
[[email protected] ~]# chmod +x /var/www/onlyoffice/configure.sh
[[email protected] ~]# /var/www/onlyoffice/configure.sh
Configuring MySQL access...
Host: localhost
Database name: onlyoffice
User: root
Password: <- enter the mysql root password here
Trying to establish MySQL connection... OK
Installing MySQL database... Warning: Using a password on the command line interface can be insecure.
Warning: Using a password on the command line interface can be insecure.
Warning: Using a password on the command line interface can be insecure.
Warning: Using a password on the command line interface can be insecure.
OK
Restarting services... OK
Ändern Sie dann die Zeile
listen 80 default_server;
zu
listen 81 default_server;
in der Datei /etc/nginx/nginx.conf als ONLYOFFICE definiert seinen eigenen Standard-vhost auf Port 80 und aktiviert und startet nginx:
nano /etc/nginx/nginx.conf
Aktivieren und starten Sie dann nginx:
systemctl enable nginx.service
systemctl start nginx.service
Läuft mit ONLYOFFICE
Um Ihr Büro im Webbrowser zu öffnen, geben Sie localhost (http://127.0.0.1) oder die externe IP Ihres Servers, wenn Sie keinen Desktop installiert haben, in die Adressleiste Ihres Browsers ein. Die Willkommensseite wird geöffnet:
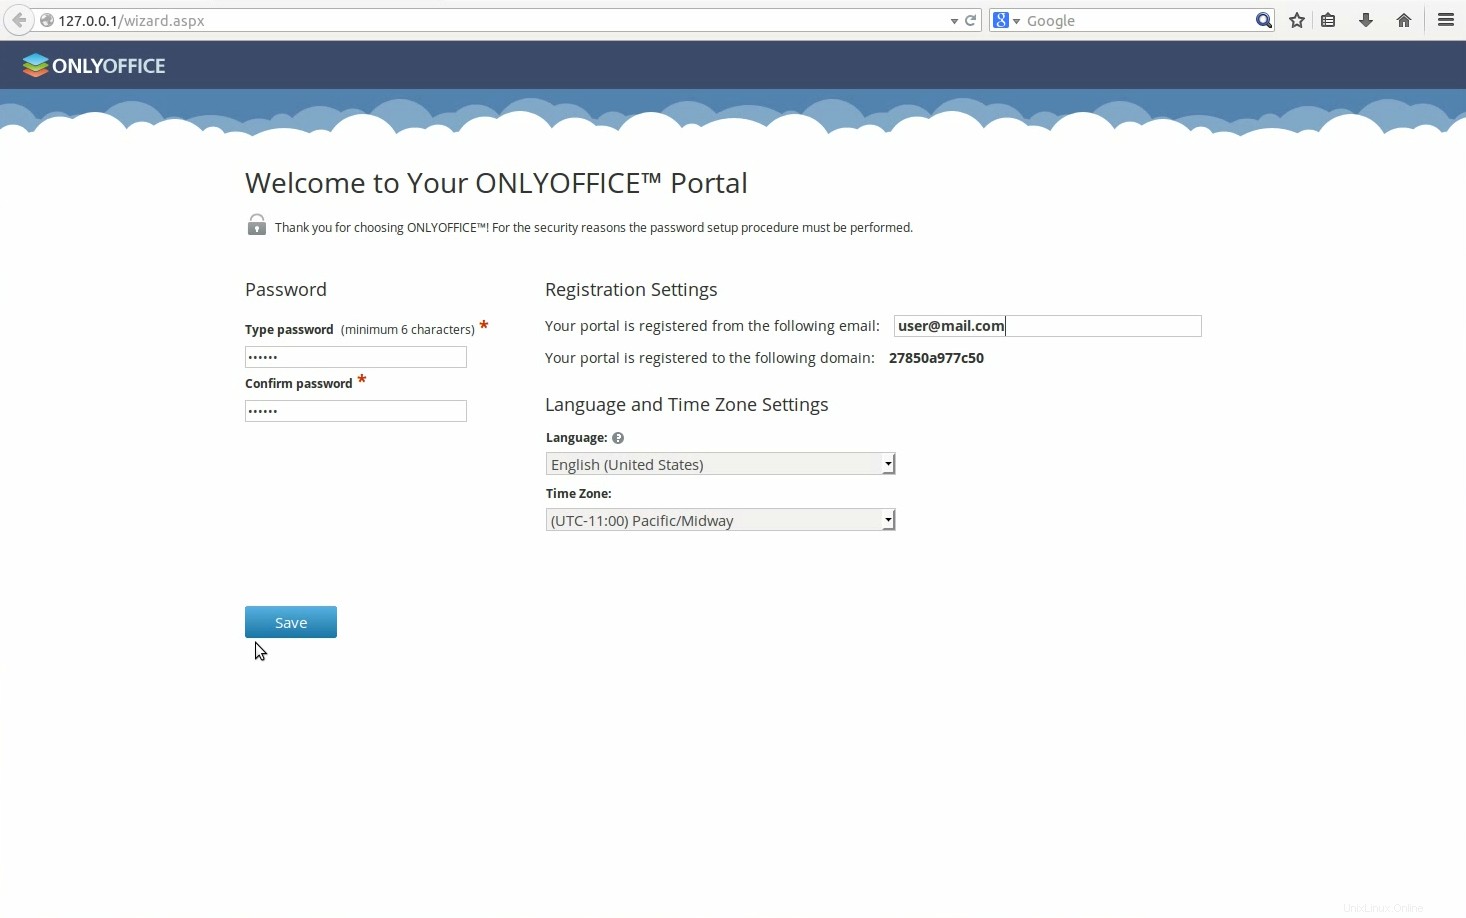
Geben Sie ein Passwort ein und geben Sie die E-Mail-Adresse an, mit der Sie das nächste Mal auf Ihr ONLYOFFICE zugreifen werden.
Fertig! Sie können anfangen zu arbeiten!
Tipps und Tricks
- Tipp 1. ONLYOFFICE verwendet Mono v. 3.2 oder höher, um es zu installieren, lesen Sie die offiziellen Anweisungen. Wenn es installiert ist, um Ihre aktuelle Version herauszufinden, führen Sie den folgenden Befehl aus:mono --version.
- Tipp 2. Befolgen Sie die offiziellen Anweisungen, um die neueste Version von nginx zu installieren.
- Tipp 3. ONLYOFFICE erfordert MySQL Version 5.6 oder höher. Um es auf Ihrem Computer zu installieren, lesen Sie die offiziellen Anweisungen.
- Tipp 4. Sobald ONLYOFFICE installiert ist, müssen Sie es möglicherweise anpassen und verwalten, damit es Ihren Anforderungen entspricht. Alle notwendigen Anweisungen finden Sie auf der offiziellen Website von ONLYOFFICE.
- Tipp 5. Um ONLYOFFICE über die grafische Benutzeroberfläche zu installieren, laden Sie die Installationsdatei von SourceForge herunter.
- Tipp 6. Wenn Sie nach der einfachsten und sichersten Möglichkeit suchen, ONLYOFFICE zu installieren, verwenden Sie den Docker-Dienst.
Links
- ONLYOFFICE