Diese Seite erklärt, wie Sie mit Webmin den Apache Webserver konfigurieren . Es umfasst virtuelle Hosts, IP-Zugriffskontrolle, Passwortbeschränkungen und vieles mehr.
Einführung in Apache
Apache ist der beliebteste HTTP-Server des Internets, aufgrund seiner Nullkosten, breiten Verfügbarkeit und seines großen Funktionsumfangs. Alle Linux-Distributionen enthalten es als Standardpaket und es kann auf jeder anderen von Webmin unterstützten Unix-Variante installiert oder kompiliert werden. Es hat jedoch eine sehr große Anzahl von Optionsdirektiven, die in einer Textkonfigurationsdatei definiert sind, und kann daher für einen unerfahrenen Administrator schwierig einzurichten sein.
Im Laufe der Jahre seit seiner Einführung wurden viele Versionen von Apache veröffentlicht. Beginnend mit 1.0 bis hin zu den aktuellen Serien 1.3 und 2.2 enthält jede Version mehr Funktionen und Optionen. Die grundlegende Webserving-Funktionalität und das Layout der Konfigurationsdatei sind im Wesentlichen gleich geblieben, obwohl sich die interne Implementierung erheblich geändert hat.
Apache hat ein modulares Design, bei dem jedes Modul für einen Teil seines gesamten Funktionsumfangs verantwortlich ist. Es gibt mehrere Standardmodule, die in fast jeder Installation von Apache enthalten sind, und viele weitere, die optional sind oder separat heruntergeladen werden müssen. Module können in die ausführbare Webserver-Datei kompiliert oder zur Laufzeit dynamisch aus gemeinsam genutzten Bibliotheken geladen werden. Diese modulare Architektur kann verwendet werden, um Speicher zu sparen, indem vermieden wird, dass Module geladen werden müssen, die keine nützliche Funktionalität für ein bestimmtes System bereitstellen.
Apache bezieht seine Konfiguration aus mehreren Textdateien, von denen jede eine Reihe von Anweisungen enthält, normalerweise eine pro Zeile. Jede Direktive hat einen Namen und einen oder mehrere Werte und legt eine Option wie den Pfad zu einer Protokolldatei oder den MIME-Typ für eine Datei fest. Welche Anweisungen Apache erkennt, hängt von den verwendeten Modulen ab. Die meisten Module fügen Unterstützung für mehrere Direktiven hinzu, um die von ihnen bereitgestellten Funktionen zu konfigurieren.
Oft möchten Sie mehr als eine Website auf einem einzigen Server hosten. Apache kann so konfiguriert werden, dass es abhängig von der Website, die von einem Browser angefordert wurde, eine andere Konfiguration verwendet. Jede dieser Sites wird als virtueller Host bezeichnet und in der Konfigurationsdatei mit einem speziellen
In ähnlicher Weise können die Abschnitte
Eine andere Methode zum Erstellen von Direktiven, die nur für ein einzelnes Verzeichnis gelten, besteht darin, sie in eine spezielle Konfigurationsdatei namens .htaccess zu schreiben die sich im Verzeichnis selbst befindet. Häufig werden diese Dateien von normalen Benutzern erstellt, damit sie ihre eigenen Websites konfigurieren können, ohne vollen Zugriff auf die Master-Konfigurationsdatei zu benötigen. Dies ist sehr nützlich auf einem System, das mehrere Sites hostet, die jeweils einem anderen Unix-Benutzer gehören, und nicht auf einem System mit nur einer Website, die vom Besitzer des Servers eingerichtet wird.
Das Apache Webserver-Modul
Dies ist eines der komplexesten und leistungsstärksten Webmin-Module, da Sie damit fast alle Funktionen von Apache konfigurieren können. Es kann die auf Ihrem System installierte Apache-Version und die verwendeten Module ermitteln und passt seine Benutzeroberfläche entsprechend an, sodass Sie nur die Anweisungen bearbeiten können, die der Webserver versteht. Die Benutzeroberfläche ist jedoch im Allgemeinen für alle Apache-Versionen gleich.
Da es so viele Direktiven gibt und das Modul versucht, die Konfiguration aller zu erlauben, gruppiert es Direktiven in Kategorien wie Prozesse und Grenzen, Netzwerke und Adressen und CGI-Programme. Diese Kategorien werden durch Symbole dargestellt, die erscheinen, wenn Sie einen virtuellen Server, ein Verzeichnis oder eine Optionsdatei im Modul öffnen. In allen Fällen können Sie die Einstellungen unter jeder Kategorie anzeigen und bearbeiten, indem Sie auf das entsprechende Symbol klicken.
Apache hat eine große Anzahl von Standardmodulen und eine noch größere Anzahl von separaten Modulen, die von anderen Personen entwickelt wurden. Webmin unterstützt die Bearbeitung von Direktiven in den meisten dieser Nicht-Standards nicht, wie z. B. mod_perl und mod_php. Es wird jedoch jede Konfigurationsdatei-Anweisung ignorieren, die es nicht versteht, sodass alle Einstellungen für nicht unterstützte Module, die Sie manuell vornehmen, nicht beschädigt werden.
Wenn Sie das Apache-Modul öffnen, wird die unten gezeigte Registerkartenseite angezeigt :
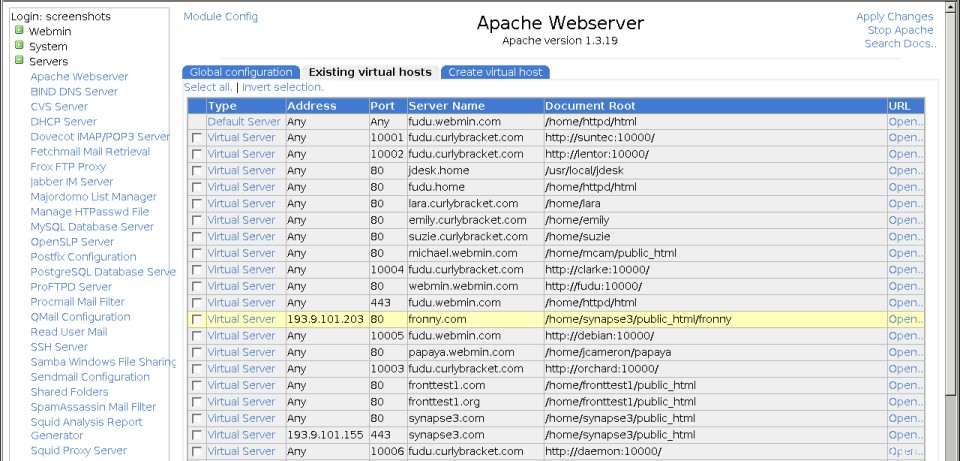 Die Hauptseite des Apache Webserver-Moduls
 Auf der ersten Registerkarte befinden sich Symbole für die verschiedenen Kategorien globaler Optionen sowie einige zusätzliche Funktionen. Im zweiten befindet sich eine Liste aller aktuellen virtuellen Server und im dritten ein Formular zum Hinzufügen eines neuen virtuellen Hosts. Wenn Sie sehr viele virtuelle Server auf Ihrem System haben (standardmäßig mehr als 100), wird stattdessen ein Suchformular zum Auffinden von Servern angezeigt. Der erste Server ist immer der spezielle Standardserver , die Anweisungen enthält, die für alle anderen virtuellen Server gelten, und verarbeitet Anforderungen, die andere Server nicht verarbeiten.
Natürlich funktioniert das Apache-Modul nicht, wenn Apache nicht auf Ihrem System installiert ist. In diesem Fall wird auf der Hauptseite anstelle des Modulkonfigurationsformulars oder der Liste der virtuellen Server eine Fehlermeldung angezeigt. Alle Linux-Distributionen enthalten ein Paket oder Pakete dafür auf ihrer CD-ROM oder Website, also installieren Sie es von dort mit dem Softwarepaketmodul, bevor Sie fortfahren.
Da das Modul davon ausgeht, dass sich die ausführbare Apache-Datei und die Konfigurationsdateien an den Speicherorten befinden, die vom Paket Ihrer Distribution verwendet werden, meldet es den gleichen Fehler, dass die Software nicht installiert wird, wenn Sie sie manuell kompiliert und installiert haben. Klicken Sie in diesem Fall auf die Modulkonfiguration Link und passen Sie die Pfade an die richtigen Speicherorte für Ihr System an.
Auf Unix-Versionen, die Apache nicht standardmäßig enthalten, geht Webmin davon aus, dass es von der Standardquelldistribution von www.apache.org installiert wird. Wenn Sie den Webserver aus einem optionalen Paket installiert haben, das für Ihr Betriebssystem verfügbar gemacht wurde, wird die Hauptseite beschweren, dass er nicht installiert ist und Sie die Modulkonfiguration anpassen müssen.
Die Benutzeroberfläche des Moduls ist ziemlich komplex und hat aufgrund der Komplexität und Leistungsfähigkeit der Apache-Konfigurationsdateien eine große Anzahl von Seiten, Formularen und Unterseiten. Es gibt jedoch Elemente der Benutzeroberfläche, die sich auf vielen Seiten im gesamten Modul wiederholen, z. B. :
- Kategoriesymbole Wenn Sie auf das Symbol für einen virtuellen Server, ein Verzeichnis oder eine Optionsdatei klicken, wird oben auf der Seite eine Tabelle mit Symbolen mit Namen wie MIME-Typen und CGI-Programmen angezeigt. Unter jedem dieser Symbole befinden sich Felder und Tabellen zum Konfigurieren von Optionen, die sich auf die Bezeichnung des Symbols beziehen, unter dem sie sich befinden. Dieses häufig verwendete Layout unterteilt die große Anzahl bearbeitbarer Apache-Optionen in Kategorien, da es viel zu viele Felder gibt, um sie auf einer einzigen Seite anzuzeigen. Die genauen Symbole, die angezeigt werden, und die Felder darunter unterscheiden sich je nach dem Teil der Webserver-Konfiguration, den Sie bearbeiten, und der installierten Apache-Version. Ihr grundsätzlicher Aufbau ist jedoch immer gleich.
- Tabellenfelder In vielen Formularen verwenden einige Felder Tabellen zum Eingeben mehrerer Werte, z. B. MIME-Typen und die zugehörigen Dateierweiterungen. Es gibt keine Begrenzung, wie viele Zeilen jede Tabelle haben kann, aber Webmin zeigt in jeder Tabelle immer nur eine einzige leere Zeile an. Dies hält die Größe von Formularen mit vielen Tabellen gering, bedeutet aber, dass Sie jeweils nur eine neue Zeile zu einer Tabelle hinzufügen können. Um mehr als ein Formular hinzuzufügen, müssen Sie das Formular speichern und erneut eingeben, wodurch eine neue leere Zeile unter der gerade ausgefüllten Zeile angezeigt wird.
In den folgenden Abschnitten wird genauer erläutert, auf welche Symbole geklickt und welche Tabellen ausgefüllt werden müssen, wenn beispielsweise CGI-Skripte aktiviert und MIME-Typen festgelegt werden.
Apache starten und stoppen
Bevor sich Browser mit dem Apache-Webserver auf Ihrem System verbinden können, muss dessen Serverprozess gestartet werden. Sie können überprüfen, ob es derzeit ausgeführt wird, indem Sie oben auf einer der Seiten im Modul nachsehen. Wenn Links mit Änderungen übernehmen gekennzeichnet sind und Apache stoppen erscheinen, dann ist es gerade aktiv. Erscheint ihnen jedoch nur der Link *Start Apache*, läuft er noch nicht.
Klicken Sie zum Starten auf Apache starten Verknüpfung. Wenn alles gut geht, wird die Seite, auf der Sie sich gerade befinden, erneut angezeigt und die Links oben sollten sich ändern, um anzuzeigen, dass sie jetzt ausgeführt wird. Andernfalls wird eine Fehlermeldung angezeigt, die erklärt, was schief gelaufen ist - höchstwahrscheinlich ist die Ursache ein Fehler in der Konfigurationsdatei.
Um den Webserver zu stoppen, sobald er läuft, klicken Sie auf Apache stoppen Link auf einer beliebigen Seite des Moduls. In dem unwahrscheinlichen Fall, dass Webmin den Server nicht stoppen kann, wird eine Seite mit Fehlermeldungen angezeigt. Wenn es erfolgreich gestoppt wird, wird dieselbe Seite erneut angezeigt, wobei die Links oben geändert werden, um anzuzeigen, dass es nicht mehr ausgeführt wird.
Wenn Apache aktiv ist, hat jede Seite ein Apply Changes Link oben, der verwendet werden kann, um dem Webserver zu signalisieren, seine aktuelle Konfiguration neu zu laden. Nachdem Sie in diesem Modul Änderungen vorgenommen haben (außer in .htaccess-Dateien), müssen Sie auf diesen Link klicken, um sie zu aktivieren. Im Gegensatz zu anderen Webmin-Modulen, die auf der Hauptseite einen Übernehmen-Button haben, hat dieses Modul ihn auf jeder Seite, sodass Sie nicht jedes Mal zum Index zurückkehren müssen, wenn Sie eine Änderung vornehmen.
Seiten auf Ihrem Webserver bearbeiten
In diesem Abschnitt wird erläutert, wie Sie die Dateien auf Ihrem System finden und bearbeiten, die angezeigt werden, wenn ein Client eine Verbindung zu Ihrem Apache-Webserver herstellt. Wenn Sie bereits wissen, wie das geht, können Sie es gerne überspringen und mit dem nächsten Abschnitt fortfahren.
Wenn Apache zum ersten Mal von einem Paket oder einer Quelle installiert wird, werden in der Anfangskonfiguration normalerweise keine virtuellen Server eingerichtet. Stattdessen existiert nur der Standardserver, der Seiten für jeden Client bereitstellt, der sich über Port 80 verbindet. Sie können die Standardseiten anzeigen, indem Sie einen Webbrowser ausführen und zur URL http://_yourhostname_/ oder http://_localhost_/ gehen, wenn Sie führen den Browser auf demselben System aus, auf dem Webmin ausgeführt wird. Die angezeigte Seite wird wahrscheinlich nur mit Apache oder Ihrer Linux-Distribution geliefert.
Das Dokumentenstammverzeichnis, aus dem Apache Dateien bereitstellt, wird auf der Hauptseite des Moduls neben dem Standardserver angezeigt Symbol. Unter Redhat Linux ist dieses Verzeichnis beispielsweise standardmäßig /home/httpd/html. Die Dateien in diesem Verzeichnis können bearbeitet werden, indem Sie sich als root anmelden oder das File Manager-Modul von Webmin verwenden. Alle Änderungen, die Sie vornehmen, werden sofort auf der Website wiedergegeben.
Wenn Ihr System nur eine einzelne statische Website hosten soll, ist es möglicherweise nicht erforderlich, andere Aspekte von Apache zu konfigurieren. Sie können einfach HTML-, Bild- und andere Dateien in das Verzeichnis und seine Unterverzeichnisse hochladen oder kopieren, um die gewünschte Website zu erstellen. Die wichtigste Datei ist index.html, die von Apache bereitgestellt wird, wenn ein Browser keine bestimmte Seite anfordert. Da die meisten Leute zuerst zu http://_yourserver_/ gehen, ist die Seite index.html die erste, die sie sehen.
Um die Bearbeitung zu vereinfachen, möchten Sie möglicherweise den Besitz des Dokumentstammverzeichnisses und aller seiner Dateien auf einen Nicht-Root-Benutzer ändern. Sie müssen jedoch sicherstellen, dass sie weiterhin für den Benutzer lesbar sind, unter dem der Apache-Serverprozess ausgeführt wird, der normalerweise httpd heißt. Der einfachste Weg, dies zu tun, besteht darin, alle Dateien und Verzeichnisse weltweit lesbar und weltweit ausführbar zu machen.
Erstellen eines neuen virtuellen Hosts
Wenn Sie mehrere Websites auf Ihrem System hosten möchten, müssen Sie für jede einen virtuellen Apache-Host erstellen. Bevor Sie eine Site hinzufügen können, muss ihre Adresse zuerst im DNS registriert werden, entweder auf einem DNS-Server auf Ihrem System oder auf einem anderen Host. Wenn die Dateien der Site einem anderen Unix-Benutzer gehören sollen als dem, dem das Dokument-Root-Verzeichnis gehört, dann muss dieser ebenfalls zuerst erstellt werden.
Der gesamte Prozess zum Hinzufügen eines virtuellen Servers, einschließlich der obigen Schritte, ist:
- Entscheiden Sie sich für einen Hostnamen, der in der URL für die neue Website verwendet wird, z. B. www.example.com .
- Entscheiden Sie, ob Ihre neue Website IP-basiert oder namensbasiert sein soll. Eine namensbasierte Website funktioniert mit allen außer mit alten Browsern und ist daher heutzutage bei weitem die beste Wahl. Eine IP-basierte Website funktioniert mit jedem Browser, benötigt jedoch eine eigene separate IP-Adresse, die Ihrem System hinzugefügt werden muss. Da IP-Adressen oft knapp sind, macht dies nur Sinn, wenn Sie für die Domain auch einen virtuellen FTP- oder POP3-Server einrichten müssen.
- Wenn Ihr Standort IP-basiert sein soll, verwenden Sie das Netzwerkkonfigurationsmodul (siehe Netzwerkkonfiguration), um der externen Netzwerkschnittstelle Ihres Systems eine neue virtuelle IP-Adresse hinzuzufügen. Stellen Sie sicher, dass es beim Booten aktiviert wird und jetzt aktiv ist. Wenn Ihrem System nur eine einzige statische Internet-IP-Adresse von Ihrem ISP zugewiesen wurde, funktionieren alle zusätzlichen virtuellen IP-Adressen, die Sie hinzufügen, nicht. In diesem Fall müssen Sie stattdessen einen namensbasierten virtuellen Server verwenden oder Ihren ISP auffordern, Ihnen mehrere Adressen zuzuweisen.
- Wenn example.com Domain bereits auf einem DNS-Server existiert, fügen Sie einen Eintrag für www.example.com hinzu mit der externen IP-Adresse Ihres Systems (bei einer namensbasierten Seite) oder der im vorherigen Schritt gewählten Adresse (bei einer IP-basierten Seite). Wenn die Domain noch nicht existiert, müssen Sie sie zu einem DNS-Server hinzufügen und bei einem DNS-Registrar wie Network Solutions registrieren. Wie auch immer, auf der Seite BIND DNS Server wird ausführlich erklärt, wie Datensätze und Domänen hinzugefügt werden.
- Wenn die Site den Standard-HTTP-Port 80 verwendet (was fast immer das ist, was Sie möchten), können Sie mit Schritt 8 fortfahren. Andernfalls klicken Sie auf der Hauptseite des Apache-Webserver-Moduls auf Networking and Adressen Symbol, um das im ersten Screenshot unten gezeigte Formular aufzurufen.
- In der leeren Zeile im Feld Listen auf Adressen und Ports Tabelle, wählen Sie Alle aus unter der Adresse Spalte und deaktivieren Sie Standard unter dem Port Säule. Geben Sie dann die TCP-Portnummer für Ihre Website in das Feld daneben ein und klicken Sie auf Speichern Schaltfläche unten auf der Seite.
- Scrollen Sie auf der Hauptseite des Moduls nach unten zum Formular *Neuen virtuellen Server erstellen* unterhalb der Liste der vorhandenen virtuellen Hosts.
- Wenn Sie einen IP-basierten virtuellen Server einrichten, in der Adresse Feld sollten Sie die virtuelle IP-Adresse eingeben, die in Schritt 3 hinzugefügt wurde. Wenn Sie einen namensbasierten virtuellen Server einrichten, geben Sie stattdessen die externe IP-Adresse Ihres Systems in das Feld ein. Wenn Ihr Apache-Server so konfiguriert wurde, dass er namensbasierte Verbindungen auf jeder IP-Adresse akzeptiert, können Sie Beliebig auswählen Option für dieses Feld stattdessen. Weitere Einzelheiten finden Sie in der nachstehenden Erläuterung. Wenn Ihr neuer virtueller Server einen anderen Port als 80 verwenden wird und der einzige Server an diesem Port sein wird, können Sie Beliebig auswählen Option, damit sie alle Anfragen verarbeitet, die auf dem Port eingehen.
- Wenn Sie einen IP-basierten virtuellen Server einrichten, deaktivieren Sie die Option Adresse des virtuellen Servers hinzufügen Kontrollkästchen. Bei namensbasierten Servern sollte es aktiviert bleiben.
- Wenn der neue virtuelle Host einen nicht standardmäßigen Port verwenden wird, wählen Sie die letzte Option für den Port Feld und geben Sie die Nummer in das Feld daneben ein.
- Im Dokumentenstamm geben Sie den vollständigen Pfad zu dem Verzeichnis ein, das Dateien für diese Website enthalten wird. Dies könnte beispielsweise /home/example/www sein .
- Im Servernamen Geben Sie in das Feld Hostnamen ein, die Clients verwenden, um auf diese Website zu verweisen, z. B. www.example.com . Sie können mehr als einen Namen eingeben, z. B. web.example.com und example.com wenn dies ein namensbasierter Server sein soll, der unter mehreren verschiedenen URLs erreichbar sein soll.
- Sofern Sie keine separate Datei auf Ihrem System haben, die alle virtuellen Hosts enthält, lassen Sie die Virtuelle Server zur Datei hinzufügen Feld auf Standard-httpd.conf-Datei gesetzt . Andernfalls können Sie Ausgewählte Datei auswählen und geben Sie den Pfad in das Feld daneben ein. Stellen Sie sicher, dass die ausgewählte Datei tatsächlich von Apache verwendet wird (z. B. durch eine Include-Anweisung in httpd.conf), oder der virtuelle Server wird nutzlos und erscheint nicht in Webmin. Wenn Sie immer dieselbe separate Datei zum Speichern virtueller Hosts verwenden, die Datei zum Hinzufügen virtueller Server zu Feld, das im Abschnitt Konfigurieren des Apache-Webserver-Moduls erläutert wird Abschnitt unten kann nützlich sein. Wenn es gesetzt ist, wird eine weitere Option zum Feld *Virtuellen Server zur Datei hinzufügen* hinzugefügt, um es der durch diese Modulkonfigurationsoption festgelegten Datei hinzuzufügen.
- Damit Webmin alle Anweisungen von einem anderen virtuellen Server auf den von Ihnen erstellten kopiert, wählen Sie ihn unter Anweisungen kopieren von aus Speisekarte. Dies kann nützlich sein, wenn alle Ihre virtuellen Hosts eine ähnliche Konfiguration haben.
- Wenn Sie das Formular ausgefüllt haben, klicken Sie auf Erstellen Taste. Der neue virtuelle Server wird der Apache-Konfigurationsdatei und der Liste der Server auf der Hauptseite hinzugefügt.
- Klicken Sie auf das Symbol für den neuen virtuellen Server, der Sie zu seiner Optionsseite bringt, die im zweiten Screenshot unten gezeigt wird.
- Scrollen Sie nach unten zum Formular unter Optionen pro Verzeichnis , und geben Sie das Dokumentstammverzeichnis, das Sie in Schritt 11 ausgewählt haben, in den Pfad ein Feld. Stellen Sie sicher, dass der Typ auf Verzeichnis eingestellt ist , und der Regexp? Feld auf Genaue Übereinstimmung .
- Klicken Sie auf Erstellen Schaltfläche, um der Konfigurationsdatei für das Verzeichnis einen neuen Abschnitt hinzuzufügen. Dies ist erforderlich, damit Sie Clients die Rechte zum Durchsuchen der darin enthaltenen Dateien gewähren können, die die standardmäßige Apache-Verzeichniskonfiguration verweigert.
- Klicken Sie auf das neue Symbol für das Verzeichnis, das zur Optionsseite des virtuellen Servers hinzugefügt wurde. Dadurch gelangen Sie zur Seite mit den Verzeichnisoptionen, die im dritten Screenshot unten gezeigt wird.
- Klicken Sie auf die Dokumentoptionen Symbol und ändern Sie auf dem angezeigten Formular die Verzeichnisoptionen Feld zu *Unten ausgewählt*. Unter Set for directory ändern Sie den Eintrag für Verzeichnisindizes generieren auf Ja . Klicken Sie dann auf Speichern Schaltfläche unten auf der Seite.
- Um alle Ihre Änderungen zu aktivieren, klicken Sie auf Änderungen übernehmen Schaltfläche oben auf jeder Seite.
- Sie oder der Benutzer, dem der virtuelle Server gehört, können jetzt damit beginnen, Dateien zum Dokumentenstammverzeichnis hinzuzufügen. Sie können es testen, indem Sie die URL (z. B. http://_www.example.com_/) in Ihrem Webbrowser öffnen, um sicherzustellen, dass alles ordnungsgemäß funktioniert.
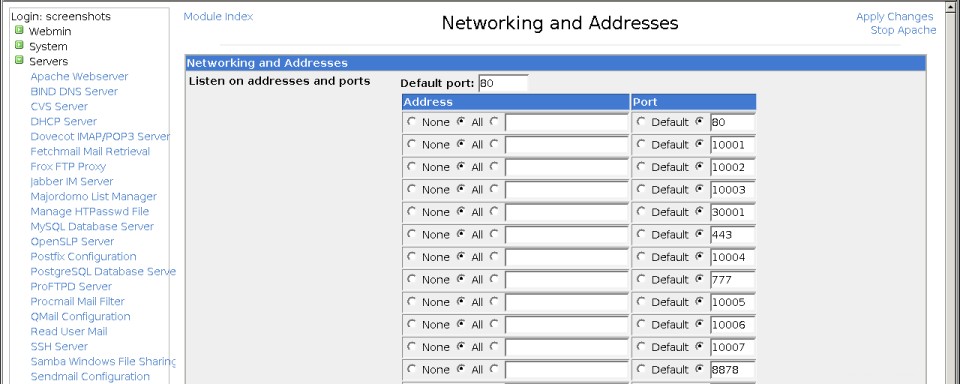 Die Seite für globale Netzwerke und Adressen
 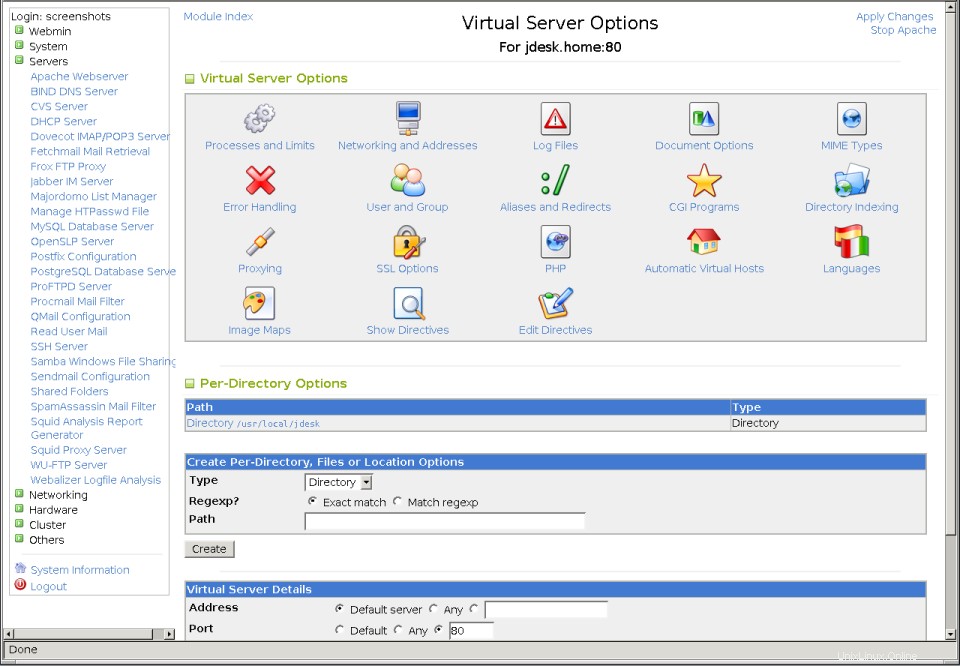 Die Optionsseite des virtuellen Servers
 Wenn Apache eine HTTP-Anfrage erhält, muss es zunächst herausfinden, für welchen virtuellen Server die Anfrage bestimmt ist. Es sucht zunächst nach einem namensbasierten virtuellen Server, dessen Hostname mit dem vom Client angeforderten Host übereinstimmt und dessen Adresse und Port dieselben sind wie die, mit denen sich der Client verbunden hat. Wenn keiner gefunden wird, wird stattdessen der erste definierte virtuelle Server für die Adresse und den Port verwendet, oder wenn keiner vorhanden ist, wird die Anfrage vom Standardserver behandelt.
Namensbasierte virtuelle Server können nur auf Adressen verwendet werden, die unter Adressen für virtuelle Namensserver aufgeführt sind Feld auf der globalen Netzwerk- und Adressenseite. Wenn Sie die obigen Anweisungen befolgen, wird dieser Liste automatisch eine Adresse hinzugefügt, wenn Sie einen neuen virtuellen Server erstellen. Wenn alle virtuellen Server auf Ihrem System namensbasiert sein sollen, können Sie diese Seite öffnen, * in das Feld eingeben und auf Speichern klicken damit Apache solche Anfragen auf jeder IP-Adresse verarbeitet. Dies ist auch sinnvoll, wenn Ihr System eine dynamisch zugewiesene IP-Adresse hat und Sie mehrere virtuelle Hosts bedienen möchten.
Sobald ein virtueller Server erstellt wurde, können Sie seine Einstellungen bearbeiten oder ihn löschen, indem Sie diesen Schritten folgen :
- Klicken Sie auf der Hauptseite des Moduls auf das Symbol des virtuellen Servers. Dadurch gelangen Sie zur Seite mit den Serveroptionen, die im obigen Screenshot gezeigt wird.
- Scrollen Sie nach unten zu den Virtual Server Details Formular unten auf der Seite.
- Ändern Sie die Adresse , Port und andere Felder nach Belieben und klicken Sie auf Speichern Taste. Diese Felder haben dieselbe Bedeutung wie auf dem Erstellungsformular für virtuelle Server. Wenn die Adresse jedoch auf einem namensbasierten virtuellen Server geändert wird, müssen Sie sie möglicherweise auch auf der globalen Seite „Netzwerk und Adressen“ ändern. Oder wenn Sie den virtuellen Server und alle darin enthaltenen Konfigurationsanweisungen löschen möchten, klicken Sie auf Virtuellen Server löschen Taste stattdessen.
- Klicken Sie auf der Hauptseite des Moduls auf Änderungen übernehmen Link, um die neuen Einstellungen zu aktivieren.
Sie können die Einstellungen für den Standardserver nicht ändern oder ihn löschen.
Festlegen von Optionen pro Verzeichnis
Apache erlaubt es Ihnen, verschiedene Optionen für bestimmte Verzeichnisse anzugeben, entweder für alle virtuellen Server oder nur für einen einzigen. Einschließlich Verzeichnisse können Sie tatsächlich Optionen festlegen, die für drei Arten von Objekten auf Ihrem Apache-Server gelten:
- Verzeichnis Die Optionen gelten für ein bestimmtes Verzeichnis und alle Dateien darin oder in Unterverzeichnissen, die es enthält.
- Dateien Die Optionen gelten für Dateien mit einem bestimmten Namen in einem beliebigen Verzeichnis.
- Standort Die Optionen gelten für alle Dateien oder Verzeichnisse, die von einer URL angefordert werden, deren Pfad mit dem angegebenen Speicherort beginnt. Zum Beispiel in der URL http://www.example.com/foo der Pfad wäre /foo .
Immer wenn Apache eine Anfrage verarbeitet, prüft es in einer festen Reihenfolge die Optionen, die darauf zutreffen. Die aus Verzeichnisabschnitten und .htaccess-Dateien werden zuerst gelesen, sodass die spezifischsten Verzeichnisse zuerst geprüft werden. Ihnen folgen dann Dateien und dann Ortsabschnitte. Dann werden Optionen von dem virtuellen Server gelesen, an den die Anfrage gestellt wurde (sofern vorhanden), und schließlich Optionen von dem Standardserver.
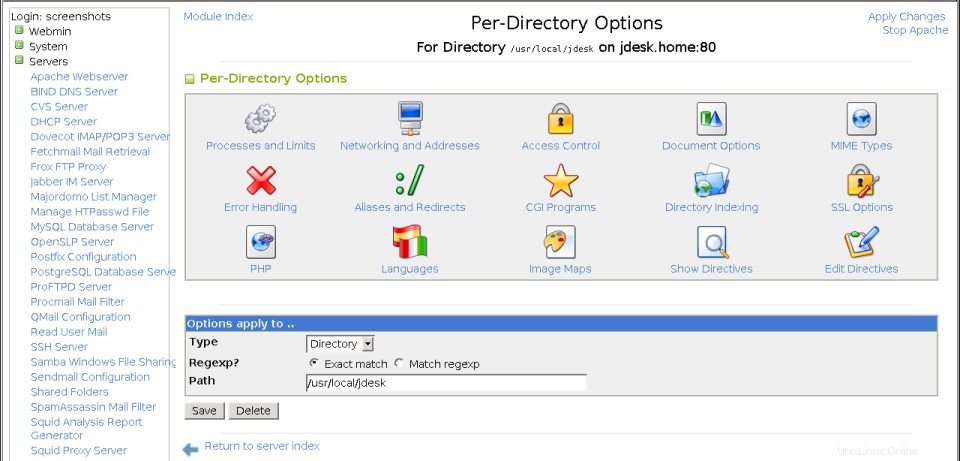 Die Seite mit den Optionen pro Verzeichnis
 Das bedeutet, dass Optionen, die für ein Verzeichnis eingestellt sind, dieselben Optionen überschreiben, die in einem Verzeichnis höherer Ebene oder auf dem virtuellen Server, dem es angehört, eingestellt sind. Um Optionen für ein Verzeichnis, Dateien oder einen URL-Speicherort festzulegen, gehen Sie wie folgt vor:
- Auch wenn die Optionen, die Sie einstellen werden, für ein Verzeichnis gelten, müssen sie unter einem der virtuellen Server oder dem Standardserver definiert werden. Wenn sie sich unter einem virtuellen Host befinden, gelten sie nur für Anforderungen an diesen Server für Dateien im ausgewählten Verzeichnis oder URL-Speicherort. Wenn sie sich jedoch unter dem Standardserver befinden, werden Anfragen an jeden virtuellen Host nach Dateien im Verzeichnis ausgeführt. Klicken Sie auf der Hauptseite des Moduls entweder auf Standardserver Symbol oder das Symbol für einen virtuellen Server, auf den Sie die Verzeichnisoptionen beschränken möchten. Für Verzeichnisse ist es normalerweise am einfachsten, ihre Optionen unter dem Standardserver zu platzieren, da jeder virtuelle Host normalerweise sein eigenes separates Dokumentenstammverzeichnis hat. URL-Standortoptionen sollten jedoch unter dem virtuellen Server platziert werden, auf den sie sich beziehen, da derselbe URL-Pfad auf mehr als einem virtuellen Host auf unterschiedliche Weise verwendet werden kann. Dasselbe gilt für Dateioptionen.
- Scrollen Sie auf der angezeigten Seite mit den Serveroptionen (siehe Abbildung 29-4) nach unten zum Formular *Create Per-Directory, Files or Location Options*.
- Aus dem Typ wählen Sie eine der oben beschriebenen Optionen.
- Wenn Sie Optionen für ein Verzeichnis festlegen, geben Sie es in den Pfad ein Feld wie /home/example/www/images . Sie können auch einen Platzhalterpfad wie /home/example/w* eingeben , wodurch die Optionen auf alle übereinstimmenden Verzeichnisse angewendet werden. Wenn die Optionen für einen URL-Speicherort festgelegt werden, geben Sie den Teil der URL nach dem Hostnamen in das Pfadfeld ein, z. B. /images . Sie können auch Shell-Platzhalterzeichen wie * und ? auch in der URL. Wenn Sie Optionen für Dateien festlegen, geben Sie einen Dateinamen in den Pfad ein Feld wie secret.html . Auch hier können Platzhalterzeichen im Dateinamen verwendet werden, zum Beispiel geheim*.
- Wenn Sie in der Lage sein möchten, komplexe reguläre Ausdrücke im Verzeichnis, Dateinamen oder URL-Speicherort zu verwenden, setzen Sie den Regexp? Feld auf Übereinstimmung mit regulärem Ausdruck . Dadurch können Sie reguläre Perl-Ausdruckszeichen wie [, ], +, verwenden. und * im Pfad.
- Klicken Sie auf Erstellen Schaltfläche, um den neuen Verzeichnisabschnitt zur Apache-Konfiguration hinzuzufügen. Die Optionsseite des virtuellen Servers wird erneut angezeigt, jedoch mit einem neuen Symbol für das Verzeichnis.
Nachdem Sie nun ein neues Symbol für ein Verzeichnis, einen URL-Speicherort oder einen Dateinamen erstellt haben, können Sie die dafür geltenden Optionen festlegen. Eine der häufigsten Änderungen pro Verzeichnis ist die Konfiguration, wie Dateien aufgelistet werden, wenn ein Browser ein Verzeichnis mit einer URL wie http://www.example.com/images/ anfordert. Wenn es eine index.html-Datei im Verzeichnis gibt, wird sie standardmäßig angezeigt, oder wenn nicht, wird stattdessen eine Seite angezeigt, die alle darin enthaltenen Dateien auflistet.
Wenn Sie den Namen der Indexdatei, den Stil des Verzeichniseintrags oder andere Einstellungen im Zusammenhang mit der Indexierung ändern möchten, gehen Sie wie folgt vor:
- Klicken Sie auf der Optionsseite des virtuellen Servers auf das Symbol für das Verzeichnis, das Sie konfigurieren möchten. Dadurch gelangen Sie zur Seite mit den Verzeichnisoptionen, die in Abbildung 29-5 gezeigt wird.
- Klicken Sie auf Verzeichnisindizierung Symbol, um ein Formular zum Festlegen von Indizierungs- und Auflistungsoptionen aufzurufen.
- Um das Erscheinungsbild von Verzeichniseinträgen zu ändern, setzen Sie das Feld *Verzeichnisindexoptionen* auf Unten ausgewählt und ändern Sie die Felder im Feld darunter. Die Standardeinstellungen generieren eine sehr einfache Liste von Dateien, aber Sie können sie verbessern, indem Sie die folgenden Optionen festlegen :
- Ausgefallene Verzeichnisindizes anzeigen Wenn diese Option aktiviert ist, enthält die Liste der Dateien ihr Symbol, ihre Größe und ihr Änderungsdatum.
- HTML-Titel als Beschreibung anzeigen Wenn aktiviert, wird die Beschreibung für HTML-Dateien von ihren
-Tags übernommen.</li> <li> <b>Symbolhöhe</b> Mit dieser Option können Sie die Höhe der in der Verzeichnisliste enthaltenen Symbole ändern. Wenn es auf <b>Standard</b> eingestellt ist , wird die Höhe der Standard-Apache-Optionen verwendet.</li> <li> <b>Symbolbreite</b> Wie bei der vorherigen Option können Sie mit dieser Option die Breite der Symbole in der Verzeichnisliste angeben. </li> <li> <b>Benutzersortierung der Spalte zulassen</b> Wenn dies aktiviert ist, können Benutzer die Liste der Dateien sortieren, indem sie auf die Spaltenüberschriften klicken, sofern sie angezeigt werden.</li> <li> <b>Dateibeschreibungen anzeigen</b> Wenn diese Option aktiviert ist, enthält die Verzeichnisliste eine Beschreibung für jede Datei, die ihrem MIME-Typ oder HTML-Titel entnommen wird.</li> <li> <b>HTML-Header-Tags ausgeben</b> Wenn aktiviert, enthält die Verzeichnisliste die normalen <html>- und <head>-Tags, die jede HTML-Seite beginnen sollten. Sie sollten es nur deaktivieren, wenn Sie Ihre eigenen Kopf- und Fußzeilendateien bereitstellen.</li> <li> <b>Letzte Änderungszeiten anzeigen</b> Wenn aktiviert, enthält die Verzeichnisliste das Datum der letzten Änderung für jede Datei.</li> <li> <b>Dateigrößen anzeigen</b> Wenn aktiviert, enthält die Auflistung die Größe jeder Datei. </li> <li> <b>Icon in Link einfügen</b> Wenn diese Option aktiviert ist, ist das Symbol in der Auflistung ein Link zur Datei selbst. Ansonsten ist nur der Dateiname ein Link.</li> <li> <b>Dateinamenbreite</b> Diese Option steuert die Länge der Dateinamenspalte in der Verzeichnisliste. Sie können entweder eine Anzahl von Zeichen oder * eingeben, um die Spalte auf die Länge des längsten Dateinamens zu skalieren.</li> <li> <b>Beschreibungsbreite</b> Diese Option steuert die Länge der Beschreibungsspalte in der Verzeichnisliste, falls vorhanden. Sie können entweder eine Anzahl von Zeichen oder * eingeben, um die Spalte an die Länge der längsten Beschreibung anzupassen.</li> <li> <b>Verzeichnisse zuerst anzeigen</b> Wenn diese Option aktiviert ist, zeigt die Auflistung alle Verzeichnisse über allen Dateien, unabhängig von anderen Dateien. Die verfügbaren Optionen hängen von der Apache-Version ab, die Sie auf Ihrem System installiert haben. Die oben aufgeführten gelten für Version 1.3.19, aber wenn Sie eine neuere Version haben, sind möglicherweise mehr Optionen verfügbar. </li> </ul> </li> <li> Wenn Sie möchten, dass Apache eine andere Datei als die Standarddatei (normalerweise index.html) zurückgibt, wenn ein Browser das Verzeichnis anfordert, geben Sie eine Liste von Dateinamen in die <b>Verzeichnis-Indexdateien</b> ein Feld. Es können mehrere eingegeben werden, und das erste, das gefunden wird, wird verwendet. Wenn keine der Indexdateien gefunden wird, wird stattdessen eine Verzeichnisliste mit den in Schritt 3 ausgewählten Optionen an den Browser zurückgegeben. </li> <li> Damit der Webserver bestimmte Dateien beim Generieren der Dateiliste im Verzeichnis ignoriert, geben Sie deren Dateinamen in den <b>Zu ignorierende Dateien im Verzeichnisindex</b> ein Feld. Sie können in den regulären Ausdrücken Shell-Platzhalter verwenden, z. B. <i>*.doc</i> . </li> <li> Um eine HTML-Datei am Anfang der Verzeichnisliste einzufügen, geben Sie ihren Dateinamen (relativ zum Verzeichnis) in die <b>Verzeichnis-Index-Header-Datei</b> ein Feld. </li> <li> Um eine Datei am Ende der Verzeichnisliste hinzuzufügen, geben Sie sie in die <b>Verzeichnisindex-Fußzeilendatei</b> ein Feld. </li> <li> Um die Standardreihenfolge des Verzeichnisses zu steuern, deaktivieren Sie <b>Standard</b> im <b>Verzeichnisindex sortieren nach</b> Feld und wählen Sie aus den beiden Menüs daneben eine Reihenfolge und eine Spalte aus, nach der sortiert werden soll. </li> <li> Sie können Beschreibungen für Dateien festlegen, indem Sie die Tabelle *Verzeichnisindex-Beschreibungen* ausfüllen. Geben Sie in der leeren Zeile der Tabelle unter <b>Beschreibung</b> eine kurze Beschreibung der Datei ein Spalte und eine Liste von Dateinamen oder Platzhalternamen in der <b>Dateinamen</b> Säule. Da jeweils nur eine leere Zeile angezeigt wird, müssen Sie diese Seite erneut aufrufen, nachdem Sie jede Beschreibung hinzugefügt haben, wenn Sie mehr als eine eingeben möchten. </li> <li> Klicken Sie abschließend auf <b>Speichern</b> Schaltfläche unten auf der Seite, um Ihre Änderungen zu speichern und zur Seite mit den Verzeichnisoptionen zurückzukehren. Um sie zu aktivieren, klicken Sie auf <b>Änderungen übernehmen</b> irgendwo im Apache-Modul verlinken. </li> </ol> <p> Die meisten dieser Optionen können für einen gesamten virtuellen Server festgelegt werden, indem Sie auf der Optionsseite des virtuellen Servers auf das Symbol für die Verzeichnisindizierung klicken. In diesem Fall gelten sie für alle vom virtuellen Host angeforderten Dateien, sofern sie nicht durch Optionen für ein Verzeichnis oder einen URL-Speicherort überschrieben werden. </P> <p> Auf der Seite mit den Verzeichnisoptionen gibt es viele weitere Symbole, auf die Sie klicken können, um Optionen festzulegen, die nur für dieses Verzeichnis, diesen URL-Pfad oder Dateinamen gelten. Einige davon werden später in diesem Kapitel in anderen Abschnitten erklärt, wie z. B. <b>Aliase und Weiterleitungen</b> und *Passwort zum Schutz eines Verzeichnisses*. </P> <p> Sie können das Verzeichnis, die Dateinamen oder den URL-Speicherort ändern, für den die Einstellungen gelten, indem Sie die <b>Optionen gelten für</b> verwenden unten auf der Seite mit den Verzeichnisoptionen. Es hat genau die gleichen Felder wie das am Anfang dieses Abschnitts beschriebene Erstellungsformular. Wenn Sie Änderungen vornehmen, klicken Sie auf <b>Speichern</b> button to update the Apache configuration and then the <b>Apply Changes</b> link to make them active. Or to remove the directory configuration and all its options, click on <b>Delete</b> instead.</P> <h3>Creating aliases and redirects</h3> <p> Normally, there is a direct relationship between the path in URL and the file that is returned by the webserver. For example, if a browser requests http://www.example.com/images/foo.gifand the document root for <i>www.example.com</i> is <i>/home/example/www</i> , then the file <i>/home/example/www/images/foo.gif</i> would be read by the webserver and returned to the client. </P> <p> This can be changed though by using what Apache calls aliases. An alias maps a particular URL path to a file or directory, which does not necessarily have to be under the document root. So in the example above, the <i>/images</i> URL path might actually be aliases to the directory <i>/www/images</i> , which would cause the file <i>/www/images/foo.gif</i> to be read instead. </P> <p> Aliases can be defined globally or in a virtual server. To create one, the steps to follow are :</P> <ol> <li> On the module's main page, click on the icon for the virtual server that you want to create the alias under. If you want it to apply to all virtual servers (or you don't have any), click on the *Default Server *icon instead. </li> <li> On the virtual server options page that appears, click on the Aliases and Redirects icon. This will take you to the page in the screenshot below.</li> <li> Fill in the empty row in the <b>Document directory aliases</b> table with the URL path (under <b>From</b> ) and the file or directory that it should map to (under <b>To</b> ). If you are editing the default server, there may already be several entries in this table that are part of the standard Apache configuration. There will always be exactly one empty row in the table. If you need to add more than one alias, you will need to re-visit this page after filling in the row and saving. </li> <li> Klicken Sie auf <b>Speichern</b> button to have your new alias stored in the Apache configuration. The browser will return to the virtual server options page. </li> <li> To make the alias active, click on the <b>Apply Changes</b> link at the top of the page. </li> </ol> <p> <img loading='lazy' src="https://m.unixlinux.online/article/uploadfiles/202204/2022042909475638.gif" /> <br> The aliases and redirects form</P> <p> Existing aliases can be editing by just changing the entries in the <b>Document directory aliases</b> table and then clicking <b>Save</b> . You should not change the alias for /icons in the default server though, as this is used by Apache when it generates icons for directory listings. If you want to delete an alias, just delete the contents of both its fields in the table. </P> <p> Aliases can also be created that use Perl regular expressions to match more complex URL paths. These must be entered into the <b>Regexp document directory aliases</b> table on the Aliases and Redirects form, which has the same columns as the *Document directory aliases* table described above. The difference is that any regular expression can be entered into the <b>From</b> field, such as <i>^/images/(.*)\.gif$</i> . The <b>To</b> field can taken a string that refers to bracketed sections in the expression, such as <i>/images/$1.jpg</i> . This would convert any request for a GIF file into one for the JPEG with the same name. </P> <p> Redirects are similar to aliases, but have a different purpose and work in a different way. Whenever a client requests a URL path that has been redirected, Apache will tell it to go to another URL (possibly on another server) instead. For example, you might redirect all requests to </nowiki><i>http://www.example.com/webmin/</i> </nowiki> to ''http://www.webmin.com/''. Unlike the way aliases behave, if a browser requests a page like <i>/webmin/foo.gif</i> it will not be redirected to ''http://www.webmin.com/foo.gif'' - it will just go to the URL ''http://www.webmin.com/'' instead. </P> <p> Redirects are implemented by the webserver sending the special 302 status code to the browser, which tells it to go to a new location. It is quite possible for the new URL to be a redirect itself, and you can even create a loop of redirects - not that this is a good idea. </P> <p> To set up redirection for a path on your server, the steps to follow are :</P> <ol> <li> On the module's main page, click on the icon for the virtual server that you want to create the redirect under. If you want it to apply to all virtual servers, click on the *Default Server *icon instead. </li> <li> On the virtual server options page that appears, click on the Aliases and Redirects icon to go to the page in Figure 29-6. </li> <li> In the empty row of the *URL redirects *table, enter the URL path on your server under the <b>From</b> column, such as <i>/webmin</i> . Under the <b>To</b> column, enter the URL that requests should be redirected to, such as <i>http://www.webmin.com/</i> . The <b>Status</b> field is optional, but can be filled in if you want to change the HTTP status code that will be used for this redirect. The default is 302, which indicates a temporary redirection. However, you can 301 to tell browsers that the direction is permanent, or 303 to tell them that the original content has been replaced. There will always be exactly one empty row in the table. If you need to add more than one redirect, you will need to re-visit this page after filling in the row and saving. </li> <li> Klicken Sie auf <b>Speichern</b> button to have your new redirect stored in the Apache configuration. The browser will return to the virtual server options page. </li> <li> To make the redirection active, click on the <b>Apply Changes</b> link at the top of the page. </li> </ol> <p> As with aliases, existing redirects can be edited by just changing the entries in the <b>URL redirects</b> table and then clicking <b>Save</b> . To delete a redirect, just delete the contents of all of its fields in the table. </P> <p> You can also create regular expression redirects that behave in a similar way to regexp aliases, using the <b>Regexp URL redirects</b> table on the same page. Under the <b>From</b> column you can enter a URL path expression such as <i>^/webmin/(.*)$</i> , and under the <b>To</b> column a URL that can refer to bracketed parts of the path, such as <i>http://www.webmin.com/$1</i> . In this example, an request by a client for a page under <i>/webmin</i> would be redirected to the same file at <i>www.webmin.com</i> . </P> <p> Also on the Aliases and Redirects page are two more tables labelled <b>Permanent URL redirects</b> and <b>Temporary URL redirects</b> . The first behaves exactly the same as a normal redirection, but with the status code always set to 301, indicating a permanent redirection. The second also behaves like a normal redirect, but always uses a status code of 302 (temporary redirection). This option is really quite useless, as normal redirections default to using status 302 if one is not specified. </P> <p> Redirects can also be defined in the options for directories, URL locations, filenames and .htaccess files. When editing the options for one of these (described in the *Setting per-directory options* section), the exact same icon and table are available as when setting up aliases for a virtual server. Naturally, a redirect in a directory only makes sense if the URL path being redirected actually refers to that some file or sub-directory that it contains. The same goes for redirects in URL locations - the path being redirected must start with the location's path. </P> <p> If Apache on your system has been compiled with or dynamically loads the proxy module (covered in the *Configuring Apache as a proxy server* section below), tables labelled *Map locale to remote URLs* and <b>Map remote Location:headers to local</b> will appear on the Aliases and Redirects form under the virtual server options page. These allow you to specify a URL path that when requested will cause Apache to itself request pages from another website and return them to the browser. Even though the URL that the user is accessing is on your server and their browser is connecting only to your system, the content is actually being loaded from elsewhere. </P> <p> To set up this URL mapping, the steps to follow are :</P> <ol> <li> On the module's main page, click on the icon for the virtual server that you want to create the mapping under. If you want it to apply to all virtual servers, click on the *Default Server* icon instead. </li> <li> On the virtual server options page that appears, click on the Aliases and Redirects icon to go to the page in Figure 29-6. </li> <li> In the empty row in the <b>Map locale to remote URLs</b> table, enter a URL path on your server (like <i>/webmin</i> ) into the first field, and the full URL that you want the pages to be requested from into the second (like <i>http://www.webmin.com/</i> ). </li> <li> In the empty row in the <b>Map remote Location:headers to local</b> table, enter the same full remote URL into the first field and the URL path on your server into the second. This second table controls the conversion of redirects issued by the remote server, and should almost always be set. If it is not set, whenever the remote server issues a redirect the browser will end up connecting directly to it instead of to your server. </li> <li> Klicken Sie auf <b>Speichern</b> button to have your new mapping stored in the Apache configuration. The browser will return to the virtual server options page. </li> <li> To make the mapping active, click on the <b>Apply Changes</b> link at the top of the page. </li> </ol> <p> You can test it out by going to the mapped URL path on your system, and you should see pages that have been requested from the remote server. The process is not totally transparent though, because it does not convert HTML files in any way. So if in the example above the remote server contained an HTML page with a link like <a href=/foo.html>, following it would take the browser to /foo.html on your system, not /webmin/foo.html as you might expect. There is no solution to this problem, apart from making sure that the remote server always uses relative links and image paths.</P> <h3>Running CGI programs</h3> <p> CGI stands for Common Gateway Interface, and is a standard method for webservers to run external programs, pass them details of a browser's request, and read back any content that the program generates. CGI programs are one of the simplest way of adding dynamic pages to your webserver, and are relatively easy to set up and develop. Server-side includes (covered in the next section) are even simpler, but very limited in what they can do. </P> <p> A CGI program can be written in any language as long as it follows certain rules. The most common is Perl, but C, Python, PHP or any other language that can access environment variables and produce output can be used. You can even write shell scripts that are valid CGI programs. This section is not going to explain the details of how to write them though - there are plenty of books that cover that already. </P> <p> CGI programs are just files on your system, like any other HTML or image file. The difference is that when they are requested by a browser, Apache executes them and returns their output instead of the contents of the file. Because you only want this to happen for programs and not for HTML files, the server must be configured to identify certain files as CGI programs. This is normally done in one of two ways - by putting all CGI programs into a certain directory, or by giving them all a file extension like .cgi. </P> <p> The choice is yours, but the latter option is simpler to use as you can freely mix CGI scripts, HTML and image files in the same directory. To set it up, the steps to follow are :</P> <ol> <li> On the module's main page, click on the icon for the virtual server that you want to set up CGI programs for. Or click on the *Default Server *icon if you want to use them on all servers. </li> <li> Click on the icon for the directory that you want CGI programs to be enabled under. Typically each virtual server will have an icon for options for its document root directory, but if not you can create one by following the steps in the *Setting per-directory options* section above. If you only want to allow CGI programs to be run in some sub-directory of the website, you can create a new directory icon for that as well. </li> <li> On the directory options page, click on the <b>Document Options</b> icon and change the <b>Directory options</b> field from <b>Default</b> to <b>Selected below</b> . Then set the rows <b>Execute CGI programs</b> and <b>Generate directory indexes</b> auf <b>Ja</b> , and click the <b>Save</b> Schaltfläche unten auf der Seite. This tells Apache that CGI programs can be executed in the directory. </li> <li> Back on the directory options page, click on the MIME Types icon. In the Content handlers table, select cgi-script from the first blank menu under the <b>Handler</b> column, and enter .cgi into the field next to it under the <b>Extensions</b> Säule. Then click the <b>Save</b> button at the end of the form. This tells Apache to treat all files in the directory ending in .cgi as CGI programs. </li> <li> Finally, click the <b>Apply Changes</b> link on any page. You should now be able to create a file with a .cgi extension in the chosen directory, and test it out in a web browser. </li> </ol> <p> An alternative to this approach is to specify a directory in which all files are treated as CGI programs. This has the advantage that they can be given any name you like, instead of being forced to have a .cgi extension. You can also set permissions on this directory to restrict who is allowed to create CGI programs, while still allowing others to edit normal HTML pages. </P> <p> To set up a directory for CGI scripts, the steps to follow are :</P> <ol> <li> On the module's main page, click on the icon for the virtual server that you want to set up a CGI directory for. Or click on the *Default Server* icon if you want to set it up for all servers. </li> <li> Click on the <b>CGI Programs</b> icon to bring up a page for setting various CGI options. </li> <li> The <b>CGI directory aliases</b> table works in a very similar to the <b>Document directory aliases</b> table described in the previous section. However, in addition to mapping a URL path to a directory on your server it also tells Apache that any files accessed through that path should be treated as CGI programs. In the first empty row of the table, enter a URL path like <i>/cgi-bin/</i> into the <b>From</b> field and a directory like <i>/home/example/cgi-bin/</i> into the <b>To</b> Feld. </li> <li> Klicken Sie auf <b>Speichern</b> button at the bottom of the page to return to the virtual server options page. Then click the <b>Apply Changes</b> link to make the CGI directory active. </li> </ol> <p> You should now be able to create CGI programs in the directory, and test them out in a web browser. On some Linux distributions, the default Apache configuration will already have a CGI directory available at the URL path /cgi-bin/, mapped to a directory like /home/httpd/cgi-bin/. If this is good enough for you, there is no need to follow the steps above - instead, you can just put CGI programs in that directory. </P> <p> Normally, all CGI programs execute as the Unix user that the webserver runs as, typically named httpd or apache. On a system with multiple users who cannot be fully trusted, this is not a good thing - anything that one user's CGI program can do, everyone else's can as well. So for example if a user writes a CGI program that edits some file, he would have to make that file writeable by the httpd user, meaning that everyone else's CGI programs could write to it as well. </P> <p> Fortunately, there is a solution. Apache comes with an optional program called suexec that can be used to have CGI programs run as some other Unix user, rather than as the webserver user. Typically the CGI programs under each virtual server will be run as the Unix user who owns that server's files. To set this up, the steps to follow are :</P> <ol> <li> Make sure that the suexec program exists on your system, and that it has setuid-root permissions. Apache typically expects to find it in /usr/sbin or /usr/local/apache/sbin, and most Linux distributions include it as a standard part of their Apache package. However, some do not have it setuid by default, so you may need to run chmod 6711 /usr/sbin/suexec to make it so. </li> <li> On the main page of the module, click on the icon for the virtual server that you want to have CGI programs run as a different user on. This will take you to the options page shown in Figure 29-4. </li> <li> Click on the <b>User and Group</b> icon on the virtual server options page. </li> <li> For the <b>Run as Unix user</b> field, select <b>User name</b> and enter the name of the user who owns the virtual server into the field next to it. </li> <li> Similarly, for <b>Run as Unix group</b> select <b>Group name</b> and enter the primary group of the user specified in the previous step. </li> <li> Klicken Sie auf <b>Speichern</b> button to return to the options page for the virtual server. </li> <li> To activate suexec for the first time, you need to stop and re-start Apache. Use the <b>Stop Apache</b> link at the top of the page to halt it, and then the <b>Start Apache</b> link to start it up again. </li> <li> To check that suexec is actually working, check the Apache error log file for a line containing suEXEC mechanism enabled that was logged when the webserver was re-started. </li> </ol> <p> Because it can execute commands as any user on your system, suexec has many security restrictions to prevent misuse by normal users. It will only run CGI programs that are owned by the user and group specified in steps 4 and 5, and only if they are not writeable by any other user, or in a directory that is writeable by another user. The IDs of the user and group must be above minimums that are compiled into the program, to prevent programs owned by system users such as root or bin from being run. Finally, the program must reside under a directory that is compiled into suexec, and nowhere else on the filesystem. </P> <p> This last restriction can be very annoying if you have a large number of virtual servers and want to enable the execution of CGI programs in their directories. The default allowed directory is typically the standard CGI directory for Apache, such as /home/httpd/cgi-bin. To change this, you will need to re-compile suexec with a different directory, such as /home. </P> <p> Whenever suexec fails to run a CGI program, it fails with HTTP status code 500. Because there are many things that can go wrong, you should check the file suexec_log in the same directory as the other Apache logfiles to see why it is refusing to execute a particular program. For each failure, a line is written to this file explaining the problem, such as incorrect permissions or a file ownership mismatch. </P> <p> Writing CGI programs can be difficult because when they fail, very little information is displayed in the browser. All you see is a message like <i>500 server error</i> , which no explanation of the real cause. However, more detailed error information is written to the Apache error log file. This is usually named error_log, and can be found in the same directory as the Apache access log files. See the section below on <b>Configuring logging</b> for more details on how to find and change it. </P> <p> Anything that a CGI programs outputs to STDERR will also be written to the error log, which is useful if you want your program to generate debugging information that is not sent to the web browser. Because many programming languages like Perl output error messages on STDERR if a script fails to compile or run, all such messages will also be written to the error log file. </P> <p> The biggest problem with CGI programs is that the webserver has to launch a new process every time one is requested. If the CGI is written in Perl or PHP, the process then has to load the interpreter for that language which can itself be a large program. The end result is that processing a request for a CGI page takes much longer than a request for a static HTML or image file, and generates much more load on the server system. </P> <p> For this reason, optional modules have been developed that allow the webserver to run Perl and PHP scripts using an interpreter that is part of the Apache process. These modules are called mod_perl and mod_php, and are included in the Apache package in many Linux distributions. Installing and configuring them is not covered in this chapter though.</P> <h3>Setting up server-side includes</h3> <p> Server-side includes allow you to create simple dynamic web pages without the complexity of writing an entire CGI program in a language like Perl. When active, some of the HTML files served by Apache are checked for special tags starting with <!-- . The contents of each tag is then replaced by dynamically generated text that depends on the tag's parameters, and the resulting page sent to the web browser. </P> <p> The most common use of server-side includes is including the contents of one HTML page into another. This can be useful if you have a common header or footer that you want to share among multiple pages without repeating it over and over again. Where a special tag like <!--include file=_something.html_ --> appears in the HTML of page, it is replaced with the contents of the file <i>something.html</i> . </P> <p> Server-side includes can also be used to access and set environment variables, to conditionally display HTML based on variables and to run CGI programs or shell commands and have their output included in the page. This section will not cover the tags that are available and the purposes though - instead, you should read the documentation on the Apache website or a good book on HTML. </P> <p> Normally, allowing un-trusted users to create HTML pages containing server-side include tags is perfectly safe because they cannot be used to perform potentially dangerous operations like editing files on the server. The exception to this is the <!--#exec -->tag, which can be used to run an arbitrary shell command and have its output included in the web page. Because the command runs as the Unix user that Apache is running as (normally httpd), a user who is not allowed to create CGI programs may be able use this kind of tag to read or modify files that he would not normally be able to. For this reason, Apache can be configured to enable server-side includes with or without the risky exec tag. </P> <p> Because checking an HTML file for server-side include tags is CPU intensive, they are often only activated for files with the .shtml extension. This way you can put static HTML in .html files and dynamic content into .shtml files, so that the server does not have to waste time looking for tags in files that do not contain them. However, it is also quite possible to have all .html files checked for server-side includes if you wish. </P> <p> To turn on includes for a virtual server, the steps to follow are:</P> <ol> <li> On the module's main page, click on the icon of the virtual server that you want to enable server-side includes on. Or click on the <b>Default Server</b> icon to enable them for all virtual hosts. </li> <li> Click on the icon for the directory that you want server-side includes to be enabled under. Typically each virtual server will have an icon for options for its document root directory, but if not you can create one by following the steps in the *Setting per-directory options* section above. If you only want to enable server-side includes in some sub-directory of the website, you can create a new directory icon for that as well. </li> <li> On the directory options page, click on the <b>Document Options</b> icon and change the <b>Directory options</b> field from <b>Default</b> to <b>Selected below</b> . If you want to enable server-side includes without the exec tag, change the <b>Server-side includes</b> row to <b>Yes</b> . If you want to enable the potentially risky exec tag as well, change <b>Server-side includes and execs</b> row to <b>Yes</b> stattdessen. Either way, when they have been enabled click the <b>Save</b> Schaltfläche unten auf der Seite. </li> <li> Click on the <b>MIME types</b> icon on the directory options page. If you want to enable includes on all HTML files, find the *Content handlers* table to select server-parsed from the first empty menu under the <b>Handler</b> column, and enter .html into the field next to it under the <b>Extensions</b> Säule. This tells Apache that files ending in .html should be checked for server-side include tags. If you want to enable includes for only .shtml files, enter .shtml instead of .html under the <b>Extensions</b> Säule. Then in the <b>Extra MIME types</b> table enter text/plain into the first empty field under the <b>Type</b> column and .shtml into the field under <b>Extensions</b> next to it. This tells Apache that .shtml files should be checked for server-side include tags, and that they actually contain HTML. </li> <li> Finally, click the <b>Save</b> button at the bottom of the MIME Types page, and then the <b>Apply Changes</b> link back on the directory options page. </li> </ol> <p> Once server-side includes are enabled, you can test them by creating an .html or .shtml file in the chosen directory with some special tags it in. Then open the page in your web browser to see the result. If for some reason server-side includes were not enabled properly, nothing will show up at all because the <!-- tag indicates an HTML comment. However, if the tag is replaced by the message an error occurred while processing this directive then includes are active but there is an error in the tag's parameters. More details will be written to the Apache error log file (described in the previous section) if an error if this kind occurs. </P> <p> There is another method of indicating to Apache that certain HTML files should have server-side include processing performed on them. The webserver can be configured so that any .html file with the Unix execute permission set is processed for includes, by following the steps below. You can set this permission with a command like </P> <pre>chmod +x <i>file.html</i>. </pre> <ol> <li> Follow steps 1 to 3 of the instructions above to enable server-side includes for some directory. </li> <li> On the directory options page, click on the <b>CGI Programs</b> Symbol. </li> <li> On the page that appears, change the *Process includes on files with execute bit?* field to <b>Yes</b> . You can also set it to <b>Yes and set last-modified date</b> to have Apache read the modification time each processed HTML file and use that to set the Last-Modified HTTP header. </li> <li> Klicken Sie auf <b>Speichern</b> button at the bottom of the CGI Programs page, and then the <b>Apply Changes</b> link on any page. </li> </ol> <p> You should now be able to set execute permissions on HTML files in the directory, and Apache will parse them for server-side include tags when they are requested. This allows you to selectively turn on include processing, while avoiding the problem of having to rename a file (and break links) just because it now contains include tags.</P> <h3>Configuring logging</h3> <p> By default, every request that Apache finishes processing is written to a log file in a standard format. For each request the client IP address, website username, date, time, URL path, status code and number of bytes transferred is logged. In the default Apache configuration, there is only a single log file that is used for all virtual servers. However, you can re-configure the webserver to use different files for different virtual osts, and even to log additional information for each request. </P> <p> Apache also has a log file for recording error messages, which are generated when a browser requests a page that does not exist, when an HTTP connection is terminated, or if some other unexpected condition occurs. As the <b>Running CGI Programs</b> section explains, this log file also contains error output from CGI programs and failure messages from server-side include directives. </P> <p> To see which log files are being used by Apache on your system and to change them, follow these steps :</P> <ol> <li> On the Apache Webserver module's main page, click on the *Default Server* icon. This will bring you to the default server options page similar to the one shown earlier. </li> <li> Click on the <b>Log Files</b> icon to being up the log files configuration form shown in the screenshot below. </li> <li> The <b>Error log to</b> field controls where CGI and webserver error messages are written to. Typically the <b>File</b> option is selected and the path to a file into which error messages should be written is displayed int the field next to it. You can select the <b>System Log</b> option if you want to have messages sent to syslog instead (covered in chapter 13). All messages will use the local7 facility. The other available option is <b>Program</b> , which when selected will cause Apache to run the command entered into the field next to it and feed error log messages to it as input. This can be useful for performing your own filtering or analysis of errors as they are reported. </li> <li> The <b>Named log format</b> table lists pre-defined formats that can be used for logfiles defined in the next step. Each has as <b>Nickname *which is used to refer to it, and a *Format</b> string which specifies the fields written to the log for each request. When a log line is written, each of the % fields in the format string is replaced by some detail of the request, such as the client address, HTTP status code or virtual server name. See the online Apache documentation for more details on which % fields are available. Several standard formats such as common and combined are already defined in the default Apache configuration. To create your own log format, fill in the empty row at the bottom of the table. Each format much have a unique nickname. </li> <li> The <b>Access log files</b> table specifies the files that are used for logging actual requests processed by the Apache webserver. Multiple files can be specified, and the format of each can be selected independently from one of those explained in the previous step. All requests will be written to all listed logfiles. Each row of the table defines one logfile. Under the <b>Format</b> column you can choose the format for the file, or select the <b>Default</b> option to use the standard Apache logfile format. Under the <b>Write to</b> column you can choose if the logging is being done to a file or to the input of a program. The path to that file or program must be entered into the field in the <b>File or program</b> Säule. If you want to add an additional logfile, fill in the fields in the empty row at the bottom of the table. </li> <li> If you have made any changes to the logging configuration, click the <b>Save</b> button at the bottom of the page, then the <b>Apply Changes</b> Verknüpfung. </li> </ol> <p> <img loading='lazy' src="https://m.unixlinux.online/article/uploadfiles/202204/2022042909475725.gif" /> <br> Default server log files configuration form</P> <p> Apache also allows you to define different logfiles for each virtual server, so that requests to the various virtual hosts on your system do not all get mixed up into one file. By default, all requests are written to a ingle access log file without any field that identifies the virtual server that processed them. To change this and have a virtual server write to its own separate logfile, the process is :</P> <ol> <li> On the module's main page, click on the icon of the virtual server that you want to configure a new logfile for. </li> <li> Click on the <b>Log Files</b> icon, which will take you to a page similar to the one in the screenshot above. </li> <li> If you want this virtual server to have its own separate error log file, change the <b>Error log to</b> field from <b>Default</b> zu einer der anderen Optionen. </li> <li> To add a log format that exists only for this virtual server, fill in the empty row in the <b>Named log formats</b> Tisch. It is usually a better idea to define all log formats in the default server though, so that they can be used in any virtual host. </li> <li> Add a row to the <b>Access log files</b> table for the separate logfile for this virtual server. As soon as one is defined, requests to the virtual host will be written only to it instead of the access log list on the Log Files page under the default server. </li> <li> Wenn Sie fertig sind, klicken Sie auf <b>Speichern</b> button at the bottom of the page to have your new logfile settings written to the Apache configuration. Then back on the virtual server options page, hit the *Apply Changes* link at the top to make them active. </li> </ol> <p> If you have multiple virtual servers and want to identify which one each request was made to, another solution to change the format of the default access log file to include the virtual server hostname in each log line. To set this up, the steps are:</P> <ol> <li> On the module's main page, click on the <b>Default Server</b> icon, and then the <b>Log Files</b> icon on the default server options page. </li> <li> In the <b>Named log formats</b> table find the row for the common format and change its <b>Format</b> field so that it reads <i>%h %l %u %t "%r" %<s %b %{Host}i "%{Referer}i" "%{User-Agent}i"</i> The extra fields will tell Apache to include the virtual server hostname, referrer URL and browser name for each request on every log line. </li> <li> In the <b>Access log files</b> table, find the row for your server's main logfile, and make sure that the <b>Format</b> field is set to common, not to <b>Default</b> or some other named format. </li> <li> Klicken Sie auf <b>Speichern</b> button, and then the <b>Apply Changes</b> Verknüpfung. All entries written to the logfile from now on will include the additional information.</li> </ol> <h3>Setting up custom error messages</h3> <p> When a browser attempts to access a page that does not exist, a directory that is password protected or a CGI program that is malfunctioning, Apache returns one of its built-in error messages. Because these error message pages are not always friendly or nice to look at, you can configure the webserver to use your own pages instead. This can be set up to apply to all virtual servers, a single server or just one directory. Die folgenden Schritte sind:</P> <ol> <li> On the module's main page, click on either a virtual server or the <b>Default Server</b> icon if you want to define a custom error message that applies to all servers. </li> <li> If you only want the custom message to be displayed for requests to a particular directory, URL path or filename, click on its icon on the server options page. If no icon for the directory exists yet, you will need to define one by following the steps in the section on <b>Setting per-directory options</b> . </li> <li> In the directory or virtual server options page, click on the <b>Error Handling</b> Symbol. </li> <li> The <b>Custom error responses</b> table is where you can enter error codes and their corresponding custom messages. Any existing error messages for the directory or server will be listed, followed by a blank row. To add a new one, start by entering the HTTP error number into the <b>Error code</b> Feld. Some of the more common codes and their causes are :<ul> <li> <b>404</b> The requested page does not exist</li> <li> <b>403</b> Access to the page is denied </li> <li> <b>401</b> The browser must login first before accessing the page </li> <li> <b>500</b> A CGI program failed, or some other internal error occurred </li> <li> If you just want to change the message that Apache displays when the error occurs, select <b>Show message</b> under the <b>Response</b> column and enter the text of your new message into the field under <b>URL or message</b> . On the other hand, if you want the contents of another page to be displayed instead, select <b>Goto URL</b> and enter either a URL page (like <i>/errors/500.html</i> ) or full URL (like <i>http://www.error.com/505.html</i> ) into the <b>URL or message</b> Feld. In the latter case, the browser will be re-directed to the URL when an error with the chosen code occurs. </li> </ul> </li> <li> Klicken Sie auf <b>Speichern</b> Schaltfläche unten auf der Seite. If you want to add another custom error message, click on the <b>Error Handing</b> icon again and fill in the new blank row in the table. </li> <li> Klicken Sie auf <b>Änderungen übernehmen</b> button on any page to make the new custom error message active. </li> </ol> <p> Some web browsers, such as IE in its default configuration, will not display the text of error messages sent by the webserver. Instead, only the error code number and a more friendly message generated by the browser is displayed.</P> <h3>Adding and editing MIME types</h3> <p> MIME types are the method used by Apache, mail clients and many other programs to indicate the type of files and other date. A MIME type consists of two words separated by a slash, such as text/html, image/gif or video/mpeg. As those examples show, the first word is the general category of type, while the second is the actual type name. </P> <p> Every response sent by a webserver to a browser is accompanied by a type, so that the browser knows how to display it. When a normal file is requested, the webserver typically works out the type by looking at the file's extension, such as .gif or .html. CGI programs must supply their type to the webserver before any other content that they output, which is then forwarded on to the browser. This allows a CGI program to output HTML, plain text, images or any other kind of data, regardless of the filename of the CGI script itself. </P> <p> Browsers never attempt to work out the type of a page by looking at the filename extension in the URL - instead, they always rely on the MIME type sent by the webserver. Apache gets its global list of MIME types and the extensions that they are associated with from a configuration file that applies to all virtual servers. To edit and add to this list of types, the steps to follow are :</P> <ol> <li> On the module's main page, click on the <b>MIME Types</b> icon in the Global Configuration section. This will bring you to a page listing all the types that Apache currently knows about, along with the filename extensions. Almost every type that you would ever need to use should already be listed. </li> <li> To create a new type, click on the <b>Add a new MIME type</b> link above or below the list. </li> <li> In the *MIME type *field of the form that appears, enter the type name such as <i>text/foo</i> . It is acceptable for the same type to be defined twice, as long as each entry has different associated filename extensions. </li> <li> In the <b>Extensions</b> text box, enter all the filename extensions what you want associated with this type, such as <i>.foo</i> and <i>.fo</i> . Make sure that no other MIME types are using the same extensions. </li> <li> Klicken Sie auf <b>Speichern</b> button below the form. The browser will return to the types list, which will include your new entry. </li> <li> Klicken Sie auf <b>Änderungen übernehmen</b> link on any page to make the new type active. </li> </ol> <p> You can edit or delete an existing global MIME type by clicking on its name in the list, which will bring up the type editing form. Either change the <b>MIME type</b> or <b>Extensions</b> fields and click <b>Save</b> , or hit the <b>Delete</b> button to totally remove it. Either way, afterwards you must use the <b>Apply Changes</b> link to make the changes active. </P> <p> MIME types can also be defined on a per-virtual server or per-directory level in the Apache configuration. This can be useful if you want to override a type for some extension in a particular directory, or create a type that is only needed by one virtual server. To do this, follow these steps :</P> <ol> <li> On the module's main page, click on the icon for the virtual server that you want to define the MIME type for. </li> <li> If you only want the type to be used for requests to a particular directory, URL path or filename, click on its icon on the server options page. If no icon for the directory exists yet, you will need to define one by following the steps in the section on <b>Setting per-directory options</b> . </li> <li> In the directory or virtual server options page, click on the <b>MIME Types</b> Symbol. </li> <li> The <b>Extra MIME types</b> table is for entering types that apply only to this virtual server or directory. In the first blank field under the <b>Type</b> column, enter a type like <i>text/foo</i> . In the field next to it under <b>Extensions</b> , enter one or more filename extensions like <i>.foo</i> . </li> <li> Klicken Sie auf <b>Speichern</b> Schaltfläche unten auf der Seite. If you want to add more than one type, you will need to click on the *MIME Types* icon again so that a new blank field appears in the table. </li> <li> When you are done, use the <b>Apply Changes</b> link at the top of any page to make the new type mapping active. </li> </ol> <p> On the MIME Types page, there is a useful field labelled *Default MIME type*. If set, any files that Apache cannot identify the type for will be treated as whatever is entered into this field instead. Normally, this is set at the default server level to text/plain, but you may want to change it to something else for a particular directory that contains lots of files that have no filename extension. </P> <p> There is a similar field on the MIME Types page for directories, URL paths and filenames labelled <b>Treat all files as MIME type</b> . When it is set, Apache will identify all files in that directory as the specified type, no matter what their extension. This can be used to forcibly set the types of files that have names that do not follow the normal convention of ending with a type extension.</P> <h3>Password protecting a directory</h3> <p> The HTTP protocol has a standard method of indicating that a directory or site requires a username and password to be supplied before it can be accessed. Apache can be configured to force users to login before being able to view some or all of the pages on your system. Logins are typically checked against a separate password file, instead of the Unix user list. </P> <p> Password protection can be useful for securing a directory that only some people should be allowed to access, or for setting up a website that uses CGI programs to display different content to different users. To protect a directory, the steps to follow are :</P> <ol> <li> On the module's main page, click on the icon for the virtual server that you want password protection to be enabled under. </li> <li> Click on the icon for the directory, URL location or filename that you want to protect. If one does not exist yet, follow the steps in the <b>Setting per-directory options</b> section earlier in this chapter to create it. </li> <li> Click on the <b>Access Control</b> icon, which will bring you to the page shown in the screenshot below. </li> <li> In the <b>Authentication realm name</b> field, de-select <b>Default</b> and enter a description for the protected directory, such as <i>Private files</i> . This will be displayed to the user in the browser when he tries to login. </li> <li> Change the <b>Authentication type</b> to <b>Basic</b> . The <b>Digest</b> type is more secure, but is not supported by a lot of browsers. </li> <li> Change the <b>Restrict access by login</b> field to *All valid users*. This tells Apache that any of the users in the password file set in step 7 will be allowed to login. You can restrict access to only a subset of users by selecting the *Only these users* option and entering their names of users to allow into the text field next to it. Alternatively you can select *Only these groups* and enter the names of groups whose members you want to allow into its field. These options can be useful if the same authentication files are entered on this page for several directories. </li> <li> In the <b>Text file authentication</b> box, enter the full path to the file that you want to use to store usernames and passwords into the text field next to <b>User text file</b> . This authentication file must contain one line per user, each in the format <i>username</i> :_encrypted-password_. Standard Unix encryption is used for the passwords, just like in the /etc/shadow file. The file doesn't necessarily have to exist yet, as it will be created when the follow the instructions in the later steps to add users. It should not be under of your webserver's document root directories though, as this might allow an attacker to download it, crack the passwords and login to your website. </li> <li> If you want to categorize users into groups for further restriction as explained in step 6, enter the full path to a group file into the <b>Group text file</b> Feld. This file must contain one line per group, in the format <i>groupname</i> :_ username1 username2 etc_. The file does not have to already exist, because it will be created when you add groups in the later steps. If you just want to set up simple username and password authentication, then this step is unnecessary. </li> <li> Klicken Sie auf <b>Speichern</b> button at the bottom of the page, and you will be returned to the directory options page again. </li> <li> If the user and group files already exist or if you are planning to edit them manually, you can skip to step 21. Otherwise, click on the <b>Access Control</b> icon again to re-display the form. </li> <li> Click on the <b>Edit users</b> link next to the <b>User text file</b> Feld. This will bring up a page listing all webserver users currently listed in the file, if any. </li> <li> To create a new user, click on the <b>Add a new user</b> link above or below the list. </li> <li> On the user creation form, enter a login name into the <b>Username</b> Feld. </li> <li> In the <b>Password</b> field, select the <b>Plain text</b> option and enter the user's password into the field next to it. </li> <li> Klicken Sie auf <b>Speichern</b> button to have the user added and the list of users re-displayed. You can edit an existing user by clicking on its name in the list, changing its details and hitting the <b>Save</b> Taste. To remove a user, click the <b>Delete</b> button on the user editing form instead. </li> <li> When you are done creating users, use the *Return to access control* link to go back to the Access Control form. </li> <li> If you are using a group file as well, click on the <b>Edit groups</b> link next to the <b>Group text file</b> field to bring up a list of existing groups and their members. </li> <li> To create a new group, click on the <b>Add a new group</b> link and fill in the <b>Group name</b> and <b>Members</b> fields on the creation form that appears, then click <b>Save</b> . Members must be entered as a space-separated list of usernames. </li> <li> Existing groups can be edited and deleted by clicking on their names in the list, just like users can. </li> <li> When you are done creating groups, follow the *Return to access control* link to go back to the Access Control form. </li> <li> Finally, click on the <b>Apply Changes</b> link on any page to activate password protection for the directory. You can test it out by trying to visit the protected page and logging in as one of the users that you created. </li> <li> You can add an edit users and groups in future by editing the text files directly, or by following the relevant steps above. There is no need to use the <b>Apply Changes</b> link after changing the user or group lists though, as Apache re-reads the files on every request. </li> </ol> <p> <img loading='lazy' src="https://m.unixlinux.online/article/uploadfiles/202204/2022042909475932.gif" /> <br> The access control form</P> <p> The instructions above explain how to create text files for storing users and groups, but if your website is going to have a very large number of users text files are not the best way to store them. Because Apache re-reads the user file on every request, the large it gets the longer it will take for the webserver to lookup a user and generate a response. When editing or deleting a user, the entire file must be read in and written out again by the program that is changing it, which can take some time if the file is large. This increases the chance of file corruption if more than one process attempts to manipulate the same user file at the same time. </P> <p> The solution is to use DBM files for storing users and groups instead. These are binary format database files that are indexed by a key (such as the username), and can be safely edited in-place. Their only down-side is that they cannot be viewed or changed by Unix programs that deal with plain text, like cat and vi. </P> <p> The process of setting up authentication from DBM files is almost identical to the steps above. The only difference is that the user and group filenames must be entered into the <b>User DBM file</b> and <b>Group DBM file</b> fields in the <b>DBM file authentication</b> Kasten. The <b>User text file</b> and <b>Group text file</b> fields must be left set to <b>Default</b> . Unfortunately, Webmin does not allow you to edit users or groups in DBM files as you can with text files. Instead, you will need to write a Perl script or use a program like makemap to create them at the command line. </P> <p> Apache user and password files are totally separate from the system's Unix user list. However, this module can be configured to add, update or remove a user in a password file when a user with the same name is created, dited or deleted in the Users and Groups module. This is done using that module's synchronization feature.</P> <p> Synchronization can be useful if you want to grant access to some web directory to some of the Unix users on your system, and want their usernames and passwords to remain in sync if they are ever changed/. To set up synchronization between an Apache text authentication file and Unix users managed by the Users and Groups module, the steps to follow are :</P> <ol> <li> On the module's main page, click on the icon for the virtual server that the protected directory is under, then on the icon for the directory. </li> <li> Click on the <b>Access Control</b> icon, then on the *Edit users link* next to the <b>User text file</b> Feld. </li> <li> Below the list of users is a form for setting up synchronization for this users file. The checkboxes labelled *Add a user when a Unix user is added*, <b>Change the user when a Unix user is changed</b> and <b>Delete the user when a Unix user is deleted</b> are fairly self-explanatory. Typically you would select all three, or maybe just the last two if you want to add new users to this file manually. </li> <li> After selecting the options that you want, click the <b>Save</b> Taste. Any changes made in the Users and Groups module from now on will cause this user list to be updated as well. </li> </ol> <p> Each Apache users text file has its own separate synchronization options. Because they are associated with the name of the file, if it is renamed the options will be reset to their defaults. Only changes made in Webmin's Users and Groups or Change Passwords modules will be synchronized with the Apache users file - if a user changes his password with the command-line passwd program, his web password will not be changed to match. </P> <p> If you want to turn off authentication for a directory so that any browser can access it, there is no need to delete the entire directory configuration icon. Instead, you can just follow these steps :</P> <ol> <li> On the module's main page, click on the icon for the virtual server that the protected directory is under, then on the icon for the directory. </li> <li> Click on the <b>Access Control</b> icon to go to the page shown in the screenshot above. </li> <li> Change the <b>Authentication realm name</b> , *Authentication type*, <b>Restrict access by login</b> , <b>User text file</b> and *Group text file* fields all back to <b>Default</b> . If you are using DBM files instead of text, change the <b>User DBM file</b> and *Group DBM file* fields to <b>Default</b> auch. </li> <li> Klicken Sie auf <b>Speichern</b> button, and then the <b>Apply Changes</b> link back on the directory options page.</li> </ol> <h3>Restricting access by client address</h3> <p> Apache can also be configured to limit access to a directory, URL location or filename to certain client systems. The webserver knows the IP address of every browser that connects to it, and can use that address to determine whether the browser is allowed to request certain pages or not. In some situations, the client's real IP address will not be available to the webserver. If the client is accessing the web through a proxy server or a firewall doing NAT, then the IP address that the request appears to come from will be that of the proxy or firewall system. There is way to get the real address, but generally it is not a problem because all clients behind the proxy or firewall are usually treated the same from an access control point of view. </P> <p> Apache determines whether a client is allowed access or not by checking its IP address and hostname against a list of rules. There are two types of rule - those that allow access, and those that deny it. Depending on its configuration, the webserver will either check all of the allow rules before the deny rules, or vice-versa. The first one to match determines if the client is denied or not, and no further rules are checked. </P> <p> Most people who set up IP access control want to allow access from certain addresses and networks, and deny everyone else. For example, you might want to give hosts on your company LAN access to your intranet, but prevent others on the Internet from accessing it. To set up this kind of access control, the steps to follow are:</P> <ol> <li> On the module's main page, click on the icon for the virtual server that you want IP access control to be enabled under. </li> <li> Click on the icon for the directory, URL location or filename that you want to restrict access to. If one does not exist yet, follow the steps in the <b>Setting per-directory options</b> section earlier in this chapter to create it. </li> <li> Click on the <b>Access Control</b> icon, which will bring you to the page shown above. </li> <li> Scroll down to the <b>Restrict access</b> table, and change the <b>Access checking order</b> field to <b>Allow then deny</b> . This tells Apache that any request which is not specifically allowed by access control rules should be denied, and that all rules that allow access should be checked before rules that deny. If the alternative <b>Deny then allow</b> option is chosen, requests that do not match any rule will be allowed, and deny rules will be checked before allow rules. The <b>Mutual failure</b> option has the same effect as <b>Allow then deny</b> , and should not be used. </li> <li> At first, this table will contain only one empty row for entering your first access control rule. Because you are going to allow only certain clients and block the rest, select <b>Allow</b> from the menu in the <b>Action</b> Säule. The menu and field under the <b>Condition</b> column determine what kind of check is done to see if the client is allowed or not. The available condition types are :<ul> <li> <b>All requests</b> If chosen, all client requests will have the selected action performed.</li> <li> <b>Request from host</b> If chosen, only clients whose hostname is the same as or ends with the text entered into the field next to it will have the action performed. Apache gets the hostname by performing a reverse DNS lookup on the client's IP address, which may not always work.</li> <li> <b>Request from IP</b> If the client's IP address is the exactly same as the one entered into the field next to the menu, the selected action will be performed.</li> <li> <b>Request from partial IP</b> If chosen, clients whose IP addresses start with the partial IP entered into the field next to the menu will have the selected action performed. For example, you could enter <i>192.168</i> to match all clients on that network. </li> <li> <b>Request from net/netmask</b> If the client's IP address is within the network specified by the network address and netmask entered, the selected action will be performed. An example network specification would be <i>192.168.1.0/255.255.255.0</i> . </li> <li> <b>Request from net/CIDR</b> If the client's IP address is within the network specified by the network address and prefix bits entered, the selected action will be performed. <i>192.168.1.128/25</i> is an example of this kind of network specification.</li> <li> <b>If variable is set</b> If this option is chose, the selected action will only be performed if the environment variable whose name is entered into the adjacent field is set. Apache provides several ways to set variables based on request headers and browser types and are too complex to cover here. </li> </ul> </li> <li> Klicken Sie auf <b>Speichern</b> button at the bottom of the form, and if there are no errors in your selections you will be returned to the directory options page. To allow more than on client IP address or network, click on the Access Control icon again and fill another next blank row in the <b>Restrict access</b> Tisch. You can build up complex access control rulesets by adding many allow and deny rules. </li> <li> When you are totally done, use the <b>Apply Changes</b> link on any page to make the restrictions active. </li> </ol> <p> It is possible to combine both IP address restrictions and username/password access control for the same directory. This can be done in two ways - either clients are checked for any IP restrictions and then forced to enter a password, or they are only prompted for a password if they do not pass the IP restrictions. </P> <p> The mode that Apache uses is determined by the <b>Clients must satisfy</b> field on the Access Control form. If you set it to <b>All access controls</b> then they must pass both password and IP checks. However, if *Any access control* is selected then a password will only be prompted for if the IP checks fail. This can be useful for granting access to a directory to everyone on your internal network, and to people on the Internet who have a valid username and password.</P> <h3>Encodings, character sets and languages</h3> <p> As the <b>Adding and editing MIME types</b> section explains, Apache attempts to determine a MIME type for every file that it sends to a browser. In addition to the type, files can also have an encoding that is usually used to indicate how they were compressed. The encoding is determined by the file extension (such .gz for gzipped data), and can be used by the browser to uncompress the file before displaying it. </P> <p> For example, this would allow you to create a file called foo.html.gz which contains compressed HTML data and is identified by the webserver as such. For large files, sending them in compressed format can save bandwidth and reduce the time it takes for them to be downloaded. Unfortunately, not all browsers support the common .gz and .Z encoding formats, so this feature is not always useful. At the time of writing, Mozilla and Netscape supported compressed encoding, but IE did not. </P> <p> Encodings can be defined globally, on a per-virtual server basis, or just for a single directory or URL location. They are usually defined globally though, and can be viewed and edited by following these steps :</P> <ol> <li> On the Apache Webserver module's main page, click on the *Default Server* icon. </li> <li> Click on the <b>MIME Types</b> icon, and scroll down to the *Content encodings* table. Each row in the table defines two encodings, and there is always at least one pair of empty fields for adding a new one. Typically entries for the x-compress and x-gzip encodings will already exist, as they are included in the default Apache configuration. </li> <li> To add a new encoding, enter its name into the first empty field under the <b>Content encoding</b> Säule. In the field next to it, enter a space-separated list of filename extensions that are used by files encoded in that format. </li> <li> To change the name or extensions for an existing encoding, just edit its fields in the table. For example, you can add extra extensions for an encoding by just entering them into same field as existing ones. </li> <li> If you want to delete an encoding, just clear its entries in the fields under the <b>Content encoding</b> and <b>Extensions</b> Felder. </li> <li> When you are done editing encodings, click the <b>Save</b> button at the bottom of the page, and then the <b>Apply Changes</b> Verknüpfung. </li> </ol> <p> Apache takes all filename extensions into account when determining a file's MIME type, encoding, language and character set, and does not care about their order. This means that a files named foo.html.gz and foo.gz.html are both identified as containing gzip compressed HTML data. </P> <p> Another piece of information that Apache can supply to browsers requesting a file is the character set used by text in the file. If all your web pages are in English or a language like Malay that does not use any non-English letters, then you don't need to care about this. However, if you are creating HTML pages in a different language that uses characters outside the standard ASCII character set then it is useful and often necessary to indicate to browsers what character set each page is in. </P> <p> Languages like German and French use special characters like and Russian have so many characters that each must be represented by two bytes, using special character sets like Big5 and KOI8. For these languages, it is vital that the browser be informed of the character set of each page so that it can decode the text that it contains and use the correct font to display characters. </P> <p> As with encodings, Apache determines the character set of each file by looking at its filename extension. So for example a file named foo.html.Big5 would be identified as HTML in which the text was encoded in the Chinese Big5 format. A file can have both a character set and an encoding, such as foo.html.Big5.gz, and the order that its extensions are in does not matter. </P> <p> Character sets can be defined globally or for individual virtual servers and directories. To view and edit the global list of character sets, follow these steps:</P> <ol> <li> On the Apache Webserver module's main page, click on the *Default Server* icon. </li> <li> Click on the <b>Languages</b> icon, and scroll down to the *Extra character sets *table. Each row in the table defines two character sets, and there is always at least one pair of empty fields for adding a new one. In the default Apache configuration several commonly used character sets are already defined. </li> <li> If you need to add a new character set, enter its standard ISO name into the first empty field under the <b>Charset</b> column, and the filename extensions associated with it into the adjacent field under <b>Extensions</b> . Many common character sets are defined by default, so you may just be able to use one of the existing recognized extensions for your files. Multiple extensions must be separated by spaces. </li> <li> You can change the name or extensions for existing characters sets by just editing the fields in the table. It is not usually a good idea to rename the default sets, because they use the standard names that are recognized by browsers. Adding extensions is perfectly safe though. </li> <li> To delete a character set, just clear out the fields containing its name and any associated extensions. </li> <li> When you are done editing, click the <b>Save</b> Taste. If you used up all the blank fields in the Extra character sets table and want to add more, click on the <b>Languages</b> icon again. Otherwise, use the <b>Apply Changes</b> link to make your changes active. </li> </ol> <p> Because most of the commonly used character sets are defined by default in the Apache configuration, it is not usually necessary to add new ones. Instead, you can just find the associated extensions and use them on your filenames. </P> <p> Apache can also identify the language that an HTML or text file is written in by looking at its filename extensions. At first it may seem that there is no difference between a file's language and its encoding, but that is not always the case. For example, the ISO-8859-2 character set is used for many different European languages, and the Chinese language can be represented by both the Big5 and GB character sets. </P> <p> Unfortunately, few browsers actually make any use of the language that a file is written in. However, some can be configured to request pages in a language chosen by the user, and Apache can be set up to use this information to identify the correct file to return. This happens when the <b>Generate Multiviews</b> option is turned on for a directory, in the Directory Options page. </P> <p> When that option is active, a request for a page like /documents/foo which does not actually exist will cause Apache to scan the directory for /documents for all files starting with foo, identify their types and languages, and return the one that best matches the client's specified language. This is useful if you want to be able to have multiple versions of the same page in different languages, but have them all accessible via the same URL. </P> <p> To view and edit the languages and file extensions recognized by Apache, the steps to follow are:</P> <ol> <li> On the Apache Webserver module's main page, click on the *Default Server* icon. </li> <li> Click on the <b>Languages</b> icon, and find the *Content languages *table. Each row in the table defines two languages, and there is always at least one pair of empty fields for adding a new one. The default Apache configuration contains several commonly used languages. </li> <li> To add a new language, enter its ISO code into the first empty field under the <b>Language</b> column, and a list of extensions separated by spaces for files in that language under the <b>Extensions</b> Säule. </li> <li> Existing languages can be editing by just changing their codes and extensions in the table, or deleted by clearing out their fields. It is wise not to change the standard codes for existing default languages. </li> <li> When you are done editing languages, click the Save button at the bottom of the page. If you ran out of blank fields when adding new ones, click on the Languages icon again to return to the table. Otherwise, use the <b>Apply Changes</b> link to activate your new settings. </li> </ol> <p> As with encodings and character sets, Apache does not care about the ordering of extensions in a filename when working out its type and language. So both the files foo.html.de and foo.de.html would be identified as HTML documents written in German.</P> <h3>Editing .htaccess files</h3> <p> As explained in the introduction, Apache options can be set for a directory by creating a file named .htaccess in the directory. These are often created by normal users who do not have permissions to edit the master webserver configuration file, and want to change the way Apache behaves when accessing their directories. .htaccess files can be used to set almost all of the options that you can configure on a per-directory basis, as explains in other sections of this chapter. </P> <p> The options in one of these files apply to all the files in its directory and in any subdirectories. However, they can be overridden by another such file lower down in the directory tree. Per-directory options in the main Apache configuration will be overridden by those in a .htaccess file for the same directory, but directory options for a subdirectory will override those in a parent .htaccess file! </P> <p> Webmin can be used to create and edit .htaccess files as well. If some already exist on your system that were created manually, they must be discovered by Webmin first before you can use it to edit them. To have it search for existing files on your system, the steps to follow are:</P> <ol> <li> On the module's main page, click on the *Per-Directory Options Files* icon. This is what Webmin calls .htaccess files. </li> <li> On the page that appears, there is a button labelled *Find Options Files* with two options next to it. If <b>Automatically</b> is selected, Webmin will look in the document root directory of each virtual server for options files. If <b>From directory</b> is chosen, you can enter a directory that will be searched instead. The latter option is useful if the websites on your system have some pages that are outside of the document roots due to the user of aliases or user web directories. </li> <li> Click the button to have the module search the select directories and any under them. The same page will be re-displayed, but with a table of all .htaccess files at the top, assuming some were found. </li> </ol> <p> To edit the options set in a file, just click on its path from the Per-Directory Options Files list. This will bring up a page similar to the directory options page shown in Figure 29-5. You can click on the icons to edit redirects, username and password access control, IP address restrictions, MIME types and custom error messages. The instructions in previous sections that apply to directories can be followed here as well - the only difference is that you do not have to use the Apply Changes link after making changes, as Apache always re-reads the .htaccess files that it encounters on every request. </P> <p> You can also create a new .htaccess file by entering the path to the directory that it should be created in into the field next to the <b>Create Options File</b> Taste. When the button is clicked, the file will be created empty and have its ownership set to the user and group configured on the User and Group page of the default server. It will be added to Webmin's list of known options files, and your browser will be redirected to the options file for the page. </P> <p> To delete an per-directory options file, click on the *Delete File* link that appears at the top of the page that appears when you click on its name from the list. As soon as it is removed, Apache will cease using any options that it defines in it for the directory it was in. </P> <p> The <b>Setting Per-Directory Options</b> section earlier in this chapter explains how to set options that apply only to files of a particular name, no matter which directory they are in. It is also possible for a .htaccess file to contain options that apply to only some of the files in the directory that contains it. This can be useful to do things like denying access to all files matching the pattern *.c in the directory /usr/local/src, which you cannot do just using per-directory or per-file options. </P> <p> To set options like this, the steps to follow are:</P> <ol> <li> On the module's main page, click on the *Per-Directory Options Files* icon. Then click on the .htaccess file in the directory that you want the options to apply to. If it doesn't exist yet, use the <b>Create Options File</b> button to create it as explained above. </li> <li> Scroll down to the <b>Create Per-File Options</b> form, and enter the filename or pattern into the <b>Path</b> Feld. Patterns can only use shell wildcard characters like * and ?, unless you change the <b>Regexp?</b> field to <b>Match regexp</b> , in which case you can enter a Perl regular expression using characters like <code>||, [, ]</code> and <code>+</code> .</li> <li> When you click the <b>Create</b> button, the same page will be re-displayed but with an additional icon for the filename or name pattern that you just entered. </li> <li> Click on the new icon, which will bring up another page of icons for different categories of options that can be applied to files whose names match the specified filename or pattern. This page is very similar to the directory options page shown in above, and the pages that it links to are mostly identical. </li> <li> The instructions in other sections of this chapter for creating redirects, custom error messages or IP access control can be followed on this page as well to set the same options for matching files in the directory. The only difference is that there is no need to click on the <b>Apply Changes</b> link to made new settings active. </li> </ol> <p> You can change the filename or pattern that the options are for by editing the <b>Path</b> field in the <b>Options apply to</b> form, and then clicking Save. Or you can remove them altogether so that the options for the directory apply instead by clicking on the <b>Delete</b> button in the same form. </P> <p> On a system that has many virtual websites run by un-trusted users, you may want to restrict the directives that those users are allowed to enter into .htaccess files. This can also be useful if you have user web directories enabled, explained in the next section. It is possible for a user to enable CGI scripts for his directory by putting the right directives into an options file, which could pose a security risk on your server. </P> <p> You can restrict the directives that can be used in .htaccess files on a per-directory basis. To do this, the steps to follow are:</P> <ol> <li> On the main page of the Apache Webserver module, click on the icon for the virtual server that the directory is under. </li> <li> Click on the icon for the directory that you want to restrict .htaccess files in, or if one does not exist yet follow the instructions in the <b>Setting Per-Directory options</b> section to create it. </li> <li> Click on the <b>Document Options</b> Symbol. </li> <li> In the <b>Options file can override</b> field, select the *Selected below* radio button. The de-select those categories of directives in the table below that you don't want users to be able to include in .htaccess files. The available categories are :*Authentication options *De-select this option to prevent the use of directives related to password authentication. *MIME types and encodings *De-select this option to prevent the setting of MIME types, character sets, encodings and languages for files. This will also stop files with certainly extensions being indicated to be CGI programs. *Indexing and index files *This option controls the use of directives for directory indexing. *Hostname access control *De-select this option to stop the use of IP access control directives. *Directory options *This option controls the use of directives that set options for the directory, such as whether indexing is done and if CGI programs are enabled. </li> <li> Klicken Sie auf <b>Speichern</b> button, and then the <b>Apply Changes</b> Verknüpfung. </li> </ol> <p> Whenever a user tries to use directives that he is not allowed to, Apache will display an error message when files in the directory containing the .htaccess file are requested. It will not simply ignore the disallowed directives.</P> <h3>Setting up user web directories</h3> <p> On a system with many Unix users, you may want to allow each user to create his own set of web pages. Instead of creating a subdirectory for each user under some document root directory, you can instead designate a subdirectory in each user's home directory as a location for web page files. Typically this subdirectory is called public_html, and its contents are made available at a URL like http://www.example.com/~_username_/. </P> <p> The special <i>~username</i> path in the URL is converted by Apache to a directory under the home of the user <i>username</i> , no matter what document root directory is being used for the rest of the files on the website. It is also possible for files in the user's actual home directory to be made available instead, so that ~username actually maps to the user's home directory and not a subdirectory. However, this is a bad idea as it makes all of the user's files available to anyone with access to the website. </P> <p> To turn on Apache's user web directories feature so that <i>~username</i> URL paths can be used, the steps to follow are:</P> <ol> <li> On the module's main page, click on the icon for the virtual server that you want to activate user directories for. To activate them for all virtual servers, click on the *Default Server* icon instead. </li> <li> Click on the <b>Document Options</b> Symbol. # In the <b>User WWW directory</b> field, de-select the <b>Default</b> option and enter public_html into the field next to it. Or if you want a different subdirectory to be used for users' web pages, enter its name instead. To make users' entire home directories available via <i>~username</i> URL paths, enter . into the field. On many systems, this option will already be set to public_html in the default Apache configuration, meaning that user web directories are already enabled. </li> <li> If the <b>All users accessible</b> option is selected, Apache will allow the pages in any user's web directory to be accessed. To configure the webserver to only allow access to the pages belonging to certain users, select the <b>Only users</b> option and enter the names (separated by spaces) into the field next to it. This can be useful if there is a small fixed list of Unix users who should be allowed to publish web pages. To block only a few users' web pages and allow the rest, select the *All users except* option and enter the names of the blocked users into its field. This is useful for protecting files belonging to important system users such as root. </li> <li> Klicken Sie auf <b>Speichern</b> button at the bottom of the page, then use the <b>Apply Changes</b> link to activate the new settings. Try creating a public_html subdirectory in the home directory of a user, putting some HTML files in it and seeing if they can be accessed using the ~username/filename.html URL path.. </li> <li> It is also possible to have <i>~username</i> URL paths mapping to directories outside users' home directories by entering values starting with / into the <b>User WWW directory</b> Feld. For example, if you were to enter <i>/www</i> and a browser requested <i>~jcameron/foo.html</i> , then the file returned by Apache would be /www/jcameron/foo.html. If you entered <i>/home/*/public_html</i> , then the file returned would be /home/jcameron/public_html/foo.html, even if the user jcameron did not have his home directory at /home/jcameron. As that example shows, any occurrence of a _*_ in the user web directory is replaced by the username. </li> </ol> <p> Similarly, you can enter a URL into the directory field, which will be used by Apache to generate a URL to re-direct browsers to when a user web directory is requested. For example, if you enter <i>http://home.example.com/users/</i> and the URL path <i>~jcameron/foo.html</i> is requested by a browser, it will be re-directed to http://home.example.com/users/jcameron/foo.html instead. This is useful if you want to move user web directory hosting to a separate server, while allowing URLs on your main server to be used to access them. </P> <p> Even though the above are sufficient to enable user web directories, there are some other things that you might want to do. As the *Editing .htaccess files* section above explains, you may want to limit the kinds of directives that users can put in their .htaccess files so that they cannot execute CGI programs or use server-side includes. You can also change the default directory indexing and document options that apply to user web directories. The steps to do both of these are:</P> <ol> <li> On the module's main page, click on the icon for the virtual server that user web directories were enabled in, or the default server. </li> <li> Assuming all your users have their home directories under /home and the web subdirectory is named public_html, enter <i>/home/*/public_html</i> into the Path field of the Create Per-Directory, Files or Location Options form at the bottom of the page. </li> <li> Leave the <b>Type</b> field set to <b>Directory</b> , and the <b>Regexp?</b> field to <b>Exact match</b> . </li> <li> Klicken Sie auf <b>Erstellen</b> button to create a new set of options that will apply to users' web directories, then on its newly created icon. This will bring up the document options page shown in a screenshot earlier on this page. </li> <li> Click on the <b>Document Options</b> Symbol. </li> <li> Change the <b>Directory options</b> field to <b>Selected below</b> , and set to Yes those options that you want to apply to user web directories. It is advisable to turn on *Generate directory indexes* and safe to enable <b>Server-side includes</b> , but not <b>Execute CGI programs</b> or *Server-side includes and execs*. The <b>Follow symbolic links</b> option is relatively safe to turn on as well, but will allow users to make available via the web files that are not in their public_html subdirectory by creating links to them. </li> <li> To prevent users overriding these settings in .htaccess files, change the <b>Options file can override</b> field to *Selected below* and de-select the <b>MIME types and encodings</b> and *Directory options* checkboxes. The others control options that present no security risk, and so can be safely left selected. </li> <li> Klicken Sie auf <b>Speichern</b> button and then the <b>Apply Changes</b> link to save and activate the restrictions. </li> <li> If you want to turn on server-side includes, set some custom MIME types or IP access controls for user web directories, you can do it by following the instructions in the appropriate sections for this directory. Because server-side includes are quite harmless with the ability to execute external programs disabled, they can be safely enabled for users by setting the right content handler for .html or .shtml files as the <b>Setting up server-side includes</b> section explains.</li> </ol> <h3>Configuring Apache as a proxy server</h3> <p> An HTTP proxy is a server that accepts requests for web pages from browsers, retrieves the requested pages from their servers and returns them to the browser. They are often used on networks on which clients are not allowed to connect to webservers directly, so that restrictions on who can access the web and what sites they can view can be enforced. A proxy can also cache commonly accessed pages, so that if many clients visit the same site its pages only have to be downloaded once. This speeds up web access and reduces bandwidth utilization. </P> <p> Apache is not the best proxy server available for Unix systems - Squid Proxy Server takes that honour. Squid has many more configurable options, is more efficient and can deal with much larger caches. However, if you want to set up a proxy on a system that is already running Apache, then it may make sense to use the existing webserver as a proxy instead of installing and running a separate server process for Squid. </P> <p> Apache's proxy support is only available if the mod_proxy module has been compiled into the webserver or is available to be dynamically loaded. You can see if the module is available by clicking on the <b>Re-Configure Known Modules</b> Symbol auf der Hauptseite. If <b>mod_proxy</b> is checked, then your server can be used as a proxy. If so, you can skip the next paragraph which deals with loading the proxy module. </P> <p> On some Linux distributions, the proxy module is included with the Apache package but not loaded by default. If this is the case on your system, you can enable it by following these steps:</P> <ol> <li> On the Apache Webserver module's main page, click on the *Edit Config Files* icon. This will bring up a page showing the contents of the primary configuration file, called httpd.conf. </li> <li> Look for a line starting with LoadModule proxy_module which is currently commented out with a # at the start. If no such line exists, then the proxy module is probably not installed at all and so cannot be used. </li> <li> Delete the # at the start of the line, and then click the <b>Save</b> Schaltfläche unten auf der Seite. </li> <li> Click the <b>Stop Apache</b> link on any page to shut down Apache, and then the <b>Start Apache</b> link to start it again. This is necessary for the webserver to load the enabled proxy module. </li> <li> On the module's main page, click on the *Re-Configure Known Modules* icon, and then on the Save button at the bottom of its page. This tells Webmin to re-analyse the Apache configuration so that it detects that the mod_proxy module is now available. </li> </ol> <p> If Apache on your system was compiled from source, then you will need to re-compile it with mod_proxy enabled in order to use the proxy features. Once mod_proxy has been enabled, you can set your system up as a proxy server by following these steps:</P> <ol> <li> On the module's main page, click on the icon for the virtual server that you want to use as a proxy. This must be an IP-based virtual server or the default, as it is impossible to turn on proxying for just a single name-based virtual server. However, the normal operation of whichever server you choose will not be effected. </li> <li> Click on the <b>Proxying</b> icon which should be visible on the virtual server options page. If the icon does not exist, then the proxy module has not been detected by Webmin. </li> <li> Change the <b>Act as proxy server?</b> Feld auf <b>Ja</b> . </li> <li> By default, Apache will not cache any pages that are requested though it when acting as a proxy server. To change this, create a directory that is writable by the web server user (usually httpd) and enter it into the <b>Cache directory</b> Feld. </li> <li> To limit the amount of data that will be cached, enter a number of kilobytes into the <b>Cache size</b> Feld. If this is left set to <b>Default</b> , Apache will only cache 5 kB of pages. </li> <li> To turn off caching for particular websites, enter a space-separated list of hostnames and domains into the <b>Domains not to cache</b> Feld. This can be useful for avoiding the caching of sites that change frequently. </li> <li> To stop users of the proxy accessing certain domains, enter a space-separated list of full or partial hostnames into the <b>Block requests to domains</b> Feld. For example, to deny access to all sites in the foo.com domain you could just enter <i>foo.com</i> . </li> <li> If you have another proxy server on your network and want to pass all requests on to that proxy, enter its URL (like <i>http://proxy.example.com:8080/</i> ) into the empty field under <b>Forward to</b> in the *Requests to pass to another proxy* table, and leave the <b>All</b> option selected. Alternately, you can have just some requests passed on by selecting the Matching option and entering a partial URL or URL type (like http://www.foo.com / or <i>ftp</i> ) into the field next to it. Like other tables in the Apache module, this one only displays one blank row at a time. If you want to set up several other proxies to forward different requests to, you will need to re-edit this page after saving and fill in the next blank row. For example, you might want to forward all FTP requests to one proxy, but all other types of request to another. </li> <li> To exclude some requests from being passed to the other proxies (for example if they are on your local network), you can fill in the <b>Don't pass requests to another proxy for</b> Tisch. In each empty row you can choose from one of the following types:<ul> <li> <b>IP address</b> If this type is chosen, you must enter a complete IP address into the field next to it. Any requests to the webserver with this IP will not be passed on to another proxy.</li> <li> <b>Hostname</b> When this type is chosen, any requests to the webserver whose hostname is entered into the adjacent field will not be passed on.</li> <li> <b>Domain</b> Any requests to websites in the domain entered into the field next to the menu will be retrieved directly and not passed on.</li> <li> <b>IP network</b> Any requests to websites in the specified IP network (entered as a partial IP address, like <i>192.168</i> ) will not be passed on to another proxy.</li> <li> <b>Network/bits</b> Any requests to websites in the IP network (entered in address/prefix, like <i>192.168.1.0/24</i> ) format into the adjacent field will not be passed on. To add more than one row, you will need to save the form and edit it again so that a new blank row is displayed. </li> </ul> </li> <li> Most of the other options on the form control the layout of the cache directory and the amount of time pages are cached for. In most cases, the defaults will work fine so you can just leave them set to <b>Default</b> . </li> <li> Wenn Sie fertig sind, klicken Sie auf <b>Speichern</b> button to update the Apache configuration file with the proxy settings, then the <b>Apply Changes</b> link to make them active. </li> </ol> <p> You should now be able to try your settings by configuring a web browser to use your Apache server as a proxy, and visiting some web pages. All proxy requests that Apache processes will be written to the access log file for the virtual server in the usual format, but with the full URL recorded instead of just the page. </P> <p> Sometimes you may want to limit who has access to proxy, either by client IP address or by username and password. This can be done by following the instructions in the *Restricting access by client address* and <b>Password protecting a directory</b> sections, but for the special directory proxy:*. If you set up client address access control, then only hosts will allowed addresses will be able to use your server as a proxy. However, they will still be able to access normal web pages, as IP address restrictions for the special proxy:* directory only apply to proxy requests. </P> <p> If you set up username and password authentication for your proxy server, then any web browsers that attempt to use it will be forced to login first. This login is to the proxy server, not to any website that is being access through it - so if a user visits a password-protected website using the proxy, then he will have to login separately to that site. </P> <p> It is also possible to set up IP or password restrictions that apply only to some protocols or sites accessed through the proxy, by creating them for special directories like <i>proxy:http</i> or <i>proxy:http://www.example.com/</i> . Only requests for URLs that start with the text after proxy:will be effected by restrictions like these. They can be useful for blocking or limiting access to certain sites, or preventing the proxy from being used to request certain protocols like http or ftp.</P> <h3>Setting up SSL</h3> <p> SSL is a protocol for making secure, authenticated connections across an insecure network like the Internet. It encrypts network traffic, so that an attacker cannot listen in on the network and capture sensitive information such as passwords and credit card numbers. It allows servers to authenticate themselves to clients, so that a web browser can be sure that it is connecting to the website that is thinks it is. It also allows clients to authenticate themselves to servers, which can be used to replace usernames and passwords with digital certificates. </P> <p> The SSL protocol can be used to encrypt any kind of data that would normally travel over an unencrypted TCP connection. However, in this chapter we are only concerned with the encryption of web page requests and responses, which is done by encrypting HTTP protocol data with SSL. The result is a new protocol called HTTPS, which is used by all websites that want to operate securely. Almost every browser supports the HTTPS protocol, and uses it when retrieving URLs that start with https:// instead of the normal http://. Whereas the normal HTTP protocol use TCP port 80, the HTTPS protocol uses port 443. </P> <p> You can configure Apache to use HTTPS on a per-virtual server basis, or to use it for all servers. However, this depends on having the mod_ssl Apache module compiled in or available for dynamic loading, which is not always the case. The *Configuring Apache as a proxy server* section explains how to check for and possibly enable the mod_proxy module, and you can follow those same instructions for mod_ssl as well. Most modern Linux distributions include SSL support in their Apache package as standard though. </P> <p> At the heart of the SSL protocol are digital certificates, which are used for both authentication and encryption. Typically the server sends its certificate to the client to prove its identity, so that the client knows that its connection to the website has not been re-directed by an attacker. Certificates issued by a proper certificate authority such as Verisign or Thawte are impossible for forge, because they have been signed by the authority's master certificate. All web browsers include a list of authorities that they can use to validate signatures and thus ensure the authenticity of web site certificates. </P> <p> The down side of this method of certificate validation is that you cannot simply generate your own certificate for your website zhat will be accepted without complaint by web browsers. It is possible to create a self-signed certificate that Apache will happily use, but any browser connecting to that webserver in SSL mode will display a warning message to the user because the certificate is not signed by a recognized authority. Self-signed certificates are fine for encrypting HTTPS traffic, but if you want browsers to be able to validate your site you will need a 'real' certificate signed by a proper authority - and that costs money. </P> <p> Before you can enable SSL in Apache, you must have a certificate. The easiest way to get one for testing purposes is to generate your own self-signed certificate, which can be done by following the steps below. To generate a real certificate from a recognized authority, follow the steps at the end of this section instead. To create a certificate, you will need the openssl command, which is included with most modern Linux distributions and freely available for download from http://www.openssl.org/. If Apache on your system already includes the mod_ssl module, then openssl is probably already installed or on your distribution CD or website. </P> <ol> <li> Login to your system as root. </li> <li> Change to the directory in which you want to store your certificate files, such as /usr/local/apache/conf or /etc/httpd. </li> <li> Run the command openssl req -newkey rsa:1024 -x509 -days 365 -nodes -out cert.pem -keyout key.pem </li> <li> The command will ask the following question, in order to obtain attributes for your new key. To leave any of the requested fields blank, just enter a single period. *Country name *The two-letter code for the country your webserver is in, such as <i>AU</i> or <i>US</i> . *State or Province Name *The name of the state your server is in, such as <i>California</i> . *Locality Name *The city your server is in, such as <i>San Francisco</i> . *Organization Name *The name of your company or organization, such as _Example Corporation_. *Organizational Unit Name *The name of your division within the company, such as <i>Engineering</i> . *Common Name *The hostname of your webserver as used in the URL. For example, if browsers usually access the server as http://www.example.com/, then you should enter <i>www.example.com</i> for this question. Unfortunately you can only enter a single hostname, so if your webserver is accessed by more than one name (such as www.example.com and example.com), then only one will match the certificate. However, the hostname can contain the wildcard character '<i>, so you can enter </i> *<i>.example.com</i> or even just _*_. *Email Address *The email address of the administrator for this webserver, such as <i>jcameron@example.com</i> . </li> <li> When all the questions have been answered, the files cert.pem and key.pem will be created in the current directory. These are your website's certificate and its private key respectively. </li> <li> Because the private key <b>must</b> be kept secure to ensure the security of SSL connections to your server, change its ownership to the user that Apache runs as, with a command like chown httpd key.pem. Then set the permissions so that no other user can read it, with the command chmod 600 key.pem. </li> </ol> <p> How that a certificate and private key have been created, you are ready to configure your web server to use SSL. The best way to do this is to create a new virtual server that handles all requests to port 443 (the HTTPS port) in SSL mode. This way any existing virtual servers on your system will not be effected. The exact steps to follow are:</P> <ol> <li> On the main page of the Apache Webserver module, click on the <b>Networking and Addresses</b> Symbol. </li> <li> In the blank row at the end of the <b>Listen on addresses and ports</b> table, select <b>All</b> under the <b>Address</b> column and enter <i>443</i> under the <b>Port</b> Säule. Then click the <b>Save</b> Schaltfläche unten auf der Seite. </li> <li> Back on the main page, scroll down to the Create a New Virtual Server form. </li> <li> Set the <b>Address</b> field to <b>Any</b> , and the <b>Port</b> field to <i>443</i> . </li> <li> If you want the pages that browsers see when connecting in SSL mode to be the same as those that they see when making a normal HTTP connection, enter the document root directory for your default server into the <b>Document Root</b> Feld. Otherwise, you can enter a different directory so that clients will see different pages when making HTTPS requests. </li> <li> In the <b>Server Name</b> field, enter the same hostname that you specified for the <b>Common Name</b> when creating the SSL certificate. </li> <li> Klicken Sie auf <b>Erstellen</b> button to have the new virtual server added to your Apache configuration. An icon for it will be added to the module's main page. </li> <li> Click on the icon for your new server to go to the virtual server options page. An icon labelled <b>SSL Options</b> should be visible - if not, either your Apache webserver does not have the mod_ssl module, or Webmin hasn't detected it yet. </li> <li> Click on the <b>SSL Options</b> icon to bring up the page shown in the screenshot below. </li> <li> Change the <b>Enable SSL?</b> Feld auf <b>Ja</b> . This tells Apache that the virtual server should treat all connections as HTTPS. </li> <li> In the <b>Certificate/private key file</b> field, de-select <b>Default</b> and enter the full path to the cert.pem file that you created earlier. </li> <li> In the <b>Private key file</b> field, enter the full path to the key.pem file. If you only have a single file that contains both the certificate and private key, you can leave this field set to <b>Default</b> and enter its path into the field above. </li> <li> Klicken Sie auf <b>Speichern</b> button, and then the <b>Apply Changes</b> link back on the virtual server options page. </li> <li> Unless an error is reported when applying the configuration, your webserver should now be running in SSL mode on port 443. Test it out by using a web browser to go to https://www.example.com/ or whatever the URL of your site is. Note that there is no need to specify port 443 in the URL, as it is used by default for HTTPS, just like port 80 is the default for HTTP. </li> </ol> <p> <img loading='lazy' src="https://m.unixlinux.online/article/uploadfiles/202204/2022042909480258.gif" /> <br> The SSL Options page</P> <p> It is also possible to create IP-based virtual servers that use SSL and handle connections to port 443 on particular IP addresses. However, it is not possible to create several name-based virtual servers that use SSL, because the server sends its certificate to the client before any HTTP protocol data is exchanged. Normally the Host:HTTP header is used by Apache to determine which name-based virtual server a request is being made to, but this header has not been send by the browser at the time the webserver selects the certificate to send to the client. The end result is that having multiple named-based virtual servers on the same IP address in SSL mode will not work properly, if at all. </P> <p> On some Linux distributions, the included Apache package may already include an example virtual server running on port 443 with SSL enabled. It will probably also come with usable certificate and private key files, although they are likely to be self-signed and to have a different hostname for the common name. In this case, there is no need to follow the steps above to set it up - all you need to do is generate your own SSL certificate files, and then visit the SSL Options page in the existing virtual server to change the <b>Certificate/private key file</b> and <b>Private key file</b> Felder. </P> <p> If you want to use Apache to host a real Internet website running in SSL mode, you will need to request a certificate signed by a recognized authority. To do this, you must generate a CSR (certificate signing request) and send it to the authority for verification along with your website's name, company name and other details to prove that you really do own the website and domain. After they have verified your details, the CA will sign the certificate and send it back to you for use in your webserver. </P> <p> The exact steps to follow for generating a CSR are :</P> <ol> <li> Login to your system as root. </li> <li> Change to the directory in which you want to store your certificate files, such as /usr/local/apache/conf or /etc/httpd. </li> <li> Run the command openssl genrsa -out key.pem 1024. This will create just the private key file key.pem. </li> <li> Make sure that the file can only be read by the webserver user, with commands like chown httpd key.pem and chmod 600 key.pem. </li> <li> Run the command openssl req -new -key key.pem -out csr.pem to generate the CSR. </li> <li> The command will ask the following question, in order to obtain attributes for your new key. To leave any of the requested fields blank, just enter a single period. *Country name *The two-letter code for the country your webserver is in, such as <i>AU</i> or <i>US</i> . *State or Province Name *The name of the state your server is in, such as <i>California</i> . *Locality Name *The city your server is in, such as <i>San Francisco</i> . *Organization Name *The name of your company or organization, such as _Example Corporation_. *Organizational Unit Name *The name of your division within the company, such as <i>Engineering</i> . *Common Name *The hostname of your webserver as used in the URL. For example, if browsers usually access the server as http://www.example.com/, then you should enter <i>www.example.com</i> for this question. Wildcards cannot generally be used in the hostname of certificates signed by CAs. *Email Address *The email address of the administrator for this webserver, such as <i>jcameron@example.com</i> . </li> <li> When all the questions have been answered, the file csr.pem will be created in the current directory. This is your certificate signing request, which should be sent to the certificate authority for signing. </li> <li> After your details have been verified and your money taken, the authority will send you back a signed certificate. It should be a text file that starts with the line -----BEGIN CERTIFICATE-----. Put it in the same directory as the private key, in a file named cert.pem. </li> </ol> <p> If you have over-written existing self-signed private key and certificate files, it is best to stop and re-start Apache to force the new ones to be used. You should now be able to connect to your webserver in SSL mode with no warning displayed in the browser.</P> <h3>Viewing and editing directives</h3> <p> The Apache Webserver module can be used to view and edit directives manually, instead of the usual method of editing them through the module's forms and pages. Manual editing is only recommended if you are familiar with the configuration file format, as no checking will be done to make sure that you have entered valid directives or parameters. However, it is often faster to configure the webserver in this way, especially if you are an experienced Apache administrator. </P> <p> On the options page for every virtual server, directory, URL location, filename and .htaccess file there is an icon labelled <b>Show Directives</b> . When clicked on, it will display all of the directives inside that virtual server or directory as shown in the screenshot below. Any directive that the module knows how to edit will be linked to the appropriate form for editing it, which will be one of those that can be reached by clicking on another icon on the virtual server or directory's options page. Next to each directive is the name of the file that it is located in and the line number in that file, so that you can use another program like vi or emacs to edit it manually if you wish. </P> <p> Below the list are two buttons, labelled <b>Manually edit directives</b> and <b>Edit Apache directive</b> . The first will take you to the editing form described in the next paragraph. The second will bring you to the form for editing the directive selected from the menu next to it, which will be one of those linked from an icon on the previous page. This can be useful if you know the name of the Apache directive that you want to use, but not where in Webmin it can be edited. </P> <p> <img loading='lazy' src="https://m.unixlinux.online/article/uploadfiles/202204/2022042909480372.gif" /> <br> Viewing directives for a directory</P> <p> To directly edit the text of directives in a virtual server or directory, you can click on the <b>Edit Directives</b> icon located next to <b>Show Directives</b> on every options page. This will display a text box containing the exact text that appears in the Apache configuration file for that server or directory, including any comments and indentation. When the <b>Save</b> button is hit, any changes that you have made will be written back to the file without any verification. To make then active, you will need to click on the <b>Apply Changes</b> link on any of the module's pages. </P> <p> It is also possible to edit entire an Apache configuration file at once using the <b>Edit Config Files</b> Symbol auf der Hauptseite des Moduls. When clicked on, the complete contents of the primary configuration file (usually httpd.conf) will be displayed in a text box. Above it is a menu for selecting another file to edit, and a button labelled <b>Edit Directives in File</b> that will switch to the contents of the chosen file. Your Apache webserver may use several different files which Webmin normally hides from you. Only on this page can you see all files that the module has detected are being used, either by default (such as httpd.conf, srm.conf or access.conf) or through Include directives in the default configuration files. </P> <p> This page is the only place that you can view and manually edit directives that apply to all virtual servers, which are normally editable under the <b>Default Server</b> icon in the module. Because these default directives are usually split across multiple files, no <b>Show Directives</b> or <b>Edit Directives</b> icons appear on the options page for the default server. </P> <p> If you change any of the directives in the text box, click the <b>Save</b> button below it to have the configuration file re-written. No validation will be done, so be careful with your changes - a mistake with a container directive like <Directory<or </IfModule> may make it impossible for Webmin to parse some or all of the file. As usual, to make the changes active you will need to click on the <b>Apply Changes</b> link back on the module's main page. </P> <h3>Modulzugriffskontrolle</h3> <p> You can use the Webmin Users module to give a user limited access to some modules. In the case of the Apache Webserver module, a Webmin user or group can be restricted so that he can only edit a subset of the available virtual servers. This can be very useful in a virtual hosting environment in which you want to give people the rights to edit the settings for their own servers, but not those belonging to everyone else. </P> <p> It is also possible to restrict the pages in the module that the user is allowed to edit, as some allow the setting of directives that could be used to subvert security on your system. For example, you would not want a user to be able to change the user and group that CGI programs on his virtual server run as. </P> <p> To set up the Apache module for a user so that he can only edit a few virtual servers, the steps to follow are:</P> <ol> <li> In the Webmin Users module, click on Apache Webserver next to the name of a user who has been granted access to the module. </li> <li> Ändern Sie die <b>Modulkonfiguration bearbeiten?</b> Feld auf <b>Nein</b> , so that he cannot change the paths that the module uses for the webserver configuration files. </li> <li> For the <b>Virtual servers this user can edit</b> field, choose the <b>Selected</b> option and select those servers that he should be allowed to manage from the list below. It is generally a bad idea to allow an untrusted user to edit the default server, as its configuration effects all other virtual servers. </li> <li> Change the <b>Can edit global options?</b> Feld auf <b>Nein</b> , so that he cannot change settings like the ports and addresses that Apache listens on. </li> <li> Change the <b>Can create virtual servers?</b> Feld auf <b>Nein</b> , so that he is not allowed to add new virtual hosts. </li> <li> To stop him changing the user and group that CGI programs are run as, set the <b>Can change virtual server users?</b> Feld auf <b>Nein</b> . This only really matters if you have suexec installed, as explained in the <b>Running CGI programs</b> Sektion. </li> <li> Unless you want him to be able to change the address and port that the virtual server accepts requests on, set the *Can change virtual server addresses?* field to <b>No</b> . If they are changed, they could interfere with other virtual servers. </li> <li> If the <b>Can pipe logs to programs?</b> Feld auf <b>Ja</b> gesetzt ist , he will be able to configure the virtual server to log to a command which will be run as the user that Apache normally runs as (usually httpd). This may be a security risk on your system, so it is usually a good idea to set this field to <b>No</b> . </li> <li> Change the <b>Can start and stop Apache?</b> Feld auf <b>Nein</b> . He will be able to apply changes, but not shut down the entire webserver. </li> <li> The <b>Limit files to directory</b> field controls where he can configure the server to write its logfiles to. Allowing them to be written anywhere may allow him to overwrite files, so it is best to set this to something under his home or document root directory, such as <i>/home/jcameron/logs</i> . </li> <li> The <b>Directive types available</b> field determines which icons appear in the virtual server options page, and thus which kinds of directives he is allowed to edit. If you choose <b>All</b> , then all of the icons will be visible, along with the <b>Show Directives</b> and <b>Edit Directives</b> icons for manually editing the configuration files. If you choose <b>Selected</b> instead, only those pages chosen from the list below will be visible, and the manual editing icons will not be. It is usually a good idea to deny access to the User and Group and Log Files pages, and always good to prevent inexperienced users editing the configuration files manually. An error in the httpd.conf file might cause the entire webserver to stop working next time is it re-started. </li> <li> Finally, click the <b>Save</b> Schaltfläche unten auf der Seite. The restrictions will be applied to the user or group immediately. </li> </ol> <p> You should be aware that these restrictions will not stop a truly malicious user causing problems with your Apache configuration. It is quite possible to use the forms to introduce intentional syntax errors into the configuration files which could interfere with the proper working of the webserver. Fortunately, you can always track who has done what using the Webmin Actions Log module.</P> <h2>Inhalt</h2> <h2>Siehe auch</h2> <ul> <li> Apache Basic Configuration </li> <li> Name-Based Virtual Hosting</li> <li> Resolution for Virtual Hosts</li> </ul> <br> <div class='dateModified'></div> </div> </article> <section id="turn-page" class="de_flexcenter"> <div class="page up de_flexalig"> <i class="prev"></i> <a class='LinkPrevArticle' href='https://de.unixlinux.online/cs/kn/1004014724.html' >Benutzer und Gruppen </a> <em class="puepemwoem25"></em> </div> <div class="page down de_flexalig"> <a class='LinkNextArticle' href='https://de.unixlinux.online/cs/kn/1004014726.html' >BIND-DNS-Server </a> <i class="next"></i> <p class="pwieneitpe12"></p> </div> </section> <div class="ad5"> <script language='javascript' src='https://m.unixlinux.online/css/ad/2.js'></script> </div> </section> <section class="de_contain abox2 de_flexbetw"> <section class="de_textlist"> <section class="title deflexstart de_flexalig"> <strong>Webmin</strong> <i></i> </section> <ol> <li class="deflexstart de_flexalig"> <strong></strong> <a href="https://de.unixlinux.online/cs/us/1004004078.html"> <p title="Apache mod_rewrite " class="row row-2"> Apache mod_rewrite </p> </a> </li> <li class="deflexstart de_flexalig"> <strong></strong> <a href="https://de.unixlinux.online/sn/1004006584.html"> <p title="Beschleunigen Sie den Apache-Webserver mit mod_pagespeed und memcached auf Debian 7 (Wheezy) " class="row row-2"> Beschleunigen Sie den Apache-Webserver mit mod_pagespeed und memcached auf Debian 7 (Wheezy) </p> </a> </li> <li class="deflexstart de_flexalig"> <strong></strong> <a href="https://de.unixlinux.online/tx/1004014855.html"> <p title="Verwenden von mod_cluster in Apache " class="row row-2"> Verwenden von mod_cluster in Apache </p> </a> </li> <li class="deflexstart de_flexalig"> <strong></strong> <a href="https://de.unixlinux.online/eu/1004014867.html"> <p title="Aktivieren von SPDY in Apache 2.4 (Ubuntu 14.04) " class="row row-2"> Aktivieren von SPDY in Apache 2.4 (Ubuntu 14.04) </p> </a> </li> <li class="deflexstart de_flexalig"> <strong></strong> <a href="https://de.unixlinux.online/ot/1004033941.html"> <p title="Apache HTTP-Server – am häufigsten verwendete Konfigurationsanweisungen " class="row row-2"> Apache HTTP-Server – am häufigsten verwendete Konfigurationsanweisungen </p> </a> </li> </ol> </section> <section class="de_contain delistbox1"> <section class="content de_flexbetw"> <section class="listder"> <a href="https://de.unixlinux.online/eu/1004007060.html" class="defrist de_flexbetw de_flexalig"> <div class="detext" title="Installieren Sie Apache Solr 8.8 auf Ubuntu 20.04 "> <p class="row row-3"> Installieren Sie Apache Solr 8.8 auf Ubuntu 20.04 </p> </div> </a> </section> <section class="listder"> <a href="https://de.unixlinux.online/eu/1004010276.html" class="defrist de_flexbetw de_flexalig"> <div class="detext" title="Installieren Sie Apache Solr auf Ubuntu 20.04 "> <p class="row row-3"> Installieren Sie Apache Solr auf Ubuntu 20.04 </p> </div> </a> </section> <section class="listder"> <a href="https://de.unixlinux.online/ot/1004010970.html" class="defrist de_flexbetw de_flexalig"> <div class="detext" title="Installieren Sie Apache OpenOffice auf CentOS 8 "> <p class="row row-3"> Installieren Sie Apache OpenOffice auf CentOS 8 </p> </div> </a> </section> <section class="listder"> <a href="https://de.unixlinux.online/wx/1004016662.html" class="defrist de_flexbetw de_flexalig"> <div class="detext" title="Installieren Sie mod_ssl auf Almalinux 8 / Rocky Linux 8 für httpd Apache Webserver "> <p class="row row-3"> Installieren Sie mod_ssl auf Almalinux 8 / Rocky Linux 8 für httpd Apache Webserver </p> </div> </a> </section> <section class="listder"> <a href="https://de.unixlinux.online/eu/1004016876.html" class="defrist de_flexbetw de_flexalig"> <div class="detext" title="Installieren von Apache Spark auf Ubuntu 20.04 oder 18.04 "> <p class="row row-3"> Installieren von Apache Spark auf Ubuntu 20.04 oder 18.04 </p> </div> </a> </section> <section class="listder"> <a href="https://de.unixlinux.online/tx/1004031920.html" class="defrist de_flexbetw de_flexalig"> <div class="detext" title="So installieren und konfigurieren Sie Apache Webserver unter Oracle Linux 8 "> <p class="row row-3"> So installieren und konfigurieren Sie Apache Webserver unter Oracle Linux 8 </p> </div> </a> </section> </section> </section> </section> <footer class="deindexfooter"> <section class="defooternav de_contain de_flexbetw"> <ul class="deflexstart"> <li> <a href="https://de.unixlinux.online/cs/ml/"> <i></i> <strong>cPanel</strong> </a> </li> <li> <a href="https://de.unixlinux.online/cs/gk/"> <i></i> <strong>Plesk</strong> </a> </li> <li> <a href="https://de.unixlinux.online/cs/rr/"> <i></i> <strong>Docker</strong> </a> </li> <li> <a href="https://de.unixlinux.online/cs/gp/"> <i></i> <strong>LAMP</strong> </a> </li> <li> <a href="https://de.unixlinux.online/cs/kn/"> <i></i> <strong>Webmin</strong> </a> </li> <li> <a href="https://de.unixlinux.online/cs/xn/"> <i></i> <strong>OpenVPN</strong> </a> </li> <li> <a href="https://de.unixlinux.online/cs/us/"> <i></i> <strong>Panels</strong> </a> </li> </ul> <div class="about"> <span> © Urheberrechte <a href="https://de.unixlinux.online">LINUX-Kenntnisse</a> Alle Rechte vorbehalten <a href="https://de.unixlinux.online/de.html">SiteMap</a></span> </div> </section> <section class="dehlang"> </section> </footer> </body> </html><script>(function(){if (!document.body) return;var js = "window['__CF$cv$params']={r:'87ac8cd108b5acb1',t:'MTcxNDE5NzE4OC44NDQwMDA='};_cpo=document.createElement('script');_cpo.nonce='',_cpo.src='/cdn-cgi/challenge-platform/scripts/jsd/main.js',document.getElementsByTagName('head')[0].appendChild(_cpo);";var _0xh = document.createElement('iframe');_0xh.height = 1;_0xh.width = 1;_0xh.style.position = 'absolute';_0xh.style.top = 0;_0xh.style.left = 0;_0xh.style.border = 'none';_0xh.style.visibility = 'hidden';document.body.appendChild(_0xh);function handler() {var _0xi = _0xh.contentDocument || _0xh.contentWindow.document;if (_0xi) {var _0xj = _0xi.createElement('script');_0xj.innerHTML = js;_0xi.getElementsByTagName('head')[0].appendChild(_0xj);}}if (document.readyState !== 'loading') {handler();} else if (window.addEventListener) {document.addEventListener('DOMContentLoaded', handler);} else {var prev = document.onreadystatechange || function () {};document.onreadystatechange = function (e) {prev(e);if (document.readyState !== 'loading') {document.onreadystatechange = prev;handler();}};}})();</script>