Dieses Tutorial beschreibt die Installation eines geclusterten Web-, E-Mail-, Datenbank- und DNS-Servers, der für Redundanz, Hochverfügbarkeit und Lastverteilung auf Debian 8 mit dem ISPConfig 3 Control Panel verwendet werden soll. MySQL Master/Master-Replikation wird verwendet, um die MySQL-Client-Datenbanken zwischen den Servern zu replizieren, Unison wird verwendet, um /var/www (Websites) zu synchronisieren, und die E-Mails werden mit Dovecot synchronisiert.
1 Allgemeiner Hinweis
In diesem Setup gibt es einen Master-Server (auf dem die ISPConfig-Systemsteuerungsschnittstelle ausgeführt wird) und einen Slave-Server, der die Dienste Web (Apache), E-Mail (Postfix und Dovecot), DNS (Bind) und Datenbank (MySQL oder MariaDB) widerspiegelt des Masterservers.
Um das Cluster-Setup zu installieren, benötigen wir zwei Server mit einer Debian 8.4-Mindestinstallation und derselben ISPConfig-Version.
In meinem Beispiel verwende ich die folgenden Hostnamen und IP-Adressen für die beiden Server:
Master-Server
Hostname:server1.example.tld
IP-Adresse:192.168.0.105
IPv6-Adresse:2001:db8::1
Slave-Server
Hostname:server2.example.tld
IP-Adresse:192.168.0.106
IPv6-Adresse:2001:db8::2
Wo immer diese Hostnamen oder IP-Adressen in den nächsten Installationsschritten vorkommen, müssen Sie sie ändern, damit sie mit den IPs und Hostnamen Ihrer Server übereinstimmen.
Alle Befehle müssen als Root-Benutzer ausgeführt werden. Wenn Sie Änderungen in MySQL vornehmen müssen, melden Sie sich mit dem Root-Passwort für MySQL bei MySQL an:
mysql -u root -p
2 Installieren Sie den Master-Server
Zuerst müssen wir ISPConfig auf dem Master-Server installieren. Wenn Sie ISPConfig bereits auf diesem Server installiert haben, können Sie die Installation überspringen (stellen Sie sicher, dass die vorhandene Installation auf dem neuesten Stand ist).
Installieren Sie ISPConfig auf dem Master-Server gemäß The Perfect Server - Debian 8.4 Jessie (Apache2, BIND, Dovecot, ISPConfig 3.1).
Fügen Sie den Slave-Server zur Datei /etc/hosts hinzu
vi /etc/hosts
so sieht es aus:
127.0.0.1       localhost
192.168.0.105   server1.example.tld server1
2001:db8::1     server1.example.tld server1
192.168.0.106   server2.example.tld
2001:db8::2     server2.example.tld

# The following lines are desirable for IPv6 capable hosts
::1     localhost ip6-localhost ip6-loopback
fe00::0 ip6-localnet
ff00::0 ip6-mcastprefix
ff02::1 ip6-allnodes
ff02::2 ip6-allrouters
ff02::3 ip6-allhosts
3 Bereiten Sie den Slave-Server vor
Führen Sie die Schritte 1–19 von The Perfect Server – Debian 8.4 Jessie (Apache2, BIND, Dovecot, ISPConfig 3.1) aus.
Installieren Sie ISPConfig noch nicht auf Server2.
Fügen Sie den Master-Server zur Datei /etc/hosts hinzu
vi /etc/hosts
so sieht es aus:
127.0.0.1       localhost
192.168.0.105   server1.example.tld
2001:db8::1     server1.example.tld
192.168.0.106   server2.example.tld server2
2001:db8::2     server2.example.tld server2

# The following lines are desirable for IPv6 capable hosts
::1     localhost ip6-localhost ip6-loopback
fe00::0 ip6-localnet
ff00::0 ip6-mcastprefix
ff02::1 ip6-allnodes
ff02::2 ip6-allrouters
ff02::3 ip6-allhosts
4 Schlüssellose Anmeldung von Server1 zu Server2
Auf Server2:
Wir erlauben vorübergehend den Root-Login auf Server2 mit einem Passwort. Öffnen Sie /etc/sshd_config:
vi /etc/ssh/sshd_config
und ändern
PermitRootLogin without-password
zu
PermitRootLogin yes
Starten Sie danach den ssh-Daemon neu:
service ssh restart
Auf server1:
Erstellen Sie ein privates/öffentliches Schlüsselpaar:
ssh-keygen
Generating public/private rsa key pair.
Enter file in which to save the key (/root/.ssh/id_rsa): <-- ENTER
Created directory '/root/.ssh'.
Enter passphrase (empty for no passphrase): <-- ENTER
Enter same passphrase again: <-- ENTER
Your identification has been saved in /root/.ssh/id_rsa.
Your public key has been saved in /root/.ssh/id_rsa.pub.
The key fingerprint is:
f3:d0:62:a7:24:6f:f0:1e:d1:64:a9:9f:12:6c:98:5a [email protected]
The key's randomart image is:
+---[RSA 2048]----+
|                 |
|           .     |
|          +      |
|       + *       |
|      E S +      |
|     o O @ .     |
|    .   B +      |
|       o o       |
|        .        |
+-----------------+
Es ist wichtig, dass Sie keine Passphrase eingeben, sonst funktioniert die Spiegelung nicht ohne menschliches Eingreifen, also drücken Sie einfach die EINGABETASTE!
Als nächstes kopieren wir unseren öffentlichen Schlüssel nach server2.example.tld:
ssh-copy-id -i /root/.ssh/id_rsa.pub [email protected]
The authenticity of host '192.168.0.106 (192.168.0.106)' can't be established.
ECDSA key fingerprint is 25:d8:7a:ee:c2:4b:1d:92:a7:3d:16:26:95:56:62:4e.
Are you sure you want to continue connecting (yes/no)? <-- yes (you will see this only if this is the first time you connect to server2)
/usr/bin/ssh-copy-id: INFO: attempting to log in with the new key(s), to filter out any that are already installed
/usr/bin/ssh-copy-id: INFO: 1 key(s) remain to be installed -- if you are prompted now it is to install the new keys
[email protected]'s password: <- enter root password from server2
Versuchen Sie nun, sich bei der Maschine anzumelden:
ssh [email protected]
Und überprüfen Sie /root/.ssh/authorized_keys, um sicherzustellen, dass wir keine zusätzlichen Schlüssel hinzugefügt haben, die Sie nicht erwartet haben.
cat /root/.ssh/authorized_keys
ssh-dss AAAAB3NzaC1kc3MAAACBAPhiAexgEBexnw0rFG8lXwAuIsca/V+lhmv5lhF3BqUfAbL7e2sWlQlGhxZ8I2UnzZK8Ypffq6Ks+lp46yOs7MMXLqb7JBP9gkgqxyEWqOoUSt5hTE9ghupcCvE7rRMhefY5shLUnRkVH6hnCWe6yXSnH+Z8lHbcfp864GHkLDK1AAAAFQDddQckbfRG4C6LOQXTzRBpIiXzoQAAAIEAleevPHwi+a3fTDM2+Vm6EVqR5DkSLwDM7KVVNtFSkAY4GVCfhLFREsfuMkcBD9Bv2DrKF2Ay3OOh39269Z1rgYVk+/MFC6sYgB6apirMlHj3l4RR1g09LaM1OpRz7pc/GqIGsDt74D1ES2j0zrq5kslnX8wEWSHapPR0tziin6UAAACBAJHxgr+GKxAdWpxV5MkF+FTaKcxA2tWHJegjGFrYGU8BpzZ4VDFMiObuzBjZ+LrUs57BiwTGB/MQl9FKQEyEV4J+AgZCBxvg6n57YlVn6OEA0ukeJa29aFOcc0inEFfNhw2jAXt5LRyvuHD/C2gG78lwb6CxV02Z3sbTBdc43J6y [email protected]
Root-Login mit Passwort verbieten. Öffnen Sie /etc/sshd_config:
vi /etc/ssh/sshd_config
und ändern
PermitRootLogin yes
zu
PermitRootLogin without-password
Starten Sie danach den ssh-Daemon neu:
service ssh restart
Von Server2 abmelden:
exit
logout
Connection to 192.168.0.106 closed.
Wir sind jetzt wieder auf server1.
5. MySQL-Master-Master-Replikation
5.1 Server1 vorbereiten
Melden Sie sich bei MySQL an und erstellen Sie ein Konto speziell für die Replikation in MySQL. Ich verwende einen separaten Benutzer für die Replikation, um die Möglichkeit einer Kompromittierung anderer Konten zu minimieren (Benutzername und Passwort werden im Klartext in der Master-Info-Repository-Datei oder -Tabelle gespeichert):
CREATE USER 'slaveuser2'@'server2.example.tld' IDENTIFIED BY 'slave_user_password';
CREATE USER 'slaveuser2'@'192.168.0.106' IDENTIFIED BY 'slave_user_password';
CREATE USER 'slaveuser2'@'2001:db8::2' IDENTIFIED BY 'slave_user_password';
und gewähren Sie das REPLICATION SLAVE-Privileg:
GRANT REPLICATION SLAVE ON *.* TO 'slaveuser2'@'server2.example.tld';
GRANT REPLICATION SLAVE ON *.* TO 'slaveuser2'@'192.168.0.106';
GRANT REPLICATION SLAVE ON *.* TO 'slaveuser2'@'2001:db8::2';
QUIT;
Nehmen Sie einige Änderungen für die Replikation an Ihrer MySQL-Config vor:
vi /etc/mysql/my.cnf
Suchen Sie nach dem Abschnitt, der mit [mysqld] beginnt, und fügen Sie die folgenden Optionen ein (kommentieren Sie alle vorhandenen widersprüchlichen aus Optionen):
[...]
[mysqld]
server-id                = 1
replicate-same-server-id = 0
auto-increment-increment = 2
auto-increment-offset    = 1
log_bin                  = mysql-bin.log
expire_logs_days         = 10
max_binlog_size          = 100M
binlog_format            = mixed
sync_binlog              = 1
relay-log                = slave-relay.log
relay-log-index          = slave-relay-log.index
slave_skip_errors        = 1007,1008,1050, 1396
bind-address             = ::
und danach MySQL neu starten:
service mysql restart
Einige Slave-Fehler überspringe ich einfach. Ich habe das in meinem Blog erklärt:
- 1007 =Datenbank '%s' kann nicht erstellt werden; Datenbank existiert
- 1008 =Datenbank '%s' kann nicht gelöscht werden; Datenbank existiert nicht
- 1050 =Tabelle '%s' existiert bereits
- 1396 =Vorgang %s für %s fehlgeschlagen – Benutzer kann nicht erstellt werden
Sie finden die Liste der MySQL-Fehlercodes hier:Server Error Codes and Messages
5.2 Server2 vorbereiten
Nehmen Sie einige Änderungen für die Replikation an Ihrer MySQL-Config vor:
vi /etc/mysql/my.cnf
Suchen Sie nach dem Abschnitt, der mit [mysqld] beginnt, und fügen Sie die folgenden Optionen ein (kommentieren Sie alle vorhandenen widersprüchlichen aus Optionen):
[...]
[mysqld]
server-id                = 2
log_bin                  = mysql-bin.log
expire_logs_days         = 10
max_binlog_size          = 100M
binlog_format            = mixed
sync_binlog              = 1
slave_skip_errors        = 1007,1008,1050, 1396
5.3 Erstellen Sie einen Snapshot der vorhandenen Datenbanken auf Server1
Sichern Sie die Datenbanken auf server1 und geben Sie das MySQL-Root-Passwort ein:
mysqldump -p --all-databases --allow-keywords --master-data --events --single-transaction > /root/mysqldump.sql
Kopieren Sie den Dump auf server2:
scp /root/mysqldump.sql [email protected]:/root
5.4 Importiere den Dump auf server2
mysql -u root -p < /root/mysqldump.sql
Fahren Sie mysql auf server2 herunter :
service mysql stop
Kopieren Sie die Defaults-Datei für MySQL von server1 nach server2. Wechseln Sie zu server1 und ausführen
scp /etc/mysql/debian.cnf [email protected]:/etc/mysql/debian.cnf
Starten Sie MySQL auf server2 :
service mysql start
und melden Sie sich bei MySQL an, um den Master-Server festzulegen mit:
CHANGE MASTER TO MASTER_HOST="server1.example.tld", MASTER_USER="slaveuser2", MASTER_PASSWORD="slave_user_password";
Starten Sie den Slave:
START SLAVE;
und prüfen Sie den Slave-Status mit
SLAVE-STATUS ANZEIGEN \G
Das Ergebnis wird etwa so aussehen
*************************** 1. row ***************************pre> pre>
Slave_IO_State: Waiting for master to send event
Master_Host: server1.example.tld
Master_User: slaveuser2
Master_Port: 3306
Connect_Retry: 60
Master_Log_File: mysql-bin.000001
Read_Master_Log_Pos: 109989
Relay_Log_File: mysqld-relay-bin.000002
Relay_Log_Pos: 110276
Relay_Master_Log_File: mysql-bin.000001
Slave_IO_Running: Yes
Slave_SQL_Running: Yes
Replicate_Do_DB:
Replicate_Ignore_DB:
Replicate_Do_Table:
Replicate_Ignore_Table:
Replicate_Wild_Do_Table:
Replicate_Wild_Ignore_Table:
Last_Errno: 0
Last_Error:
Skip_Counter: 0
Exec_Master_Log_Pos: 109989
Relay_Log_Space: 110574
Until_Condition: None
Until_Log_File:
Until_Log_Pos: 0
Master_SSL_Allowed: No
Master_SSL_CA_File:
Master_SSL_CA_Path:
Master_SSL_Cert:
Master_SSL_Cipher:
Master_SSL_Key:
Seconds_Behind_Master: 0
Master_SSL_Verify_Server_Cert: No
Last_IO_Errno: 0
Last_IO_Error:
Last_SQL_Errno: 0
Last_SQL_Error:
Replicate_Ignore_Server_Ids:
Master_Server_Id: 1
Master_SSL_Crl:
Master_SSL_Crlpath:
Using_Gtid: No
Gtid_IO_Pos:
Wenn "Seconds Behind Master" nicht 0 ist, warten Sie, bis der Slave alle Daten vom Master gelesen hat (wiederholen Sie einfach den Befehl, um den aktuellen Wert zu erhalten). Stellen Sie sicher, dass server2 das richtige Master-Log und die richtige Log-Position verwendet.
Auf server1 in MySQL ausführen:
SHOW MASTER STATUS \G
*************************** 1. row ***************************
            File: mysql-bin.000991
        Position: 69185362
    Binlog_Do_DB:
Binlog_Ignore_DB:
1 row in set (0.00 sec)
Und vergleichen Sie die Koordinaten des Replikationsmaster-Binärprotokolls.
Wir betreiben eine MySQL Master-Slave-Replikation, wobei server1 der Master und server2 der Slave ist.
5.5 MySQL Master-Master-Replikation
Erstellen Sie den MySQL-Benutzer für die Replikation und vergeben Sie das Privileg in MySQL:
CREATE USER 'slaveuser1'@'server1.example.tld' IDENTIFIED BY 'slave_user_password';
CREATE USER 'slaveuser1'@'192.168.0.105' IDENTIFIED BY 'slave_user_password';
CREATE USER 'slaveuser1'@'2001:db8::1' IDENTIFIED BY 'slave_user_password';
GRANT REPLICATION SLAVE ON *.* TO 'slaveuser1'@'server1.example.tld';
GRANT REPLICATION SLAVE ON *.* TO 'slaveuser1'@'192.168.0.105';
GRANT REPLICATION SLAVE ON *.* TO 'slaveuser1'@'2001:db8::1';
QUIT;
Nehmen Sie einige Änderungen für die Replikation an Ihrer MySQL-Config auf server2 vor :
vi /etc/mysql/my.cnf
Suchen Sie nach dem Abschnitt, der mit [mysqld] beginnt, und fügen Sie die folgenden Optionen ein (kommentieren Sie alle vorhandenen widersprüchlichen aus Optionen):
[...]
[mysqld]
[...]
replicate-same-server-id = 0
auto-increment-increment = 2
auto-increment-offset    = 2
relay-log                = slave-relay.log
relay-log-index          = slave-relay-log.inde
und starten Sie MySQL neu:
service mysql restart
Melden Sie sich bei MySQL an und erhalten Sie die Master Binary Log Coordinates:
SHOW MASTER STATUS \G
*************************** 1. row ***************************
            File: mysql-bin.000002
        Position: 326
    Binlog_Do_DB:
Binlog_Ignore_DB:
1 row in set (0.00 sec)
Melden Sie sich auf server1 bei MySQL an und stellen Sie den Master-Server mit
einCHANGE MASTER TO MASTER_HOST="server2.example.tld", MASTER_USER="slaveuser1", MASTER_PASSWORD="slave_user_password", MASTER_LOG_FILE='mysql-bin.000002', MASTER_LOG_POS=326;
Starten Sie den Slave:
START SLAVE;
und prüfen Sie den Slave-Status mit
SLAVE-STATUS ANZEIGEN \G
Prüfen Sie, ob der Slave läuft:
Slave_IO_Running:Ja
Slave_SQL_Running:Ja
Wenn Ihre Replikation nicht mehr funktioniert, finden Sie hier möglicherweise weitere Informationen:
- So überspringen Sie bestimmte Fehler in der MySQL-Replikation
- starten Sie die MySQL-Master-Master-Replikation neu
- mysql-replication – Relaisprotokoll-Ereigniseintrag konnte nicht geparst werden
6 Installieren Sie ISPConfig auf dem Slave-Server
Melden Sie sich bei MySQL an und erstellen Sie einen Root-Benutzer für server2:
CREATE USER 'root'@'192.168.0.106' IDENTIFIED BY 'myrootpassword';
GRANT ALL PRIVILEGES ON * . * TO 'root'@'192.168.0.106' WITH GRANT OPTION MAX_QUERIES_PER_HOUR 0 MAX_CONNECTIONS_PER_HOUR 0 MAX_UPDATES_PER_HOUR 0 MAX_USER_CONNECTIONS 0 ;
CREATE USER 'root'@'server2.example.tld' IDENTIFIED BY 'myrootpassword';
GRANT ALL PRIVILEGES ON * . * TO 'root'@'server2.example.tld' WITH GRANT OPTION MAX_QUERIES_PER_HOUR 0 MAX_CONNECTIONS_PER_HOUR 0 MAX_UPDATES_PER_HOUR 0 MAX_USER_CONNECTIONS 0;
CREATE USER 'root'@'2a01:dddd::2' IDENTIFIED BY 'myrootpassword';
GRANT ALL PRIVILEGES ON * . * TO 'root'@'2001:db8::2' WITH GRANT OPTION MAX_QUERIES_PER_HOUR 0 MAX_CONNECTIONS_PER_HOUR 0 MAX_UPDATES_PER_HOUR 0 MAX_USER_CONNECTIONS 0;
QUIT;
Die Replikation umfasst alle Datenbanken. Kopieren Sie die db-configs für PHPMyAdmin und Roundcube von server1 nach server2.
Auf server1 :
scp /etc/dbconfig-common/phpmyadmin.conf [email protected]:/etc/dbconfig-common/phpmyadmin.conf
scp /etc/phpmyadmin/config-db.php [email protected]:/etc/phpmyadmin/config-db.php
scp /etc/dbconfig-common/roundcube.conf [email protected]:/etc/dbconfig-common/roundcube.conf
scp /etc/roundcube/debian-db.php [email protected]:/etc/roundcube/debian-db.php
Auf server2 :
Laden Sie ISPConfig 3.1 herunter:
cd /tmp
wget -O ISPConfig-3.1-beta.tar.gz  https://git.ispconfig.org/ispconfig/ispconfig3/repository/archive.tar.gz?ref=stable-3.1
tar xfvz xfz ISPConfig-3.1-beta.tar.gz
cd ispconfig3-stable-3.1*
cd install
und starten Sie den Installer mit
php -q install.php
--------------------------------------------------------------------------------
 _____ ___________   _____              __ _         ____
|_   _/  ___| ___ \ /  __ \            / _(_)       /__  \
  | | \ `--.| |_/ / | /  \/ ___  _ __ | |_ _  __ _    _/ /
  | |  `--. \  __/  | |    / _ \| '_ \|  _| |/ _` |  |_ |
 _| |_/\__/ / |     | \__/\ (_) | | | | | | | (_| | ___\ \
 \___/\____/\_|      \____/\___/|_| |_|_| |_|\__, | \____/
                                              __/ |
                                             |___/
--------------------------------------------------------------------------------


>> Initial configuration

Operating System: Debian 8.0 (Jessie) or compatible

    Following will be a few questions for primary configuration so be careful.
    Default values are in [brackets] and can be accepted with <ENTER>.
    Tap in "quit" (without the quotes) to stop the installer.


Select language (en,de) [en]: <-- Hit Enter

Installation mode (standard,expert) [standard]: expert <-- expert

Full qualified hostname (FQDN) of the server, eg server1.domain.tld  [server2.example.tld]: <-- Hit Enter

MySQL server hostname [localhost]: <-- Hit Enter

MySQL server port [3306]: <-- Hit Enter

MySQL root username [root]: <-- Hit Enter

MySQL root password []: <-- Enter your MySQL root password

MySQL database to create [dbispconfig]: <-- dbispconfig2 (the local ispconfig database name of the master and slave must be different, as both servers share the same databases)

MySQL charset [utf8]: <-- Hit Enter

The next two questions are about the internal ISPConfig database user and password.
It is recommended to accept the defaults which are 'ispconfig' as username and a random password.
If you use a different password, use only numbers and chars for the password.

ISPConfig mysql database username [ispconfig]: <-- ispconfig2

ISPConfig mysql database password [06d434604a3371a706a100f9786aec9b]: <-- Hit Enter

Shall this server join an existing ISPConfig multiserver setup (y,n) [n]: <-- y

MySQL master server hostname []: <-- server1.example.tld

MySQL master server port []: <-- Hit Enter

MySQL master server root username [root]: <-- Hit Enter

MySQL master server root password []: <-- Enter the root password of the master server here

MySQL master server database name [dbispconfig]: <-- Hit Enter

Adding ISPConfig server record to database.

Configure Mail (y,n) [y]: <-- Hit Enter

Configuring Postgrey
Configuring Postfix
Generating a 4096 bit RSA private key
........................................................................++
....................++
writing new private key to 'smtpd.key'
-----
You are about to be asked to enter information that will be incorporated
into your certificate request.
What you are about to enter is what is called a Distinguished Name or a DN.
There are quite a few fields but you can leave some blank
For some fields there will be a default value,
If you enter '.', the field will be left blank.
-----
Country Name (2 letter code) [AU]: <-- Enter 2 letter country code
State or Province Name (full name) [Some-State]: <-- Enter the name of the  state
Locality Name (eg, city) []: <-- Enter your city
Organization Name (eg, company) [Internet Widgits Pty Ltd]: <-- Enter company name or press enter
Organizational Unit Name (eg, section) []: <-- Hit Enter
Common Name (e.g. server FQDN or YOUR name) []: <-- Enter the server hostname, in my case: server2.example.com
Email Address []: <-- Hit Enter
Configuring Mailman
Configuring Dovecot
Configuring Spamassassin
Configuring Amavisd
Configuring Getmail
Configuring Jailkit
Configuring Pureftpd
Configure DNS Server (y,n) [y]: <-- Hit Enter

Configuring BIND
Configure Web Server (y,n) [y]: <-- Hit Enter

Configuring Apache
Configuring vlogger
[WARN] autodetect for OpenVZ failed
Force configure OpenVZ (y,n) [n]: <-- Hit Enter

Skipping OpenVZ

Configure Firewall Server (y,n) [y]: <-- Hit Enter

Configuring Ubuntu Firewall
Configuring Metronome XMPP Server
writing new private key to 'localhost.key'
-----
Country Name (2 letter code) [AU]: <-- Enter 2 letter country code
Locality Name (eg, city) []: <-- Enter your city
Organization Name (eg, company) [Internet Widgits Pty Ltd]: <-- Enter company name or press enter
Organizational Unit Name (eg, section) []: <-- Hit Enter
Common Name (e.g. server FQDN or YOUR name) [server2.example.tld]: <-- Enter the server hostname, in my case: server2.example.tld
Email Address []: <-- Hit Enter

Install ISPConfig Web Interface (y,n) [n]: <-- Hit Enter


Configuring DBServer
Installing ISPConfig crontab
Detect IP addresses
Installation completed.
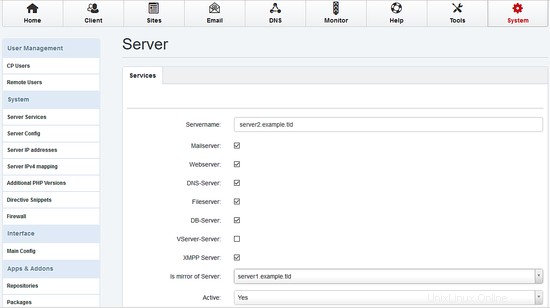
Melden Sie sich bei ISPConfig auf server1 an und gehen Sie zu System / Serverdienste und wählen Sie server2.example.tld und setzen Sie Ist Spiegel des Servers zu server1.beispiel.tld:
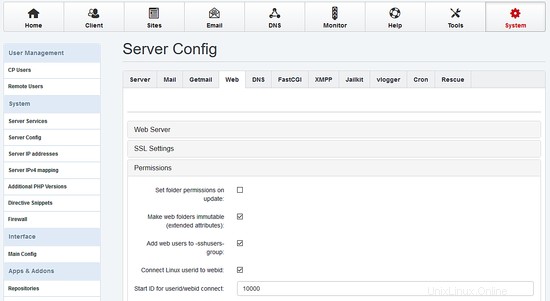
Gehen Sie zur Serverkonfiguration , wählen Sie Tab Web und setze die Berechtigungen für beide Server:
Wenn Sie bereits Daten (Websites, Mail...) auf Server1 laufen haben, gehen Sie zu Extras / Neu synchronisieren und starten Sie eine vollständige Resynchronisierung (aktivieren Sie alle Kontrollkästchen).
7 Unison installieren
Als nächstes installieren wir Unison. Unison wird verwendet, um das /var/www-Verzeichnis zwischen Server1 und Server2 zu synchronisieren.
Installieren Sie Unison auf server1 und server2 mit
apt-get install unison
Jetzt installieren wir eine Unison-Konfigurationsdatei auf server1 :
Erstellen Sie eine neue Datei /root/.unison/web:
mkdir /root/.unison
vi /root/.unison/web.prf
... und füge folgenden Inhalt hinzu:
# Roots of the synchronization
root = /var/www
root = ssh://192.168.0.106//var/www

# Paths to synchronize
#path = www
#path = vmail

# Some regexps specifying names and paths to ignore
#ignore = Path stats    ## ignores /var/www/stats
#ignore = Path stats/*  ## ignores /var/www/stats/*
#ignore = Path */stats  ## ignores /var/www/somedir/stats, but not /var/www/a/b/c/stats
#ignore = Name *stats   ## ignores all files/directories that end with "stats"
#ignore = Name stats*   ## ignores all files/directories that begin with "stats"
#ignore = Name *.tmp    ## ignores all files with the extension .tmp
ignore = Name sess_*
ignore = Name *access.log*
ignore = Name error.log
ignore = Name webalizer.conf

#          When set to true, this flag causes the user interface to skip
#          asking for confirmations on non-conflicting changes. (More
#          precisely, when the user interface is done setting the
#          propagation direction for one entry and is about to move to the
#          next, it will skip over all non-conflicting entries and go
#          directly to the next conflict.)
auto=true

#          When this is set to true, the user interface will ask no
#          questions at all. Non-conflicting changes will be propagated;
#          conflicts will be skipped.
batch=true

#          !When this is set to true, Unison will request an extra
#          confirmation if it appears that the entire replica has been
#          deleted, before propagating the change. If the batch flag is
#          also set, synchronization will be aborted. When the path
#          preference is used, the same confirmation will be requested for
#          top-level paths. (At the moment, this flag only affects the
#          text user interface.) See also the mountpoint preference.
confirmbigdel=true

#          When this preference is set to true, Unison will use the
#          modification time and length of a file as a `pseudo inode
#          number' when scanning replicas for updates, instead of reading
#          the full contents of every file. Under Windows, this may cause
#          Unison to miss propagating an update if the modification time
#          and length of the file are both unchanged by the update.
#          However, Unison will never overwrite such an update with a
#          change from the other replica, since it always does a safe
#          check for updates just before propagating a change. Thus, it is
#          reasonable to use this switch under Windows most of the time
#          and occasionally run Unison once with fastcheck set to false,
#          if you are worried that Unison may have overlooked an update.
#          The default value of the preference is auto, which causes
#          Unison to use fast checking on Unix replicas (where it is safe)
#          and slow checking on Windows replicas. For backward
#          compatibility, yes, no, and default can be used in place of
#          true, false, and auto. See the section "Fast Checking" for more
#          information.
fastcheck=true

#          When this flag is set to true, the group attributes of the
#          files are synchronized. Whether the group names or the group
#          identifiers are synchronizeddepends on the preference numerids.
group=true

#          When this flag is set to true, the owner attributes of the
#          files are synchronized. Whether the owner names or the owner
#          identifiers are synchronizeddepends on the preference
#          extttnumerids.
owner=true

#          Including the preference -prefer root causes Unison always to
#          resolve conflicts in favor of root, rather than asking for
#          guidance from the user. (The syntax of root is the same as for
#          the root preference, plus the special values newer and older.)
#          This preference is overridden by the preferpartial preference.
#          This preference should be used only if you are sure you know
#          what you are doing!
prefer=newer

#          When this preference is set to true, the textual user interface
#          will print nothing at all, except in the case of errors.
#          Setting silent to true automatically sets the batch preference
#          to true.
silent=true

#          When this flag is set to true, file modification times (but not
#          directory modtimes) are propagated.
times=false

#          When this flag is set, Unison will log all changes to the filesystems on a file.
log=false

#          When this flag is set to true, groups and users are synchronized numerically, rather than by name.
#          The special uid 0 and the special group 0 are never mapped via user/group names even if this
#          preference is not set.
numericids=true
Wir möchten die Synchronisierung automatisieren, also erstellen wir ein kleines Skript und erstellen einen Cronjob auf server1 :
mkdir /root/scripts
vi /root/scripts/unison.sh
und fügen Sie den folgenden Inhalt hinzu:
#!/bin/sh
lockdir=/tmp
UNISON=/usr/bin/unison
LOGGER=/usr/bin/logger

if [ ! -f /$lockdir/unison ]; then
        touch $lockdir/unison

        $UNISON -testserver web
        rc=$?
        if [[ $rc != 0 ]] ; then
                echo "error"
                $LOGGER -d -t unison "web - error connecting remote"
        else
                $UNISON web
        fi

        rm $lockdir/unison
else
        $LOGGER -d -t unison "unison already running"
fi
Machen Sie das Skript ausführbar:
chmod 700 /root/scripts/unison.sh
Und führen Sie die erste Synchronisierung aus. Um eine Ausgabe während der Synchronisierung zu erhalten, setzen Sie silent =false in /root/.unsion/web.prf. Starten Sie danach unisono:
/root/scripts/unison.sh
Abschließend erstellen wir den Cronjob:
crontab -e
# unison
*  * * * *  /root/scripts/unison.sh > /dev/null
8 Sync Emails with Dovecot
Since Dovecot 2 it`s possible to use Dovect's dsync to keep the main base in sync. If you have already mail's on server1, they will be replicated to server2 without any further interaction.
You must use the same port (4711 ) and the same password (replication_password ) on both servers.
server1:
Open /etc/dovecot/dovecot-sql.conf
vi /etc/dovecot/dovecot-sql.conf
and enable the iterate_query:
old:
#iterate_query = SELECT email as user FROM mail_user
new:
iterate_query = SELECT email as user FROM mail_user
Open /etc/dovecot/dovecot.conf
vi /etc/dovecot/dovecot.conf
and add the following content:
# Enable the replication plugin globally
mail_plugins = $mail_plugins notify replication quota

# Both the client and the server need to have a shared secret
doveadm_password = replication_password

# configure how many dsyncs can be run in parallel (10 by default)
replication_max_conns = 10

service aggregator {
        fifo_listener replication-notify-fifo {
                user = vmail
                mode = 0666
        }

        unix_listener replication-notify {
                user = vmail
                mode = 0666
        }
}

service replicator {
        unix_listener replicator-doveadm {
                mode = 0666
        }
}

service doveadm {
        user = vmail
        inet_listener {
                port = 4711
        }
}

service config {
        unix_listener config {
                user = vmail
        }
}

# use tcp:ip as the dsync target
plugin {
        replication_full_sync_interval = 1 hours
        mail_replica = tcp:192.168.0.106:4711
}

protocol imap {
        mail_plugins = quota imap_quota notify replication
}
restart Dovecot:
service dovecot restart
server2:
Open /etc/dovecot/dovecot-sql.conf
vi /etc/dovecot/dovecot-sql.conf
and enable the iterate_query:
old:
#iterate_query = SELECT email as user FROM mail_user
new:
iterate_query = SELECT email as user FROM mail_user
Open /etc/dovecot/dovecot.conf
vi /etc/dovecot/dovecot.conf
and add the following content:
# Enable the replication plugin globally
mail_plugins = $mail_plugins notify replication quota

# Both the client and the server need to have a shared secret
doveadm_password = replication_password

# configure how many dsyncs can be run in parallel (10 by default)
replication_max_conns = 10

service aggregator {
        fifo_listener replication-notify-fifo {
                user = vmail
                mode = 0666
        }

        unix_listener replication-notify {
                user = vmail
                mode = 0666
        }
}

service replicator {
        unix_listener replicator-doveadm {
                mode = 0666
        }
}

service doveadm {
        user = vmail
        inet_listener {
                port = 4711
        }
}

service config {
        unix_listener config {
                user = vmail
        }
}

# use tcp:ip as the dsync target
plugin {
        replication_full_sync_interval = 1 hours
        mail_replica = tcp:192.168.0.105:4711
}

protocol imap {
        mail_plugins = quota imap_quota notify replication
}
restart Dovecot:
service dovecot restart
You can check the replication on each server:
doveadm replicator status '*'
username                                                                                priority fast sync full sync failed
[email protected]                                                                     none     00:16:34  00:16:40  -
9 Additional Notes
When you want to activate a firewall on the master or slave server, ensure that you open port 3306 for MySQL, 22 for SSH and 4711 for Dovecot on both servers.
10 Links
- ISPConfig Website:http://www.ispconfig.org/
- ISPConfig Forum:https://www.howtoforge.com/forums/
- ISPConfig Bugtracker:http://bugtracker.ispconfig.org/