Installieren eines Web-, E-Mail- und MySQL-Datenbankclusters auf Debian 6.0 mit ISPConfig 3
Dieses Tutorial beschreibt die Installation eines geclusterten Web-, E-Mail-, Datenbank- und DNS-Servers, der für Redundanz, Hochverfügbarkeit und Lastausgleich auf Debian 6 mit dem ISPConfig 3 Control Panel verwendet werden soll. MySQL Master/Master-Replikation wird verwendet, um die MySQL-Client-Datenbanken zwischen den Servern zu replizieren, und Unison wird verwendet, um die Ordner /var/www (Websites) und /var/vmail (E-Mail-Kontodaten) zu synchronisieren.
1 Einrichten der zwei Basissysteme
In diesem Setup gibt es einen Master-Server (auf dem die ISPConfig-Systemsteuerungsschnittstelle ausgeführt wird) und einen Slave-Server, der die Web- (Apache), E-Mail- (Postfix und Dovecot) und Datenbankdienste (MySQL) des Master-Servers widerspiegelt.
Um das Cluster-Setup zu installieren, benötigen wir zwei Server mit einer Debian 6.0-Mindestinstallation. Die Grundeinstellung wird im folgenden Tutorial in den Schritten 1 - 8 beschrieben:
https://www.howtoforge.com/perfect-server-debian-squeeze-with-bind-and-dovecot-ispconfig-3
Installieren Sie nur die Schritte 1 - 8 des perfekten Server-Tutorials und nicht die anderen Schritte, da sie sich für ein Cluster-Setup unterscheiden!
In meinem Beispiel verwende ich die folgenden Hostnamen und IP-Adressen für die beiden Server:
Master-Server
Hostname:server1.example.tld
IP-Adresse:192.168.0.105
Slave-Server
Hostname:server2.example.tld
IP-Adresse:192.168.0.106
Wo immer diese Hostnamen oder IP-Adressen in den nächsten Installationsschritten vorkommen, müssen Sie sie ändern, damit sie mit den IPs und Hostnamen Ihrer Server übereinstimmen.
2 Installation der beiden Server
Die folgenden Schritte müssen auf dem Master- und auf dem Slave-Server ausgeführt werden. Wenn ein bestimmter Schritt nur für den Master oder Slave ist, dann habe ich einen Hinweis in der Beschreibung in Rot hinzugefügt.
vi /etc/hosts
127.0.0.1       localhost
192.168.0.105   server1.example.tld
192.168.0.106   server2.example.tld

# The following lines are desirable for IPv6 capable hosts
::1     localhost ip6-localhost ip6-loopback
fe00::0 ip6-localnet
ff00::0 ip6-mcastprefix
ff02::1 ip6-allnodes
ff02::2 ip6-allrouters
ff02::3 ip6-allhosts
Legen Sie den Hostnamen des Servers fest:
echo server1.example.tld> /etc/hostname
/etc/init.d/hostname.sh start
Verwenden Sie server1.example.tld auf dem ersten Server und server2.example.tld auf dem zweiten Server.
Bearbeiten Sie die Datei sources.list...
vi /etc/apt/sources.list
... und stellen Sie sicher, dass Ihre /etc/apt/sources.list das squeeze-updates-Repository enthält (dies stellt sicher, dass Sie immer die neuesten Updates für den ClamAV-Virenscanner erhalten - dieses Projekt veröffentlicht sehr oft Releases, und manchmal funktionieren alte Versionen nicht mehr ).
[...]
deb http://ftp.de.debian.org/debian/ squeeze-updates main
[...]
Ausführen
apt-get update
apt-get upgrade
um die neuesten Updates zu installieren (falls vorhanden).
Es ist eine gute Idee, die Systemuhr mit einem NTP (n Netzwerk t ich bin p rotocol)-Server über das Internet. Führen Sie einfach
ausapt-get -y install ntp ntpdate
und Ihre Systemzeit wird immer synchron sein.
Auf Server 1:
Jetzt erstellen wir ein privates/öffentliches Schlüsselpaar auf server1.example.tld:
ssh-keygen -t dsa
example@unixlinux.online:~# ssh-keygen -t dsa
Erzeuge ein öffentliches/privates dsa-Schlüsselpaar.
Geben Sie die Datei ein, in der der Schlüssel gespeichert werden soll (/root/.ssh/id_dsa):<- - ENTER
Verzeichnis '/root/.ssh' erstellt.
Passphrase eingeben (leer für keine Passphrase):<-- ENTER
Geben Sie dieselbe Passphrase erneut ein:<-- ENTER
Ihre Identifikation wurde in /root/.ssh/id_dsa gespeichert.
Ihr öffentlicher Schlüssel wurde in /root/.ssh/id_dsa.pub gespeichert.
Der Fingerabdruck des Schlüssels lautet:
1b:95:bc:4a:f4:9f:d8:ea:24:31:0f:c9:72:d5:a7:80 example@unixlinux.online
Das randomart-Bild des Schlüssels ist:
+- -[ DSA 1024]----+
| |
| o o |
| E * . . |
| o =o o |
| . So . |
| + O + . |
| + + + |
| Ö . |
| .o |
+----------------+
example@unixlinux.online:~#
Es ist wichtig, dass Sie keine Passphrase eingeben, sonst funktioniert die Spiegelung nicht ohne menschliches Eingreifen, also drücken Sie einfach die EINGABETASTE!
Als nächstes kopieren wir unseren öffentlichen Schlüssel nach server2.example.tld:
ssh-copy-id -i $HOME/.ssh/id_dsa.pub example@unixlinux.online
example@unixlinux.online:~# ssh-copy-id -i $HOME/.ssh/id_dsa.pub example@unixlinux.online
Die Authentizität von Host '192.168.0.101 (192.168.0.101)' kann nicht eingerichtet werden.
Der Fingerabdruck des RSA-Schlüssels ist 25:d8:7a:ee:c2:4b:1d:92:a7:3d:16:26:95:56:62:4e.
Sind Sie sicher? Möchten Sie die Verbindung fortsetzen (ja/nein)? <-- ja (Sie sehen dies nur, wenn Sie sich zum ersten Mal mit Server2 verbinden)
Warnung:„192.168.0.101“ (RSA) wurde dauerhaft zur Liste bekannter Hosts hinzugefügt.
Beispiel@ Passwort von unixlinux.online:<-- server2 root password
Versuchen Sie jetzt, sich mit "ssh 'example@unixlinux.online'" in den Rechner einzuloggen, und checken Sie ein:
.ssh/authorized_keys
to make sure we haven't added extra keys that you weren't expecting.
Überprüfen Sie nun auf Server2, ob der öffentliche Schlüssel von Server1 korrekt übertragen wurde:
server2:
cat $HOME/.ssh/authorized_keys
ssh-dss AAAAB3NzaC1kc3MAAACBAPhiAexgEBexnw0rFG8lXwAuIsca/V+lhmv5lhF3BqUfAbL7e2sWlQlGhxZ8I2UnzZK8Ypffq6Ks+lp46yOs7MMXLqb7JBP9gkgqxyEWqOoUSt5hTE9ghupcCvE7rRMhefY5shLUnRkVH6hnCWe6yXSnH+Z8lHbcfp864GHkLDK1AAAAFQDddQckbfRG4C6LOQXTzRBpIiXzoQAAAIEAleevPHwi+a3fTDM2+Vm6EVqR5DkSLwDM7KVVNtFSkAY4GVCfhLFREsfuMkcBD9Bv2DrKF2Ay3OOh39269Z1rgYVk+/MFC6sYgB6apirMlHj3l4RR1g09LaM1OpRz7pc/GqIGsDt74D1ES2j0zrq5kslnX8wEWSHapPR0tziin6UAAACBAJHxgr+GKxAdWpxV5MkF+FTaKcxA2tWHJegjGFrYGU8BpzZ4VDFMiObuzBjZ+LrUs57BiwTGB/MQl9FKQEyEV4J+AgZCBxvg6n57YlVn6OEA0ukeJa29aFOcc0inEFfNhw2jAXt5LRyvuHD/C2gG78lwb6CxV02Z3sbTBdc43J6y example@unixlinux.online
Installieren Sie postfix, dovecot und mysql mit einem einzigen Befehl:
apt-get -y install postfix postfix-mysql postfix-doc mysql-client mysql-server openssl getmail4 rkhunter binutils dovecot-imapd dovecot-pop3d sudo
Geben Sie das neue Passwort für den MySQL-Root-Benutzer ein, wenn Sie vom Installationsprogramm dazu aufgefordert werden. Sie sollten für beide Server dasselbe Passwort wählen. Beantworten Sie dann die nächsten Fragen wie unten beschrieben:
Allgemeine Art der Konfiguration? <-- Internetseite
E-Mail-Name? <-- server1.mydomain.tld
SSL-Zertifikat erforderlich <-- Ok
Verwenden Sie server1.example.tld auf dem ersten Server und server2.example.tld auf dem zweiten Server.
Wir möchten, dass MySQL auf allen Schnittstellen lauscht, nicht nur auf localhost, deshalb bearbeiten wir /etc/mysql/my.cnf und kommentieren die Zeile bind-address =127.0.0.1:
ausvi /etc/mysql/my.cnf
[...]

# Instead of skip-networking the default is now to listen only on
# localhost which is more compatible and is not less secure.
#bind-address           = 127.0.0.1

[...]
Starten Sie dann MySQL neu:
/etc/init.d/mysql restart
Jetzt bereiten wir die MySQL-Server für die MySQL-Master/Master-Replikation vor.
Auf Server 1:
Melden Sie sich bei MySQL auf der Shell mit ...
anmysql -u root -p
... und geben Sie das MySQL-Root-Passwort ein, das Sie während der MySQL-Installation gewählt haben. Führen Sie dann diesen Befehl auf der MySQL-Shell aus:
GRANT REPLICATION SLAVE ON *.* TO 'slaveuser'@'%' IDENTIFIED BY 'slave_user_password';
FLUSH PRIVILEGES;
quit;
Ersetzen Sie 'slave_user_password' mit einem sicheren Passwort, das Sie verwenden möchten, damit sich der Slave mit dem Master-Server verbindet. Ersetzen Sie diesen Platzhalter in den nächsten Schritten durch das von Ihnen gewählte Passwort dort, wo der Platzhalter vorkommt.
Lassen Sie uns nun unsere 2 MySQL-Knoten konfigurieren:
Auf Server 1:
vi /etc/mysql/my.cnf
Suchen Sie nach dem Abschnitt, der mit [mysqld] beginnt, und fügen Sie die folgenden Optionen ein (kommentieren Sie alle vorhandenen widersprüchlichen aus Optionen):
[...]
[mysqld]
server-id = 1
replicate-same-server-id = 0
auto-increment-increment = 2
auto-increment-offset = 1

master-host = 192.168.0.106
master-user = slaveuser
master-password = slave_user_password
master-connect-retry = 60

expire_logs_days        = 10
max_binlog_size         = 500M
log_bin                        = /var/log/mysql/mysql-bin.log
[...]
Dann stoppen Sie MySQL:
/etc/init.d/mysql stop
Machen Sie jetzt fast dasselbe auf Server2...
Auf Server 2:
vi /etc/mysql/my.cnf
Suchen Sie nach dem Abschnitt, der mit [mysqld] beginnt, und fügen Sie die folgenden Optionen ein (kommentieren Sie alle vorhandenen widersprüchlichen aus Optionen):
[...]
[mysqld]
server-id = 2
replicate-same-server-id = 0
auto-increment-increment = 2
auto-increment-offset = 2

master-host = 192.168.0.105
master-user = slaveuser
master-password = slave_user_password
master-connect-retry = 60

expire_logs_days        = 10
max_binlog_size         = 500M
log_bin                        = /var/log/mysql/mysql-bin.log
[...]
Dann stoppen Sie MySQL:
/etc/init.d/mysql stop
Jetzt müssen wir die beiden MySQL-Server synchronisieren. Dazu kopieren wir das MySQL-Datenverzeichnis vom Master auf den Slave und auch die Debian-Konfigurationsdatei, die den Benutzer debian-sys-maint enthält. Dies ist möglich, da wir MySQL zuvor auf beiden Servern gestoppt haben.
Auf Server 1:
scp -pr /var/lib/mysql/* example@unixlinux.online:/var/lib/mysql/
scp -pr /etc/mysql/debian.cnf example@unixlinux.online:/etc/mysql/ debian.cnf
Nun starten wir MySQL erneut auf dem Masterserver:
/etc/init.d/mysql start
Melden Sie sich als Root-Benutzer bei der MySQL-Shell an...
mysql -u root -p
... und diesen Befehl in der MySQL-Shell ausführen...
SHOW MASTER STATUS;
... um den MySQL-Master-Status zu erhalten:
mysql> MEISTERSTATUS ANZEIGEN;
+------------------+----------+--------- -----+------------------+
| Datei | Stelle | Binlog_Do_DB | Binlog_Ignore_DB |
+------------------+----------+------------- --------------------+
| mysql-bin.000002 | 106 | | |
+-------------+----------+------------- +------------------+
1 Zeile im Satz (0,00 Sek.)
Die Informationen, die wir für den nächsten Schritt benötigen, sind die Binlog-Datei mysql-bin.000002 und die Binlog-Position 106. Wir benötigen die gleichen Details für Server2 weiter unten.
Führen Sie nun diesen Befehl in der MySQL-Shell auf dem Master aus, um ihn mit dem Slave zu verbinden:
STOP SLAVE;
CHANGE MASTER TO MASTER_HOST='192.168.0.106', MASTER_USER='slaveuser', MASTER_PASSWORD='slave_user_password', MASTER_LOG_FILE='mysql-bin.000002', MASTER_LOG_POS=106;
START SLAVE;
Überprüfen Sie dann den Slave-Status:
SHOW SLAVE STATUS \G
Es ist wichtig, dass sowohl Slave_IO_Running als auch Slave_SQL_Running in der Ausgabe den Wert Yes haben.
Auf Server 2:
Melden Sie sich als Root-Benutzer bei der MySQL-Shell an...
mysql -u root -p
... und führen Sie diesen Befehl in der MySQL-Shell aus:
STOP SLAVE;
CHANGE MASTER TO MASTER_HOST='192.168.0.105', MASTER_USER='slaveuser', MASTER_PASSWORD='slave_user_password', MASTER_LOG_FILE='mysql-bin.000002', MASTER_LOG_POS=106;
START SLAVE;
Überprüfen Sie dann den Slave-Status:
SHOW SLAVE STATUS \G
Wichtig ist, dass sowohl Slave_IO_Running als auch Slave_SQL_Running den Wert Yes in der Ausgabe haben
Die Konfiguration der MySQL-Master/Master-Replikation ist nun abgeschlossen und wir fahren mit der Installation der anderen Softwarepakete fort.
Installieren eines Web-, E-Mail- und MySQL-Datenbank-Clusters auf Debian 6.0 mit ISPConfig 3 - Seite 2
Die nächsten Schritte müssen auf Server 1 und Server 2 ausgeführt werden.
Um amavisd-new, SpamAssassin und ClamAV zu installieren, führen wir Folgendes aus:
apt-get install amavisd-new spamassassin clamav clamav-daemon zoo unzip bzip2 arj nomarch lzop cabextract apt-listchanges libnet-ldap-perl libauthen-sasl-perl clamav-docs daemon libio-string-perl libio-socket-ssl-perl libnet-ident-perl zip libnet-dns-perl
Das ISPConfig 3-Setup verwendet amavisd, das die SpamAssassin-Filterbibliothek intern lädt, sodass wir SpamAssassin stoppen können, um etwas RAM freizugeben:
/etc/init.d/spamassassin stop
update-rc.d -f spamassassin remove
Installieren Sie dann Apache2, PHP5, phpMyAdmin, FCGI, suExec, Pear und mcrypt können wie folgt installiert werden:
apt-get -y install apache2 apache2.2-common apache2-doc apache2-mpm-prefork apache2-utils libexpat1 ssl-cert libapache2-mod-php5 php5 php5-common php5-curl php5-gd php5-mysql php5-imap phpmyadmin php5-cli php5-cgi libapache2-mod-fcgid apache2-suexec php-pear php-auth php5-mcrypt mcrypt php5-imagick imagemagick libapache2-mod-suphp libruby libapache2-mod-ruby php5-xcache libapache2-mod-perl2 sudo zip wget
Sie sehen die folgende Frage:
Webserver zur automatischen Neukonfiguration:<-- apache2
Datenbank für phpmyadmin mit dbconfig-common konfigurieren? <-- Nein
Führen Sie dann den folgenden Befehl aus, um die Apache-Module suexec, rewrite, ssl, actions und include zu aktivieren:
a2enmod suexec rewrite ssl actions include ruby dav_fs dav auth_digest
PureFTPd und Quota können mit dem folgenden Befehl installiert werden:
apt-get -y install pure-ftpd-common pure-ftpd-mysql quota quotatool
Bearbeiten Sie die Datei /etc/default/pure-ftpd-common...
vi /etc/default/pure-ftpd-common
... und stellen Sie sicher, dass der Startmodus auf Standalone eingestellt ist und setzen Sie VIRTUALCHROOT=true:
[...]
STANDALONE_OR_INETD=standalone
[...]
VIRTUALCHROOT=true
[...]
Bearbeiten Sie die Datei /etc/inetd.conf, um zu verhindern, dass inetd versucht, ftp:
zu startenvi /etc/inetd.conf
Wenn eine Zeile mit ftp stream tcp beginnt, kommentieren Sie sie aus (wenn es keine solche Datei gibt, ist das in Ordnung, und Sie müssen /etc/inetd.conf nicht ändern):
[...]
#:STANDARD: These are standard services.
#ftp    stream  tcp     nowait  root    /usr/sbin/tcpd /usr/sbin/pure-ftpd-wrapper
[...]
Wenn Sie /etc/inetd.conf ändern mussten, starten Sie inetd jetzt neu:
/etc/init.d/openbsd-inetd restart
Jetzt konfigurieren wir PureFTPd so, dass FTP- und TLS-Sitzungen zugelassen werden. FTP ist ein sehr unsicheres Protokoll, da alle Passwörter und alle Daten im Klartext übertragen werden. Durch die Verwendung von TLS kann die gesamte Kommunikation verschlüsselt werden, wodurch FTP viel sicherer wird.
Wenn Sie FTP- und TLS-Sitzungen zulassen möchten, führen Sie Folgendes aus:
echo 1 > /etc/pure-ftpd/conf/TLS
Um TLS verwenden zu können, müssen wir ein SSL-Zertifikat erstellen. Ich erstelle es in /etc/ssl/private/, also erstelle ich zuerst dieses Verzeichnis:
mkdir -p /etc/ssl/private/
Anschließend können wir das SSL-Zertifikat wie folgt generieren:
openssl req -x509 -nodes -days 7300 -newkey rsa:2048 -keyout /etc/ssl/private/pure-ftpd.pem -out /etc/ssl/private/pure-ftpd.pem
Ländername (2-Buchstaben-Code) [AU]:<-- Geben Sie Ihren Ländernamen ein (z. B. "DE").
Staats- oder Provinzname (vollständiger Name) [Some-State]:<-- Geben Sie Ihren Staat ein oder Provinzname.
Ortsname (zB Stadt) []:<-- Geben Sie Ihre Stadt ein.
Organisationsname (zB Firma) [Internet Widgits Pty Ltd]:<-- Geben Sie Ihren Organisationsnamen ein (z. B. der Name Ihres Unternehmens).
Name der Organisationseinheit (z. B. Abteilung) []:<-- Geben Sie den Namen Ihrer Organisationseinheit ein (z. B. "IT-Abteilung").
Allgemeiner Name (z. B. IHR Name) []:<-- Geben Sie den vollständig qualifizierten Domänennamen des Systems ein (z. B. "server1.example.com").
E-Mail-Adresse []:<-- Geben Sie Ihre E-Mail-Adresse ein.
Ändern Sie die Berechtigungen des SSL-Zertifikats:
chmod 600 /etc/ssl/private/pure-ftpd.pem
Starten Sie dann PureFTPd neu:
/etc/init.d/pure-ftpd-mysql restart
Bearbeiten Sie /etc/fstab. Meine sieht so aus (ich habe ,usrjquota=aquota.user,grpjquota=aquota.group,jqfmt=vfsv0 zur Partition mit dem Einhängepunkt / hinzugefügt):
vi /etc/fstab
# /etc/fstab: static file system information.
#
# Use 'blkid' to print the universally unique identifier for a
# device; this may be used with UUID= as a more robust way to name devices
# that works even if disks are added and removed. See fstab(5).
#
# <file system> <mount point>   <type>  <options>       <dump>  <pass>
proc            /proc           proc    defaults        0       0
# / was on /dev/sda1 during installation
UUID=92bceda2-5ae4-4e3a-8748-b14da48fb297 /               ext3    errors=remount-ro,usrjquota=aquota.user,grpjquota=aquota.group,jqfmt=vfsv0 0       1
# swap was on /dev/sda5 during installation
UUID=e24b3e9e-095c-4b49-af27-6363a4b7d094 none            swap    sw              0       0
/dev/scd0       /media/cdrom0   udf,iso9660 user,noauto     0       0
/dev/fd0        /media/floppy0  auto    rw,user,noauto  0       0
Führen Sie die folgenden Befehle aus, um Kontingente zu aktivieren:
mount -o remount /
quotecheck -avugm
quotaon -avug
Installieren Sie den BIND-DNS-Server:
apt-get -y install bind9 dnsutils
vlogger, webalizer und awstats installieren:
apt-get -y install vlogger webalizer awstats geoip-database
Danach /etc/cron.d/awstats öffnen...
vi /etc/cron.d/awstats
... und kommentieren Sie beide Cron-Jobs in dieser Datei aus:
#*/10 * * * * www-data [ -x /usr/share/awstats/tools/update.sh ] && /usr/share/awstats/tools/update.sh

# Generate static reports:
 #10 03 * * * www-data [ -x /usr/share/awstats/tools/buildstatic.sh
Installieren Sie Jailkit:Jailkit wird nur benötigt, wenn Sie SSH-Benutzer chrooten möchten. Es kann wie folgt installiert werden (Wichtig:Jailkit muss vor ISPConfig installiert werden - es kann nicht nachträglich installiert werden!):
apt-get -y install build-essential autoconf automake1.9 libtool flex bison
cd /tmp
wget http://olivier.sessink.nl/jailkit/jailkit-2.14.tar.gz
tar xvfz jailkit-2.14.tar.gz
cd jailkit-2.14
./configure
make
make install
cd ..
rm -rf jailkit-2.14*
Fail2ban installieren:Dies ist optional, wird aber empfohlen, da der ISPConfig-Monitor versucht, das Protokoll anzuzeigen:
apt-get install fail2ban
Damit fail2ban PureFTPd und Dovecot überwacht, erstellen Sie die Datei /etc/fail2ban/jail.local:
vi /etc/fail2ban/jail.local
[pureftpd]
enabled  = true
port     = ftp
filter   = pureftpd
logpath  = /var/log/syslog
maxretry = 3

[dovecot-pop3imap]
enabled = true
filter = dovecot-pop3imap
action = iptables-multiport[name=dovecot-pop3imap, port="pop3,pop3s,imap,imaps", protocol=tcp]
logpath = /var/log/mail.log
maxretry = 5
Erstellen Sie dann die folgenden zwei Filterdateien:
vi /etc/fail2ban/filter.d/pureftpd.conf
[Definition]
failregex = .*pure-ftpd: \(.*@<HOST>\) \[WARNING\] Authentication failed for user.*
ignoreregex =
fehlgeschlagen
vi /etc/fail2ban/filter.d/dovecot-pop3imap.conf
[Definition]
failregex = (?: pop3-login|imap-login): .*(?:Authentication failure|Aborted login \(auth failed|Aborted login \(tried to use disabled|Disconnected \(auth failed|Aborted login \(\d+ authentication attempts).*rip=(?P<host>\S*),.*
ignoreregex =
Danach fail2ban neu starten:
/etc/init.d/fail2ban restart
Um den SquirrelMail-Webmail-Client zu installieren, führen Sie Folgendes aus:
apt-get install squirrelmail
Erstellen Sie dann den folgenden Symlink...
ln -s /usr/share/squirrelmail/ /var/www/webmail
... und SquirrelMail konfigurieren:
squirrelmail-configure
Wir müssen SquirrelMail mitteilen, dass wir Dovecot-IMAP/-POP3 verwenden:
SquirrelMail Konfiguration : Lesen Sie: config.php (1.4.0)
---------------------------------------------- ------------------------
Hauptmenü --
1. Organisationseinstellungen
2. Servereinstellungen
3. Ordner-Standardeinstellungen
4. Allgemeine Optionen
5. Themen
6. Adressbücher
7. Nachricht des Tages (MOTD)
8. Plugins
9. Datenbank
10. Sprachen
D. Festlegen vordefinierter Einstellungen für bestimmte IMAP-Server
C Farbe einschalten
S Daten speichern
Q Beenden
Befehl >> <-- D
SquirrelMail-Konfiguration : Lesen Sie: config.php
---------------------- ------------------------------
Während wir SquirrelMail entwickelt haben, haben wir einige
Einstellungen entdeckt die mit einigen Servern besser funktionieren, die mit anderen nicht
gut funktionieren. Wenn Sie Ihren IMAP-Server auswählen, legt diese Option
einige vordefinierte Einstellungen für diesen Server fest.
Bitte beachten Sie müssen noch durchgehen und sicherstellen, dass
alles so ist ist richtig. Das ändert nicht alles. Es sind
nur einige Einstellungen, die dadurch geändert werden.
Bitte wählen Sie Ihren IMAP-Server aus:
bincimap = Binc-IMAP-Server
courier = Courier-IMAP-Server
cyrus = Cyrus IMAP Server
dovecot = Dovecot Secure IMAP Server
exchange = Microsoft Exchange IMAP Server
hmailserver = hMail Server
macosx = Mac OS X > Mailserver
macosx = Mac OS X > Mailserver /32
uw = IMAP Server der University of Washington
gmail = IMAP-Zugriff auf Google Mail (Gmail) Konten
beenden = Nichts ändern
Befehl >> <-- Dovecot
SquirrelMail-Konfiguration : Lesen Sie: config.php
----------------------- ----------------------------------
Während wir SquirrelMail entwickelt haben, haben wir einige entdeckt
Einstellungen, die mit einigen Servern besser funktionieren, die mit anderen
nicht so gut funktionieren. Wenn Sie Ihren IMAP-Server auswählen, legt diese Option
einige vordefinierte Einstellungen für diesen Server fest.
Bitte beachten Sie müssen noch durchgehen und sicherstellen, dass
alles so ist ist richtig. Das ändert nicht alles. Es sind
nur einige Einstellungen, die dadurch geändert werden.
Bitte wählen Sie Ihren IMAP-Server aus:
bincimap = Binc-IMAP-Server
courier = Courier-IMAP-Server
cyrus = Cyrus IMAP Server
dovecot = Dovecot Secure IMAP Server
exchange = Microsoft Exchange IMAP Server
hmailserver = hMail Server
macosx = Mac OS X > Mailserver
macosx = Mac OS X > Mailserver /32
uw = IMAP Server der University of Washington
gmail = IMAP-Zugriff auf Google Mail (Gmail) Konten
beenden = Nichts ändern
Befehl >> dovecot
IMAP_SERVER_TYPE =DOVECOT
default_folder_prefix =
trash_folder =trash
sent_folder =send
entworfen_folder =entworfen
show_prefix_option =false
false
false
false
fälschlich
false
fälschlich /> default_sub_of_inbox = false
show_contain_subfolders_option =false
optional_delimiter = detect
delete_folder = false
Drücken Sie die Eingabetaste, um fortzufahren... <-- drücken Sie die EINGABETASTE
SquirrelMail-Konfiguration :Lesen Sie: config.php (1.4.0)
------------------------------------ ---------------------
Hauptmenü --
1. Organisationseinstellungen
2. Servereinstellungen
3. Ordner-Standardeinstellungen
4. Allgemeine Optionen
5. Themen
6. Adressbücher
7. Nachricht des Tages (MOTD)
8. Plugins
9. Datenbank
10. Sprachen
D. Festlegen vordefinierter Einstellungen für bestimmte IMAP-Server
C Farbe einschalten
S Daten speichern
Q Beenden
Befehl >> <-- S
SquirrelMail-Konfiguration : Lesen Sie: config.php (1.4.0)
---------------------- -----------------------------------
Hauptmenü --
1. Organisationseinstellungen
2. Servereinstellungen
3. Ordner-Standardeinstellungen
4. Allgemeine Optionen
5. Themen
6. Adressbücher
7. Nachricht des Tages (MOTD)
8. Plugins
9. Datenbank
10. Sprachen
D. Festlegen vordefinierter Einstellungen für bestimmte IMAP-Server
C Farbe einschalten
S Daten speichern
Q Beenden
Befehl >> <-- Q
Als nächstes aktivieren wir einen globalen Alias /webmail für Squirrelmail:
cd /etc/apache2/conf.d/
ln -s ../../squirrelmail/apache.conf squirrelmail.conf
/etc/init.d/apache2 reload
Öffnen Sie nun /etc/apache2/conf.d/squirrelmail.conf...
vi /etc/apache2/conf.d/squirrelmail.conf
... und fügen Sie dem Container
[...]
Alias /webmail /usr/share/squirrelmail
<Directory /usr/share/squirrelmail>
   Options FollowSymLinks
<IfModule mod_php5.c>
   AddType application/x-httpd-php .php
   php_flag magic_quotes_gpc Off
   php_flag track_vars On
   php_admin_flag allow_url_fopen Off
   php_value include_path .
   php_admin_value upload_tmp_dir /var/lib/squirrelmail/tmp
   php_admin_value open_basedir /usr/share/squirrelmail:/etc/squirrelmail:/var/lib/squirrelmail:/etc/hostname:/etc/mailname
   php_flag register_globals off
</IfModule>
<IfModule mod_dir.c>
   DirectoryIndex index.php
</IfModule>

# access to configtest is limited by default to prevent information leak
<Files configtest.php>
   order deny,allow
   deny from all
   allow from 127.0.0.1
</Files>
</Directory>
[...]
Erstellen Sie das Verzeichnis /var/lib/squirrelmail/tmp...
mkdir /var/lib/squirrelmail/tmp
... und machen es zum Eigentum des Benutzers www-data:
chown www-data /var/lib/squirrelmail/tmp
Apache erneut laden:
/etc/init.d/apache2 reload
Das war's auch schon - /etc/apache2/conf.d/squirrelmail.conf definiert einen Alias namens /squirrelmail, der auf das Installationsverzeichnis von SquirrelMail /usr/share/squirrelmail zeigt.
Sie können jetzt wie folgt von Ihrer Website aus auf SquirrelMail zugreifen:
http://www.example.com/squirrelmail
Sie können auch wie folgt vom ISPConfig Control Panel vhost aus darauf zugreifen (dies erfordert keine Konfiguration in ISPConfig):
http://server1.example.com:8080/squirrelmail
Als nächstes installieren wir Unison. Unison wird verwendet, um die Verzeichnisse /var/www und /var/vmail zwischen Master und Slave zu synchronisieren
apt-get install unison
Jetzt installieren wir eine Unison-Konfigurationsdatei auf dem ersten Server.
Auf Server 1:
Erstellen Sie eine neue Datei /root/.unison/default.prf auf server1...
mkdir /root/.unison
vi /root/.unison/default.prf
... und füge folgenden Inhalt hinzu:
# Roots of the synchronization
root = /var
root = ssh://192.168.0.106//var/

# Paths to synchronize
path = www
path = vmail

# Some regexps specifying names and paths to ignore
#ignore = Path stats    ## ignores /var/www/stats
#ignore = Path stats/*  ## ignores /var/www/stats/*
#ignore = Path */stats  ## ignores /var/www/somedir/stats, but not /var/www/a/b/c/stats
#ignore = Name *stats   ## ignores all files/directories that end with "stats"
#ignore = Name stats*   ## ignores all files/directories that begin with "stats"
#ignore = Name *.tmp    ## ignores all files with the extension .tmp

#          When set to true, this flag causes the user interface to skip
#          asking for confirmations on non-conflicting changes. (More
#          precisely, when the user interface is done setting the
#          propagation direction for one entry and is about to move to the
#          next, it will skip over all non-conflicting entries and go
#          directly to the next conflict.)
auto=true

#          When this is set to true, the user interface will ask no
#          questions at all. Non-conflicting changes will be propagated;
#          conflicts will be skipped.
batch=true

#          !When this is set to true, Unison will request an extra
#          confirmation if it appears that the entire replica has been
#          deleted, before propagating the change. If the batch flag is
#          also set, synchronization will be aborted. When the path
#          preference is used, the same confirmation will be requested for
#          top-level paths. (At the moment, this flag only affects the
#          text user interface.) See also the mountpoint preference.
confirmbigdel=true

#          When this preference is set to true, Unison will use the
#          modification time and length of a file as a `pseudo inode
#          number' when scanning replicas for updates, instead of reading
#          the full contents of every file. Under Windows, this may cause
#          Unison to miss propagating an update if the modification time
#          and length of the file are both unchanged by the update.
#          However, Unison will never overwrite such an update with a
#          change from the other replica, since it always does a safe
#          check for updates just before propagating a change. Thus, it is
#          reasonable to use this switch under Windows most of the time
#          and occasionally run Unison once with fastcheck set to false,
#          if you are worried that Unison may have overlooked an update.
#          The default value of the preference is auto, which causes
#          Unison to use fast checking on Unix replicas (where it is safe)
#          and slow checking on Windows replicas. For backward
#          compatibility, yes, no, and default can be used in place of
#          true, false, and auto. See the section "Fast Checking" for more
#          information.
fastcheck=true

#          When this flag is set to true, the group attributes of the
#          files are synchronized. Whether the group names or the group
#          identifiers are synchronizeddepends on the preference numerids.
group=true

#          When this flag is set to true, the owner attributes of the
#          files are synchronized. Whether the owner names or the owner
#          identifiers are synchronizeddepends on the preference
#          extttnumerids.
owner=true

#          Including the preference -prefer root causes Unison always to
#          resolve conflicts in favor of root, rather than asking for
#          guidance from the user. (The syntax of root is the same as for
#          the root preference, plus the special values newer and older.)
#          This preference is overridden by the preferpartial preference.
#          This preference should be used only if you are sure you know
#          what you are doing!
prefer=newer

#          When this preference is set to true, the textual user interface
#          will print nothing at all, except in the case of errors.
#          Setting silent to true automatically sets the batch preference
#          to true.
silent=true

#          When this flag is set to true, file modification times (but not
#          directory modtimes) are propagated.
times=true
Wir wollen die Synchronisation automatisieren, deshalb erstellen wir dafür einen Cron-Job auf server1.example.tld:
crontab -e
*/5 * * * * /usr/bin/unison &> /dev/null
Installieren eines Web-, E-Mail- und MySQL-Datenbank-Clusters auf Debian 6.0 mit ISPConfig 3 - Seite 3
3 Installation von ISPConfig auf dem ersten (Master-)Server
In diesem Schritt installieren wir ISPConfig auf dem Masterserver. To get the download URL of the latest ISPConfig 3 stable release, please visit the ISPConfig website:http://www.ispconfig.org/ispconfig-3/download/
Now we have to add two new mysql root user records in the master database to allow root access from the slave server hostname and IP address.
On server1:
Log into the MySQL database as root user...
mysql -u root -p
... and execute these mysql queries:
CREATE USER 'root'@'192.168.0.106' IDENTIFIED BY 'myrootpassword';
GRANT ALL PRIVILEGES ON * . * TO 'root'@'192.168.0.106' IDENTIFIED BY 'myrootpassword' WITH GRANT OPTION MAX_QUERIES_PER_HOUR 0 MAX_CONNECTIONS_PER_HOUR 0 MAX_UPDATES_PER_HOUR 0 MAX_USER_CONNECTIONS 0;
CREATE USER 'root'@'server2.example.tld' IDENTIFIED BY 'myrootpassword';
GRANT ALL PRIVILEGES ON * . * TO 'root'@'server2.example.tld' IDENTIFIED BY 'myrootpassword' WITH GRANT OPTION MAX_QUERIES_PER_HOUR 0 MAX_CONNECTIONS_PER_HOUR 0 MAX_UPDATES_PER_HOUR 0 MAX_USER_CONNECTIONS 0;
FLUSH PRIVILEGES;
QUIT;
In the above SQL commands, replace 192.168.0.106 with the IP address of the second server, replace server2.example.tld with the hostname of the second server and 'myrootpassword' with the desired root password.
Now you shpuld be back on the shell on server1.example.tld and download the latest ISPConfig 3 stable release:
cd /tmp
wgethttp://www.ispconfig.org/downloads/ISPConfig-3-stable.tar.gz
tar xfz ISPConfig-3-stable.tar.gz
cd ispconfig3_install/install/
Start the install script:
php -q install.php
Select language (en,de) [en]:<-- en
Installation mode (standard,expert) [standard]:<-- standard
Full qualified hostname (FQDN) of the server, eg server1.domain.tld [server1.example.tld]:<-- server1.example.tld
MySQL server hostname [localhost]:<-- localhost
MySQL root username [root]:<-- root
MySQL root password []:<-- Enter your mysql root password here
MySQL database to create [dbispconfig]:<-- dbispconfig1 (the local ispconfig database name of the master and slave must be different, as both servers share the same data directory)
MySQL charset [utf8]:<-- utf8
Country Name (2 letter code) [AU]:<-- DE (Enter the ISO country code where you live here)
State or Province Name (full name) [Some-State]:<-- Niedersachsen (Enter the state where you live here)
Locality Name (eg, city) []:<-- Lueneburg (Enter the city here)
Organization Name (eg, company) [Internet Widgits Pty Ltd]:
Organizational Unit Name (eg, section) []:
Common Name (eg, YOUR name) []:
Email Address []:
Installing ISPConfig
ISPConfig Port [8080]:
Do you want a secure (SSL) connection to the ISPConfig web interface (y,n) [y]:
Generating RSA private key, 4096 bit long modulus
........................++
................++
e is 65537 (0x10001)
You are about to be asked to enter information that will be incorporated
into your certificate request.
What you are about to enter is what is called a Distinguished Name or a DN.
There are quite a few fields but you can leave some blank
For some fields there will be a default value,
If you enter '.', the field will be left blank.
-----
Country Name (2 letter code) [AU]:
State or Province Name (full name) [Some-State]:
Locality Name (eg, city) []:
Organization Name (eg, company) [Internet Widgits Pty Ltd]:
Organizational Unit Name (eg, section) []:
Common Name (eg, YOUR name) []:
Email Address []:
Please enter the following 'extra' attributes
to be sent with your certificate request
A challenge password []:
An optional company name []:
Clean up the install directories:
rm -rf /tmp/ispconfig3_install
rm -f /tmp/ISPConfig-3-stable.tar.gz
Installing A Web, Email &MySQL Database Cluster On Debian 6.0 With ISPConfig 3 - Page 4
4 Installing ISPConfig 3 On The Second Server
In this step we will install ISPConfig on the slave server (server2.example.tld). This time we use the expert mode of the ISPConfig installer to add this node to the master ispconfig server and database. To get the download URL of the latest ISPConfig 3 stable release, please visit the ISPConfig website:http://www.ispconfig.org/ispconfig-3/download/
On server 2:
Download the latest ISPConfig 3 stable release...
cd /tmp
wgethttp://www.ispconfig.org/downloads/ISPConfig-3-stable.tar.gz
tar xfz ISPConfig-3-stable.tar.gz
cd ispconfig3_install/install/
... and start the install script:
php -q install.php
Select language (en,de) [en]:<-- en
Installation mode (standard,expert) [standard]:<-- expert
Full qualified hostname (FQDN) of the server, eg server2.domain.tld [server2.example.tld]:<-- server2.example.tld
MySQL server hostname [localhost]:<-- localhost
MySQL root username [root]:<-- root
MySQL root password []:<-- Enter your mysql root password here
MySQL database to create [dbispconfig]:<-- dbispconfig2 (the local ispconfig database name of the master and slave must be different, as both servers share the same data directory)
MySQL charset [utf8]:<-- utf8
The next two questions are about the internal ISPConfig database user and password.
It is recommended to accept the defaults which are 'ispconfig' as username and a random password.
If you use a different password, use only numbers and chars for the password.
ISPConfig mysql database username [ispconfig]:<-- ispconfig2
ISPConfig mysql database password [54c243fd3f9ca68de7b08527c81dd5ef]:<-- (press return to accept the default)
Shall this server join an existing ISPConfig multiserver setup (y,n) [n]:<-- y
MySQL master server hostname []:<-- server1.example.tld
MySQL master server root username [root]:<-- root
MySQL master server root password []:<-- Enter the root password of the master server here
MySQL master server database name [dbispconfig]:<-- dbispconfig1
Configure Mail (y,n) [y]:<-- y
Country Name (2 letter code) [AU]:<-- DE (Enter the ISO country code where you live here)
State or Province Name (full name) [Some-State]:<-- Niedersachsen (Enter the state where you live here)
Locality Name (eg, city) []:<-- Lueneburg (Enter the city here)
Organization Name (eg, company) [Internet Widgits Pty Ltd]:
Organizational Unit Name (eg, section) []:
Common Name (eg, YOUR name) []:
Email Address []:
Configure Jailkit (y,n) [y]:<-- y
Configure FTP Server (y,n) [y]:<-- y
Configure DNS Server (y,n) [y]:<-- y
Configure Apache Server (y,n) [y]:<-- y
Configure Firewall Server (y,n) [y]:<--y
Install ISPConfig Web-Interface (y,n) [y]:<--y
Installing ISPConfig
ISPConfig Port [8080]:
Enable SSL for the ISPConfig web interface (y,n) [y]:<-- y
Generating RSA private key, 4096 bit long modulus
.................++
.............................................................................................................++
e is 65537 (0x10001)
You are about to be asked to enter information that will be incorporated
into your certificate request.
What you are about to enter is what is called a Distinguished Name or a DN.
There are quite a few fields but you can leave some blank
For some fields there will be a default value,
If you enter '.', the field will be left blank.
-----
Country Name (2 letter code) [AU]:
State or Province Name (full name) [Some-State]:
Locality Name (eg, city) []:
Organization Name (eg, company) [Internet Widgits Pty Ltd]:
Organizational Unit Name (eg, section) []:
Common Name (eg, YOUR name) []:
Email Address []:
Please enter the following 'extra' attributes
to be sent with your certificate request
A challenge password []:
An optional company name []:
Clean up the install directories:
rm -rf /tmp/ispconfig3_install/install
rm -f /tmp/ISPConfig-3-stable.tar.gz
In a last configuration step, we want to connect the ISPConfig interface of the slave directly to the master database. This step is only required if you want to access ISPConfig on port 8080 on the master and on the slave server. Log into the master server as root user on the shell...
On server 1:
... and execute this command:
scp -p /usr/local/ispconfig/interface/lib/config.inc.php example@unixlinux.online:/usr/local/ispconfig/interface/lib/config.inc.php
This command has to be excuted after each ISPConfig update again after you updated ISPConfig on the master and on the slave with the normal ISPConfig update command (ispconfig_update.sh).
Installing A Web, Email &MySQL Database Cluster On Debian 6.0 With ISPConfig 3 - Page 5
5 Configure Replication In ISPConfig
Log into ISPConfig on the master server with a webbrowser:
http://192.168.0.105:8080
Click on System> Server Services> server2.example.tld:
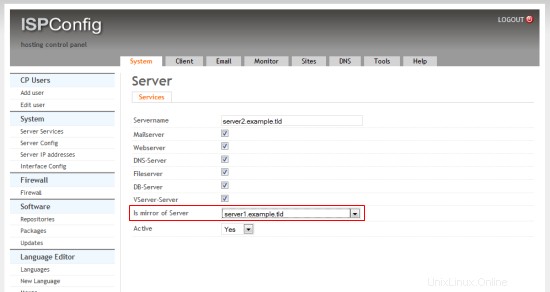
Select "server1.example.tld" in the "is mirror of" field and click on Save.
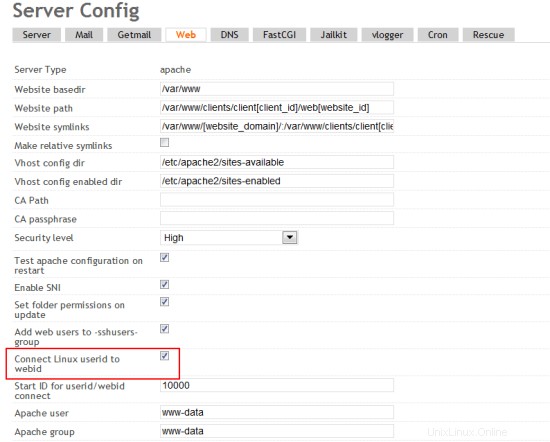
Then open System> Server Config and enable the checkbox "Connect Linux userid to webid" on the "Web" tab:
6 Additional Notes
When you want to activate a firewall on the master or slave server, ensure that you open port 3306 for MySQL on both servers.
7 Links
- ISPConfig Website:http://www.ispconfig.org/
- ISPConfig Forum:https://www.howtoforge.com/forums/
- ISPConfig Bugtracker:http://bugtracker.ispconfig.org/