Dieses Tutorial erklärt, wie Sie ClamAV in ProFTPd zum Virenscannen auf einem Debian-Lenny-System integrieren können. Dies wird durch mod_clamav erreicht. Am Ende prüft ClamAV immer dann, wenn eine Datei über ProFTPd hochgeladen wird, die Datei und löscht sie, wenn es sich um Malware handelt.
Ich gebe keine Garantie dafür, dass dies bei Ihnen funktioniert!
1 Vorbemerkung
Sie sollten ein funktionierendes ProFTPd-Setup auf Ihrem Debian-Lenny-Server haben.
2 Installation von ClamAV
ClamAV kann wie folgt installiert werden:
aptitude install clamav clamav-daemon libclamav-dev
Jetzt müssen wir ClamAV neu konfigurieren, damit Clamd TCP-Verbindungen anstelle eines lokalen Unix-Sockets verwendet. Es wird dringend empfohlen, Unix-Socket-Verbindungen zu vermeiden, wenn die Chroot-Funktion von ProFTPd (DefaultRoot ~) verwendet wird. Der Grund dafür ist, dass, wenn mod_clamav sich mit Clamd verbinden muss, der Unix-Socket in der Chroot-Umgebung nicht verfügbar ist.
Ausführen
dpkg-reconfigure clamav-base
... und beantworten Sie diese Fragen wie folgt (übernehmen Sie die Standardwerte für alle anderen Fragen):
Socket-Typ:<-- TCP
TCP-Port, auf dem Clamd lauscht:<-- 3310
IP-Adresse, auf dem Clamd lauscht:<-- 127.0.0.1
Starten Sie dann Clamd und freshclam neu:
/etc/init.d/clamav-daemon restart
/etc/init.d/clamav-freshclam restart
Jetzt ausführen
netstat -tap | grep clamd
... und Sie sollten sehen, dass Clamd über TCP auf localhost lauscht:
server1:~# netstat -tap | grep clamd
tcp        0      0 localhost.localdom:3310 *:*                     LISTEN      29430/clamd
server1:~#
3 Neuerstellung von ProFTPd
Leider ist mod_clamav standardmäßig nicht Teil von ProFTPd, und es gibt kein Debian-Paket für mod_clamav, also müssen wir ProFTPd mit mod_clamav neu bauen. Ich werde das Debian-Quellpaket von ProFTPd verwenden und neue ProFTPd-.deb-Pakete mit mod_clamav-Unterstützung erstellen.
Zuerst installieren wir alle Pakete, die zum Neuaufbau von ProFTPd benötigt werden:
aptitude build-dep proftpd
Wir brauchen auch das folgende Paket (das aus irgendeinem Grund nicht durch den vorherigen Befehl installiert wird ...):
aptitude install libpam-dev
Jetzt laden wir das ProFTPd-Quellpaket nach /usr/src:
heruntercd /usr/src
apt-get source proftpd
Als nächstes laden wir mod_clamav nach /usr/src herunter und entpacken es:
wget --no-check-certificate https://secure.thrallingpenguin.com/redmine/attachments/download/1/mod_clamav-0.11rc.tar.gz
tar xzvf mod_clamav-0.11rc.tar.gz
Dann kopieren wir die Dateien mod_clamav-0.11rc/mod_clamav.* in das Verzeichnis proftpd-dfsg-1.3.1/contrib...
cp mod_clamav-0.11rc/mod_clamav.* proftpd-dfsg-1.3.1/contrib
... und die ProFTPd-Quellen patchen:
cd proftpd-dfsg-1.3.1
patch -p1 < ../mod_clamav-0.11rc/proftpd.patch
Als nächstes müssen wir debian/rules bearbeiten:
vi debian/rules
Durchsuchen Sie den Abschnitt CONF_ARGS und fügen Sie --with-modules=mod_clamav hinzu:
[...]
CONF_ARGS := --prefix=/usr \
             --with-includes=$(shell pg_config --includedir):$(shell mysql_config --include|sed -e 's/-I//') \
             --mandir=/usr/share/man --sysconfdir=/etc/$(NAME) --localstatedir=/var/run --libexecdir=/usr/lib/$(NAME) \
             --enable-sendfile --enable-facl --enable-dso --enable-autoshadow --enable-ctrls --with-modules=mod_readme \
             --enable-ipv6 --enable-nls --with-modules=mod_clamav
[...] |
Jetzt können wir ProFTPd neu erstellen:
dpkg-buildpackage
Jetzt gehen wir ein Verzeichnis nach oben, dort wurden die neuen .deb-Pakete erstellt:
cd ..
Der Befehl
ls -l
zeigt Ihnen die verfügbaren Pakete:
server1:/usr/src# ls -l
total 5472
drwxr-xr-x  2  501  501    4096 2009-04-20 10:22 mod_clamav-0.11rc
-rw-r--r--  1 root src     5115 2010-10-01 03:28 mod_clamav-0.11rc.tar.gz
-rw-r--r--  1 root src   195066 2010-10-01 03:32 proftpd_1.3.1-17lenny4_all.deb
-rw-r--r--  1 root src   690228 2010-10-01 03:32 proftpd-basic_1.3.1-17lenny4_i386.deb
drwxr-xr-x 13 root root    4096 2010-10-01 03:32 proftpd-dfsg-1.3.1
-rw-r--r--  1 root src   107998 2010-10-01 03:29 proftpd-dfsg_1.3.1-17lenny4.diff.gz
-rw-r--r--  1 root src     1103 2010-10-01 03:29 proftpd-dfsg_1.3.1-17lenny4.dsc
-rw-r--r--  1 root src     3305 2010-10-01 03:32 proftpd-dfsg_1.3.1-17lenny4_i386.changes
-rw-r--r--  1 root src  2662056 2007-10-16 01:02 proftpd-dfsg_1.3.1.orig.tar.gz
-rw-r--r--  1 root src  1255660 2010-10-01 03:32 proftpd-doc_1.3.1-17lenny4_all.deb
-rw-r--r--  1 root src   213004 2010-10-01 03:32 proftpd-mod-ldap_1.3.1-17lenny4_i386.deb
-rw-r--r--  1 root src   203562 2010-10-01 03:32 proftpd-mod-mysql_1.3.1-17lenny4_i386.deb
-rw-r--r--  1 root src   203512 2010-10-01 03:32 proftpd-mod-pgsql_1.3.1-17lenny4_i386.deb
server1:/usr/src#
Wir können die neuen ProFTPd .deb-Pakete wie folgt installieren:
dpkg -i proftpd*.deb
4 Konfigurieren von ProFTPd
Jetzt müssen wir ProFTPd so konfigurieren, dass es mod_clamav verwendet, wenn eine Datei hochgeladen wird. Öffnen Sie /etc/proftpd/proftpd.conf...
vi /etc/proftpd/proftpd.conf
... und füge die Strophe hinzu
<IfModule mod_clamav.c>
   ClamAV on
   ClamServer 127.0.0.1
   ClamPort 3310
</IfModule>
irgendwo, z. unter dem
<IfModule mod_ctrls_admin.c>
AdminControlsEngine off
</IfModule>
Abschnitt:
[...] <IfModule mod_ctrls_admin.c> AdminControlsEngine off </IfModule> <IfModule mod_clamav.c> ClamAV on ClamServer 127.0.0.1 ClamPort 3310 </IfModule> # # Alternative authentication frameworks # #Include /etc/proftpd/ldap.conf Include /etc/proftpd/sql.conf [...] |
Starten Sie ProFTPd neu:
/etc/init.d/proftpd restart
Überprüfen Sie nun, ob mod_clamav geladen ist, indem Sie Folgendes ausführen:
proftpd -vv
mod_clamav sollte in der Ausgabe aufgeführt sein:
server1:~# proftpd -vv
 - ProFTPD Version: 1.3.1 (stable)
 -   Scoreboard Version: 01040002
 -   Built: Fri Oct 1 03:31:03 CEST 2010
 -     Module: mod_core.c
 -     Module: mod_xfer.c
 -     Module: mod_auth_unix.c
 -     Module: mod_auth_file/0.8.3
 -     Module: mod_auth.c
 -     Module: mod_ls.c
 -     Module: mod_log.c
 -     Module: mod_site.c
 -     Module: mod_delay/0.6
 -     Module: mod_dso/0.4
 -     Module: mod_auth_pam/1.0.1
 -     Module: mod_clamav.c
 -     Module: mod_cap/1.0
 -     Module: mod_ctrls/0.9.4
 -     Module: mod_lang/0.8
server1:~#
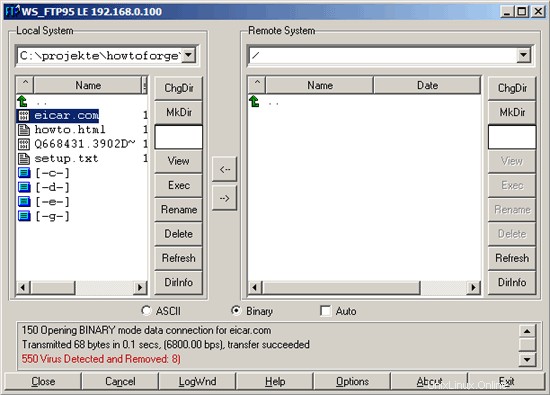
Das ist es! Wenn jetzt jemand versucht, Malware über ProFTPd auf Ihren Server hochzuladen, werden die "schlechten" Dateien gelöscht. Sie können dies testen, indem Sie den Eicar-Testvirus von http://www.eicar.org/anti_virus_test_file.htm herunterladen; Versuchen Sie, es auf Ihren ProFTPd-Server hochzuladen, und wenn alles gut geht, sollte es gelöscht werden:
5 Links
- ProFTPd:http://www.proftpd.org/
- mod_clamav:http://www.thrallingpenguin.com/resources/mod_clamav.htm
- ClamAV:http://www.clamav.net/
- Debian:http://www.debian.org/