Automad ist ein kostenloses, quelloffenes und flaches Content-Management-System, das in PHP geschrieben ist. Es ist schnell, reaktionsschnell und bietet Funktionen, die anderen PHP-basierten CMS möglicherweise nicht zur Verfügung stehen. Automad verwendet eine Textdatei, um seinen Inhalt anstelle einer Datenbank zu speichern. Automad bietet eine webbasierte Schnittstelle zum Verwalten der Website, der Systemeinstellungen, zum Hochladen von Bildern und zum Schreiben eines Blog-Beitrags. Es wird mit einem integrierten Markdown-Editor und einem Ein-Klick-Updater geliefert, um Ihr Automad auf dem neuesten Stand zu halten.
In diesem Tutorial zeigen wir Ihnen, wie Sie Automad CMS unter Debian 10 mit dem Apache-Webserver installieren.
Anforderungen
- Ein Server mit Debian 10.
- Ein Root-Passwort wird für Ihren Server eingerichtet.
Erste Schritte
Bevor Sie beginnen, müssen Sie Ihr System mit der neuesten Version aktualisieren. Sie können dies tun, indem Sie den folgenden Befehl ausführen:
apt-get update -y
 apt-get upgrade -y
Sobald Ihr Server aktualisiert ist, starten Sie Ihren Server neu, um die Änderungen zu übernehmen.
Apache und PHP installieren
Automad basiert auf PHP und läuft auf einem Webserver. Sie müssen also Apache, PHP und andere erforderliche Module auf Ihrem Server installieren. Sie können alle installieren, indem Sie den folgenden Befehl ausführen:
apt-get install apache2 php libapache2-mod-php php-zip php-curl php-mbstring php-gd php-xml php-xmlrpc php-soap unzip -y
Sobald alle Pakete installiert sind, starten Sie den Apache-Webserver und ermöglichen Sie ihm, beim Systemneustart mit dem folgenden Befehl zu starten:
systemctl start apache2
 systemctl enable apache2
Sobald Sie fertig sind, können Sie mit dem nächsten Schritt fortfahren.
Automad installieren
Zunächst müssen Sie die neueste Version von Automad aus dem Bitbucket-Repository herunterladen. Sie können es mit dem folgenden Befehl herunterladen:
wget https://bitbucket.org/marcantondahmen/automad/get/default.zip
Sobald der Download abgeschlossen ist, extrahieren Sie die heruntergeladene Datei mit dem folgenden Befehl:
unzip default.zip
Verschieben Sie als Nächstes das extrahierte Verzeichnis mit dem folgenden Befehl in das Apache-Webstammverzeichnis:
mv marcantondahmen-automad-c241e88edc3c /var/www/html/automad
Als nächstes ändern Sie den Besitz des automad-Verzeichnisses in www-data und erteilen Sie die entsprechende Berechtigung mit dem folgenden Befehl:
chown -R www-data:www-data /var/www/html/automad
 chmod -R 755 /var/www/html/automad
Sobald Sie fertig sind, können Sie mit dem nächsten Schritt fortfahren.
Apache für Automad konfigurieren
Als Nächstes müssen Sie eine virtuelle Apache-Host-Konfigurationsdatei für den Server Automad erstellen. Sie können es mit dem folgenden Befehl erstellen:
nano /etc/apache2/sites-available/automad.conf
Fügen Sie den folgenden Inhalt hinzu:
<VirtualHost *:80>
     ServerAdmin [email protected]
     DocumentRoot /var/www/html/automad
     ServerName example.com

     <Directory /var/www/html/automad>
          Options FollowSymlinks
          AllowOverride All
          Require all granted
     </Directory>

     ErrorLog ${APACHE_LOG_DIR}/automadcms_error.log
     CustomLog ${APACHE_LOG_DIR}/automadcms_access.log combined

</VirtualHost>
Speichern und schließen Sie die Datei, wenn Sie fertig sind. Überprüfen Sie dann Apache mit dem folgenden Befehl auf Syntaxfehler:
apachectl configtest
Wenn alles in Ordnung ist, sollten Sie die folgende Ausgabe erhalten:
AH00558: apache2: Could not reliably determine the server's fully qualified domain name, using 127.0.1.1. Set the 'ServerName' directive globally to suppress this message
Syntax OK
Aktivieren Sie als Nächstes den virtuellen Apache-Host und das Rewrite-Modul mit dem folgenden Befehl:
a2ensite automad
 a2enmod rewrite
Starten Sie abschließend den Apache-Webserver neu, um die Konfigurationsänderungen zu übernehmen:
systemctl restart apache2
Sobald Sie fertig sind, können Sie mit dem nächsten Schritt fortfahren.
Zugriff auf Automad
Automad ist jetzt installiert und konfiguriert, es ist Zeit, auf die Automad-Weboberfläche zuzugreifen.
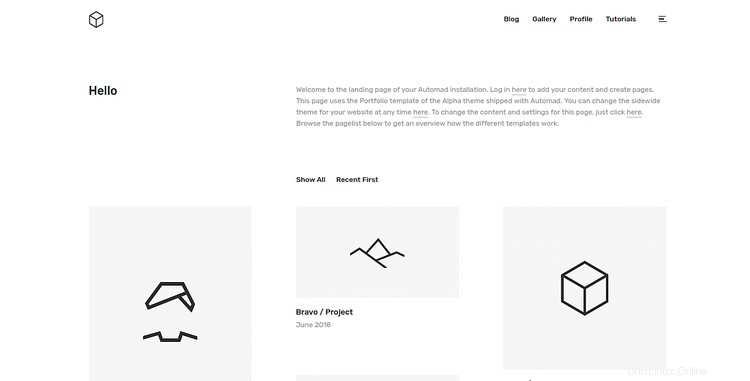
Öffnen Sie Ihren Webbrowser und geben Sie die URL http://example.com ein. Sie werden auf dem folgenden Bildschirm zur Automad-Site weitergeleitet:
Um ein Automad-Konto zu erstellen, öffnen Sie Ihren Webbrowser und besuchen Sie die URL http://example.com/dashboard. Sie werden auf die folgende Seite weitergeleitet:
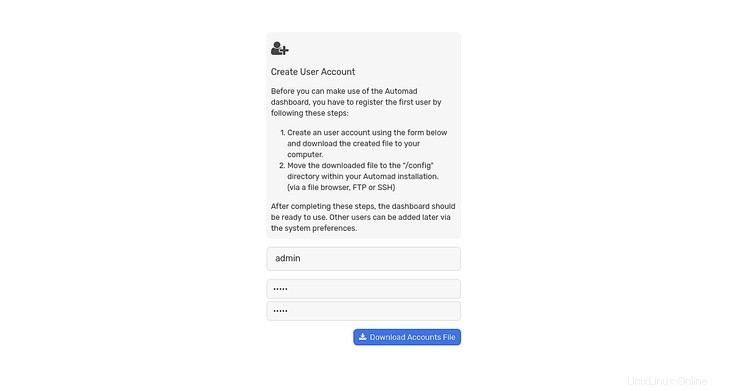
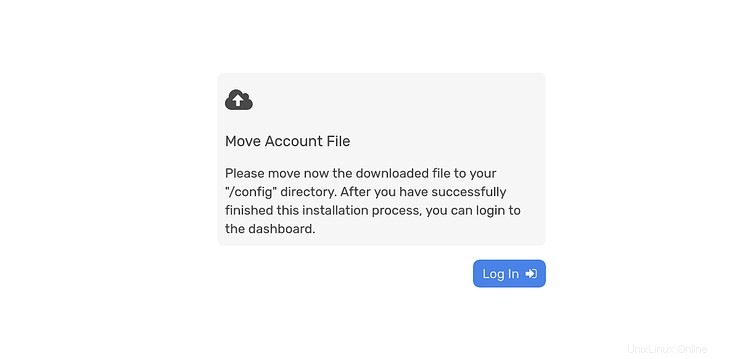
Geben Sie nun Ihren gewünschten Benutzernamen und Ihr Passwort ein und klicken Sie dann auf Herunterladen Konten Datei Schaltfläche, um das Benutzerregistrierungsformular herunterzuladen und in das Konfigurationsverzeichnis zu kopieren:
mv config.php /var/www/html/automad/config/
Als nächstes erteilen Sie der Datei config.php mit dem folgenden Befehl die richtige Berechtigung:
chown -R www-data:www-data /var/www/html/automad/config/config.php
Öffnen Sie nun Ihren Webbrowser und geben Sie die URL http://example.com/dashboard ein. Sie sollten die Anmeldeseite von Automad sehen:
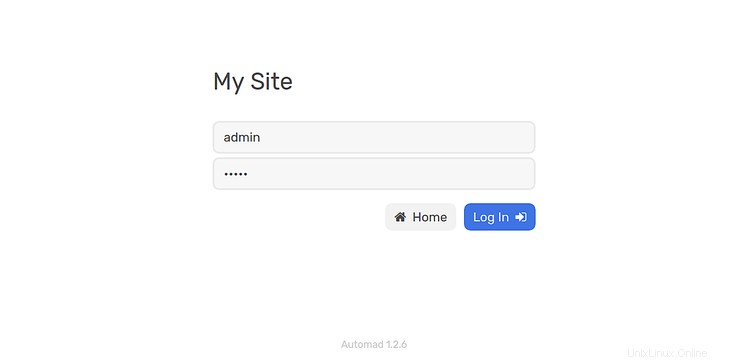
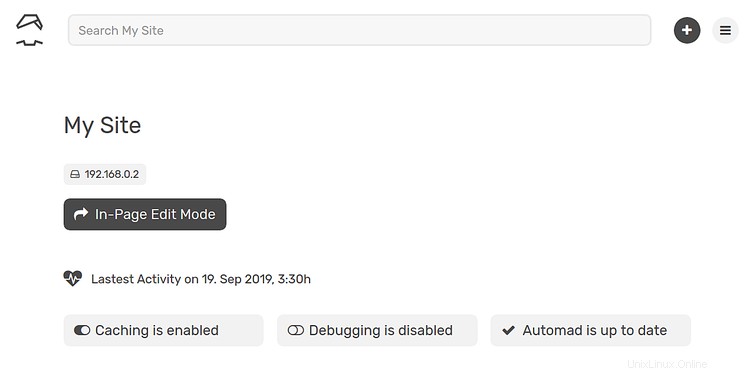
Geben Sie nun Ihren Benutzernamen und Ihr Passwort ein und klicken Sie auf Protokoll In-Taste. Sie sollten das Standard-Dashboard von Automad CMS auf der folgenden Seite sehen:
Sichern Sie Automad mit Let's Encrypt
Zuerst müssen Sie das Certbot-Tool installieren, um das kostenlose SSL von Let's Encrypt für Ihre Website herunterzuladen und zu installieren.
Fügen Sie zuerst das Certbot-Repository mit dem folgenden Befehl hinzu:
apt-get install software-properties-common
 add-apt-repository ppa:certbot/certbot
Aktualisieren Sie als Nächstes das Repository und installieren Sie Certbot mit dem folgenden Befehl:
apt-get update -y
 apt-get install certbot python-certbot-apache -y
Nach der Installation müssen Sie ein .well-known-Verzeichnis innerhalb des letsencrypt-Verzeichnisses erstellen. Sie können es mit dem folgenden Befehl erstellen:
mkdir -p /var/lib/letsencrypt/.well-known
Als nächstes müssen Sie dem letsencrypt-Verzeichnis die richtigen Berechtigungen erteilen. Sie können dies mit dem folgenden Befehl tun:
chgrp www-data /var/lib/letsencrypt
 chmod g+s /var/lib/letsencrypt
Erstellen Sie als Nächstes eine bekannte.conf-Datei mit dem folgenden Befehl:
nano /etc/apache2/conf-available/well-known.conf
Fügen Sie die folgenden Zeilen hinzu:
Alias /.well-known/acme-challenge/ "/var/lib/letsencrypt/.well-known/acme-challenge/"
<Directory "/var/lib/letsencrypt/">
    AllowOverride None
    Options MultiViews Indexes SymLinksIfOwnerMatch IncludesNoExec
    Require method GET POST OPTIONS
</Directory>
Speichern und schließen Sie die Datei. Aktivieren Sie dann die erforderlichen Module mit dem folgenden Befehl:
a2enmod ssl
 a2enmod http2
 a2enmod headers
 a2enconf well-known
Starten Sie als Nächstes den Apache-Dienst neu, um alle Konfigurationsänderungen zu übernehmen:
systemctl restart apache2
Installieren Sie jetzt Let’s Encrypt Free SSL für Ihre Domain example.com, indem Sie den folgenden Befehl ausführen:
certbot --apache -d example.com
Zunächst müssen Sie eine gültige E-Mail-Adresse angeben und den unten aufgeführten Nutzungsbedingungen zustimmen:
Saving debug log to /var/log/letsencrypt/letsencrypt.log
Plugins selected: Authenticator apache, Installer apache
Enter email address (used for urgent renewal and security notices) (Enter 'c' to
cancel): [email protected]

- - - - - - - - - - - - - - - - - - - - - - - - - - - - - - - - - - - - - - - -
Please read the Terms of Service at
https://letsencrypt.org/documents/LE-SA-v1.2-November-15-2017.pdf. You must
agree in order to register with the ACME server at
https://acme-v02.api.letsencrypt.org/directory
- - - - - - - - - - - - - - - - - - - - - - - - - - - - - - - - - - - - - - - -
(A)gree/(C)ancel: A

- - - - - - - - - - - - - - - - - - - - - - - - - - - - - - - - - - - - - - - -
Would you be willing to share your email address with the Electronic Frontier
Foundation, a founding partner of the Let's Encrypt project and the non-profit
organization that develops Certbot? We'd like to send you email about our work
encrypting the web, EFF news, campaigns, and ways to support digital freedom.

- - - - - - - - - - - - - - - - - - - - - - - - - - - - - - - - - - - - - - - -
(Y)es/(N)o: Y
Obtaining a new certificate
Performing the following challenges:
http-01 challenge for example.com
Enabled Apache rewrite module
Waiting for verification...
Cleaning up challenges
Created an SSL vhost at /etc/apache2/sites-available/example.com-le-ssl.conf
Deploying Certificate to VirtualHost /etc/apache2/sites-available/example.com-le-ssl.conf
Enabling available site: /etc/apache2/sites-available/example.com-le-ssl.conf

Please choose whether or not to redirect HTTP traffic to HTTPS, removing HTTP access.
- - - - - - - - - - - - - - - - - - - - - - - - - - - - - - - - - - - - - - - -
1: No redirect - Make no further changes to the webserver configuration.
2: Redirect - Make all requests redirect to secure HTTPS access. Choose this for
new sites, or if you're confident your site works on HTTPS. You can undo this
change by editing your web server's configuration.
- - - - - - - - - - - - - - - - - - - - - - - - - - - - - - - - - - - - - - - -
Select the appropriate number [1-2] then [enter] (press 'c' to cancel): 2
Wählen Sie als Nächstes Option 2, um ein kostenloses SSL-Zertifikat für Ihre Domain herunterzuladen und zu installieren. Sobald die Installation erfolgreich abgeschlossen wurde. Sie sollten die folgende Ausgabe erhalten:
Enabled Apache rewrite module
Redirecting vhost in /etc/apache2/sites-enabled/example.com.conf to ssl vhost in /etc/apache2/sites-available/
example.com-le-ssl.conf

- - - - - - - - - - - - - - - - - - - - - - - - - - - - - - - - - - - - - - - -
Congratulations! You have successfully enabled https://example.com

You should test your configuration at:
https://www.ssllabs.com/ssltest/analyze.html?d=example.com
- - - - - - - - - - - - - - - - - - - - - - - - - - - - - - - - - - - - - - - -

IMPORTANT NOTES:
 - Congratulations! Your certificate and chain have been saved at:
   /etc/letsencrypt/live/example.com/fullchain.pem
   Your key file has been saved at:
   /etc/letsencrypt/live/example.com/privkey.pem
   Your cert will expire on 2019-10-22. To obtain a new or tweaked
   version of this certificate in the future, simply run certbot again
   with the "certonly" option. To non-interactively renew *all* of
   your certificates, run "certbot renew"
 - Your account credentials have been saved in your Certbot
   configuration directory at /etc/letsencrypt. You should make a
   secure backup of this folder now. This configuration directory will
   also contain certificates and private keys obtained by Certbot so
   making regular backups of this folder is ideal.
 - If you like Certbot, please consider supporting our work by:
   Donating to ISRG / Let's Encrypt:   https://letsencrypt.org/donate
   Donating to EFF:                    https://eff.org/donate-le
Ihr Automad CMS ist jetzt mit Let's Encrypt Free SSL gesichert. Sie können darauf zugreifen, indem Sie die URL https://example.com.
aufrufen