Einführung
Apache Solr ist eine auf Java geschriebene Open-Source-Suchplattform. Solr bietet Volltextsuche, Rechtschreibvorschläge, benutzerdefinierte Reihenfolge und Rangordnung von Dokumenten, Generierung von Snippets und Hervorhebungen. Solr verarbeitet eine Vielzahl von Datentypen sofort, darunter JSON, XML, viele Office-Dokumente, CSV und mehr.
Solr ist auf Skalierbarkeit und Fehlertoleranz ausgelegt. wird auch für Unternehmenssuch- und Analyseanwendungsfälle verwendet und verfügt über eine aktive Entwickler-Community und regelmäßige Veröffentlichungen.
Außerdem ist Solr die beliebte, blitzschnelle Open-Source-Suchplattform für Unternehmen, die auf Apache Lucene basiert.
Linux-Softwarepakete aktualisieren
Aktualisieren Sie Softwarepakete in Ihrem Linux-Betriebssystem.
# dnf update -yInstallieren Sie OpenJDK
Apache Solr ist in Java geschrieben, es erfordert das Java Development Kit (JDK)
OpenJDK ist im Standard-yum-Repository verfügbar und kann einfach installiert werden.
Also installieren wir OpenJDK 11 auf einem Linux-Server mit dem folgenden Befehl:
# dnf install -y java-11-openjdkOpenJDK wurde also auf Ihrem Linux-Server installiert.
Installieren Sie Apache Solr
Sie können Apache Solr von Github oder von der offiziellen Website herunterladen, um die neueste Version zu erhalten.
Im Moment ist die neueste Version solr-8.9.0
[root@unixcop ~]# wget https://downloads.apache.org/lucene/solr/8.9.0/solr-8.9.0.tgz
--2021-08-25 10:06:52--  https://downloads.apache.org/lucene/solr/8.9.0/solr-8.9.0.tgz
Resolving downloads.apache.org (downloads.apache.org)... 135.181.209.10, 135.181.214.104, 88.99.95.219, ...
Connecting to downloads.apache.org (downloads.apache.org)|135.181.209.10|:443... connected.
HTTP request sent, awaiting response... 200 OK
Length: 202942547 (194M) [application/x-gzip]
Saving to: 'solr-8.9.0.tgz'

solr-8.9.0.tgz                        100%[=======================================================================>] 193.54M   401KB/s    in 8m 41s

2021-08-25 10:15:34 (380 KB/s) - 'solr-8.9.0.tgz' saved [202942547/202942547]
Extrahieren Sie das Installationsskript aus dem heruntergeladenenTarball wie unten gezeigt.
[root@unixcop ~]# tar xzf solr-8.9.0.tgz solr-8.9.0/bin/install_solr_service.sh --strip-components=2
[root@unixcop ~]# ls
anaconda-ks.cfg  install_solr_service.sh  solr-8.9.0.tgz
[root@unixcop ~]#
Führen Sie das Installationsskript aus, um Apache Solr Search Server zu installieren.
[root@unixcop ~]# ./install_solr_service.sh solr-8.9.0.tgz
We recommend installing the 'lsof' command for more stable start/stop of Solr
id: 'solr': no such user
Creating new user: solr

Extracting solr-8.9.0.tgz to /opt


Installing symlink /opt/solr -> /opt/solr-8.9.0 ...


Installing /etc/init.d/solr script ...


Installing /etc/default/solr.in.sh ...

Service solr installed.
Customize Solr startup configuration in /etc/default/solr.in.sh
*** [WARN] *** Your open file limit is currently 1024.
 It should be set to 65000 to avoid operational disruption.
 If you no longer wish to see this warning, set SOLR_ULIMIT_CHECKS to false in your profile or solr.in.sh
*** [WARN] ***  Your Max Processes Limit is currently 3901.
 It should be set to 65000 to avoid operational disruption.
 If you no longer wish to see this warning, set SOLR_ULIMIT_CHECKS to false in your profile or solr.in.sh
NOTE: Please install lsof as this script needs it to determine if Solr is listening on port 8983.

Started Solr server on port 8983 (pid=15862). Happy searching!


Found 1 Solr nodes:

Solr process 15862 running on port 8983
{
  "solr_home":"/var/solr/data",
  "version":"8.9.0 05c8a6f0163fe4c330e93775e8e91f3ab66a3f80 - mayyasharipova - 2021-06-10 17:54:40",
  "startTime":"2021-08-25T14:20:43.324Z",
  "uptime":"0 days, 0 hours, 0 minutes, 19 seconds",
  "memory":"79.9 MB (%15.6) of 512 MB"}

[root@unixcop ~]#
Dadurch wird ein Konto namens solr auf Ihrem System erstellt und der Installationsvorgang abgeschlossen.
Machen Sie sich auch keine Sorgen über die obige Warnung, wir werden sie lösen.
Installieren Sie lsof wie von Apache Solr gefordert.
# dnf install -y lsofAktivieren Sie den Solr-Dienst mit dem Befehl:
[root@unixcop ~]# systemctl enable solr
solr.service is not a native service, redirecting to systemd-sysv-install.
Executing: /usr/lib/systemd/systemd-sysv-install enable solr
[root@unixcop ~]#
Stellen Sie sicher, dass der Solr-Suchdienst auf dem Standardport 8983 ausgeführt wird.
[root@unixcop ~]# ss -tulpn | grep 8983
tcp   LISTEN 0      50                      *:8983            *:*    users:(("java",pid=15862,fd=153))
[root@unixcop ~]#
Sie müssen die vom Apache Solr Enterprise Search Server geforderten Sicherheitsgrenzen definieren.
Bearbeiten Sie also die limits.conf Datei im vim-Editor.
# vi /etc/security/limits.confUnd fügen Sie folgendes in diese Datei ein.
solr   soft   nofile   65536
solr   hard   nofile   65536
solr   soft   nproc    65536
solr   hard   nproc    65536
Starten Sie dann den Solr-Dienst neu
[root@unixcop ~]# service solr restart
Sending stop command to Solr running on port 8983 ... waiting up to 180 seconds to allow Jetty process 15862 to stop gracefully.
Waiting up to 180 seconds to see Solr running on port 8983 [\]
Started Solr server on port 8983 (pid=16988). Happy searching!

[root@unixcop ~]#
Außerdem müssen Sie den Port 8983 (der von solr verwendet wird) in der Firewall zulassen.
[root@unixcop ~]# firewall-cmd --permanent --add-port=8983/tcp
success
[root@unixcop ~]# firewall-cmd --reload
success
[root@unixcop ~]#
Neue Solr-Sammlung erstellen
Eine Sammlung ist die Gruppe von Kernen, die zusammen einen einzelnen logischen Index bilden. Eine Sammlung hat einen anderen Satz von Konfigurationsdateien und Schemadefinitionen als andere Sammlungen. Sie können eine Sammlung erstellen, indem Sie den folgenden Befehl ausführen:
[root@unixcop ~]# su - solr -c "/opt/solr/bin/solr create -c Unixcop_col1 -n data_driven_schema_configs"

Created new core 'Unixcop_col1'
[root@unixcop ~]#
Greifen Sie auf das Solr-Admin-Panel zu
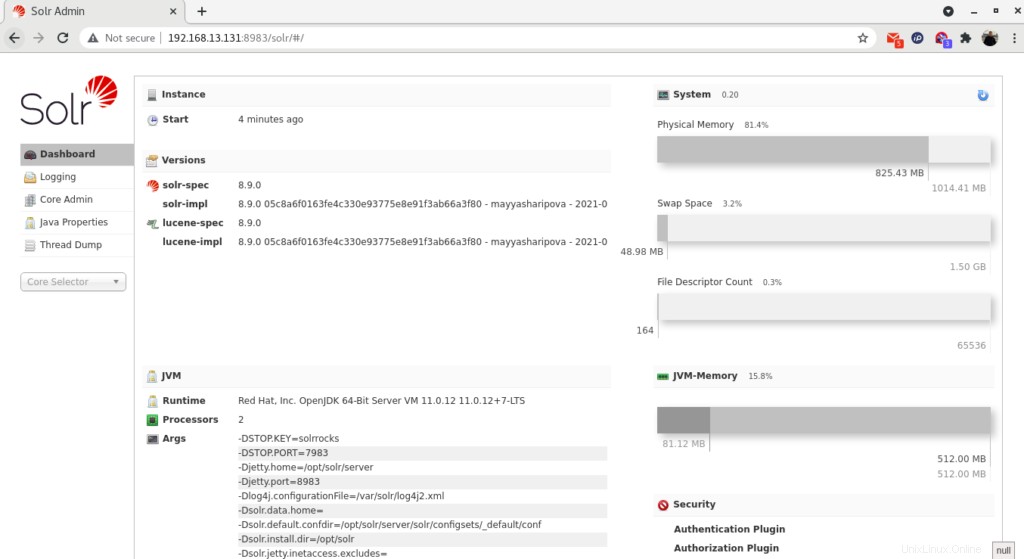
Standardmäßig läuft der Solr-Server auf Port 8983. Greifen Sie in Ihrem Webbrowser über die Server-IP-Adresse oder den Hostnamen mit Port 8983 auf das Solr-Dashboard zu.
http://ip_address:8983/

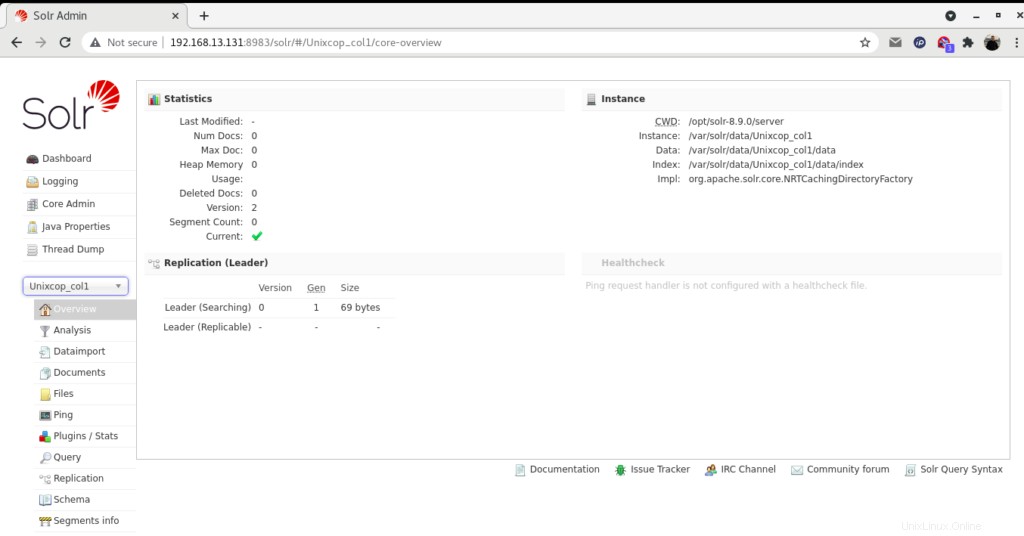
Sie können die Statistik der erstellten Sammlung mit dem Namen „Unixcop_col1“ anzeigen. Klicken Sie auf „Core Selector“ und wählen Sie die erstellte Sammlung aus.

Schlussfolgerung
In dieser Installationsanleitung haben Sie gelernt, wie Sie Apache Solr Enterprise Server installieren auf CentOS / RHEL 8.