Dieses Tutorial ist Copyright (c) 2008 von Falko Timme. Es ist abgeleitet von einem Tutorial von Christoph Haas, das Sie unter http://workaround.org finden. Es steht Ihnen frei, dieses Tutorial unter der Creative Commons-Lizenz 2.5 oder einer späteren Version zu verwenden.
Dieses Dokument beschreibt, wie Sie einen Postfix-basierten Mailserver installieren, der auf virtuellen Benutzern und Domänen basiert, d. h. Benutzern und Domänen, die sich in einer MySQL-Datenbank befinden. Ich werde auch die Installation und Konfiguration von Courier (Courier-POP3, Courier-IMAP) demonstrieren, damit Courier sich bei derselben MySQL-Datenbank authentifizieren kann, die Postfix verwendet.
Der resultierende Postfix-Server ist SMTP-AUTH-fähig und TLS und Quote (Kontingent ist standardmäßig nicht in Postfix integriert, ich werde zeigen, wie Sie Ihr Postfix entsprechend patchen können). Passwörter werden verschlüsselt gespeichert Formular in der Datenbank (die meisten Dokumente, die ich gefunden habe, befassten sich mit Passwörtern im Klartext, was ein Sicherheitsrisiko darstellt). Darüber hinaus behandelt dieses Tutorial die Installation von Amavisd , SpamAssassin und ClamAV damit E-Mails auf Spam und Viren gescannt werden. Ich werde auch zeigen, wie man SquirrelMail installiert als Webmail-Schnittstelle, damit Benutzer E-Mails lesen und senden und ihre Passwörter ändern können.
Der Vorteil eines solchen „virtuellen“ Setups (virtuelle Benutzer und Domänen in einer MySQL-Datenbank) ist, dass es wesentlich performanter ist als ein Setup, das auf „echten“ Systembenutzern basiert. Mit diesem virtuellen Setup kann Ihr Mailserver Tausende von Domänen und Benutzern verwalten. Außerdem ist es einfacher zu administrieren, da Sie sich nur mit der MySQL-Datenbank befassen müssen, wenn Sie neue Benutzer/Domains hinzufügen oder bestehende bearbeiten. Keine Postmap-Befehle mehr zum Erstellen von db-Dateien, kein erneutes Laden von Postfix usw. Für die Verwaltung der MySQL-Datenbank können Sie webbasierte Tools wie phpMyAdmin verwenden, die auch in diesem Howto installiert werden. Der dritte Vorteil ist, dass Benutzer eine E-Mail-Adresse als Benutzernamen haben (statt Benutzername + E-Mail-Adresse), was einfacher zu verstehen und zu merken ist.
Dieses Howto ist als praktischer Leitfaden gedacht; es deckt nicht die theoretischen Hintergründe ab. Sie werden in vielen anderen Dokumenten im Internet behandelt.
Dieses Dokument wird ohne jegliche Gewährleistung geliefert! Ich möchte sagen, dass dies nicht die einzige Möglichkeit ist, ein solches System einzurichten. Es gibt viele Wege, dieses Ziel zu erreichen, aber ich gehe diesen Weg. Ich gebe keine Garantie dafür, dass dies bei Ihnen funktioniert!
1 Vorbemerkung
Dieses Tutorial basiert auf Ubuntu 8.04 Server (Hardy Heron), daher sollten Sie eine grundlegende Ubuntu 8.04 Server-Installation einrichten, bevor Sie mit diesem Tutorial fortfahren (z. B. wie auf den Seiten 1 - 3 in diesem Tutorial gezeigt:Der perfekte Server - Ubuntu Hardy Heron (Ubuntu 8.04 LTS-Server)). Das System sollte eine statische IP-Adresse haben. Ich verwende 192.168.0.100 als IP-Adresse in diesem Tutorial und server1.example.com als Hostnamen.
Stellen Sie sicher, dass Sie als root angemeldet sind (geben Sie
einsudo su
um root zu werden), da wir alle Schritte aus diesem Tutorial als root-Benutzer ausführen müssen.
Es ist sehr wichtig, dass Sie /bin/sh zu einem symbolischen Link zu /bin/bash...
machenln -sf /bin/bash /bin/sh
... und dass Sie AppArmor deaktivieren:
/etc/init.d/apparmor stop
update-rc.d -f apparmor remove
2 Installieren Sie Postfix, Courier, Saslauthd, MySQL, phpMyAdmin
Um Postfix, Courier, Saslauthd, MySQL und phpMyAdmin zu installieren, führen wir einfach
ausapt-get install postfix postfix-mysql postfix-doc mysql-client mysql-server courier-authdaemon courier-authlib-mysql courier-pop courier-pop-ssl courier-imap courier-imap-ssl postfix-tls libsasl2-2 libsasl2-modules libsasl2-modules-sql sasl2-bin libpam-mysql openssl phpmyadmin apache2 libapache2-mod-php5 php5 php5-mysql libpam-smbpass
Ihnen werden einige Fragen gestellt:
Neues Passwort für den MySQL-Benutzer „root“:<-- yourrootsqlpassword
Passwort für den MySQL-Benutzer „root“ wiederholen:<-- yourrootsqlpassword
Verzeichnisse für webbasierte Verwaltung erstellen? <-- Nein
Allgemeine Art der E-Mail-Konfiguration:<-- Internet-Site
System-E-Mail-Name:<-- server1.example.com
SSL-Zertifikat erforderlich <-- Ok
Webserver zur automatischen Neukonfiguration:<-- apache2
3 Wenden Sie den Quoten-Patch auf Postfix an
Wir müssen die Postfix-Quellen besorgen, sie mit dem Quota-Patch patchen, neue Postfix-.deb-Pakete erstellen und diese .deb-Pakete installieren:
apt-get install build-essential dpkg-dev fakeroot debhelper libgdbm-dev libldap2-dev libpcre3-dev libssl-dev libsasl2-dev postgresql-server-dev-8.2 po-debconf dpatch libmysqlclient15-dev lsb-release libcdb-dev libdb-dev
cd /usr/src
apt-get source postfix
(Stellen Sie sicher, dass Sie in den folgenden Befehlen die richtige Postfix-Version verwenden. Ich habe Postfix 2.5.1 installiert. Sie können Ihre Postfix-Version herausfinden, indem Sie
ausführenpostconf -d | grep mail_version
Die Ausgabe sollte so aussehen:
[E-Mail-geschützt]:/usr/src# postconf -d | grep mail_version
mail_version =2.5.1
milter_macro_v =$mail_name $mail_version
[email protected]:/usr/src#
)
wget http://vda.sourceforge.net/VDA/postfix-2.5.1-vda-ng.patch.gz
gunzip postfix-2.5.1-vda-ng.patch.gz
cd postfix -2.5.1
patch -p1 <../postfix-2.5.1-vda-ng.patch
dpkg-buildpackage
Möglicherweise sehen Sie am Ende des Befehls dpkg-buildpackage eine Warnung wie diese:
dpkg-buildpackage: warning: Failed to sign .dsc and .changes file
Sie können diese Nachricht ignorieren.
Jetzt gehen wir ein Verzeichnis nach oben, dort wurden die neuen .deb-Pakete erstellt:
cd ..
Der Befehl
ls -l
zeigt Ihnen die verfügbaren Pakete:
[email protected]:/usr/src# ls -l
insgesamt 5804
drwxr-sr-x 19 root src 4096 2008-05-15 00:36 postfix-2.5.1
- rw-r--r-- 1 root src 235739 2008-05-15 00:35 postfix_2.5.1-2ubuntu1.diff.gz
-rw-r--r-- 1 root src 787 2008-05- 15 00:35 postfix_2.5.1-2ubuntu1.dsc
-rw-r--r-- 1 root src 2236 2008-05-15 00:37 postfix_2.5.1-2ubuntu1_i386.changes
-rw- r--r-- 1 root src 1165838 2008-05-15 00:37 postfix_2.5.1-2ubuntu1_i386.deb
-rw-r--r-- 1 root src 3153629 2008-02-26 03:04 postfix_2.5.1.orig.tar.gz
-rw-r--r-- 1 root src 57952 2008-03-24 01:51 postfix-2.5.1-vda-ng.patch
- rw-r--r-- 1 root src 39796 2008-05-15 00:37 postfix-cdb_2.5.1-2ubuntu1_i386.deb
-rw-r--r-- 1 root src 139888 2008-05- 15 00:37 postfix-dev_2.5.1-2ubuntu1_all.deb
-rw-r--r-- 1 root src 916386 2008-05-15 00:37 postfix-doc_2.5.1-2ubuntu1_all.deb
-rw-r--r-- 1 root src 46694 2008-05-15 00:37 postfix-ldap_2.5.1-2ubuntu1_i386.deb
-rw-r--r-- 1 root src 4 1730 2008-05-15 00:37 postfix-mysql_2.5.1-2ubuntu1_i386.deb
-rw-r--r-- 1 root src 41530 2008-05-15 00:37 postfix-pcre_2.5.1-2ubuntu1_i386 .deb
-rw-r--r-- 1 root src 41796 2008-05-15 00:37 postfix-pgsql_2.5.1-2ubuntu1_i386.deb
[email protected]:/usr/src#
Wählen Sie die Pakete postfix und postfix-mysql aus und installieren Sie sie wie folgt:
dpkg -i postfix_2.5.1-2ubuntu1_i386.deb
dpkg -i postfix-mysql_2.5.1-2ubuntu1_i386.deb
4 Erstellen Sie die MySQL-Datenbank für Postfix/Courier
Jetzt erstellen wir eine Datenbank namens mail:
mysqladmin -u root -p create mail
Als nächstes gehen wir zur MySQL-Shell:
mysql -u root -p
Auf der MySQL-Shell erstellen wir den Benutzer mail_admin mit dem Passwort mail_admin_password (ersetzen Sie es durch Ihr eigenes Passwort), der die Berechtigungen SELECT, INSERT, UPDATE, DELETE in der Mail-Datenbank hat. Dieser Benutzer wird von Postfix und Courier verwendet, um sich mit der Mail-Datenbank zu verbinden:
GRANT SELECT, INSERT, UPDATE, DELETE ON mail.* TO 'mail_admin'@'localhost' IDENTIFIED BY 'mail_admin_password';
GRANT SELECT, INSERT, UPDATE, DELETE ON mail.* TO 'mail_admin'@'localhost. localdomain' IDENTIFIZIERT DURCH 'mail_admin_password';
FLUSH PRIVILEGES;
Immer noch auf der MySQL-Shell erstellen wir die von Postfix und Courier benötigten Tabellen:
USE mail;
CREATE TABLE domains (
domain varchar(50) NOT NULL,
PRIMARY KEY (domain) )
TYPE=MyISAM;
CREATE TABLE forwardings (
source varchar(80) NOT NULL,
destination TEXT NOT NULL,
PRIMARY KEY (source) )
TYPE=MyISAM;
CREATE TABLE-Benutzer (
E-Mail-Varchar(80) NOT NULL,
Passwort-Varchar(20) NOT NULL,
Quote INT(10) DEFAULT '10485760',
PRIMARY KEY (E-Mail )
) TYPE=MyISAM;
CREATE TABLE transport (
domain varchar(128) NOT NULL default '',
transport varchar(128) NOT NULL default '',
UNIQUE KEY domain (domain)
) TYPE =MyISAM;
quit;
Wie Sie vielleicht bemerkt haben, mit dem Beenden; Befehl haben wir die MySQL-Shell verlassen und befinden uns wieder auf der Linux-Shell.
Die Domänen Tabelle speichert jede virtuelle Domain, für die Postfix E-Mails erhalten soll (z. B. example.com ).
| Domäne |
| beispiel.com |
Die Weiterleitungen Tabelle dient zum Aliasing einer E-Mail-Adresse zu einer anderen, z. E-Mails für [email protected] weiterleiten an [email protected] .
| Quelle | Ziel |
| [E-Mail-geschützt] | [E-Mail-geschützt] |
Die Benutzer Tabelle speichert alle virtuellen Benutzer (d. h. E-Mail-Adressen, weil E-Mail-Adresse und Benutzername identisch sind) und Passwörter (in verschlüsselt Formular!) und einen Kontingentwert für jedes Postfach (in diesem Beispiel ist der Standardwert 10485760 Bytes, was 10 MB entspricht).
| Passwort | Kontingent | |
| [E-Mail-geschützt] | No9.E4skNvGa. ("geheim" in verschlüsselter Form) | 10485760 |
Der Transport Tabelle ist optional, sie ist für fortgeschrittene Benutzer. Es erlaubt, Mails für einzelne Benutzer, ganze Domänen oder alle Mails an einen anderen Server weiterzuleiten. Beispiel:
| Domäne | Transport |
| beispiel.com | smtp:[1.2.3.4] |
würde alle E-Mails für example.com weiterleiten über das SMTP-Protokoll an den Server mit der IP-Adresse 1.2.3.4 (die eckigen Klammern [] bedeutet "keine Suche nach dem MX-DNS-Eintrag durchführen" (was für IP-Adressen sinnvoll ist ...). Wenn Sie stattdessen einen vollständig qualifizierten Domänennamen (FQDN) verwenden, würden Sie die eckigen Klammern nicht verwenden.).
Übrigens (ich gehe davon aus, dass die IP-Adresse Ihres Mailserversystems 192.168.0.100 ist) Sie können über http://192.168.0.100/phpmyadmin/ in einem Browser auf phpMyAdmin zugreifen und sich als mail_admin anmelden. Dann können Sie einen Blick in die Datenbank werfen. Später können Sie mit phpMyAdmin Ihren Mailserver verwalten.
5 Postfix konfigurieren
Jetzt müssen wir Postfix mitteilen, wo es alle Informationen in der Datenbank finden kann. Dazu müssen wir sechs Textdateien erstellen. Sie werden feststellen, dass ich Postfix anweise, sich mit MySQL über die IP-Adresse 127.0.0.1 anstelle von localhost zu verbinden. Dies liegt daran, dass Postfix in einem Chroot-Gefängnis läuft und keinen Zugriff auf den MySQL-Socket hat, den es zu verbinden versuchen würde, wenn ich Postfix anweise, localhost zu verwenden. Wenn ich 127.0.0.1 verwende, verwendet Postfix TCP-Netzwerke, um sich mit MySQL zu verbinden, was selbst in einem Chroot-Gefängnis kein Problem darstellt (die Alternative wäre, den MySQL-Socket in das Chroot-Gefängnis zu verschieben, was einige andere Probleme verursacht).
Bitte stellen Sie sicher, dass /etc/mysql/my.cnf die folgende Zeile enthält:
vi /etc/mysql/my.cnf
[...] bind-address = 127.0.0.1 [...] |
Wenn Sie /etc/mysql/my.cnf ändern mussten, starten Sie MySQL bitte jetzt neu:
/etc/init.d/mysql restart
Ausführen
netstat -tap | grep mysql
um sicherzustellen, dass MySQL auf 127.0.0.1 (localhost.localdomain) lauscht:
[email protected]:/usr/src# netstat -tap | grep mysql
tcp 0 0 localhost.localdo:mysql *:* LISTEN 6177/mysqld
[email protected]:/usr/src#
Lassen Sie uns nun unsere sechs Textdateien erstellen.
vi /etc/postfix/mysql-virtual_domains.cf
user = mail_admin password = mail_admin_password dbname = mail query = SELECT domain AS virtual FROM domains WHERE domain='%s' hosts = 127.0.0.1 |
vi /etc/postfix/mysql-virtual_forwardings.cf
user = mail_admin password = mail_admin_password dbname = mail query = SELECT destination FROM forwardings WHERE source='%s' hosts = 127.0.0.1 |
vi /etc/postfix/mysql-virtual_mailboxes.cf
user = mail_admin password = mail_admin_password dbname = mail query = SELECT CONCAT(SUBSTRING_INDEX(email,'@',-1),'/',SUBSTRING_INDEX(email,'@',1),'/') FROM users WHERE email='%s' hosts = 127.0.0.1 |
vi /etc/postfix/mysql-virtual_email2email.cf
user = mail_admin password = mail_admin_password dbname = mail query = SELECT email FROM users WHERE email='%s' hosts = 127.0.0.1 |
vi /etc/postfix/mysql-virtual_transports.cf
user = mail_admin password = mail_admin_password dbname = mail query = SELECT transport FROM transport WHERE domain='%s' hosts = 127.0.0.1 |
vi /etc/postfix/mysql-virtual_mailbox_limit_maps.cf
user = mail_admin password = mail_admin_password dbname = mail query = SELECT quota FROM users WHERE email='%s' hosts = 127.0.0.1 |
Ändern Sie dann die Berechtigungen und die Gruppe dieser Dateien:
chmod o=/etc/postfix/mysql-virtual_*.cf
chgrp postfix /etc/postfix/mysql-virtual_*.cf
Jetzt erstellen wir einen Benutzer und eine Gruppe namens vmail mit dem Home-Verzeichnis /home/vmail. Hier werden alle Postfächer gespeichert.
groupadd -g 5000 vmail
useradd -g vmail -u 5000 vmail -d /home/vmail -m
Als nächstes nehmen wir eine Postfix-Konfiguration vor. Stellen Sie sicher, dass Sie server1.example.com durch einen gültigen FQDN ersetzen, sonst funktioniert Ihr Postfix möglicherweise nicht richtig!
postconf -e 'myhostname =server1.example.com'
postconf -e 'mydestination =server1.example.com, localhost, localhost.localdomain'
postconf -e 'mynetworks =127.0.0.0/8'
postconf -e 'virtual_alias_domains ='
postconf -e 'virtual_alias_maps =proxy:mysql:/etc/postfix/mysql-virtual_forwardings.cf, mysql:/etc/postfix/mysql-virtual_email2email.cf'
postconf -e 'virtual_mailbox_domains =proxy:mysql:/etc/postfix/mysql-virtual_domains.cf'
postconf -e 'virtual_mailbox_maps =proxy:mysql:/etc/postfix/mysql-virtual_mailboxes.cf'
postconf -e 'virtual_mailbox_base =/home/vmail'
postconf -e 'virtual_uid_maps =static:5000'
postconf -e 'virtual_gid_maps =static:5000'
postconf -e ' smtpd_sasl_auth_enable =yes'
postconf -e 'broken_sasl_auth_clients =yes'
postconf -e 'smtpd_sasl_authenticated_header =yes'
postconf -e 'smtpd_recipient_restrictions =permission_mynetworks, permission_sasl_authenticated, respond_unauth_destination'.
postconf -e 'smtpd_use_tls =yes'
postconf -e 'smtpd_tls_cert_file =/etc/postfix/smtpd.cert'
postconf -e 'smtpd_tls_key_file =/etc/postfix/smtpd.key'
postconf -e 'transport_maps =proxy:mysql:/etc/postfix/mysql-virtual_transports.cf'
postconf -e 'virtual_create_maildirsize =yes'
postconf -e 'virtual_maildir_extended =yes'
postconf - e 'virtual_mailbox_limit_maps =proxy:mysql:/etc/postfix/mysql-virtual_mailbox_limit_maps.cf'
postconf -e 'virtual_mailbox_limit_override =yes'
postconf -e 'virtual_maildir_limit_message ="Der Benutzer, den Sie erreichen möchten, ist über Quota."'
postconf -e 'virtual_overquota_bounce =yes'
postconf -e 'proxy_read_maps =$local_recipient_maps $mydestination $virtual_alias_maps $virtual_alias_domains $virtual_mailbox_maps $virtual_mailbox_domains $relay_recipient_maps $relay_domains $canonical_maps $sender_canonical_maps $maps_canonical_maps relocated_maps $transport_maps $mynetworks $virtual_mailbox_limit_maps'
Anschließend erstellen wir das für TLS benötigte SSL-Zertifikat:
cd /etc/postfix
openssl req -new -outform PEM -out smtpd.cert -newkey rsa:2048 -nodes -keyout smtpd.key -keyform PEM -days 365 -x509
Ländername (2-Buchstaben-Code) [AU]:<-- Geben Sie Ihren Ländernamen ein (z. B. "DE").
Staats- oder Provinzname (vollständiger Name) [Some-State]:<-- Geben Sie Ihren Staat ein oder Provinzname.
Ortsname (zB Stadt) []:<-- Geben Sie Ihre Stadt ein.
Organisationsname (zB Firma) [Internet Widgits Pty Ltd]:<-- Geben Sie Ihren Organisationsnamen ein (z. B. der Name Ihres Unternehmens).
Name der Organisationseinheit (z. B. Abteilung) []:<-- Geben Sie den Namen Ihrer Organisationseinheit ein (z. B. "IT-Abteilung").
Allgemeiner Name (z. B. IHR Name) []:<-- Geben Sie den vollständig qualifizierten Domänennamen des Systems ein (z. B. "server1.example.com").
E-Mail-Adresse []:<-- Geben Sie Ihre E-Mail-Adresse ein.
Ändern Sie dann die Berechtigungen des smtpd.key:
chmod o= /etc/postfix/smtpd.key
6 Saslauthd konfigurieren
Erster Lauf
mkdir -p /var/spool/postfix/var/run/saslauthd
Bearbeiten Sie dann /etc/default/saslauthd. Setzen Sie START auf yes und ändern Sie die Zeile OPTIONS="-c -m /var/run/saslauthd" in OPTIONS="-c -m /var/spool/postfix/var/run/saslauthd -r":
vi /etc/default/saslauthd
# # Settings for saslauthd daemon # Please read /usr/share/doc/sasl2-bin/README.Debian for details. # # Should saslauthd run automatically on startup? (default: no) START=yes # Description of this saslauthd instance. Recommended. # (suggestion: SASL Authentication Daemon) DESC="SASL Authentication Daemon" # Short name of this saslauthd instance. Strongly recommended. # (suggestion: saslauthd) NAME="saslauthd" # Which authentication mechanisms should saslauthd use? (default: pam) # # Available options in this Debian package: # getpwent -- use the getpwent() library function # kerberos5 -- use Kerberos 5 # pam -- use PAM # rimap -- use a remote IMAP server # shadow -- use the local shadow password file # sasldb -- use the local sasldb database file # ldap -- use LDAP (configuration is in /etc/saslauthd.conf) # # Only one option may be used at a time. See the saslauthd man page # for more information. # # Example: MECHANISMS="pam" MECHANISMS="pam" # Additional options for this mechanism. (default: none) # See the saslauthd man page for information about mech-specific options. MECH_OPTIONS="" # How many saslauthd processes should we run? (default: 5) # A value of 0 will fork a new process for each connection. THREADS=5 # Other options (default: -c -m /var/run/saslauthd) # Note: You MUST specify the -m option or saslauthd won't run! # # See /usr/share/doc/sasl2-bin/README.Debian for Debian-specific information. # See the saslauthd man page for general information about these options. # # Example for postfix users: "-c -m /var/spool/postfix/var/run/saslauthd" #OPTIONS="-c -m /var/run/saslauthd" OPTIONS="-c -m /var/spool/postfix/var/run/saslauthd -r" |
Erstellen Sie dann die Datei /etc/pam.d/smtp. Es sollte nur die folgenden zwei Zeilen enthalten (stellen Sie sicher, dass Sie Ihre korrekten Datenbankdetails eingeben):
vi /etc/pam.d/smtp
auth required pam_mysql.so user=mail_admin passwd=mail_admin_password host=127.0.0.1 db=mail table=users usercolumn=email passwdcolumn=password crypt=1 account sufficient pam_mysql.so user=mail_admin passwd=mail_admin_password host=127.0.0.1 db=mail table=users usercolumn=email passwdcolumn=password crypt=1 |
Als nächstes erstellen Sie die Datei /etc/postfix/sasl/smtpd.conf. Es sollte so aussehen:
vi /etc/postfix/sasl/smtpd.conf
pwcheck_method: saslauthd mech_list: plain login allow_plaintext: true auxprop_plugin: mysql sql_hostnames: 127.0.0.1 sql_user: mail_admin sql_passwd: mail_admin_password sql_database: mail sql_select: select password from users where email = '%u' |
Als nächstes fügen Sie den postfix-Benutzer zur sasl-Gruppe hinzu (dies stellt sicher, dass Postfix die Berechtigung hat, auf saslauthd zuzugreifen):
adduser postfix sasl
Starten Sie dann Postfix und Saslauthd neu:
/etc/init.d/postfix restart
/etc/init.d/saslauthd restart
7 Kurier konfigurieren
Jetzt müssen wir Courier mitteilen, dass es sich gegen unsere MySQL-Datenbank authentifizieren soll. Bearbeiten Sie zunächst /etc/courier/authdaemonrc und ändern Sie den Wert von authmodulelist so, dass er lautet:
vi /etc/courier/authdaemonrc
[...] authmodulelist="authmysql" [...] |
Erstellen Sie dann ein Backup von /etc/courier/authmysqlrc und leeren Sie die alte Datei:
cp /etc/courier/authmysqlrc /etc/courier/authmysqlrc_orig
cat /dev/null> /etc/courier/authmysqlrc
Öffnen Sie dann /etc/courier/authmysqlrc und fügen Sie die folgenden Zeilen ein:
vi /etc/courier/authmysqlrc
MYSQL_SERVER localhost MYSQL_USERNAME mail_admin MYSQL_PASSWORD mail_admin_password MYSQL_PORT 0 MYSQL_DATABASE mail MYSQL_USER_TABLE users MYSQL_CRYPT_PWFIELD password #MYSQL_CLEAR_PWFIELD password MYSQL_UID_FIELD 5000 MYSQL_GID_FIELD 5000 MYSQL_LOGIN_FIELD email MYSQL_HOME_FIELD "/home/vmail" MYSQL_MAILDIR_FIELD CONCAT(SUBSTRING_INDEX(email,'@',-1),'/',SUBSTRING_INDEX(email,'@',1),'/') #MYSQL_NAME_FIELD MYSQL_QUOTA_FIELD quota |
Starten Sie dann Courier neu:
/etc/init.d/courier-authdaemon restart
/etc/init.d/courier-imap restart
/etc/init.d/courier-imap-ssl restart
/etc/ init.d/courier-pop restart
/etc/init.d/courier-pop-ssl restart
Durch Ausführen
telnet localhost pop3
können Sie sehen, ob Ihr POP3-Server ordnungsgemäß funktioniert. Es sollte +OK zurückgeben. Hallo. (Geben Sie quit ein, um zur Linux-Shell zurückzukehren.)
[email protected]:/etc/postfix# telnet localhost pop3
Versuche 127.0.0.1...
Verbunden mit localhost.localdomain.
Escape-Zeichen ist '^]'.
+OK Hallo.
beenden
+OK Viel Glück beim nächsten Mal.
Verbindung von fremdem Host geschlossen.
[email protected]:/etc/postfix#
8 /etc/aliases ändern
Jetzt sollten wir /etc/aliases öffnen. Stellen Sie sicher, dass postmaster auf root zeigt und root auf Ihren eigenen Benutzernamen oder Ihre E-Mail-Adresse, z. so:
vi /etc/aliases
[...] postmaster: root root: [email protected] [...] |
oder so (wenn Administrator Ihr eigener Benutzername ist):
[...] postmaster: root root: administrator [...] |
Wann immer Sie /etc/aliases ändern, müssen Sie
ausführennewaliases
anschließend Postfix neu starten:
/etc/init.d/postfix restart
9 Installieren Sie amavisd-new, SpamAssassin und ClamAV
Um amavisd-new, spamassassin und clamav zu installieren, führen Sie den folgenden Befehl aus:
apt-get install amavisd-new spamassassin clamav clamav-daemon zoo unzip bzip2 unzoo libnet-ph-perl libnet-snpp-perl libnet-telnet-perl nomarch lzop pax
Danach müssen wir amavisd-new konfigurieren. Die Konfiguration ist in verschiedene Dateien aufgeteilt, die sich im Verzeichnis /etc/amavis/conf.d befinden. Sehen Sie sich jeden von ihnen an, um sich mit der Konfiguration vertraut zu machen. Die meisten Einstellungen sind in Ordnung, aber wir müssen drei Dateien ändern:
Zuerst müssen wir ClamAV und SpamAssassin in /etc/amavis/conf.d/15-content_filter_mode aktivieren, indem wir die Zeilen @bypass_virus_checks_maps und @bypass_spam_checks_maps auskommentieren:
vi /etc/amavis/conf.d/15-content_filter_mode
Die Datei sollte folgendermaßen aussehen:
use strict; # You can modify this file to re-enable SPAM checking through spamassassin # and to re-enable antivirus checking. # # Default antivirus checking mode # Uncomment the two lines below to enable it back # @bypass_virus_checks_maps = ( \%bypass_virus_checks, \@bypass_virus_checks_acl, \$bypass_virus_checks_re); # # Default SPAM checking mode # Uncomment the two lines below to enable it back # @bypass_spam_checks_maps = ( \%bypass_spam_checks, \@bypass_spam_checks_acl, \$bypass_spam_checks_re); 1; # ensure a defined return |
Und dann sollten Sie sich die Spam-Einstellungen und die Aktionen für Spam-/Virus-Mails in /etc/amavis/conf.d/20-debian_defaults ansehen. Sie müssen nichts ändern, wenn die Standardeinstellungen für Sie in Ordnung sind. Die Datei enthält viele Erklärungen, sodass die Einstellungen hier nicht erklärt werden müssen:
vi /etc/amavis/conf.d/20-debian_defaults
[...] $QUARANTINEDIR = "$MYHOME/virusmails"; $quarantine_subdir_levels = 1; # enable quarantine dir hashing $log_recip_templ = undef; # disable by-recipient level-0 log entries $DO_SYSLOG = 1; # log via syslogd (preferred) $syslog_ident = 'amavis'; # syslog ident tag, prepended to all messages $syslog_facility = 'mail'; $syslog_priority = 'debug'; # switch to info to drop debug output, etc $enable_db = 1; # enable use of BerkeleyDB/libdb (SNMP and nanny) $enable_global_cache = 1; # enable use of libdb-based cache if $enable_db=1 $inet_socket_port = 10024; # default listening socket $sa_spam_subject_tag = '***SPAM*** '; $sa_tag_level_deflt = 2.0; # add spam info headers if at, or above that level $sa_tag2_level_deflt = 6.31; # add 'spam detected' headers at that level $sa_kill_level_deflt = 6.31; # triggers spam evasive actions $sa_dsn_cutoff_level = 10; # spam level beyond which a DSN is not sent $sa_mail_body_size_limit = 200*1024; # don't waste time on SA if mail is larger $sa_local_tests_only = 0; # only tests which do not require internet access? [...] $final_virus_destiny = D_DISCARD; # (data not lost, see virus quarantine) $final_banned_destiny = D_BOUNCE; # D_REJECT when front-end MTA $final_spam_destiny = D_BOUNCE; $final_bad_header_destiny = D_PASS; # False-positive prone (for spam) [...] |
Bearbeiten Sie abschließend /etc/amavis/conf.d/50-user und fügen Sie die Zeile $pax='pax'; in der Mitte:
vi /etc/amavis/conf.d/50-user
use strict; # # Place your configuration directives here. They will override those in # earlier files. # # See /usr/share/doc/amavisd-new/ for documentation and examples of # the directives you can use in this file # $pax='pax'; #------------ Do not modify anything below this line ------------- 1; # ensure a defined return |
Führen Sie anschließend diese Befehle aus, um den clamav-Benutzer zur amavis-Gruppe hinzuzufügen und amavisd-new und ClamAV neu zu starten:
adduser clamav amavis
/etc/init.d/amavis restart
/etc/init.d/clamav-daemon restart
/etc/init.d/clamav-freshclam restart
Jetzt müssen wir Postfix so konfigurieren, dass eingehende E-Mails durch amavisd-new:
geleitet werden
postconf -e 'content_filter =amavis:[127.0.0.1]:10024'
postconf -e 'receive_override_options =no_address_mappings'
Hängen Sie anschließend die folgenden Zeilen an /etc/postfix/master.cf an:
vi /etc/postfix/master.cf
[...]
amavis unix - - - - 2 smtp
        -o smtp_data_done_timeout=1200
        -o smtp_send_xforward_command=yes

127.0.0.1:10025 inet n - - - - smtpd
        -o content_filter=
        -o local_recipient_maps=
        -o relay_recipient_maps=
        -o smtpd_restriction_classes=
        -o smtpd_client_restrictions=
        -o smtpd_helo_restrictions=
        -o smtpd_sender_restrictions=
        -o smtpd_recipient_restrictions=permit_mynetworks,reject
        -o mynetworks=127.0.0.0/8
        -o strict_rfc821_envelopes=yes
        -o receive_override_options=no_unknown_recipient_checks,no_header_body_checks
-o smtpd_bind_address=127.0.0.1 |
Starten Sie dann Postfix neu:
/etc/init.d/postfix restart
Jetzt ausführen
netstat -tap
und Sie sollten sehen, dass Postfix (Master) auf Port 25 (smtp) und 10025 lauscht, und amavisd-new auf Port 10024:
[email protected]:/etc/postfix# netstat -tap
Aktive Internetverbindungen (Server und hergestellt)
Proto Recv-Q Send-Q Lokale Adresse Ausländische Adresse Staat PID/Programmname
tcp 0 0 localhost.localdo:10024 *:* LISTEN 15645 / amavisd (MAST
tcp 0 0 localhost.localdo:10025 *:* LISTEN 16677 / master
tcp 0 0 localhost.localdo:mysql *:* Hören Sie 6177 /mysqld
tcp 0 0**:www*:*Hören Sie 5367 /apache2
TCP 0 0**:SMTP*:*Hören Sie 16677 /Master
TCP6 0 [::]:* IMAPS [::]:*Hören Sie 14020 /Courerertcpd
tcp6 0 0 [::]:pop3s [::]:*Hören Sie 14088 /CourIERTCPD
tcp6 0 0 [::]:pop3 [::]:* HÖREN 14051/c OurERTCPD
TCP6 0 0 [::]:IMAP2 [::]:*Hören Sie 13983 /Courerertcpd
tcp6 0 0 [::]:ssh [::]:*Hören 4006 /SSHD
tcp6 0 52 server1.example.com:ssh 192.168.0.210%8191:3340 ESTABLISHED 4059/0
[email protected]:/etc/postfix#
10 Installieren Sie Razor, Pyzor und DCC und konfigurieren Sie SpamAssassin
Razor, Pyzor und DCC sind Spamfilter, die ein kollaboratives Filternetzwerk verwenden. Um Razor und Pyzor zu installieren, führen Sie
ausapt-get install razor pyzor
DCC ist in den Ubuntu 8.04-Repositories nicht verfügbar, also installieren wir es wie folgt:
cd /tmp
wget http://launchpadlibrarian.net/11564361/dcc-server_1.3.42-5_i386.deb
wget http://launchpadlibrarian.net/11564359/dcc-common_1.3.42-5_i386. deb
dpkg -i dcc-common_1.3.42-5_i386.deb
dpkg -i dcc-server_1.3.42-5_i386.deb
Jetzt müssen wir SpamAssassin anweisen, diese drei Programme zu verwenden. Bearbeiten Sie /etc/spamassassin/local.cf und fügen Sie die folgenden Zeilen hinzu:
vi /etc/spamassassin/local.cf
[...] #dcc use_dcc 1 dcc_path /usr/bin/dccproc #pyzor use_pyzor 1 pyzor_path /usr/bin/pyzor #razor use_razor2 1 razor_config /etc/razor/razor-agent.conf #bayes use_bayes 1 use_bayes_rules 1 bayes_auto_learn 1 |
Dann müssen wir das DCC-Plugin in SpamAssassin aktivieren. Öffnen Sie /etc/spamassassin/v310.pre und kommentieren Sie die loadplugin Mail::SpamAssassin::Plugin::DCC line:
ausvi /etc/spamassassin/v310.pre
[...] # DCC - perform DCC message checks. # # DCC is disabled here because it is not open source. See the DCC # license for more details. # loadplugin Mail::SpamAssassin::Plugin::DCC [...] |
You can check your SpamAssassin configuration by executing:
spamassassin --lint
It shouldn't show any errors.
Restart amavisd-new afterwards:
/etc/init.d/amavis restart
Now we update our SpamAssassin rulesets as follows:
sa-update --no-gpg
We create a cron job so that the rulesets will be updated regularly. Ausführen
crontab -e
to open the cron job editor. Create the following cron job:
23 4 */2 * * /usr/bin/sa-update --no-gpg &> /dev/null |
This will update the rulesets every second day at 4.23h.
11 Quota Exceedance Notifications
If you want to get notifications about all the email accounts that are over quota, then do this:
cd /usr/local/sbin/
wget http://puuhis.net/vhcs/quota.txt
mv quota.txt quota_notify
chmod 755 quota_notify
Open /usr/local/sbin/quota_notify and edit the variables at the top. Further down in the file (towards the end) there are two lines where you should add a % sign:
vi /usr/local/sbin/quota_notify
[...]
my $POSTFIX_CF = "/etc/postfix/main.cf";
my $MAILPROG = "/usr/sbin/sendmail -t";
my $WARNPERCENT = 80;
my @POSTMASTERS = ('[email protected]');
my $CONAME = 'My Company';
my $COADDR = '[email protected]';
my $SUADDR = '[email protected]';
my $MAIL_REPORT = 1;
my $MAIL_WARNING = 1;
[...]
           print "Subject: WARNING: Your mailbox is $lusers{$luser}% full.\n";
[...]
           print "Your mailbox: $luser is $lusers{$luser}% full.\n\n";
[...] |
Ausführen
crontab -e
to create a cron job for that script:
0 0 * * * /usr/local/sbin/quota_notify &> /dev/null |
12 Test Postfix
To see if Postfix is ready for SMTP-AUTH and TLS, run
telnet localhost 25
After you have established the connection to your Postfix mail server type
ehlo localhost
If you see the lines
250-STARTTLS
und
250-AUTH LOGIN PLAIN
everything is fine:
[email protected]:/usr/local/sbin# telnet localhost 25
Trying 127.0.0.1...
Connected to localhost.localdomain.
Escape character is '^]'.
220 server1.example.com ESMTP Postfix (Ubuntu)
ehlo localhost
250-server1.example.com
250-PIPELINING
250-SIZE 10240000
250-VRFY
250-ETRN
250-STARTTLS
250-AUTH LOGIN PLAIN
250-AUTH=LOGIN PLAIN
250-ENHANCEDSTATUSCODES
250-8BITMIME
250 DSN
quit
221 2.0.0 Bye
Connection closed by foreign host.
[email protected]:/usr/local/sbin#
Type
quit
to return to the system shell.
13 Populate The Database And Test
To populate the database you can use the MySQL shell:
mysql -u root -p
USE mail;
At least you have to create entries in the tables domains and users :
INSERT INTO `domains` (`domain`) VALUES ('example.com');
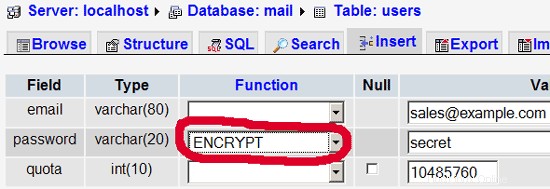
INSERT INTO `users` (`email`, `password`, `quota`) VALUES ('[email protected]', ENCRYPT('secret'), 10485760);
(Please take care that you use the ENCRYPT syntax in the second INSERT statement in order to encrypt the password!)
If you want to make entries in the other two tables, that would look like this:
INSERT INTO `forwardings` (`source`, `destination`) VALUES ('[email protected]', '[email protected]');
INSERT INTO `transport` (`domain`, `transport`) VALUES ('example.com', 'smtp:mail.example.com');
To leave the MySQL shell, type
quit;
For most people it is easier if they have a graphical front-end to MySQL; therefore you can also use phpMyAdmin (in this example under http://192.168.0.100/phpmyadmin/ or http://server1.example.com/phpmyadmin/) to administrate the mail Datenbank. Again, when you create a user, go sure that you use the ENCRYPT function to encrypt the password:
I do not think I have to explain the domains and users table further.
The forwardings table can have entries like the following:
| source | destination | |
| [email protected] | [email protected] | Redirects emails for [email protected] to [email protected] |
| @example.com | [email protected] | Creates a Catch-All account for [email protected] All emails to example.com will arrive at [email protected], except those that exist in the users table (i.e., if [email protected] exists in the users table, mails to [email protected] will still arrive at [email protected]). |
| @example.com | @anotherdomain.tld | This redirects all emails to example.com to the same user at anotherdomain.tld. E.g., emails to [email protected] will be forwarded to [email protected] |
| [email protected] | [email protected], [email protected] | Forward emails for [email protected] to two or more email addresses. All listed email addresses under destination receive a copy of the email. |
The transport table can have entries like these:
| domain | transport | |
| example.com | : | Delivers emails for example.com locally. This is as if this record would not exist in this table at all. |
| example.com | smtp:mail.anotherdomain.tld | Delivers all emails for example.com via smtp to the server mail.anotherdomain.com. |
| example.com | smtp:mail.anotherdomain.tld:2025 | Delivers all emails for example.com via smtp to the server mail.anotherdomain.com, but on port 2025, not 25 which is the default port for smtp. |
| example.com |
smtp:[1.2.3.4] | The square brackets prevent Postfix from doing lookups of the MX DNS record for the address in square brackets. Makes sense for IP addresses. |
| .example.com | smtp:mail.anotherdomain.tld | Mail for any subdomain of example.com is delivered to mail.anotherdomain.tld. |
| * | smtp:mail.anotherdomain.tld | All emails are delivered to mail.anotherdomain.tld. |
| [email protected] | smtp:mail.anotherdomain.tld | Emails for [email protected] are delivered to mail.anotherdomain.tld. |
See
man transport
for more details.
Please keep in mind that the order of entries in the transport table is important! The entries will be followed from the top to the bottom.
Important: Postfix uses a caching mechanism for the transports, therefore it might take a while until you changes in the transport table take effect. If you want them to take effect immediately, run
postfix reload
after you have made your changes in the transport table.
14 Send A Welcome Email For Creating Maildir
When you create a new email account and try to fetch emails from it (with POP3/IMAP) you will probably get error messages saying that the Maildir doesn't exist. The Maildir is created automatically when the first email arrives for the new account. Therefore it's a good idea to send a welcome email to a new account.
First, we install the mailx package:
apt-get install mailx
To send a welcome email to [email protected], we do this:
mailx [email protected]
You will be prompted for the subject. Type in the subject (e.g. Welcome), then press ENTER, and in the next line type your message. When the message is finished, press ENTER again so that you are in a new line, then press CTRL+D; if you don't want to cc the mail, press ENTER again:
[email protected]:/usr/local/sbin# mailx [email protected]
Subject:Welcome <-- ENTER
Welcome! Have fun with your new mail account. <-- ENTER
<-- CTRL+D
Cc:<-- ENTER
[email protected]:/usr/local/sbin#
15 Installing SquirrelMail
SquirrelMail is a webmail interface that will let your users send and receive emails in a browser. This chapter shows how to install it and adjust it to our setup so that users can even change their email account password from the SquirrelMail interface.
To install SquirrelMail, we run:
apt-get install squirrelmail php-pear
Next we copy the Apache configuration that comes with the SquirrelMail package to the /etc/apache2/conf.d directory and restart Apache:
cp /etc/squirrelmail/apache.conf /etc/apache2/conf.d/squirrelmail.conf
/etc/init.d/apache2 restart
SquirrelMail comes with some pre-installed plugins, unfortunately none of them is capable of letting us change our email password in our MySQL database. But there's the Change SQL Password plugin which we can install manually:
The plugin depends on the Pear-DB package so we install it:
pear install DB
Then we install the Change SQL Password plugin itself:
cd /usr/share/squirrelmail/plugins
wget http://www.squirrelmail.org/countdl.php?fileurl=http%3A%2F%2Fwww.squirrelmail.org%2Fplugins%2Fchange_sqlpass-3.3-1.2.tar.gz
tar xvfz change_sqlpass-3.3-1.2.tar.gz
cd change_sqlpass
cp config.php.sample config.php
Now we must edit config.php and adjust it to our setup. Please adjust the $csp_dsn, $lookup_password_query, $password_update_queries, $password_encryption, $csp_salt_static, and $csp_delimiter variables as follows and comment out $csp_salt_query:
vi config.php
[...]
$csp_dsn = 'mysql://mail_admin:[email protected]/mail';
[...]
$lookup_password_query = 'SELECT count(*) FROM users WHERE email = "%1" AND password = %4';
[...]
$password_update_queries = array('UPDATE users SET password = %4 WHERE email = "%1"');
[...]
$password_encryption = 'MYSQLENCRYPT';
[...]
$csp_salt_static = 'LEFT(password, 2)';
[...]
//$csp_salt_query = 'SELECT salt FROM users WHERE username = "%1"';
[...]
$csp_delimiter = '@';
[...] |
The complete file looks as follows:
<?php

/**
  * SquirrelMail Change SQL Password Plugin
  * Copyright (C) 2001-2002 Tyler Akins
  *               2002 Thijs Kinkhorst <[email protected]>
  *               2002-2005 Paul Lesneiwski <[email protected]>
  * This program is licensed under GPL. See COPYING for details
  *
  * @package plugins
  * @subpackage Change SQL Password
  *
  */


   // Global Variables, don't touch these unless you want to break the plugin
   //
   global $csp_dsn, $password_update_queries, $lookup_password_query,
          $force_change_password_check_query, $password_encryption,
          $csp_salt_query, $csp_salt_static, $csp_secure_port,
          $csp_non_standard_http_port, $csp_delimiter, $csp_debug,
          $min_password_length, $max_password_length, $include_digit_in_password,
          $include_uppercase_letter_in_password, $include_lowercase_letter_in_password,
          $include_nonalphanumeric_in_password;


   // csp_dsn
   //
   // Theoretically, any SQL database supported by Pear should be supported
   // here.  The DSN (data source name) must contain the information needed
   // to connect to your database backend. A MySQL example is included below.
   // For more details about DSN syntax and list of supported database types,
   // please see:
   //   http://pear.php.net/manual/en/package.database.db.intro-dsn.php
   //
   $csp_dsn = 'mysql://mail_admin:[email protected]/mail';


   // lookup_password_query
   //
   // This plugin will always verify the user's old password
   // against their login password, but an extra check can also
   // be done against the database for more security if you
   // desire.  If you do not need the extra password check,
   // make sure this setting is empty.
   //
   // This is a query that returns a positive value if a user
   // and password pair are found in the database.
   //
   // This query should return one value (one row, one column), the
   // value being ideally a one or a zero, simply indicating that
   // the user/password pair does in fact exist in the database.
   //
   //   %1 in this query will be replaced with the full username
   //      (including domain), such as "[email protected]"
   //   %2 in this query will be replaced with the username (without
   //      any domain portion), such as "jose"
   //   %3 in this query will be replaced with the domain name,
   //      such as "example.com"
   //   %4 in this query will be replaced with the current (old)
   //      password in whatever encryption format is needed per other
   //      plugin configuration settings (Note that the syntax of
   //      the password will be provided depending on your encryption
   //      choices, so you NEVER need to provide quotes around this
   //      value in the query here.)
   //   %5 in this query will be replaced with the current (old)
   //      password in unencrypted plain text.  If you do not use any
   //      password encryption, %4 and %5 will be the same values,
   //      except %4 will have double quotes around it and %5 will not.
   //
   //$lookup_password_query = '';
   // TERRIBLE SECURITY: $lookup_password_query = 'SELECT count(*) FROM users WHERE username = "%1" AND plain_password = "%5"';
   //$lookup_password_query = 'SELECT count(*) FROM users WHERE username = "%1" AND crypt_password = %4';
   $lookup_password_query = 'SELECT count(*) FROM users WHERE email = "%1" AND password = %4';


   // password_update_queries
   //
   // An array of SQL queries that will all be executed
   // whenever a password change attempt is made.
   //
   // Any number of queries may be included here.
   // The queries will be executed in the order given here.
   //
   //   %1 in all queries will be replaced with the full username
   //      (including domain), such as "[email protected]"
   //   %2 in all queries will be replaced with the username (without
   //      any domain portion), such as "jose"
   //   %3 in all queries will be replaced with the domain name,
   //      such as "example.com"
   //   %4 in all queries will be replaced with the new password
   //      in whatever encryption format is needed per other
   //      plugin configuration settings (Note that the syntax of
   //      the password will be provided depending on your
   //      encryption choices, so you NEVER need to provide quotes
   //      around this value in the queries here.)
   //   %5 in all queries will be replaced with the new password
   //      in unencrypted plain text - BEWARE!  If you do not use
   //      any password encryption, %4 and %5 will be the same
   //      values, except %4 will have double quotes around it
   //      and %5 will not.
   //
//   $password_update_queries = array(
//            'UPDATE users SET crypt_password = %4 WHERE username = "%1"',
//            'UPDATE user_flags SET force_change_pwd = 0 WHERE username = "%1"',
//            'UPDATE users SET crypt_password = %4, force_change_pwd = 0 WHERE username = "%1"',
//                                   );
   $password_update_queries = array('UPDATE users SET password = %4 WHERE email = "%1"');


   // force_change_password_check_query
   //
   // A query that checks for a flag that indicates if a user
   // should be forced to change their password.  This query
   // should return one value (one row, one column) which is
   // zero if the user does NOT need to change their password,
   // or one if the user should be forced to change it now.
   //
   // This setting should be an empty string if you do not wish
   // to enable this functionality.
   //
   //   %1 in this query will be replaced with the full username
   //      (including domain), such as "[email protected]"
   //   %2 in this query will be replaced with the username (without
   //      any domain portion), such as "jose"
   //   %3 in this query will be replaced with the domain name,
   //      such as "example.com"
   //
   //$force_change_password_check_query = 'SELECT IF(force_change_pwd = "yes", 1, 0) FROM users WHERE username = "%1"';
   //$force_change_password_check_query = 'SELECT force_change_pwd FROM users WHERE username = "%1"';
   $force_change_password_check_query = '';


   // password_encryption
   //
   // What encryption method do you use to store passwords
   // in your database?  Please use one of the following,
   // exactly as you see it:
   //
   //   NONE          Passwords are stored as plain text only
   //   MYSQLPWD      Passwords are stored using the MySQL password() function
   //   MYSQLENCRYPT  Passwords are stored using the MySQL encrypt() function
   //   PHPCRYPT      Passwords are stored using the PHP crypt() function
   //   MD5CRYPT      Passwords are stored using encrypted MD5 algorithm
   //   MD5           Passwords are stored as MD5 hash
   //
   //$password_encryption = 'MYSQLPWD';
   $password_encryption = 'MYSQLENCRYPT';


   // csp_salt_query
   // csp_salt_static
   //
   // Encryption types that need a salt need to know where to get
   // that salt.  If you have a constant, known salt value, you
   // should define it in $csp_salt_static.  Otherwise, leave that
   // value empty and define a value for the $csp_salt_query.
   //
   // Leave both values empty if you do not need (or use) salts
   // to encrypt your passwords.
   //
   // The query should return one value (one row, one column) which
   // is the salt value for the current user's password.  This
   // query is ignored if $csp_salt_static is anything but empty.
   //
   //   %1 in this query will be replaced with the full username
   //      (including domain), such as "[email protected]"
   //   %2 in this query will be replaced with the username (without
   //      any domain portion), such as "jose"
   //   %3 in this query will be replaced with the domain name,
   //      such as "example.com"
   //
   //$csp_salt_static = 'LEFT(crypt_password, 2)';
   //$csp_salt_static = '"a4"';  // use this format with MYSQLENCRYPT
   //$csp_salt_static = '$2$blowsomefish$';  // use this format with PHPCRYPT
   //$csp_salt_static = '';
   $csp_salt_static = 'LEFT(password, 2)';

   //$csp_salt_query = 'SELECT SUBSTRING_INDEX(crypt_password, '$', 1) FROM users WHERE username = "%1"';
   //$csp_salt_query = 'SELECT SUBSTRING(crypt_password, (LENGTH(SUBSTRING_INDEX(crypt_password, '$', 2)) + 2)) FROM users WHERE username = "%1"';
   //$csp_salt_query = 'SELECT salt FROM users WHERE username = "%1"';
   //$csp_salt_query = '';


   // csp_secure_port
   //
   // You may ensure that SSL encryption is used during password
   // change by setting this to the port that your HTTPS is served
   // on (443 is typical).  Set to zero if you do not wish to force
   // an HTTPS connection when users are changing their passwords.
   //
   // You may override this value for certain domains, users, or
   // service levels through the Virtual Host Login (vlogin) plugin
   // by setting a value(s) for $vlogin_csp_secure_port in the vlogin
   // configuration.
   //
   $csp_secure_port = 0;
   //$csp_secure_port = 443;


   // csp_non_standard_http_port
   //
   // If you serve standard HTTP web requests on a non-standard
   // port (anything other than port 80), you should specify that
   // port number here.  Set to zero otherwise.
   //
   // You may override this value for certain domains, users, or
   // service levels through the Virtual Host Login (vlogin) plugin
   // by setting a value(s) for $vlogin_csp_non_standard_http_port
   // in the vlogin configuration.
   //
   //$csp_non_standard_http_port = 8080;
   $csp_non_standard_http_port = 0;


   // min_password_length
   // max_password_length
   // include_digit_in_password
   // include_uppercase_letter_in_password
   // include_lowercase_letter_in_password
   // include_nonalphanumeric_in_password
   //
   // You can set the minimum and maximum password lengths that
   // you accept or leave those settings as zero to indicate that
   // no limit should be applied.
   //
   // Turn on any of the other settings here to check that the
   // new password contains at least one digit, upper case letter,
   // lower case letter and/or one non-alphanumeric character.
   //
   $min_password_length = 6;
   $max_password_length = 0;
   $include_digit_in_password = 0;
   $include_uppercase_letter_in_password = 0;
   $include_lowercase_letter_in_password = 0;
   $include_nonalphanumeric_in_password = 0;


   // csp_delimiter
   //
   // if your system has usernames with something other than
   // an "@" sign separating the user and domain portion,
   // specify that character here
   //
   //$csp_delimiter = '|';
   $csp_delimiter = '@';


   // debug mode
   //
   $csp_debug = 0;


?> |
The Change SQL Password plugin also depends on the Compatibility plugin which we install as follows:
cd /usr/share/squirrelmail/plugins
wget http://www.squirrelmail.org/countdl.php?fileurl=http%3A%2F%2Fwww.squirrelmail.org%2Fplugins%2Fcompatibility-2.0.11-1.0.tar.gz
tar xvfz compatibility-2.0.11-1.0.tar.gz
Now we must go into the SquirrelMail configuration and tell SquirrelMail that we use Courier as our POP3 and IMAP server and enable the Change SQL Password and the Compatibility plugins:
/usr/sbin/squirrelmail-configure
You'll see the following menu. Navigate through it as indicated:
SquirrelMail Configuration : Read: config.php (1.4.0)
---------------------------------------------------------
Main Menu --
1. Organization Preferences
2. Server Settings
3. Folder Defaults
4. General Options
5. Themes
6. Address Books
7. Message of the Day (MOTD)
8. Plugins
9. Database
10. Languages
D. Set pre-defined settings for specific IMAP servers
C Turn color on
S Save data
Q Quit
Command >> <-- D
SquirrelMail Configuration : Read: config.php
---------------------------------------------------------
While we have been building SquirrelMail, we have discovered some
preferences that work better with some servers that don't work so
well with others. If you select your IMAP server, this option will
set some pre-defined settings for that server.
Please note that you will still need to go through and make sure
everything is correct. This does not change everything. There are
only a few settings that this will change.
Please select your IMAP server:
bincimap = Binc IMAP server
courier = Courier IMAP server
cyrus = Cyrus IMAP server
dovecot = Dovecot Secure IMAP server
exchange = Microsoft Exchange IMAP server
hmailserver = hMailServer
macosx = Mac OS X Mailserver
mercury32 = Mercury/32
uw = University of Washington's IMAP server
quit = Do not change anything
Command >> <-- courier
imap_server_type = courier
default_folder_prefix = INBOX.
trash_folder = Trash
sent_folder = Sent
draft_folder = Drafts
show_prefix_option = false
default_sub_of_inbox = false
show_contain_subfolders_option = false
optional_delimiter = .
delete_folder = true
Press any key to continue... <-- press some key
SquirrelMail Configuration : Read: config.php (1.4.0)
---------------------------------------------------------
Main Menu --
1. Organization Preferences
2. Server Settings
3. Folder Defaults
4. General Options
5. Themes
6. Address Books
7. Message of the Day (MOTD)
8. Plugins
9. Database
10. Languages
D. Set pre-defined settings for specific IMAP servers
C Turn color on
S Save data
Q Quit
Command >> <-- 8
SquirrelMail Configuration : Read: config.php (1.4.0)
---------------------------------------------------------
Plugins
Installed Plugins
Available Plugins:
1. abook_take
2. administrator
3. bug_report
4. calendar
5. change_sqlpass
6. compatibility
7. delete_move_next
8. demo
9. filters
10. fortune
11. info
12. listcommands
13. mail_fetch
14. message_details
15. newmail
16. sent_subfolders
17. spamcop
18. squirrelspell
19. test
20. translate
R Return to Main Menu
C Turn color on
S Save data
Q Quit
Command >> <-- 6 (or whatever number the compatibility plugin has - it's needed by the change_sqlpass plugin)
SquirrelMail Configuration : Read: config.php (1.4.0)
---------------------------------------------------------
Plugins
Installed Plugins
1. compatibility
Available Plugins:
2. abook_take
3. administrator
4. bug_report
5. calendar
6. change_sqlpass
7. delete_move_next
8. demo
9. filters
10. fortune
11. info
12. listcommands
13. mail_fetch
14. message_details
15. newmail
16. sent_subfolders
17. spamcop
18. squirrelspell
19. test
20. translate
R Return to Main Menu
C Turn color on
S Save data
Q Quit
Command >> <-- 6 (the number of the change_sqlpass plugin)
SquirrelMail Configuration : Read: config.php (1.4.0)
---------------------------------------------------------
Plugins
Installed Plugins
1. compatibility
2. change_sqlpass
Available Plugins:
3. abook_take
4. administrator
5. bug_report
6. calendar
7. delete_move_next
8. demo
9. filters
10. fortune
11. info
12. listcommands
13. mail_fetch
14. message_details
15. newmail
16. sent_subfolders
17. spamcop
18. squirrelspell
19. test
20. translate
R Return to Main Menu
C Turn color on
S Save data
Q Quit
Command >> <-- S
SquirrelMail Configuration : Read: config.php (1.4.0)
---------------------------------------------------------
Plugins
Installed Plugins
1. compatibility
2. change_sqlpass
Available Plugins:
3. abook_take
4. administrator
5. bug_report
6. calendar
7. delete_move_next
8. demo
9. filters
10. fortune
11. info
12. listcommands
13. mail_fetch
14. message_details
15. newmail
16. sent_subfolders
17. spamcop
18. squirrelspell
19. test
20. translate
R Return to Main Menu
C Turn color on
S Save data
Q Quit
Command >> S
Data saved in config.php
Press enter to continue... <-- press some key
SquirrelMail Configuration : Read: config.php (1.4.0)
---------------------------------------------------------
Plugins
Installed Plugins
1. compatibility
2. change_sqlpass
Available Plugins:
3. abook_take
4. administrator
5. bug_report
6. calendar
7. delete_move_next
8. demo
9. filters
10. fortune
11. info
12. listcommands
13. mail_fetch
14. message_details
15. newmail
16. sent_subfolders
17. spamcop
18. squirrelspell
19. test
20. translate
R Return to Main Menu
C Turn color on
S Save data
Q Quit
Command >> <-- Q
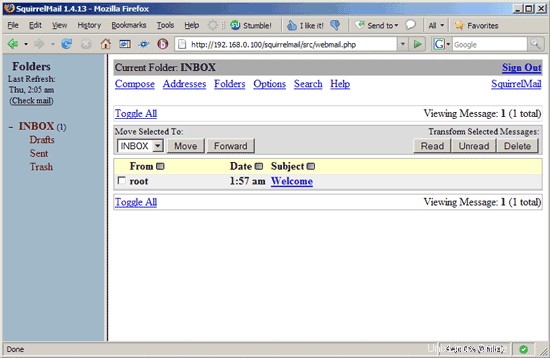
Now you can type in http://server1.example.com/squirrelmail or http://192.168.0.100/squirrelmail in your browser to access SquirrelMail.
Log in with your email address (e.g. [email protected]) and your password:

You should find the welcome email in your inbox:

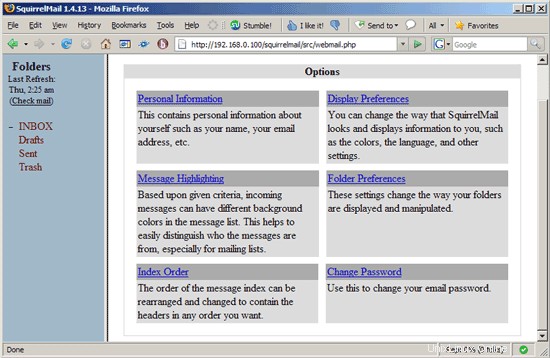
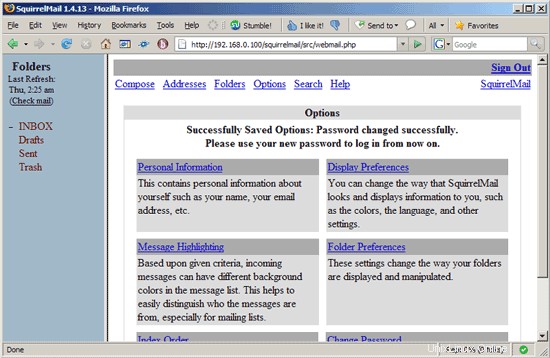
To change your password, go to Options and then select Change Password:
Type in your current password and then your new password twice:
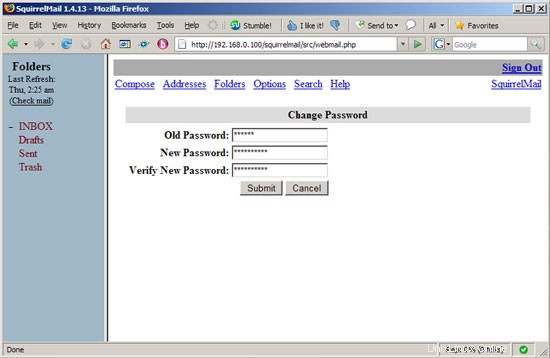
SquirrelMail will tell you if the password has been changed successfully:
16 References
- Tutorial:ISP-style Email Service with Debian-Sarge and Postfix 2.1:http://workaround.org/articles/ispmail-sarge/
- Postfix + Quota:http://vhcs.net/new/modules/newbb/viewtopic.php?topic_id=3496&forum=17
- Mail Passwords Encrypted using saslauthd:http://www.syscp.de/docs/public/contrib/cryptedmailpws
17 Links
- Postfix MTA:http://www.postfix.org/
- Postfix Quota Patch:http://web.onda.com.br/nadal/
- phpMyAdmin:http://www.phpmyadmin.net/
- SquirrelMail:http://www.squirrelmail.org/
- Ubuntu:http://www.ubuntu.com/