Der perfekte Server – OpenSUSE 12.1 x86_64 mit Nginx [ISPConfig 3]
Dieses Tutorial zeigt, wie man ein OpenSUSE 12.1 64bit (x86_64) vorbereitet Server mit nginx für die Installation von ISPConfig 3 und wie man ISPConfig 3 installiert. Seit Version 3.0.4 bietet ISPConfig zusätzlich zu Apache volle Unterstützung für den nginx-Webserver, und dieses Tutorial behandelt die Einrichtung eines Servers, der nginx verwendet statt Apache. ISPConfig 3 ist ein Webhosting-Kontrollfeld, mit dem Sie die folgenden Dienste über einen Webbrowser konfigurieren können:nginx- und Apache-Webserver, Postfix-Mailserver, MySQL, Dovecot POP3/IMAP, BIND- oder MyDNS-Nameserver, PureFTPd, SpamAssassin, ClamAV und viele mehr mehr.
Wenn Sie nginx anstelle von Apache mit ISPConfig verwenden möchten, beachten Sie bitte, dass Ihre nginx-Version mindestens 0.8.21 sein muss und Sie auch PHP-FPM installieren müssen. Für CGI/Perl-Unterstützung müssen Sie fcgiwrap verwenden. Dies alles wird in diesem Tutorial behandelt.
Ich werde die folgende Software verwenden:
- Webserver:nginx mit PHP 5
- Datenbankserver:MySQL
- Mailserver:Postfix mit virtuellen Benutzern
- DNS-Server:BIND
- FTP-Server:pureftpd
- POP3/IMAP:Dovecot
- Webalizer und AWStats für Website-Statistiken
Am Ende sollten Sie ein System haben, das zuverlässig funktioniert und mit dem ISPConfig 3 Control Panel einfach zu verwalten ist. Die folgende Anleitung gilt für die 64-Bit-Version von OpenSUSE.
Ich möchte zunächst sagen, dass dies nicht die einzige Möglichkeit ist, ein solches System einzurichten. Es gibt viele Wege, dieses Ziel zu erreichen, aber ich gehe diesen Weg. Ich gebe keine Garantie dafür, dass dies bei Ihnen funktioniert!
Hinweis:Diese Anleitung gilt für ISPConfig 3.0.4 oder neuer. Es ist nicht für ISPConfig 2.x geeignet!
ISPConfig 3 Handbuch
Um zu lernen, wie man ISPConfig 3 verwendet, empfehle ich dringend, das ISPConfig 3-Handbuch herunterzuladen.
Auf etwa 300 Seiten behandelt es das Konzept hinter ISPConfig (Admin, Reseller, Clients), erklärt, wie ISPConfig 3 installiert und aktualisiert wird, enthält eine Referenz für alle Formulare und Formularfelder in ISPConfig zusammen mit Beispielen für gültige Eingaben und bietet Tutorials für die häufigsten Aufgaben in ISPConfig 3. Es beschreibt auch, wie Sie Ihren Server sicherer machen können, und enthält am Ende einen Abschnitt zur Fehlerbehebung.
ISPConfig Monitor-App für Android
Mit der ISPConfig Monitor App können Sie Ihren Serverstatus überprüfen und herausfinden, ob alle Dienste wie erwartet laufen. Sie können TCP- und UDP-Ports überprüfen und Ihre Server anpingen. Darüber hinaus können Sie diese App verwenden, um Details von Servern anzufordern, auf denen ISPConfig installiert ist (Bitte beachten Sie, dass die installierte Mindestversion von ISPConfig 3 mit Unterstützung für die ISPConfig Monitor App 3.0.3.3 ist! ); Diese Details umfassen alles, was Sie aus dem Monitor-Modul im ISPConfig Control Panel wissen (z. B. Dienste, Mail- und Systemprotokolle, Mail-Warteschlange, CPU- und Speicherinformationen, Festplattennutzung, Quote, Betriebssystemdetails, RKHunter-Protokoll usw.) und natürlich , da ISPConfig Multiserver-fähig ist, können Sie alle Server prüfen, die von Ihrem ISPConfig-Masterserver gesteuert werden.
Anweisungen zum Herunterladen und zur Verwendung finden Sie unter http://www.ispconfig.org/ispconfig-3/ispconfig-monitor-app-for-android/.
1 Voraussetzungen
Um ein solches System zu installieren, benötigen Sie Folgendes:
- Die OpenSUSE 12.1DVD . Sie können es hier herunterladen:http://download.opensuse.org/distribution/12.1/iso/openSUSE-12.1-DVD-x86_64.iso
- Eine schnelle Internetverbindung...
2 Vorbemerkung
In diesem Tutorial verwende ich den Hostnamen server1.example.com mit der IP-Adresse 192.168.0.100 und dem Gateway 192.168.0.1. Diese Einstellungen können für Sie abweichen, daher müssen Sie sie gegebenenfalls ersetzen.
3 Das Basissystem
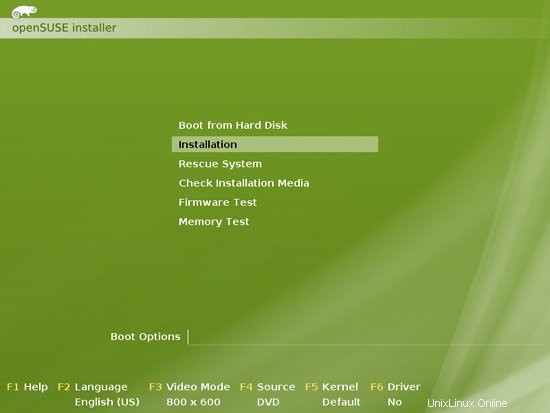
Booten Sie von Ihrer OpenSUSE 12.1 DVD und wählen Sie Installation:
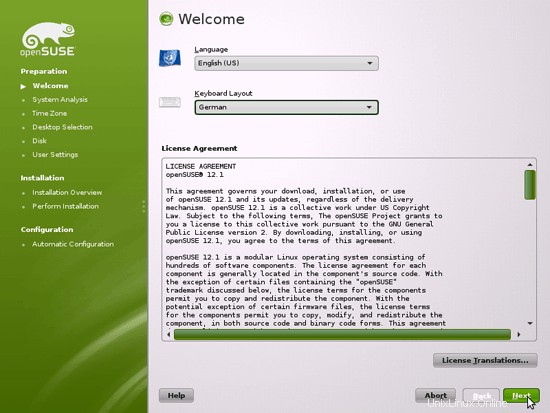
Wählen Sie Ihre Sprache und Ihr Tastaturlayout aus und akzeptieren Sie die Lizenzbedingungen:
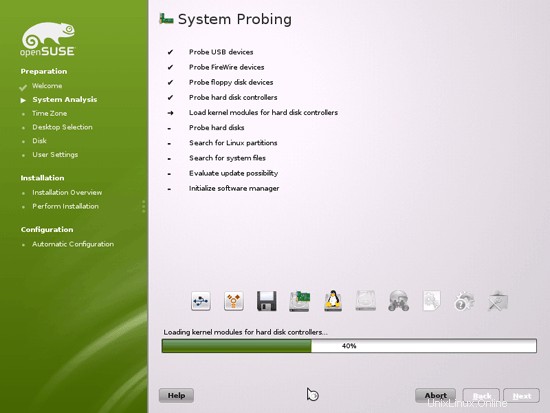
Das Installationsprogramm analysiert Ihre Hardware und erstellt den Software-Repository-Cache:
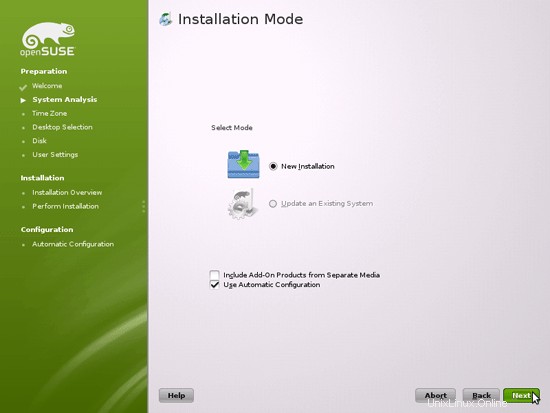
Wählen Sie Neuinstallation:
Wählen Sie die Region und die Zeitzone aus:

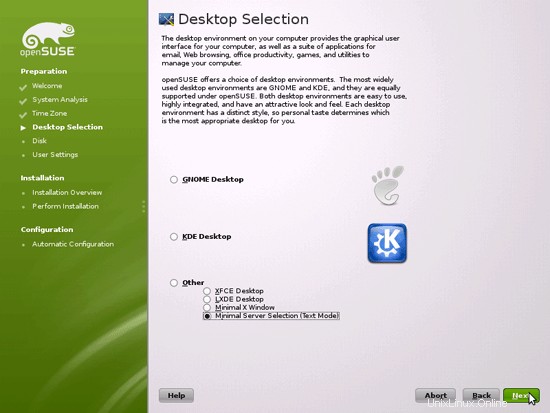
Wir wählen hier Andere> Minimale Serverauswahl (Textmodus), da wir einen Server ohne X-Window-Desktop installieren möchten. Das X-Window-System ist zum Ausführen des Servers nicht erforderlich und würde das System verlangsamen. Wir erledigen alle Verwaltungsaufgaben auf der Shell oder über eine SSH-Verbindung, z. über PuTTY von einem Remote-Desktop.
Der perfekte Server – OpenSUSE 12.1 x86_64 mit Nginx [ISPConfig 3] – Seite 2
4 Konfigurieren Sie die Netzwerkeinstellungen
Wir verwenden Yast, das Systemverwaltungstool von OpenSuSE, um die Netzwerkkarteneinstellungen neu zu konfigurieren. Nach dem ersten Start ist das System so konfiguriert, dass es die IP-Adresse mit DHCP bezieht. Für einen Server werden wir ihn auf eine statische IP-Adresse umstellen.
Ausführen
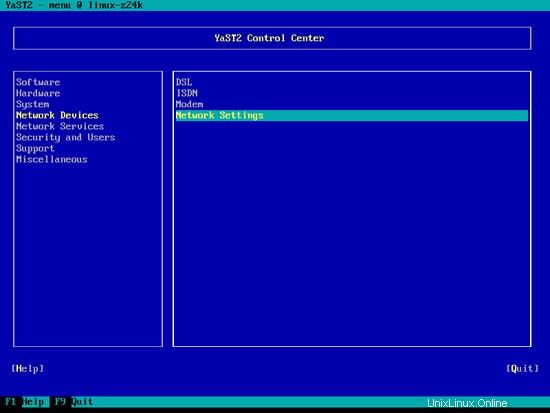
yast2
Wählen Sie Netzwerkgeräte> Netzwerkeinstellungen:
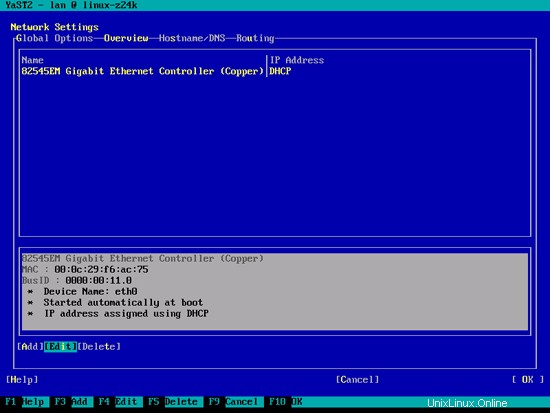
Wählen Sie Ihre Netzwerkkarte und dann Bearbeiten:
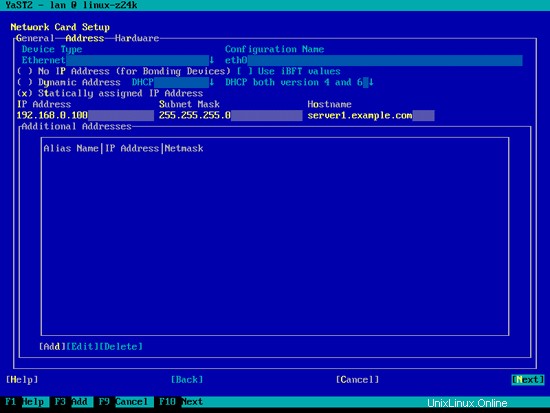
Wählen Sie Statisch zugewiesene IP-Adresse und geben Sie die IP-Adresse, die Subnetzmaske und den Hostnamen ein und speichern Sie die Änderungen, indem Sie Weiter:
wählen
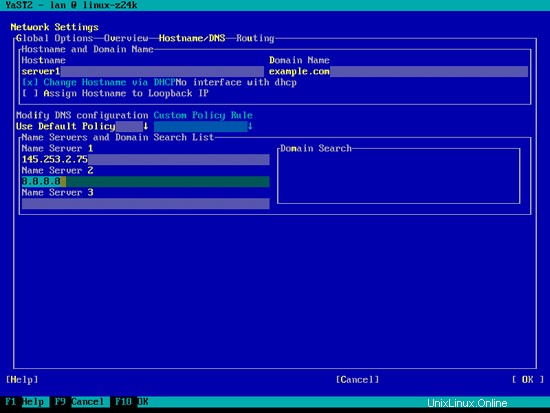
Wählen Sie nun Hostname/DNS und geben Sie den Hostnamen (z. B. server1.example.com) und die Nameserver (z. B. 145.253.2.75 und 8.8.8.8) ein:
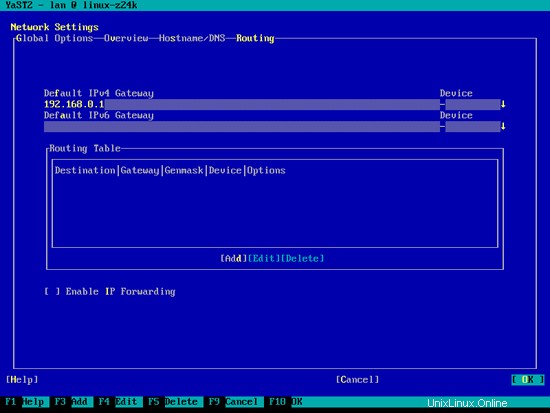
Wählen Sie nun Routing und geben Sie das Standard-Gateway ein und drücken Sie OK:
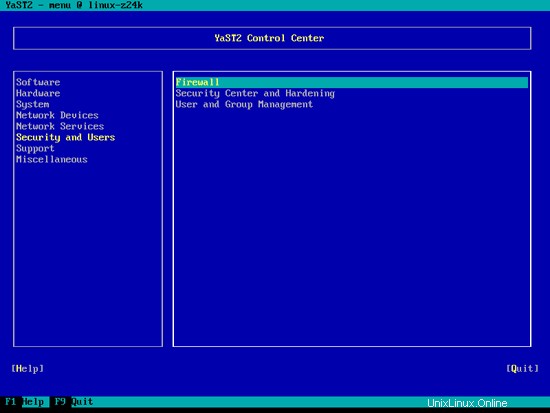
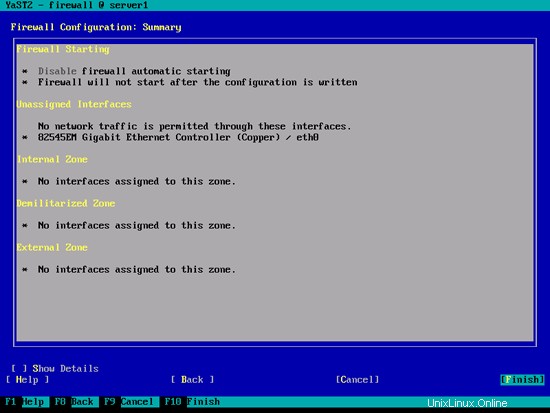
Um die Firewall zu konfigurieren (falls Sie sie nicht während der Basisinstallation konfiguriert haben), wählen Sie Sicherheit und Benutzer> Firewall in Yast:
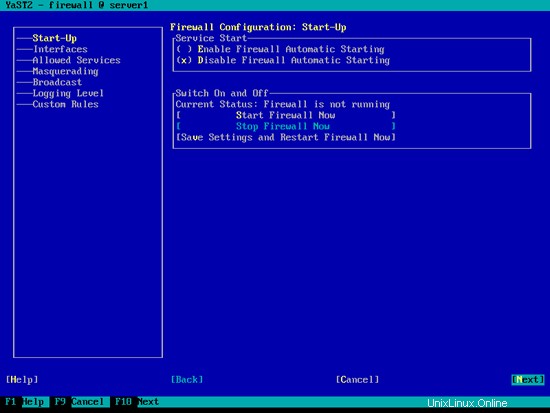
Ich möchte ISPConfig am Ende dieses Tutorials installieren, das mit einer eigenen Firewall geliefert wird. Deshalb deaktiviere ich jetzt die standardmäßige OpenSUSE-Firewall. Natürlich steht es Ihnen frei, es eingeschaltet zu lassen und nach Ihren Bedürfnissen zu konfigurieren (aber dann sollten Sie später keine andere Firewall mehr verwenden, da diese höchstwahrscheinlich die OpenSUSE-Firewall stört).
Wählen Sie Automatisches Starten der Firewall deaktivieren und Firewall jetzt stoppen und klicken Sie dann auf Weiter:
Klicken Sie auf „Fertig stellen“ und verlassen Sie Yast:
Danach sollten Sie mit
nachsehenifconfig
wenn Ihre Netzwerkkonfiguration korrekt ist. Wenn dies nicht der Fall ist (z. B. wenn eth0 fehlt), starten Sie das System neu ...
reboot
... und überprüfen Sie danach noch einmal Ihre Netzwerkkonfiguration - sie sollte jetzt stimmen.
5 Updates installieren
Jetzt installieren wir die neuesten Updates aus den openSUSE-Repositories. Ausführen
zypper update
Und starten Sie dann den Server neu, da Sie höchstwahrscheinlich auch einige Kernel-Updates installiert haben:
reboot
6 Einige Basispakete installieren
Ausführen
yast2 -i findutils readline glibc-devel findutils-locate gcc flex lynx compat-readline4 db-devel wget gcc-c++ subversion make vim telnet cron iptables iputils man man-pages nano pico sudo perl-TimeDate
7 Journaled-Quote
Führen Sie zum Installieren von Quota
ausyast2 -i quota
Bearbeiten Sie /etc/fstab so, dass es so aussieht (ich habe ,usrjquota=aquota.user,grpjquota=aquota.group,jqfmt=vfsv0 zu den Einhängepunkten / und /srv hinzugefügt):
vi /etc/fstab
/dev/sda1 swap swap defaults 0 0 /dev/sda2 / ext4 acl,user_xattr,usrjquota=aquota.user,grpjquota=aquota.group,jqfmt=vfsv0 1 1 /dev/sda3 /srv ext4 acl,user_xattr,usrjquota=aquota.user,grpjquota=aquota.group,jqfmt=vfsv0 1 2 proc /proc proc defaults 0 0 sysfs /sys sysfs noauto 0 0 debugfs /sys/kernel/debug debugfs noauto 0 0 devpts /dev/pts devpts mode=0620,gid=5 0 0 |
Führen Sie dann Folgendes aus:
mount -o remount /
mount -o remount /srv
quotecheck -avugm
quotaon -avug
Machen Sie sich keine Sorgen, wenn Sie diese Fehlermeldungen sehen - sie sind normal, wenn Sie quotacheck zum ersten Mal ausführen:
server1:~ # quotacheck -avugm
quotacheck:Scannen von /dev/sda2 [/] abgeschlossen
quotacheck:Alte Benutzerkontingentdatei kann nicht angezeigt werden:Datei oder Verzeichnis nicht vorhanden
quotacheck:Alte Gruppe kann nicht angezeigt werden Quotendatei:Datei oder Verzeichnis nicht vorhanden
quotacheck:Alter Benutzer kann nicht ermittelt werden Quotendatei:Datei oder Verzeichnis nicht vorhanden
quotacheck:Quotendatei der alten Gruppe kann nicht ermittelt werden:Datei oder Verzeichnis nicht vorhanden
quotacheck:3872 Verzeichnisse und 32991 Dateien überprüft
quotacheck:Alte Datei nicht gefunden.
quotacheck:Alte Datei nicht gefunden.
quotacheck:Scannen von /dev/sda3 [/srv] abgeschlossen
quotacheck:Kontingentdatei des alten Benutzers kann nicht angezeigt werden:Keine solche Datei oder dieses Verzeichnis
quotacheck:Kontingentdatei der alten Gruppe kann nicht angezeigt werden:Keine solche Datei oder dieses Verzeichnis
quotacheck:Kontingentdatei des alten Benutzers kann nicht angezeigt werden:Keine solche Datei oder dieses Verzeichnis
quotacheck:Kontingentdatei der alten Gruppe kann nicht angezeigt werden:Keine solche Datei oder Verzeichnis
quotacheck:6 Verzeichnisse und 0 Dateien überprüft
quotacheck:Alte Datei nicht gefunden.
quotacheck:Alte Datei nicht gefunden.
ser ver1:~ #
Der perfekte Server – OpenSUSE 12.1 x86_64 mit Nginx [ISPConfig 3] – Seite 4
8 Postfix, Dovecot, MySQL installieren
Ausführen
yast2 -i postfix postfix-mysql mysql mysql-community-server mysql-client libmysqlclient-devel dovecot12 dovecot12-backend-mysql pwgen cron python
Wenn Sie die Fehlermeldung Patterns-openSUSE-minimal_base-conflicts-12.1-25.21.1.x86_64 conflicts with python von python-2.7.2-7.1.3.x86_64 erhalten, wählen Sie die Option deinstallation of pattern-openSUSE-minimal_base-conflicts- 12.1-25.21.1.x86_64 und klicken Sie auf OK – Versuchen Sie es erneut:
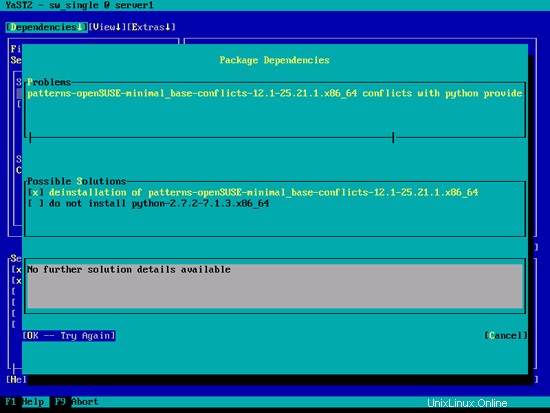
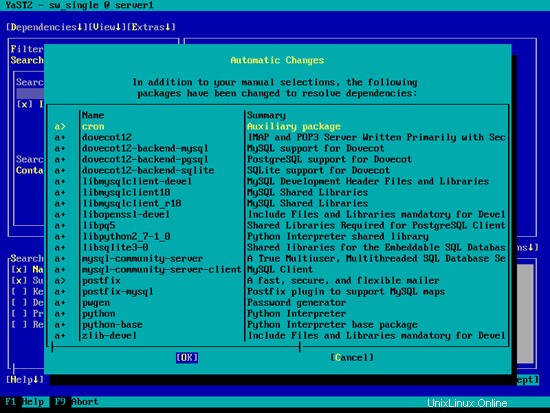
Klicken Sie auf dem nächsten Bildschirm auf Akzeptieren...
... und schließlich OK:
Öffnen Sie /etc/postfix/master.cf...
vi /etc/postfix/master.cf
... und kommentieren Sie die folgende Zeile aus:
[...] tlsmgr unix - - n 1000? 1 tlsmgr [...] |
Erstellen Sie den folgenden symbolischen Link:
ln -s /usr/lib64/dovecot/modules /usr/lib/dovecot
Starten Sie MySQL, Postfix und Dovecot und aktivieren Sie, dass die Dienste beim Booten gestartet werden.
systemctl aktiviert mysql.service
systemctl startet mysql.service
systemctl postfix.service aktivieren
systemctl postfix.service starten
systemctl ermöglicht dovecot.service
systemctl startet dovecot.service
Jetzt installiere ich das getmail-Paket:
yast2 -i getmail
Um die MySQL-Installation zu sichern, führen Sie Folgendes aus:
mysql_secure_installation
Nun werden Ihnen mehrere Fragen gestellt:
server1:~ # mysql_secure_installation
HINWEIS:DAS AUSFÜHREN ALLER TEILE DIESES SKRIPTS WIRD FÜR ALLE MySQL
SERVER IM PRODUKTIONSZWECK EMPFOHLEN! BITTE LESEN SIE JEDEN SCHRITT SORGFÄLTIG DURCH!
Um sich bei MySQL anzumelden, um es zu sichern, benötigen wir das aktuelle
Passwort für den Root-Benutzer. Wenn Sie gerade MySQL installiert und
das Root-Passwort noch nicht festgelegt haben, ist das Passwort leer,
also sollten Sie hier einfach die Eingabetaste drücken.
Enter Aktuelles Passwort für Root (Eingabe für keine):<-- ENTER
OK, erfolgreich verwendetes Passwort, weiter ...
Das Festlegen des Root-Passworts stellt sicher, dass sich niemand bei MySQL anmelden kann
Root-Benutzer ohne die entsprechende Berechtigung.
Root-Passwort festlegen? [Y/n] <-- Y
Neues Passwort: <-- yourrootsqlpassword
Neues Passwort erneut eingeben: <-- yourrootsqlpassword
Passwort erfolgreich aktualisiert!
Berechtigungstabellen werden neu geladen. .
... Erfolg!
Standardmäßig hat eine MySQL-Installation einen anonymen Benutzer, der ermöglicht, dass sich jeder
bei MySQL anmelden kann, ohne einen Benutzeraccount haben zu müssen für
sie erstellt. Dies ist nur zum Testen sollte und damit die Installation
etwas flüssiger läuft. Sie sollten sie entfernen, bevor Sie in eine
Produktionsumgebung wechseln.
Anonyme Nutzer entfernen? [J/n] <-- J
... Erfolg!
Normalerweise sollte root nur erlaubt werden, sich von 'localhost' aus zu verbinden. Dies
stellt sicher, dass niemand das Root-Passwort aus dem Netzwerk erraten kann.
Root-Anmeldung aus der Ferne nicht zulassen? [J/n] <-- J
... Erfolg!
Standardmäßig wird MySQL mit einer Datenbank namens "test" geliefert, auf die jeder
zugreifen kann. Dies ist auch nur zum Testen vorgesehen und sollte entfernt werden
bevor in eine Produktionsumgebung umgezogen wird.
Testdatenbank und Zugriff darauf entfernen? [J/n] <-- J
- Testdatenbank wird gelöscht...
... Erfolg!
- Berechtigungen für Testdatenbank entfernen...
... Erfolg !
Durch das Neuladen der Berechtigungstabellen wird sichergestellt, dass alle bisher vorgenommenen Änderungen
sofort wirksam werden.
Berechtigungstabellen jetzt neu laden? [J/n] <-- J
... Erfolg!
Aufräumen ...
Alles erledigt! Wenn Sie alle obigen Schritte durchgeführt haben, sollte Ihre MySQL
Installation jetzt sicher sein.
Vielen Dank, dass Sie MySQL verwenden!
server1:~ #
Jetzt sollte Ihr MySQL-Setup gesichert sein.
9 Amavisd-new, Spamassassin und Clamav
Installieren Sie Amavisd-new, Spamassassin und Clamav Antivirus. Ausführen
yast2 -i amavisd-new clamav clamav-db zoo unzip unrar bzip2 unarj perl-DBD-mysql
Öffnen Sie /etc/amavisd.conf...
vi /etc/amavisd.conf
... und fügen Sie die Zeile $myhostname mit Ihrem korrekten Hostnamen unterhalb der Zeile $mydomain hinzu:
[...] $mydomain = 'example.com'; # a convenient default for other settings $myhostname = "server1.$mydomain"; [...] |
Erstellen Sie dann einen Symlink von /var/run/clamav/clamd zu /var/lib/clamav/clamd-socket:
mkdir -p /var/run/clamav
ln -s /var/lib/clamav/clamd-socket /var/run/clamav/clamd
OpenSUSE 12.1 hat ein /run-Verzeichnis zum Speichern von Laufzeitdaten. /run ist jetzt ein tmpfs, und /var/run ist jetzt an /run von tmpfs gebunden und wird daher beim Neustart geleert.
Das bedeutet, dass nach einem Neustart das Verzeichnis /var/run/clamav, das wir gerade erstellt haben, nicht mehr existiert und daher clamd nicht gestartet werden kann. Deshalb erstellen wir jetzt die Datei /etc/tmpfiles.d/clamav.conf, die dieses Verzeichnis beim Systemstart erstellt (siehe http://0pointer.de/public/systemd-man/tmpfiles.d.html für weitere Details):
vi /etc/tmpfiles.d/clamav.conf
D /var/run/clamav 0755 root root - |
Bevor wir amavisd und clamd starten, müssen wir das /etc/init.d/amavis Init-Skript bearbeiten - ich konnte amavisd mit dem Standard-Init-Skript nicht zuverlässig starten, stoppen und neu starten:
vi /etc/init.d/amavis
Kommentieren Sie die folgenden Zeilen im Start- und Stoppabschnitt aus:
[...]
    start)
        # ZMI 20100428 check for stale pid file
        #if test -f $AMAVIS_PID ; then
        #       checkproc -p $AMAVIS_PID amavisd
        #       if test $? -ge 1 ; then
        #               # pid file is stale, remove it
        #               echo -n "(stale amavisd pid file $AMAVIS_PID found, removing. Did amavisd crash?)"
        #               rm -f $AMAVIS_PID
        #       fi
        #fi
        echo -n "Starting virus-scanner (amavisd-new): "
        $AMAVISD_BIN start
        #if ! checkproc amavisd; then
        #    rc_failed 7
        #fi
        rc_status -v
        #if [ "$AMAVIS_SENDMAIL_MILTER" == "yes" ]; then
        #    rc_reset
        #    echo -n "Starting amavis-milter:"
        #    startproc -u vscan $AMAVIS_MILTER_BIN -p $AMAVIS_MILTER_SOCK > /dev/null 2>&1
        #    rc_status -v
        #fi
        ;;
    stop)
        echo -n "Shutting down virus-scanner (amavisd-new): "
        #if checkproc amavisd; then
        #    rc_reset
            $AMAVISD_BIN stop
        #else
        #    rc_reset
        #fi
        rc_status -v
        #if [ "$AMAVIS_SENDMAIL_MILTER" == "yes" ]; then
        #    rc_reset
        #    echo -n "Shutting down amavis-milter: "
        #    killproc -TERM $AMAVIS_MILTER_BIN
        #    rc_status -v
        #fi
        ;;
[...] |
Da wir das Init-Skript geändert haben, müssen wir
ausführensystemctl --system daemon-reload
jetzt.
Um die Dienste zu aktivieren, führen Sie Folgendes aus:
systemctl aktiviert amavis.service
systemctl aktiviert clamd.service
systemctl startet amavis.service
systemctl startet clamd.service
10 Nginx, PHP5 (PHP-FPM) und Fcgiwrap installieren
Nginx ist als Paket für OpenSUSE verfügbar, das wir wie folgt installieren können:
yast2 -i nginx-1.0
Wenn Apache2 bereits auf dem System installiert ist, stoppen Sie es jetzt...
systemctl stop apache2.service
... und Apaches Systemstart-Links entfernen:
systemctl disable apache2.service
Dann erstellen wir die Systemstartlinks für nginx und starten es:
systemctl aktiviert nginx.service
systemctl startet nginx.service
(Wenn sowohl Apache2 als auch nginx installiert sind, fragt Sie das ISPConfig 3-Installationsprogramm, welches Sie verwenden möchten - antworten Sie in diesem Fall mit nginx. Wenn nur eines von beiden installiert ist, nimmt ISPConfig die notwendige Konfiguration automatisch vor.)
Wir können PHP5 in nginx durch PHP-FPM zum Laufen bringen (PHP-FPM (FastCGI Process Manager) ist eine alternative PHP-FastCGI-Implementierung mit einigen zusätzlichen Funktionen, die für Websites jeder Größe nützlich sind, insbesondere für stark frequentierte Websites), die wir wie folgt installieren:
yast2 -i php5-fpm
Bevor wir PHP-FPM starten, benennen Sie /etc/php5/fpm/php-fpm.conf.default in /etc/php5/fpm/php-fpm.conf:
ummv /etc/php5/fpm/php-fpm.conf.default /etc/php5/fpm/php-fpm.conf
Ändern Sie die Berechtigungen des Sitzungsverzeichnisses von PHP:
chmod 1733 /var/lib/php5
Öffnen Sie dann /etc/php5/fpm/php-fpm.conf...
vi /etc/php5/fpm/php-fpm.conf
... und ändern Sie error_log in /var/log/php-fpm.log und kommentieren Sie pm.min_spare_servers und pm.max_spare_servers aus:
[...] error_log = /var/log/php-fpm.log [...] pm.min_spare_servers = 5 [...] pm.max_spare_servers = 35 [...] |
Erstellen Sie als Nächstes die Systemstartlinks für php-fpm und starten Sie es:
systemctl aktiviert php-fpm.service
systemctl startet php-fpm.service
PHP-FPM ist ein Daemon-Prozess, der einen FastCGI-Server auf Port 9000 ausführt, wie Sie in der Ausgabe von
sehen könnennetstat -tapn
server1:~ # netstat -tapn
Aktive Internetverbindungen (Server und hergestellt)
Proto Recv-Q Send-Q Lokale Adresse Ausländische Adresse Staat PID/Programmname
tcp 0 0 .127. 3310 0.0.0.0:* Hören Sie 10357 /clamd
TCP 0 0 0.0.0.0:143 0.0.0.0:* Hören Sie 9869 /DEVECOT
TCP 0 0 0.0.0.0:80 0.0.0.0:* 105211. /nginx
TCP 0 0 0.0.0.0:22 0.0.0.0:* Hören 1275 /SSHD
TCP 0 0 127.0.1:25 0.0.0.0:* Hören Sie 9816 /Master
TCP 0 0 127.0.0.1:9000 0.0.0.0:* Hören 10695 /Php-FPm.conf)
TCP 0 0 127.0.0.1:10024 0.0.0.0:* Hören 10337 /amavisd (mast
TCP 0 0 0 0 0 0.0.0.0:3306 0.0.0.0:* LISTEN 9694/mysqld
tcp 0 0 192.168.0.100:22 192.168.0.199:4630 Gegründet 1332/0. HÖREN 9816/master
server1:~ #
Um MySQL-Unterstützung in PHP zu erhalten, können wir das Paket php5-mysql installieren. Es ist eine gute Idee, einige andere PHP5-Module zu installieren, die Sie möglicherweise für Ihre Anwendungen benötigen:
yast2 -i php5-mysql php5-bcmath php5-bz2 php5-calendar php5-ctype php5-curl php5-dom php5-ftp php5-gd php5-gettext php5-gmp php5-iconv php5-imap php5-ldap php5-mbstring php5-mcrypt php5-odbc php5-openssl php5-pcntl php5-pgsql php5-posix php5-shmop php5-snmp php5-soap php5-sockets php5-sqlite php5-sysvsem php5-tokenizer php5-wddx php5-xmlrpc php5-xsl php5-zlib php5-exif php5-pear php5-sysvmsg php5-sysvshm
Starten Sie nun PHP-FPM neu:
systemctl restart php-fpm.service
Um CGI-Unterstützung in nginx zu erhalten, installieren wir Fcgiwrap.
Fcgiwrap ist ein CGI-Wrapper, der auch für komplexe CGI-Skripte funktionieren sollte und für gemeinsam genutzte Hosting-Umgebungen verwendet werden kann, da er jedem vhost erlaubt, sein eigenes cgi-bin-Verzeichnis zu verwenden.
Da es kein fcgiwrap-Paket für OpenSUSE gibt, müssen wir es selbst erstellen. Zuerst installieren wir einige Voraussetzungen:
yast2 -i git patch automake glibc-devel gcc flex compat-readline4 db-devel wget gcc-c++ make vim libtool FastCGI-devel
Erstellen Sie die folgenden symbolischen Links:
ln -s /usr/include/fastcgi/fastcgi.h /usr/local/include/
ln -s /usr/include/fastcgi/fcgi_config.h /usr/local/include/
ln - s /usr/include/fastcgi/fcgi_stdio.h /usr/local/include/
ln -s /usr/include/fastcgi/fcgiapp.h /usr/local/include/
ln -s / usr/include/fastcgi/fcgimisc.h /usr/local/include/
ln -s /usr/include/fastcgi/fcgio.h /usr/local/include/
ln -s /usr/ include/fastcgi/fcgios.h /usr/local/include/
Jetzt können wir fcgiwrap wie folgt bauen:
cd /usr/local/src/
git clone git://github.com/gnosek/fcgiwrap.git
cd fcgiwrap
autoreconf -i
./configure
make
make install
Dies installiert fcgiwrap nach /usr/local/sbin/fcgiwrap.
Als nächstes installieren wir das Paket spawn-fcgi, das uns erlaubt, fcgiwrap als Daemon auszuführen:
yast2 -i spawn-fcgi
Wir können nun fcgiwrap wie folgt starten:
spawn-fcgi -u wwwrun -g www -s /var/run/fcgiwrap.socket -S -M 0770 -F 1 -P /var/run/spawn-fcgi.pid -- /usr/local/sbin/fcgiwrap
Sie sollten jetzt den fcgiwrap-Socket in /var/run/fcgiwrap.socket finden, der dem Benutzer wwwrun und der Gruppe www gehört. Wir müssen nun den Benutzer nginx zur Gruppe www:
hinzufügenusermod -A www nginx
Danach nginx neu laden:
systemctl reload nginx.service
Wenn Sie fcgiwrap nicht jedes Mal manuell starten möchten, wenn Sie Ihr System booten, öffnen Sie /etc/init.d/boot.local...
vi /etc/init.d/boot.local
... und fügen Sie am Ende der Datei den Befehl spawn-fcgi hinzu - dies startet fcgiwrap automatisch am Ende des Bootvorgangs:
[...] /usr/bin/spawn-fcgi -u wwwrun -g www -s /var/run/fcgiwrap.socket -S -M 0770 -F 1 -P /var/run/spawn-fcgi.pid -- /usr/local/sbin/fcgiwrap |
Das ist es! Wenn Sie jetzt einen Nginx-Vhost erstellen, kümmert sich ISPConfig um die korrekte Vhost-Konfiguration.
10.1 Installieren Sie phpMyAdmin
Als nächstes installieren wir phpMyAdmin:
yast2 -i phpMyAdmin
Da dies Apache als Abhängigkeit installiert, entfernen Sie Apaches Systemstart-Links:
systemctl disable apache2.service
phpMyAdmin befindet sich jetzt im Verzeichnis /srv/www/htdocs/phpMyAdmin, aber wir wollen es im Verzeichnis /usr/share/phpmyadmin/, also erstellen wir einen Symlink:
ln -s /srv/www/htdocs/phpMyAdmin /usr/share/phpmyadmin
Nachdem Sie ISPConfig 3 installiert haben, können Sie wie folgt auf phpMyAdmin zugreifen:
Der ISPConfig-Apps-vhost auf Port 8081 für nginx wird mit einer phpMyAdmin-Konfiguration geliefert, sodass Sie http://server1.example.com:8081/phpmyadmin oder http://server1.example.com:8081/phpMyAdmin verwenden können, um auf phpMyAdmin zuzugreifen.
Wenn Sie einen /phpmyadmin- oder /phpMyAdmin-Alias verwenden möchten, den Sie von Ihren Websites verwenden können, ist dies etwas komplizierter als für Apache, da nginx keine globalen Aliase hat (d. h. Aliase, die für alle vhosts definiert werden können). Daher müssen Sie diese Aliase für jeden definieren vhost, von dem aus Sie auf phpMyAdmin zugreifen möchten.
Fügen Sie dazu Folgendes in das Feld nginx-Anweisungen auf der Registerkarte Optionen der Website in ISPConfig ein:
        location /phpmyadmin {
               root /usr/share/;
               index index.php index.html index.htm;
               location ~ ^/phpmyadmin/(.+\.php)$ {
                       try_files $uri =404;
                       root /usr/share/;
                       fastcgi_pass 127.0.0.1:9000;
                       fastcgi_index index.php;
                       fastcgi_param SCRIPT_FILENAME $document_root$fastcgi_script_name;
                       include /etc/nginx/fastcgi_params;
                       fastcgi_buffer_size 128k;
                       fastcgi_buffers 256 4k;
                       fastcgi_busy_buffers_size 256k;
                       fastcgi_temp_file_write_size 256k;
                       fastcgi_intercept_errors on;
               }
               location ~* ^/phpmyadmin/(.+\.(jpg|jpeg|gif|css|png|js|ico|html|xml|txt))$ {
                       root /usr/share/;
               }
        }
        location /phpMyAdmin {
               rewrite ^/* /phpmyadmin last;
} |
Wenn Sie https verwenden Anstelle von http für Ihren vhost sollten Sie die Zeile fastcgi_param HTTPS on hinzufügen; wie folgt in Ihre phpMyAdmin-Konfiguration:
        location /phpmyadmin {
               root /usr/share/;
               index index.php index.html index.htm;
               location ~ ^/phpmyadmin/(.+\.php)$ {
                       try_files $uri =404;
                       root /usr/share/;
                       fastcgi_pass 127.0.0.1:9000;
                       fastcgi_param HTTPS on; # <-- add this line
                       fastcgi_index index.php;
                       fastcgi_param SCRIPT_FILENAME $document_root$fastcgi_script_name;
                       include /etc/nginx/fastcgi_params;
                       fastcgi_buffer_size 128k;
                       fastcgi_buffers 256 4k;
                       fastcgi_busy_buffers_size 256k;
                       fastcgi_temp_file_write_size 256k;
                       fastcgi_intercept_errors on;
               }
               location ~* ^/phpmyadmin/(.+\.(jpg|jpeg|gif|css|png|js|ico|html|xml|txt))$ {
                       root /usr/share/;
               }
        }
        location /phpMyAdmin {
               rewrite ^/* /phpmyadmin last;
} |
Wenn Sie sowohl http als auch https für Ihren vhost verwenden, müssen Sie den folgenden Abschnitt zum http {}-Abschnitt in /etc/nginx/nginx.conf (vor allen include-Zeilen) hinzufügen, der festlegt, ob der Besucher http oder https verwendet und setzt die Variable $fastcgi_https (die wir in unserer phpMyAdmin-Konfiguration verwenden werden) entsprechend:
vi /etc/nginx/nginx.conf
[...]
http {
[...]
        ## Detect when HTTPS is used
        map $scheme $fastcgi_https {
          default off;
          https on;
        }
[...]
}
[...] |
Vergessen Sie nicht, nginx danach neu zu laden:
systemctl reload nginx.service
Gehen Sie dann erneut zum Feld nginx-Anweisungen und statt fastcgi_param HTTPS on; Sie fügen die Zeile fastcgi_param HTTPS $fastcgi_https hinzu; damit Sie phpMyAdmin sowohl für http- als auch für https-Anfragen verwenden können:
        location /phpmyadmin {
               root /usr/share/;
               index index.php index.html index.htm;
               location ~ ^/phpmyadmin/(.+\.php)$ {
                       try_files $uri =404;
                       root /usr/share/;
                       fastcgi_pass 127.0.0.1:9000;
                       fastcgi_param HTTPS $fastcgi_https; # <-- add this line
                       fastcgi_index index.php;
                       fastcgi_param SCRIPT_FILENAME $document_root$fastcgi_script_name;
                       include /etc/nginx/fastcgi_params;
                       fastcgi_buffer_size 128k;
                       fastcgi_buffers 256 4k;
                       fastcgi_busy_buffers_size 256k;
                       fastcgi_temp_file_write_size 256k;
                       fastcgi_intercept_errors on;
               }
               location ~* ^/phpmyadmin/(.+\.(jpg|jpeg|gif|css|png|js|ico|html|xml|txt))$ {
                       root /usr/share/;
               }
        }
        location /phpMyAdmin {
               rewrite ^/* /phpmyadmin last;
} |
Der perfekte Server – OpenSUSE 12.1 x86_64 mit Nginx [ISPConfig 3] – Seite 5
11 Postbote
Seit Version 3.0.4 ermöglicht Ihnen ISPConfig auch das Verwalten (Erstellen/Ändern/Löschen) von Mailman-Mailinglisten. Wenn Sie diese Funktion nutzen möchten, installieren Sie Mailman wie folgt:
yast2 -i mailman
Bevor wir Mailman starten können, muss eine erste Mailingliste namens mailman erstellt werden:
/usr/lib/mailman/bin/newlist mailman
server1:~ # /usr/lib/mailman/bin/newlist mailman
Geben Sie die E-Mail-Adresse der Person ein, die die Liste führt:<-- Admin-E-Mail-Adresse, z. B. example@unixlinux.online
Anfängliches Mailman-Passwort:<-- Admin-Passwort für die Mailman-Liste
Drücken Sie die Eingabetaste, um den Mailman-Eigentümer zu benachrichtigen... <-- ENTER
server1:~ #
Erstellen Sie die Systemstart-Links für Mailman...
systemctl enable mailman.service
... und starten Sie es:
systemctl start mailman.service
Als nächstes Postfix neu starten:
systemctl restart postfix.service
Jetzt müssen wir diesen Symlink erstellen, damit Mailman mit ISPConfig funktioniert:
cd /usr/lib/mailman/cgi-bin/
ln -s ./ mailman
Wenn Sie Mailman von Ihren über ISPConfig erstellten Websites aus verwenden möchten, ist dies etwas komplizierter als für Apache, da nginx keine globalen Aliase hat (d. h. Aliase, die für alle vhosts definiert werden können). Daher müssen Sie diese Aliase für jeden definieren vhost, von dem aus Sie auf Mailman zugreifen möchten.
Fügen Sie dazu Folgendes in das Feld nginx-Anweisungen auf der Registerkarte Optionen der Website in ISPConfig ein:
        location /mailman {
               root /usr/lib/mailman/cgi-bin/;
               fastcgi_split_path_info (^/mailman/[^/]*)(.*)$;
               include /etc/nginx/fastcgi_params;
               fastcgi_param SCRIPT_FILENAME $document_root$fastcgi_script_name;
               fastcgi_param PATH_INFO $fastcgi_path_info;
               fastcgi_param PATH_TRANSLATED $document_root$fastcgi_path_info;
               fastcgi_intercept_errors on;
               fastcgi_pass unix:/var/run/fcgiwrap.socket;
        }

        location /mailmanicons {
               alias /usr/lib/mailman/icons;
        }

        location /pipermail {
               alias /var/lib/mailman/archives/public;
               autoindex on;
} |
Dies definiert den Alias /mailman/ für Ihren vhost, was bedeutet, dass Sie auf die Mailman-Verwaltungsschnittstelle für eine Liste unter http://
Unter http://
12 Installieren Sie PureFTPd
Installieren Sie den FTP-Daemon pure-ftpd. Ausführen:
yast2 -i pure-ftpd
systemctl enable pure-ftpd.service
systemctl start pure-ftpd.service
Jetzt konfigurieren wir PureFTPd so, dass FTP- und TLS-Sitzungen zugelassen werden. FTP ist ein sehr unsicheres Protokoll, da alle Passwörter und alle Daten im Klartext übertragen werden. Durch die Verwendung von TLS kann die gesamte Kommunikation verschlüsselt werden, wodurch FTP viel sicherer wird.
OpenSSL wird von TLS benötigt; Um OpenSSL zu installieren, führen wir einfach Folgendes aus:
yast2 -i openssl
Öffnen Sie /etc/pure-ftpd/pure-ftpd.conf...
vi /etc/pure-ftpd/pure-ftpd.conf
Wenn Sie FTP und zulassen möchten TLS-Sitzungen, setzen Sie TLS auf 1:
[...] # This option can accept three values : # 0 : disable SSL/TLS encryption layer (default). # 1 : accept both traditional and encrypted sessions. # 2 : refuse connections that don't use SSL/TLS security mechanisms, # including anonymous sessions. # Do _not_ uncomment this blindly. Be sure that : # 1) Your server has been compiled with SSL/TLS support (--with-tls), # 2) A valid certificate is in place, # 3) Only compatible clients will log in. TLS 1 [...] |
If you want to accept TLS sessions only (no FTP), set TLS to 2:
[...] # This option can accept three values : # 0 : disable SSL/TLS encryption layer (default). # 1 : accept both traditional and encrypted sessions. # 2 : refuse connections that don't use SSL/TLS security mechanisms, # including anonymous sessions. # Do _not_ uncomment this blindly. Be sure that : # 1) Your server has been compiled with SSL/TLS support (--with-tls), # 2) A valid certificate is in place, # 3) Only compatible clients will log in. TLS 2 [...] |
To not allow TLS at all (only FTP), set TLS to 0:
[...] # This option can accept three values : # 0 : disable SSL/TLS encryption layer (default). # 1 : accept both traditional and encrypted sessions. # 2 : refuse connections that don't use SSL/TLS security mechanisms, # including anonymous sessions. # Do _not_ uncomment this blindly. Be sure that : # 1) Your server has been compiled with SSL/TLS support (--with-tls), # 2) A valid certificate is in place, # 3) Only compatible clients will log in. TLS 0 [...] |
Um TLS verwenden zu können, müssen wir ein SSL-Zertifikat erstellen. Ich erstelle es in /etc/ssl/private/, also erstelle ich zuerst dieses Verzeichnis:
mkdir -p /etc/ssl/private/
Anschließend können wir das SSL-Zertifikat wie folgt generieren:
openssl req -x509 -nodes -days 7300 -newkey rsa:2048 -keyout /etc/ssl/private/pure-ftpd.pem -out /etc/ssl/private/pure-ftpd.pem
Country Name (2 letter code) [AU]:<-- Enter your Country Name (e.g., "DE").
State or Province Name (full name) [Some-State]:<-- Enter your State or Province Name.
Locality Name (eg, city) []:<-- Enter your City.
Organization Name (eg, company) [Internet Widgits Pty Ltd]:<-- Enter your Organization Name (e.g., the name of your company).
Organizational Unit Name (eg, section) []:<-- Enter your Organizational Unit Name (e.g. "IT Department").
Common Name (eg, YOUR name) []:<-- Enter the Fully Qualified Domain Name of the system (e.g. "server1.example.com").
Email Address []:<-- Enter your Email Address.
Change the permissions of the SSL certificate:
chmod 600 /etc/ssl/private/pure-ftpd.pem
Finally restart PureFTPd:
systemctl restart pure-ftpd.service
Das ist es. You can now try to connect using your FTP client; however, you should configure your FTP client to use TLS - see the next chapter how to do this with FileZilla.
13 Install BIND
The BIND nameserver can be installed as follows:
yast2 -i bind
Create the BIND system startup links and start it:
systemctl enable named.service
systemctl start named.service
14 Install Webalizer And AWStats
Since ISPConfig 3 lets you choose if you want to use Webalizer or AWStats to create your web site statistics, we install both:
yast2 -i webalizer perl-DateManip
zypper install http://download.opensuse.org/repositories/network:/utilities/openSUSE_12.1/noarch/awstats-7.0-14.1.noarch.rpm
15 Install fail2ban
fail2ban can be installed as follows:
yast2 -i fail2ban
16 Install Jailkit
Jailkit can be installed like this:
zypper install http://download.opensuse.org/repositories/security/openSUSE_12.1/x86_64/jailkit-2.13-1.1.x86_64.rpm
17 Synchronize The System Clock
If you want to have the system clock synchronized with an NTP server do the following:
yast2 -i xntp
Then add system startup links for ntp and start ntp:
systemctl enable ntp.service
systemctl start ntp.service
18 Install rkhunter
rkhunter can be installed as follows:
yast2 -i rkhunter
The Perfect Server - OpenSUSE 12.1 x86_64 With Nginx [ISPConfig 3] - Page 6
19 Install SquirrelMail
To install the SquirrelMail webmail client, run:
zypper installhttp://download.opensuse.org/repositories/server:/php:/applications/openSUSE_12.1/noarch/squirrelmail-1.4.22-1.1.noarch.rpm
Then configure SquirrelMail:
/srv/www/htdocs/squirrelmail/config/conf.pl
We must tell SquirrelMail that we are using Dovecot:
SquirrelMail Configuration : Read: config.php (1.4.0)
---------------------------------------------------------
Main Menu --
1. Organization Preferences
2. Server Settings
3. Folder Defaults
4. General Options
5. User Interface
6. Address Books
7. Message of the Day (MOTD)
8. Plugins
9. Database
10. Language settings
11. Tweaks
D. Set pre-defined settings for specific IMAP servers
C Turn color on
S Save data
Q Quit
Command >> <-- D
SquirrelMail Configuration : Read: config.php
---------------------------------------------------------
While we have been building SquirrelMail, we have discovered some
preferences that work better with some servers that don't work so
well with others. If you select your IMAP server, this option will
set some pre-defined settings for that server.
Please note that you will still need to go through and make sure
everything is correct. This does not change everything. There are
only a few settings that this will change.
Please select your IMAP server:
bincimap = Binc IMAP server
courier = Courier IMAP server
cyrus = Cyrus IMAP server
dovecot = Dovecot Secure IMAP server
exchange = Microsoft Exchange IMAP server
hmailserver = hMailServer
macosx = Mac OS X Mailserver
mercury32 = Mercury/32
uw = University of Washington's IMAP server
gmail = IMAP access to Google mail (Gmail) accounts
quit = Do not change anything
Command >> <-- dovecot
SquirrelMail Configuration : Read: config.php
---------------------------------------------------------
While we have been building SquirrelMail, we have discovered some
preferences that work better with some servers that don't work so
well with others. If you select your IMAP server, this option will
set some pre-defined settings for that server.
Please note that you will still need to go through and make sure
everything is correct. This does not change everything. There are
only a few settings that this will change.
Please select your IMAP server:
bincimap = Binc IMAP server
courier = Courier IMAP server
cyrus = Cyrus IMAP server
dovecot = Dovecot Secure IMAP server
exchange = Microsoft Exchange IMAP server
hmailserver = hMailServer
macosx = Mac OS X Mailserver
mercury32 = Mercury/32
uw = University of Washington's IMAP server
gmail = IMAP access to Google mail (Gmail) accounts
quit = Do not change anything
Command >> dovecot
imap_server_type = dovecot
default_folder_prefix =
trash_folder = Trash
sent_folder = Sent
draft_folder = Drafts
show_prefix_option = false
default_sub_of_inbox = false
show_contain_subfolders_option = false
optional_delimiter = detect
delete_folder = false
force_username_lowercase = true
Press enter to continue... <-- ENTER
SquirrelMail Configuration : Read: config.php (1.4.0)
---------------------------------------------------------
Main Menu --
1. Organization Preferences
2. Server Settings
3. Folder Defaults
4. General Options
5. User Interface
6. Address Books
7. Message of the Day (MOTD)
8. Plugins
9. Database
10. Language settings
11. Tweaks
D. Set pre-defined settings for specific IMAP servers
C Turn color on
S Save data
Q Quit
Command >> <-- S
SquirrelMail Configuration : Read: config.php (1.4.0)
---------------------------------------------------------
Main Menu --
1. Organization Preferences
2. Server Settings
3. Folder Defaults
4. General Options
5. User Interface
6. Address Books
7. Message of the Day (MOTD)
8. Plugins
9. Database
10. Language settings
11. Tweaks
D. Set pre-defined settings for specific IMAP servers
C Turn color on
S Save data
Q Quit
Command >> S
Data saved in config.php
Done activating plugins; registration data saved in plugin_hooks.php
Press enter to continue... <-- ENTER
SquirrelMail Configuration : Read: config.php (1.4.0)
---------------------------------------------------------
Main Menu --
1. Organization Preferences
2. Server Settings
3. Folder Defaults
4. General Options
5. User Interface
6. Address Books
7. Message of the Day (MOTD)
8. Plugins
9. Database
10. Language settings
11. Tweaks
D. Set pre-defined settings for specific IMAP servers
C Turn color on
S Save data
Q Quit
Command >> <-- Q
SquirrelMail is located in the /srv/www/htdocs/squirrelmail directory, but we need it in the /usr/share/squirrelmail/ directory. Therefore we create a symlink:
ln -s /srv/www/htdocs/squirrelmail /usr/share/squirrelmail
In addition to that, we change the owner of the /srv/www/htdocs/squirrelmail/data/ directory to nobody:
chown nobody /srv/www/htdocs/squirrelmail/data/
After you have installed ISPConfig 3, you can access SquirrelMail as follows:
The ISPConfig apps vhost on port 8081 for nginx comes with a SquirrelMail configuration, so you can use http://server1.example.com:8081/squirrelmail or http://server1.example.com:8081/webmail to access SquirrelMail.
If you want to use a /webmail or /squirrelmail alias that you can use from your web sites, this is a bit more complicated than for Apache because nginx does not have global aliases (i.e., aliases that can be defined for all vhosts). Therefore you have to define these aliases for each vhost from which you want to access SquirrelMail.
To do this, paste the following into the nginx Directives field on the Options tab of the web site in ISPConfig:
        location /squirrelmail {
               root /usr/share/;
               index index.php index.html index.htm;
               location ~ ^/squirrelmail/(.+\.php)$ {
                       try_files $uri =404;
                       root /usr/share/;
                       fastcgi_pass 127.0.0.1:9000;
                       fastcgi_index index.php;
                       fastcgi_param SCRIPT_FILENAME $document_root$fastcgi_script_name;
                       include /etc/nginx/fastcgi_params;
                       fastcgi_buffer_size 128k;
                       fastcgi_buffers 256 4k;
                       fastcgi_busy_buffers_size 256k;
                       fastcgi_temp_file_write_size 256k;
                       fastcgi_intercept_errors on;
               }
               location ~* ^/squirrelmail/(.+\.(jpg|jpeg|gif|css|png|js|ico|html|xml|txt))$ {
                       root /usr/share/;
               }
        }
        location /webmail {
               rewrite ^/* /squirrelmail last;
} |
If you use https instead of http for your vhost, you should add the line fastcgi_param HTTPS on; to your SquirrelMail configuration like this:
        location /squirrelmail {
               root /usr/share/;
               index index.php index.html index.htm;
               location ~ ^/squirrelmail/(.+\.php)$ {
                       try_files $uri =404;
                       root /usr/share/;
                       fastcgi_pass 127.0.0.1:9000;
                       fastcgi_param HTTPS on; # <-- add this line
                       fastcgi_index index.php;
                       fastcgi_param SCRIPT_FILENAME $document_root$fastcgi_script_name;
                       include /etc/nginx/fastcgi_params;
                       fastcgi_buffer_size 128k;
                       fastcgi_buffers 256 4k;
                       fastcgi_busy_buffers_size 256k;
                       fastcgi_temp_file_write_size 256k;
                       fastcgi_intercept_errors on;
               }
               location ~* ^/squirrelmail/(.+\.(jpg|jpeg|gif|css|png|js|ico|html|xml|txt))$ {
                       root /usr/share/;
               }
        }
        location /webmail {
               rewrite ^/* /squirrelmail last;
} |
If you use both http and https for your vhost, you need to add the following section to the http {} section in /etc/nginx/nginx.conf (before any include lines) which determines if the visitor uses http or https and sets the $fastcgi_https variable (which we will use in our SquirrelMail configuration) accordingly:
vi /etc/nginx/nginx.conf
[...]
http {
[...]
        ## Detect when HTTPS is used
        map $scheme $fastcgi_https {
          default off;
          https on;
        }
[...]
}
[...] |
Don't forget to reload nginx afterwards:
systemctl reload nginx.service
Then go to the nginx Directives field again, and instead of fastcgi_param HTTPS on; you add the line fastcgi_param HTTPS $fastcgi_https; so that you can use SquirrelMail for both http and https requests:
        location /squirrelmail {
               root /usr/share/;
               index index.php index.html index.htm;
               location ~ ^/squirrelmail/(.+\.php)$ {
                       try_files $uri =404;
                       root /usr/share/;
                       fastcgi_pass 127.0.0.1:9000;
                       fastcgi_param HTTPS $fastcgi_https; # <-- add this line
                       fastcgi_index index.php;
                       fastcgi_param SCRIPT_FILENAME $document_root$fastcgi_script_name;
                       include /etc/nginx/fastcgi_params;
                       fastcgi_buffer_size 128k;
                       fastcgi_buffers 256 4k;
                       fastcgi_busy_buffers_size 256k;
                       fastcgi_temp_file_write_size 256k;
                       fastcgi_intercept_errors on;
               }
               location ~* ^/squirrelmail/(.+\.(jpg|jpeg|gif|css|png|js|ico|html|xml|txt))$ {
                       root /usr/share/;
               }
        }
        location /webmail {
               rewrite ^/* /squirrelmail last;
} |
20 ISPConfig 3
Before we install ISPConfig 3, make sure that the /var/vmail/ directory exists:
mkdir /var/vmail/
Before you start the ISPConfig installation, make sure that Apache is stopped (if it is installed - it is possible that some of your installed packages have installed Apache as a dependency without you knowing). If Apache2 is already installed on the system, stop it now...
systemctl stop apache2.service
... and remove Apache's system startup links:
systemctl disable apache2.service
Make sure that nginx is running:
systemctl restart nginx.service
(If you have both Apache and nginx installed, the installer asks you which one you want to use:Apache and nginx detected. Select server to use for ISPConfig:(apache,nginx) [apache]:
Type nginx. If only Apache or nginx are installed, this is automatically detected by the installer, and no question is asked.)
Download the current ISPConfig 3 version and install it. The ISPConfig installer will configure all services like Postfix, Dovecot, etc. for you. A manual setup as required for ISPConfig 2 is not necessary anymore.
You now also have the possibility to let the installer create an SSL vhost for the ISPConfig control panel, so that ISPConfig can be accessed using https:// instead of http://. To achieve this, just press ENTER when you see this question:Do you want a secure (SSL) connection to the ISPConfig web interface (y,n) [y]:.
cd /tmp
wget http://www.ispconfig.org/downloads/ISPConfig-3-stable.tar.gz
tar xfz ISPConfig-3-stable.tar.gz
cd ispconfig3_install/install/
Now start the installation process by executing:
php -q install.php
server1:/tmp/ispconfig3_install/install # php -q install.php
--------------------------------------------------------------------------------
_____ ___________ _____ __ _ ____
|_ _/ ___| ___ \ / __ \ / _(_) /__ \
| | \ `--.| |_/ / | / \/ ___ _ __ | |_ _ __ _ _/ /
| | `--. \ __/ | | / _ \| '_ \| _| |/ _` | |_ |
_| |_/\__/ / | | \__/\ (_) | | | | | | | (_| | ___\ \
\___/\____/\_| \____/\___/|_| |_|_| |_|\__, | \____/
__/ |
|___/
--------------------------------------------------------------------------------
>> Initial configuration
Operating System: openSUSE or compatible, unknown version.
Following will be a few questions for primary configuration so be careful.
Default values are in [brackets] and can be accepted with
Tap in "quit" (without the quotes) to stop the installer.
Select language (en,de) [en]: <-- ENTER
Installation mode (standard,expert) [standard]: <-- ENTER
Full qualified hostname (FQDN) of the server, eg server1.domain.tld [server1.example.com]: <-- ENTER
MySQL server hostname [localhost]: <-- ENTER
MySQL root username [root]: <-- ENTER
MySQL root password []: <-- yourrootsqlpassword
MySQL database to create [dbispconfig]: <-- ENTER
MySQL charset [utf8]: <-- ENTER
Apache and nginx detected. Select server to use for ISPConfig: (apache,nginx) [apache]: <-- nginx
Generating a 2048 bit RSA private key
...................................................................................+++
...+++
writing new private key to 'smtpd.key'
-----
You are about to be asked to enter information that will be incorporated
into your certificate request.
What you are about to enter is what is called a Distinguished Name or a DN.
There are quite a few fields but you can leave some blank
For some fields there will be a default value,
If you enter '.', the field will be left blank.
-----
Country Name (2 letter code) [AU]: <-- ENTER
State or Province Name (full name) [Some-State]: <-- ENTER
Locality Name (eg, city) []: <-- ENTER
Organization Name (eg, company) [Internet Widgits Pty Ltd]: <-- ENTER
Organizational Unit Name (eg, section) []: <-- ENTER
Common Name (eg, YOUR name) []: <-- ENTER
Emai l Address []: <-- ENTER
Configuring Jailkit
Configuring Dovecot
chmod: cannot access `/etc/dovecot/dovecot-sql.conf~': No such file or directory
Configuring Spamassassin
Configuring Amavisd
Configuring Getmail
Configuring Pureftpd
Configuring BIND
Configuring nginx
Configuring Vlogger
Configuring Apps vhost
Configuring Bastille Firewall
Configuring Fail2ban
Installing ISPConfig
ISPConfig Port [8080]: <-- ENTER
Do you want a secure (SSL) connection to the ISPConfig web interface (y,n) [y]:<-- ENTER
Generating RSA private key, 4096 bit long modulus
.++
...............++
e is 65537 (0x10001)
You are about to be asked to enter information that will be incorporated
into your certificate request.
What you are about to enter is what is called a Distinguished Name or a DN.
There are quite a few fields but you can leave some blank
For some fields there will be a default value,
If you enter '.', the field will be left blank.
-----
Country Name (2 letter code) [AU]: <-- ENTER
State or Province Name (full name) [Some-State]: <-- ENTER
Locality Name (eg, city) []: <-- ENTER
Organization Name (eg, company) [Internet Widgits Pty Ltd]: <-- ENTER
Organizational Unit Name (eg, section) []: <-- ENTER
Common Name (eg, YOUR name) []: <-- ENTER
Email Address []: <-- ENTER
Please enter the following 'extra' attributes
to be sent with your certificate request
A challenge password []: <-- ENTER
An optional company name []: <-- ENTER
writing RSA key
Configuring DBServer
Installing ISPConfig crontab
no crontab for root
no crontab for getmail
Restarting services ...
redirecting to systemctl
redirecting to systemctl
redirecting to systemctl
redirecting to systemctl
redirecting to systemctl
redirecting to systemctl
redirectin g to systemctl
redirecting to systemctl
redirecting to systemctl
Installation completed.
server1:/tmp/ispconfig3_install/install #
Clean up the /tmp directory:
cd /tmp
rm -rf /tmp/ispconfig3_install
rm -f /tmp/ISPConfig-3-stable.tar.gz
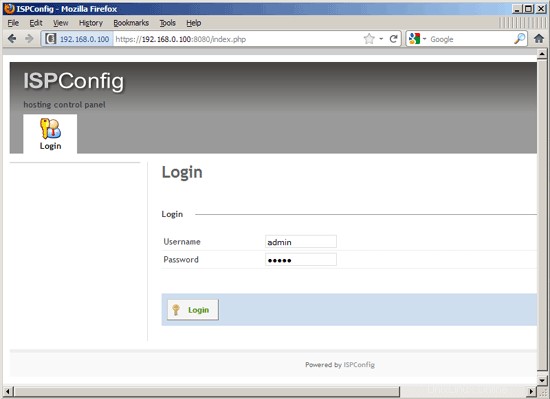
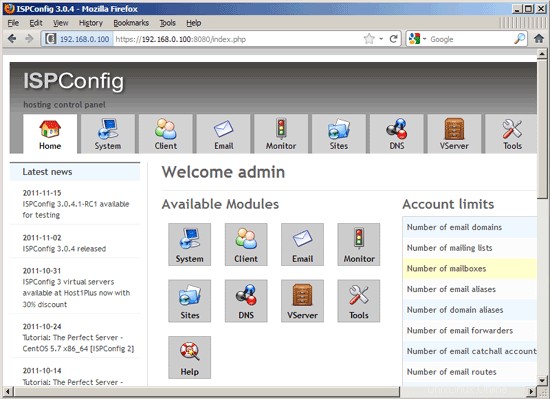
Afterwards you can access ISPConfig 3 under http(s)://server1.example.com:8080/ or http(s)://192.168.0.100:8080/ (http or https depends on what you chose during installation). Log in with the username admin and the password admin (you should change the default password after your first login):
If you want to use IPv6 addresses with your nginx vhosts, please do the following before you create IPv6 vhosts in ISPConfig:
Open /etc/sysctl.conf...
vi /etc/sysctl.conf
... and add the line net.ipv6.bindv6only =1:
[...] net.ipv6.bindv6only = 1 |
Run...
sysctl -p
... afterwards for the change to take effect.
20.1 ISPConfig 3 Manual
In order to learn how to use ISPConfig 3, I strongly recommend to download the ISPConfig 3 Manual.
Auf etwa 300 Seiten behandelt es das Konzept hinter ISPConfig (Admin, Reseller, Clients), erklärt, wie ISPConfig 3 installiert und aktualisiert wird, enthält eine Referenz für alle Formulare und Formularfelder in ISPConfig zusammen mit Beispielen für gültige Eingaben und bietet Tutorials für die häufigsten Aufgaben in ISPConfig 3. Es beschreibt auch, wie Sie Ihren Server sicherer machen können, und enthält am Ende einen Abschnitt zur Fehlerbehebung.
20.2 ISPConfig Monitor App For Android
Mit der ISPConfig Monitor App können Sie Ihren Serverstatus überprüfen und herausfinden, ob alle Dienste wie erwartet laufen. Sie können TCP- und UDP-Ports überprüfen und Ihre Server anpingen. Darüber hinaus können Sie diese App verwenden, um Details von Servern anzufordern, auf denen ISPConfig installiert ist (Bitte beachten Sie, dass die installierte Mindestversion von ISPConfig 3 mit Unterstützung für die ISPConfig Monitor App 3.0.3.3 ist! ); these details include everything you know from the Monitor module in the ISPConfig Control Panel (e.g. services, mail and system logs, mail queue, CPU and memory info, disk usage, quota, OS details, RKHunter log, etc.), and of course, as ISPConfig is multiserver-capable, you can check all servers that are controlled from your ISPConfig master server.
Anweisungen zum Herunterladen und zur Verwendung finden Sie unter http://www.ispconfig.org/ispconfig-3/ispconfig-monitor-app-for-android/.
21 Links
- OpenSUSE:http://www.opensuse.org/
- ISPConfig:http://www.ispconfig.org/
About The Author

Falko Timme is the owner of  Timme Hosting (ultra-fast nginx web hosting). He is the lead maintainer of HowtoForge (since 2005) and one of the core developers of ISPConfig (since 2000). He has also contributed to the O'Reilly book "Linux System Administration".