Der perfekte Server – Fedora 15 x86_64 [ISPConfig 3]
Dieses Tutorial zeigt, wie man einen Fedora 15 Server (x86_64) für die Installation von ISPConfig 3 vorbereitet und wie man ISPConfig 3 installiert. ISPConfig 3 ist ein Webhosting Control Panel, mit dem Sie die folgenden Dienste über einen Webbrowser konfigurieren können:Apache Webserver , Postfix-Mailserver, MySQL, BIND-Nameserver, PureFTPd, SpamAssassin, ClamAV und viele mehr.
Bitte beachten Sie, dass dieses Setup nicht für ISPConfig 2 funktioniert ! Es gilt nur für ISPConfig 3!
Ich gebe keine Garantie dafür, dass dies bei Ihnen funktioniert!
ISPConfig 3 Handbuch
Um zu lernen, wie man ISPConfig 3 verwendet, empfehle ich dringend, das ISPConfig 3-Handbuch herunterzuladen.
Auf etwa 300 Seiten behandelt es das Konzept hinter ISPConfig (Admin, Reseller, Clients), erklärt, wie ISPConfig 3 installiert und aktualisiert wird, enthält eine Referenz für alle Formulare und Formularfelder in ISPConfig zusammen mit Beispielen für gültige Eingaben und bietet Tutorials für die häufigsten Aufgaben in ISPConfig 3. Es beschreibt auch, wie Sie Ihren Server sicherer machen können, und enthält am Ende einen Abschnitt zur Fehlerbehebung.
ISPConfig Monitor-App für Android
Mit der ISPConfig Monitor App können Sie Ihren Serverstatus überprüfen und herausfinden, ob alle Dienste wie erwartet laufen. Sie können TCP- und UDP-Ports überprüfen und Ihre Server anpingen. Darüber hinaus können Sie diese App verwenden, um Details von Servern anzufordern, auf denen ISPConfig installiert ist (Bitte beachten Sie, dass die installierte Mindestversion von ISPConfig 3 mit Unterstützung für die ISPConfig Monitor App 3.0.3.3 ist! ); Diese Details umfassen alles, was Sie aus dem Monitor-Modul im ISPConfig Control Panel wissen (z. B. Dienste, Mail- und Systemprotokolle, Mail-Warteschlange, CPU- und Speicherinformationen, Festplattennutzung, Quote, Betriebssystemdetails, RKHunter-Protokoll usw.) und natürlich , da ISPConfig Multiserver-fähig ist, können Sie alle Server prüfen, die von Ihrem ISPConfig-Masterserver gesteuert werden.
Anweisungen zum Herunterladen und zur Verwendung finden Sie unter http://www.ispconfig.org/ispconfig-3/ispconfig-monitor-app-for-android/.
1 Voraussetzungen
Um ein solches System zu installieren, benötigen Sie Folgendes:
- Laden Sie das ISO-Image der Fedora 15-DVD von einem Mirror in Ihrer Nähe herunter (die Liste der Mirrors finden Sie hier:http://mirrors.fedoraproject.org/publiclist/Fedora/15/), z. http://ftp.tu-chemnitz.de/pub/linux/fedora/linux/releases/15/Fedora/x86_64/iso/Fedora-15-x86_64-DVD.iso
- eine Internetverbindung...
2 Vorbemerkung
In diesem Tutorial verwende ich den Hostnamen server1.example.com mit der IP-Adresse 192.168.0.100 und dem Gateway 192.168.0.1. Diese Einstellungen können für Sie abweichen, daher müssen Sie sie gegebenenfalls ersetzen.
Bitte stellen Sie sicher, dass das System, das Sie aktualisieren möchten, über mehr als 600 MB RAM verfügt - andernfalls kann das System beim Booten mit der folgenden Meldung hängen bleiben:
Trying to unpack rootfs image as initramfs...
3 Installieren Sie das Basissystem
Booten Sie von Ihrer Fedora 15 DVD. Wählen Sie Neues System installieren oder vorhandenes System aktualisieren:

Das Testen des Installationsmediums kann lange dauern, daher überspringen wir diesen Test hier:

Wählen Sie als nächstes Ihre Sprache:
Wählen Sie Ihr Tastaturlayout aus:
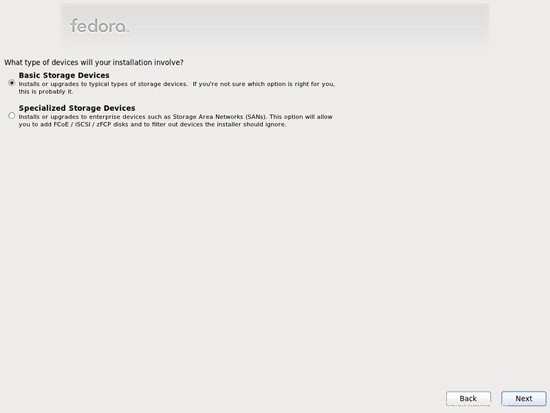
Ich gehe davon aus, dass Sie eine lokal angeschlossene Festplatte verwenden, daher sollten Sie hier Basic Storage Devices auswählen:
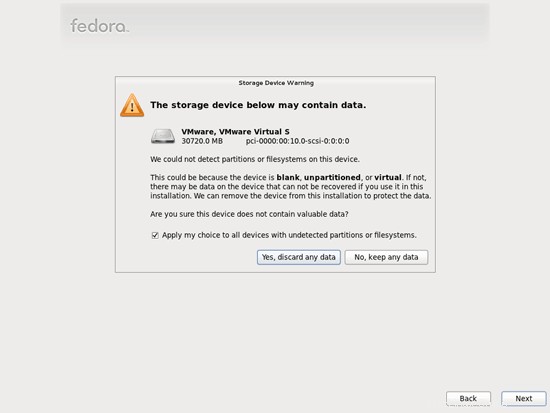
Da wir eine neue Fedora-Installation wünschen, klicken Sie als nächstes auf die Schaltfläche Ja, alle Daten verwerfen:
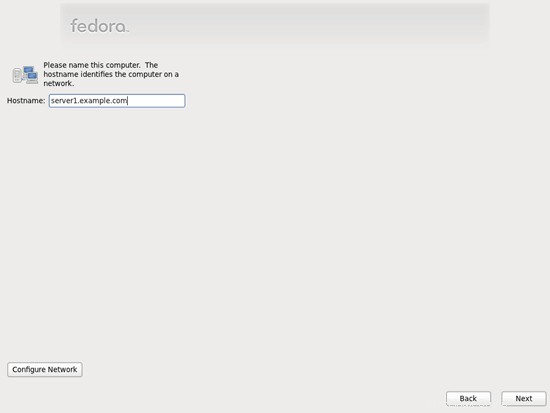
Geben Sie den Hostnamen des Servers ein:
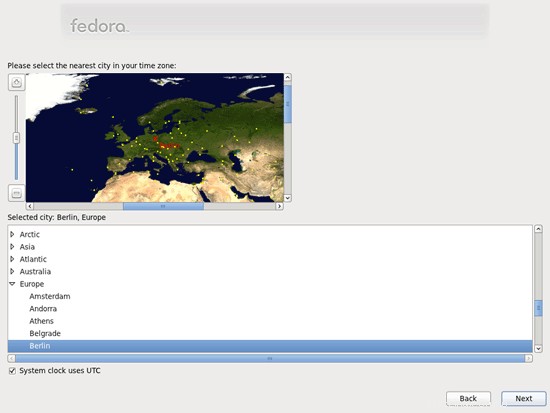
Wählen Sie Ihre Zeitzone:
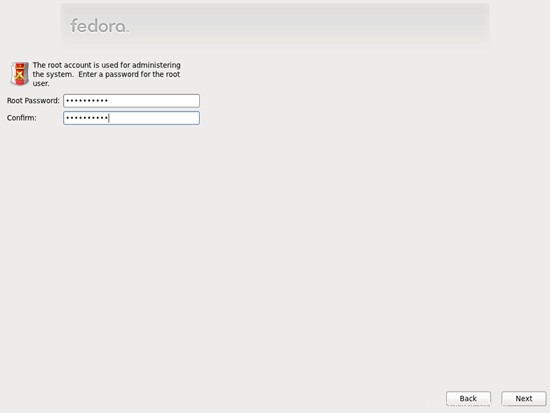
Geben Sie root ein Passwort:
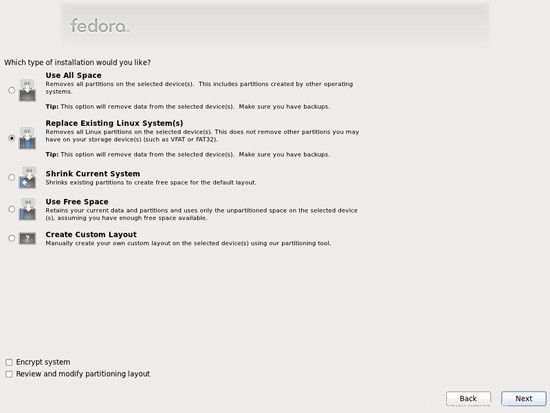
Als nächstes nehmen wir die Partitionierung vor. Wählen Sie Vorhandene(s) Linux-System(e) ersetzen aus. Dadurch erhalten Sie eine kleine /boot-Partition und eine große /-Partition, was für unsere Zwecke in Ordnung ist:
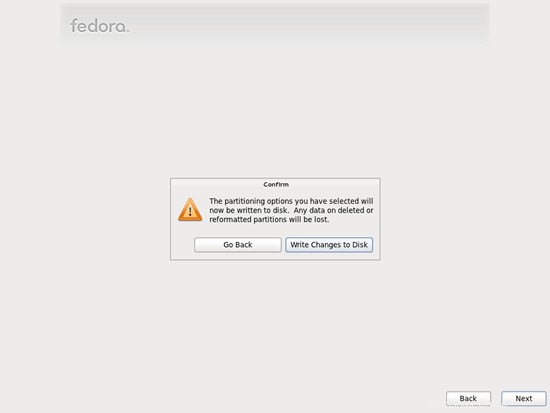
Wählen Sie Änderungen auf Datenträger schreiben:
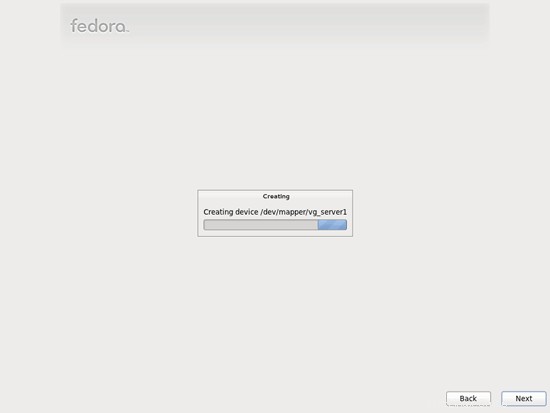
Die Festplatte wird formatiert:
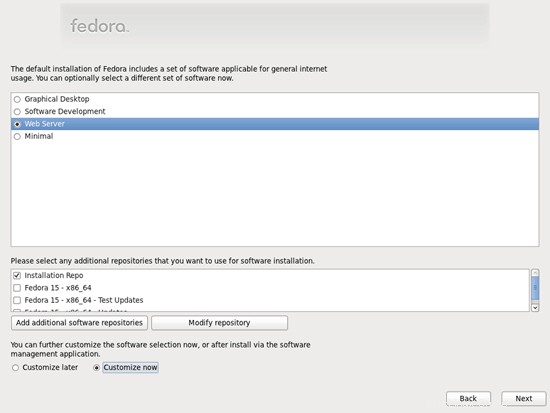
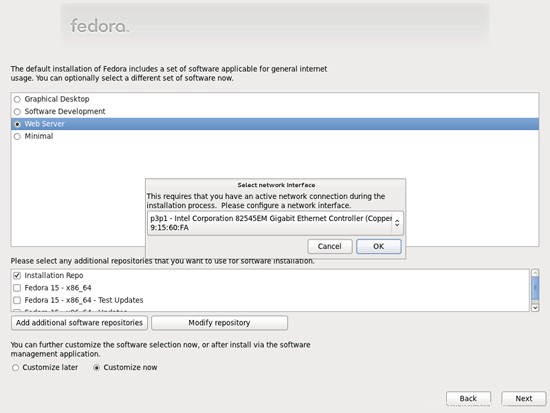
Nun wählen wir die Software aus, die wir installieren möchten. Deaktivieren Sie Graphical Desktop und aktivieren Sie stattdessen Webserver. Dann aktivieren Sie Jetzt anpassen. Wählen Sie anschließend die zusätzlichen Repositories Fedora 15 - x86_64 und Fedora 15 - x86_64 - Updates aus (wenn Sie sich auf einem i686-System befinden, lauten die Namen wahrscheinlich Fedora 15 - i686 und Fedora 15 - i686 - Updates):
Da die letzten beiden Repositorys eine Internetverbindung benötigen, erscheint ein neues Fenster, in dem Sie Ihre Netzwerkkarte konfigurieren müssen. Wählen Sie Ihre Netzwerkkarte aus und klicken Sie auf OK:
Der perfekte Server - Fedora 15 x86_64 [ISPConfig 3] - Seite 2
4 Ändern Sie den Namen Ihrer Netzwerkkarte in ethx
Jetzt müssen wir Fedora so konfigurieren, dass es keine BIOS-Gerätenamen mehr für unsere Netzwerkschnittstelle verwendet. Statt p3p1 brauchen wir unser gutes, altes eth0 zurück (weil sonst die Firewall von ISPConfig verrückt spielt und alles blockiert, weil sie eth0 statt p3p1 erwartet). Öffnen Sie /etc/grub.conf...
vi /etc/grub.conf
... und fügen Sie biosdevname=0 zur Kernel-Zeile hinzu:
# grub.conf generated by anaconda
#
# Note that you do not have to rerun grub after making changes to this file
# NOTICE:  You have a /boot partition.  This means that
#          all kernel and initrd paths are relative to /boot/, eg.
#          root (hd0,0)
#          kernel /vmlinuz-version ro root=/dev/mapper/vg_server1-lv_root
#          initrd /initrd-[generic-]version.img
#boot=/dev/sda
default=0
timeout=0
splashimage=(hd0,0)/grub/splash.xpm.gz
hiddenmenu
title Fedora (2.6.38.6-27.fc15.x86_64)
        root (hd0,0)
        kernel /vmlinuz-2.6.38.6-27.fc15.x86_64 ro root=/dev/mapper/vg_server1-lv_root rd_LVM_LV=vg_server1/lv_root rd_LVM_LV=vg_server1/lv_swap rd_NO_LUKS rd_NO_MD rd_NO_DM LANG=en_US.UTF-8 SYSFONT=latarcyrheb-sun16 KEYTABLE=de rhgb quiet biosdevname=0
initrd /initramfs-2.6.38.6-27.fc15.x86_64.img |
Starten Sie dann das System neu:
reboot
Nach dem Neustart sollte Ihre Netzwerkkarte eth0 heißen. Lauf...
ifconfig
... zu überprüfen:
[example@unixlinux.online ~]# ifconfig
eth0 Link encap:Ethernet HWaddr 00:0C:29:15:60:FA
inet addr:192.168.0.100 Bcast:192.168.0.255 Maske:255.255. 255.0
inet6 addr: fe80::20c:29ff:fe15:60fa/64 Scope:Link
UP BROADCAST RUNNING MULTICAST MTU:1500 Metrik:1
RX-Pakete:48 Fehler:0 Drop 0 Overruns:0 Frame:0
TX Pakete:58 Fehler:0 Droped:0 Overruns:0 Carrier:0
Collisions:0 txqueuelen:1000
RX Bytes:5226 (5,1 KiB) TX bytes:9682 (9,4 KiB)
lo Link encap:Local Loopback
inet addr:127.0.0.1 Maske:255.0.0.0
inet6 addr: ::1/128 Scope:Host
UP LOOPBACK RUNNING MTU:16436 Metrik:1
RX Pakete:2 Fehler:0 verloren:0 Überläufe:0 Frame:0
TX Pakete:2 Fehler:0 verloren:0 Überläufe:0 Carrier:0
Kollisionen:0 txqueuelen:0
RX-Bytes:100 (100,0 b) TX-Bytes:100 (100,0 b)
[example@unixlinux.online ~]#
5 /etc/hosts anpassen
Als nächstes bearbeiten wir /etc/hosts. Lassen Sie es so aussehen:
vi /etc/hosts
127.0.0.1 localhost localhost.localdomain localhost4 localhost4.localdomain4 192.168.0.100 server1.example.com server1 ::1 localhost localhost.localdomain localhost6 localhost6.localdomain6 |
Es ist wichtig, dass Sie eine Zeile für server1.example.com hinzufügen und server1.example.com und server1 aus der Zeile 127.0.0.1 entfernen.
6 Firewall konfigurieren
(Sie können dieses Kapitel überspringen, wenn Sie die Firewall bereits am Ende der grundlegenden Systeminstallation deaktiviert haben.)
Ich möchte ISPConfig am Ende dieses Tutorials installieren, das mit einer eigenen Firewall geliefert wird. Deshalb deaktiviere ich jetzt die standardmäßige Fedora-Firewall. Natürlich steht es Ihnen frei, sie eingeschaltet zu lassen und nach Ihren Bedürfnissen zu konfigurieren (aber dann sollten Sie später keine andere Firewall verwenden, da diese höchstwahrscheinlich die Fedora-Firewall stört).
Ausführen
system-config-firewall
und die Firewall deaktivieren.
Um zu überprüfen, ob die Firewall wirklich deaktiviert wurde, können Sie
ausführeniptables -L
nachher. Die Ausgabe sollte so aussehen:
[example@unixlinux.online ~]# iptables -L
Chain INPUT (Policy ACCEPT)
target prot opt source destination
Chain FORWARD (Policy ACCEPT)
target prot opt source destination
Chain OUTPUT (policy ACCEPT)
target prot opt source destination
[example@unixlinux.online ~]#
7 SELinux deaktivieren
SELinux ist eine Sicherheitserweiterung von Fedora, die erweiterte Sicherheit bieten soll. Meiner Meinung nach brauchen Sie es nicht, um ein sicheres System zu konfigurieren, und es verursacht normalerweise mehr Probleme als Vorteile (denken Sie daran, nachdem Sie eine Woche lang Fehler behoben haben, weil ein Dienst nicht wie erwartet funktioniert hat, und dann Sie feststellen, dass alles in Ordnung war, nur SELinux verursachte das Problem). Daher deaktiviere ich es (dies ist ein Muss, wenn Sie später ISPConfig installieren möchten).
Bearbeiten Sie /etc/selinux/config und setzen Sie SELINUX=disabled:
vi /etc/selinux/config
# This file controls the state of SELinux on the system. # SELINUX= can take one of these three values: # enforcing - SELinux security policy is enforced. # permissive - SELinux prints warnings instead of enforcing. # disabled - No SELinux policy is loaded. SELINUX=disabled # SELINUXTYPE= can take one of these two values: # targeted - Targeted processes are protected, # mls - Multi Level Security protection. SELINUXTYPE=targeted |
Danach müssen wir das System neu starten:
reboot
8 Einige Software installieren
Zuerst importieren wir die GPG-Schlüssel für Softwarepakete:
rpm --import /etc/pki/rpm-gpg/RPM-GPG-KEY*
Als nächstes aktualisieren wir unsere bestehenden Pakete auf dem System:
yum update
Jetzt installieren wir einige Softwarepakete, die später benötigt werden:
yum groupinstall 'Development Tools'
yum groupinstall 'Development Libraries'
9 Journaled-Quote
(Falls Sie ein anderes Partitionierungsschema gewählt haben als ich, müssen Sie dieses Kapitel anpassen, damit Quota für die Partitionen gilt, wo Sie es brauchen.)
Um Quota zu installieren, führen wir diesen Befehl aus:
yum install quota
Bearbeiten Sie /etc/fstab und fügen Sie ,usrjquota=aquota.user,grpjquota=aquota.group,jqfmt=vfsv0 zur Partition / (/dev/mapper/vg_server1-lv_root):
hinzuvi /etc/fstab
# # /etc/fstab # Created by anaconda on Wed May 25 15:57:24 2011 # # Accessible filesystems, by reference, are maintained under '/dev/disk' # See man pages fstab(5), findfs(8), mount(8) and/or blkid(8) for more info # /dev/mapper/vg_server1-lv_root / ext4 defaults,usrjquota=aquota.user,grpjquota=aquota.group,jqfmt=vfsv0 1 1 UUID=366ba6a7-7e68-4ec9-9743-4b02dd105180 /boot ext4 defaults 1 2 /dev/mapper/vg_server1-lv_swap swap swap defaults 0 0 tmpfs /dev/shm tmpfs defaults 0 0 devpts /dev/pts devpts gid=5,mode=620 0 0 sysfs /sys sysfs defaults 0 0 proc /proc proc defaults 0 0 |
Dann ausführen
mount -o remount /
quotecheck -avugm
quotaon -avug
zum Aktivieren des Kontingents.
10 Installieren Sie Apache, MySQL, phpMyAdmin
Dies alles kann mit einem einzigen Befehl installiert werden:
yum install ntp httpd mysql-server php php-mysql php-mbstring php-mcrypt phpMyAdmin
Der perfekte Server - Fedora 15 x86_64 [ISPConfig 3] - Seite 4
11 Installieren Sie Courier-IMAP, Courier-Authlib und Maildrop
Leider gibt es keine RPM-Pakete für Courier-IMAP, Courier-Authlib und Maildrop, daher müssen wir sie selbst bauen.
Entfernen Sie zuerst Dovecot (Fedora 15 wird mit Dovecot 2.x geliefert; leider unterstützt ISPConfig 3 Dovecot 1.2.x, aber nicht 2.x):
yum remove dovecot dovecot-mysql
Installieren Sie dann die Voraussetzungen, die wir zum Erstellen von Courier-RPM-Paketen benötigen:
yum install rpm-build gcc mysql-devel openssl-devel cyrus-sasl-devel pkgconfig zlib-devel pcre-devel openldap-devel postgresql-devel expect libtool-ltdl-devel openldap-servers libtool gdbm-devel pam-devel gamin-devel libidn-devel
RPM-Pakete sollten nicht als Root erstellt werden; courier-imap verweigert sogar die Kompilierung, wenn es feststellt, dass die Kompilierung als Root-Benutzer ausgeführt wird. Deshalb erstellen wir jetzt ein normales Benutzerkonto (in diesem Beispiel falko) und geben ihm ein Passwort:
useradd -m -s /bin/bash falko
passwd falko
Den sudo-Befehl benötigen wir später, damit der Benutzer falko die RPM-Pakete kompilieren und installieren kann. Aber zuerst müssen wir falko erlauben, alle Befehle mit sudo:
auszuführenAusführen
visudo
In der sich öffnenden Datei gibt es eine Zeile root ALL=(ALL) ALL. Fügen Sie direkt unter dieser Zeile eine ähnliche Zeile für falko hinzu:
[...] ## Allow root to run any commands anywhere root ALL=(ALL) ALL falko ALL=(ALL) ALL [...] |
Jetzt können wir unser RPM-Paket erstellen. Werde zuerst der Benutzer falko:
su falko
Als nächstes erstellen wir unsere Build-Umgebung:
mkdir $HOME/rpm
mkdir $HOME/rpm/SOURCES
mkdir $HOME/rpm/SPECS
mkdir $HOME/rpm/BUILD
mkdir $HOME/rpm/BUILDROOT
mkdir $HOME/rpm/SRPMS
mkdir $HOME/rpm/RPMS
mkdir $HOME/rpm/RPMS/i386
mkdir $HOME/rpm/RPMS/x86_64
echo "%_topdir $HOME/rpm" >> $HOME/.rpmmacros
Jetzt erstellen wir ein Download-Verzeichnis und laden die Quelldateien von http://www.courier-mta.org/download.php:
herunter
mkdir $HOME/downloads
cd $HOME/downloads
wget https://sourceforge.net/projects/courier/files/authlib/0.63.0/courier-authlib-0.63.0.tar.bz2/download
wget https://sourceforge.net/projects/courier /files/imap/4.8.1/courier-imap-4.8.1.tar.bz2/download
wget https://sourceforge.net/projects/courier/files/maildrop/2.5.4/maildrop-2.5 .4.tar.bz2/download
(Sie fragen sich vielleicht, warum ich nicht die neueste Version von courier-imap – 4.9.3 zum Zeitpunkt des Schreibens dieses Artikels – herunterlade, sondern eine ältere verwende – 4.8.1. Das liegt daran, dass 4.9.3 auf meinem System nicht erstellt werden konnte , während 4.8.1 problemlos funktioniert.)
Jetzt (immer noch in $HOME/downloads) können wir courier-authlib bauen:
sudo rpmbuild -ta courier-authlib-0.63.0.tar.bz2
Nach dem Erstellungsprozess finden Sie die RPM-Pakete in /root/rpmbuild/RPMS/x86_64 (/root/rpmbuild/RPMS/i686, wenn Sie sich auf einem i686-System befinden). Der Befehl
sudo ls -l /root/rpmbuild/RPMS/x86_64
zeigt Ihnen die verfügbaren RPM-Pakete:
[example@unixlinux.online downloads]$ sudo ls -l /root/rpmbuild/RPMS/x86_64
insgesamt 520
-rw-r--r-- 1 root root 123448 25. Mai 18:06 Kurier -authlib-0.63.0-1.fc15.x86_64.rpm
-rw-r--r-- 1 root root 265144 Mai 25 18:06 courier-authlib-debuginfo-0.63.0-1.fc15. x86_64.rpm
-rw-r--r-- 1 root root 34876 May 25 18:06 courier-authlib-devel-0.63.0-1.fc15.x86_64.rpm
-rw-r --r-- 1 root root 17448 Mai 25 18:06 courier-authlib-ldap-0.63.0-1.fc15.x86_64.rpm
-rw-r--r-- 1 root root 13808 Mai 25 18:06 courier-authlib-mysql-0.63.0-1.fc15.x86_64.rpm
-rw-r--r-- 1 root root 13020 25. Mai 18:06 courier-authlib-pgsql-0.63. 0-1.fc15.x86_64.rpm
-rw-r--r-- 1 root root 8276 May 25 18:06 courier-authlib-pipe-0.63.0-1.fc15.x86_64.rpm
-rw-r--r-- 1 root root 34108 May 25 18:06 courier-authlib-userdb-0.63.0-1.fc15.x86_64.rpm
[example@unixlinux.online downloads]$
Wählen Sie diejenigen aus, die Sie installieren möchten, und installieren Sie sie wie folgt:
sudo rpm -ivh /root/rpmbuild/RPMS/x86_64/courier-authlib-0.63.0-1.fc15.x86_64.rpm /root/rpmbuild/RPMS/x86_64/courier-authlib-mysql-0.63.0-1.fc15.x86_64.rpm /root/rpmbuild/RPMS/x86_64/courier-authlib-devel-0.63.0-1.fc15.x86_64.rpm
Jetzt gehen wir zurück zu unserem Download-Verzeichnis:
cd $HOME/downloads
Führen Sie die folgenden Befehle aus, um erforderliche Verzeichnisse zu erstellen/Verzeichnisberechtigungen zu ändern (da sonst der Erstellungsprozess für Courier-Imap fehlschlägt):
sudo mkdir /var/cache/ccache/tmp
sudo chmod o+rwx /var/cache/ccache/
sudo chmod 777 /var/cache/ccache/tmp
Führen Sie jetzt rpmbuild erneut aus, diesmal ohne sudo, sonst schlägt die Kompilierung fehl, weil sie als root ausgeführt wurde:
rpmbuild -ta courier-imap-4.8.1.tar.bz2
Nach dem Erstellungsprozess finden Sie die RPM-Pakete in $HOME/rpm/RPMS/x86_64 ($HOME/rpm/RPMS/i686, wenn Sie sich auf einem i686-System befinden):
cd $HOME/rpm/RPMS/x86_64
Der Befehl
ls -l
zeigt Ihnen die verfügbaren RPM-Pakete:
[example@unixlinux.online x86_64]$ ls -l
insgesamt 1708
-rw-rw-r-- 1 falko falko 596432 25. Mai 18:33 courier-imap-4.8.1-2.15.x86_64 .rpm
-rw-rw-r-- 1 falko falko 1149328 May 25 18:33 courier-imap-debuginfo-4.8.1-2.15.x86_64.rpm
[example@unixlinux.online x86_64] $
Sie können courier-imap wie folgt installieren:
sudo rpm -ivh courier-imap-4.8.1-2.15.x86_64.rpm
Jetzt gehen wir zurück zu unserem Download-Verzeichnis:
cd $HOME/downloads
und führen Sie rpmbuild erneut aus, diesmal um ein Maildrop-Paket zu erstellen:
sudo rpmbuild -ta maildrop-2.5.4.tar.bz2
Nach dem Erstellungsprozess finden Sie die RPM-Pakete in /root/rpmbuild/RPMS/x86_64 (/root/rpmbuild/RPMS/i686, wenn Sie sich auf einem i686-System befinden). Der Befehl
sudo ls -l /root/rpmbuild/RPMS/x86_64
zeigt Ihnen die verfügbaren RPM-Pakete:
[example@unixlinux.online downloads]$ sudo ls -l /root/rpmbuild/RPMS/x86_64
insgesamt 1628
-rw-r--r-- 1 root root 123448 25. Mai 18:06 Kurier -authlib-0.63.0-1.fc15.x86_64.rpm
-rw-r--r-- 1 root root 265144 Mai 25 18:06 courier-authlib-debuginfo-0.63.0-1.fc15. x86_64.rpm
-rw-r--r-- 1 root root 34876 May 25 18:06 courier-authlib-devel-0.63.0-1.fc15.x86_64.rpm
-rw-r --r-- 1 root root 17448 Mai 25 18:06 courier-authlib-ldap-0.63.0-1.fc15.x86_64.rpm
-rw-r--r-- 1 root root 13808 Mai 25 18:06 courier-authlib-mysql-0.63.0-1.fc15.x86_64.rpm
-rw-r--r-- 1 root root 13020 25. Mai 18:06 courier-authlib-pgsql-0.63. 0-1.fc15.x86_64.rpm
-rw-r--r-- 1 root root 8276 May 25 18:06 courier-authlib-pipe-0.63.0-1.fc15.x86_64.rpm
-rw-r--r-- 1 root root 34108 May 25 18:06 courier-authlib-userdb-0.63.0-1.fc15.x86_64.rpm
-rw-r--r-- 1 root root 278520 25. Mai 18:50 maildrop-2.5.4-1.15.x86_64.rpm
-rw-r--r-- 1 root root 685672 25. Mai 18:50 maildrop-debuginfo-2.5.4 -1.15.x86_64.rpm
-rw-r--r-- 1 root root 99924 Mai 25 18:50 maildrop-devel-2.5.4-1.15.x86_64.rpm
-rw-r- -r-- 1 root root 63968 25. Mai 18:50 maildrop-man-2.5.4-1.15.x86_64.rpm
[example@unixlinux.online downloads]$
Sie können Maildrop jetzt wie folgt installieren:
sudo rpm -ivh /root/rpmbuild/RPMS/x86_64/maildrop-2.5.4-1.15.x86_64.rpm
Nachdem Sie alle benötigten Pakete kompiliert und installiert haben, können Sie wieder root werden, indem Sie
eingebenexit
12 Postfix installieren
Postfix kann wie folgt installiert werden:
yum install postfix
Schalten Sie dann Sendmail aus und starten Sie Postfix und MySQL:
chkconfig --levels 235 mysqld beim
/etc/init.d/mysqld start
chkconfig sendmail aus
chkconfig --levels 235 postfix ein
/etc/init.d/sendmail stop
/etc/init.d/postfix start
13 Installieren Sie Getmail
Getmail kann wie folgt installiert werden:
yum install getmail
14 Legen Sie MySQL-Passwörter fest und konfigurieren Sie phpMyAdmin
Legen Sie Passwörter für das MySQL-Root-Konto fest:
mysql_secure_installation
[example@unixlinux.online ~]# mysql_secure_installation
HINWEIS:DAS AUSFÜHREN ALLER TEILE DIESES SKRIPTS WIRD FÜR ALLE MySQL-
SERVER IN DER PRODUKTION EMPFOHLEN BENUTZEN! BITTE LESEN SIE JEDEN SCHRITT SORGFÄLTIG DURCH!
Um sich bei MySQL anzumelden, um es zu sichern, benötigen wir das aktuelle
Passwort für den Root-Benutzer. Wenn Sie gerade MySQL installiert und
das Root-Passwort noch nicht festgelegt haben, ist das Passwort leer,
also sollten Sie hier einfach die Eingabetaste drücken.
Enter Aktuelles Passwort für Root (Eingabe für keine): <-- ENTER
OK, erfolgreich verwendetes Passwort, weiter ...
Das Festlegen des Root-Passworts stellt sicher, dass sich niemand bei MySQL anmelden kann
Root-Benutzer ohne die entsprechende Berechtigung.
Root-Passwort festlegen? [Y/n] <-- ENTER
Neues Passwort: <-- yourrootsqlpassword
Neues Passwort erneut eingeben: <-- yourrootsqlpassword
Passwort erfolgreich aktualisiert!
Berechtigungstabellen werden neu geladen. .
... Erfolg!
Standardmäßig hat eine MySQL-Installation einen anonymen Benutzer, der ermöglicht, dass sich jeder
bei MySQL anmelden kann, ohne einen Benutzeraccount haben zu müssen für
sie erstellt. Dies ist nur zum Testen sollte und damit die Installation
etwas flüssiger läuft. Sie sollten sie entfernen, bevor Sie in eine
Produktionsumgebung wechseln.
Anonyme Nutzer entfernen? [Y/n] <-- ENTER
... Erfolgreich!
Normalerweise sollte root nur erlaubt werden, sich von 'localhost' aus zu verbinden. Dies
stellt sicher, dass niemand das Root-Passwort aus dem Netzwerk erraten kann.
Root-Anmeldung aus der Ferne nicht zulassen? [Y/n] <-- EINGABE
... Erfolg!
Standardmäßig wird MySQL mit einer Datenbank namens "test" geliefert, auf die jeder
zugreifen kann. Dies ist auch nur zum Testen vorgesehen und sollte entfernt werden
bevor in eine Produktionsumgebung umgezogen wird.
Testdatenbank und Zugriff darauf entfernen? [Y/n] <-- ENTER
- Testdatenbank wird gelöscht...
... Erfolg!
- Berechtigungen für Testdatenbank entfernen...
... Erfolg !
Durch das Neuladen der Berechtigungstabellen wird sichergestellt, dass alle bisher vorgenommenen Änderungen
sofort wirksam werden.
Berechtigungstabellen jetzt neu laden? [Y/n] <-- EINGABE
... Erfolgreich!
Aufräumen ...
Alle fertig! Wenn Sie alle oben genannten Schritte ausgeführt haben, sollte Ihre MySQL
Installation jetzt sicher sein.
Vielen Dank, dass Sie MySQL verwenden!
[example @unixlinux.online ~]#
Jetzt konfigurieren wir phpMyAdmin. Wir ändern die Apache-Konfiguration so, dass phpMyAdmin Verbindungen nicht nur von localhost zulässt (durch Auskommentieren der Zeilengruppe
vi /etc/httpd/conf.d/phpMyAdmin.conf
# phpMyAdmin - Web based MySQL browser written in php
#
# Allows only localhost by default
#
# But allowing phpMyAdmin to anyone other than localhost should be considered
# dangerous unless properly secured by SSL

Alias /phpMyAdmin /usr/share/phpMyAdmin
Alias /phpmyadmin /usr/share/phpMyAdmin

#<Directory /usr/share/phpMyAdmin/>
#   Order Deny,Allow
#   Deny from All
#   Allow from 127.0.0.1
#   Allow from ::1
#</Directory>

<Directory /usr/share/phpMyAdmin/setup/>
   Order Deny,Allow
   Deny from All
   Allow from 127.0.0.1
   Allow from ::1
</Directory>

# These directories do not require access over HTTP - taken from the original
# phpMyAdmin upstream tarball
#
<Directory /usr/share/phpMyAdmin/libraries/>
    Order Deny,Allow
    Deny from All
    Allow from None
</Directory>

<Directory /usr/share/phpMyAdmin/setup/lib/>
    Order Deny,Allow
    Deny from All
    Allow from None
</Directory>

# This configuration prevents mod_security at phpMyAdmin directories from
# filtering SQL etc.  This may break your mod_security implementation.
#
#<IfModule mod_security.c>
#    <Directory /usr/share/phpMyAdmin/>
#        SecRuleInheritance Off
#    </Directory>
#</IfModule> |
Dann erstellen wir die Systemstartlinks für Apache und starten es:
chkconfig --levels 235 httpd on
/etc/init.d/httpd start
Jetzt können Sie Ihren Browser auf http://server1.example.com/phpmyadmin/ oder http://192.168.0.100/phpmyadmin/ leiten und sich mit dem Benutzernamen root und Ihrem neuen root-MySQL-Passwort anmelden.
Der perfekte Server - Fedora 15 x86_64 [ISPConfig 3] - Seite 5
15 Installieren Sie Amavisd-new, SpamAssassin und ClamAV
Um amavisd-new, spamassassin und clamav zu installieren, führen Sie den folgenden Befehl aus:
yum install amavisd-new spamassassin clamav clamav-data clamav-server clamav-update unzip bzip2 perl-DBD-mysql
Bei der Installation von ClamAV wurde ein Cron-Job installiert, der alle drei Stunden versucht, die ClamAV-Virendatenbank zu aktualisieren. Aber das funktioniert nur, wenn wir es in /etc/sysconfig/freshclam und /etc/freshclam.conf aktivieren:
vi /etc/sysconfig/freshclam
Kommentieren Sie die FRESHCLAM_DELAY-Zeile am Ende aus:
## When changing the periodicity of freshclam runs in the crontab, ## this value must be adjusted also. Its value is the timespan between ## two subsequent freshclam runs in minutes. E.g. for the default ## ## | 0 */3 * * * ... ## ## crontab line, the value is 180 (minutes). # FRESHCLAM_MOD= ## A predefined value for the delay in seconds. By default, the value is ## calculated by the 'hostid' program. This predefined value guarantees ## constant timespans of 3 hours between two subsequent freshclam runs. ## ## This option accepts two special values: ## 'disabled-warn' ... disables the automatic freshclam update and ## gives out a warning ## 'disabled' ... disables the automatic freshclam silently # FRESHCLAM_DELAY= ### !!!!! REMOVE ME !!!!!! ### REMOVE ME: By default, the freshclam update is disabled to avoid ### REMOVE ME: network access without prior activation #FRESHCLAM_DELAY=disabled-warn # REMOVE ME |
vi /etc/freshclam.conf
Kommentieren Sie die Beispielzeile aus:
[...] # Comment or remove the line below. #Example [...] |
Dann starten wir freshclam, amavisd und clamd...
sa-update
chkconfig --levels 235 amavisd on
chkconfig --levels 235 clamd.amavisd on
/usr/bin/freshclam
/etc/init.d/amavisd start
/etc/init.d/clamd.amavisd start
Als nächstes tun Sie dies:
rm -f /var/spool/amavisd/clamd.sock
mkdir /var/run/clamav.amavisd /var/run/clamd.amavisd /var/run/amavisd
chown amavis /var/run /clamav.amavisd
chown amavis /var/run/clamd.amavisd
chown amavis /var/run/amavisd
ln -sf /var/spool/amavisd/clamd.sock /var/ run/clamav.amavisd/clamd.sock
ln -sf /var/spool/amavisd/clamd.sock /var/run/clamd.amavisd/clamd.sock
/etc/init.d/clamd .amavisd Neustart
Fedora 15 hat ein /run-Verzeichnis zum Speichern von Laufzeitdaten. /run ist jetzt ein tmpfs, und /var/run und /var/lock sind jetzt an /run und /run/lock von tmpfs gebunden und werden daher beim Neustart geleert (siehe https://docs.fedoraproject.org/en -US/Fedora/15/html/Release_Notes/sect-Release_Notes-Changes_for_SysAdmin.html für weitere Details).
Das bedeutet, dass nach einem Neustart die Verzeichnisse /var/run/clamav.amavisd, /var/run/clamd.amavisd und /var/run/amavisd, die wir gerade erstellt haben, nicht mehr existieren und daher clamd und amavisd nicht starten. Deshalb erstellen wir jetzt die Datei /etc/tmpfiles.d/amavisd.conf, die diese Verzeichnisse beim Systemstart erstellt (siehe http://0pointer.de/public/systemd-man/tmpfiles.d.html für weitere Details):
vi /etc/tmpfiles.d/amavisd.conf
D /var/run/clamav.amavisd 0755 amavis root - D /var/run/clamd.amavisd 0755 amavis root - D /var/run/amavisd 0755 amavis root - |
16 Installation von mod_php, mod_fcgi/PHP5 und suPHP
ISPConfig 3 ermöglicht Ihnen die Verwendung von mod_php, mod_fcgi/PHP5, cgi/PHP5 und suPHP pro Website.
Wir können Apache2 mit mod_php5, mod_fcgid und PHP5 wie folgt installieren:
yum install php php-devel php-gd php-imap php-ldap php-mysql php-odbc php-pear php-xml php-xmlrpc php-mbstring php-mcrypt php-mssql php-snmp php-soap php-tidy curl curl-devel perl-libwww-perl ImageMagick libxml2 libxml2-devel mod_fcgid php-cli httpd-devel
Als nächstes öffnen wir /etc/php.ini...
vi /etc/php.ini
... und ändere die Fehlerberichterstattung (so dass keine Hinweise mehr angezeigt werden) und entkommentiere cgi.fix_pathinfo=1:
[...] ;error_reporting = E_ALL & ~E_DEPRECATED error_reporting = E_ALL & ~E_NOTICE [...] ; cgi.fix_pathinfo provides *real* PATH_INFO/PATH_TRANSLATED support for CGI. PHP's ; previous behaviour was to set PATH_TRANSLATED to SCRIPT_FILENAME, and to not grok ; what PATH_INFO is. For more information on PATH_INFO, see the cgi specs. Setting ; this to 1 will cause PHP CGI to fix its paths to conform to the spec. A setting ; of zero causes PHP to behave as before. Default is 1. You should fix your scripts ; to use SCRIPT_FILENAME rather than PATH_TRANSLATED. ; http://www.php.net/manual/en/ini.core.php#ini.cgi.fix-pathinfo cgi.fix_pathinfo=1 [...] |
Als nächstes installieren wir suPHP:
cd /tmp
wget http://www.suphp.org/download/suphp-0.7.1.tar.gz
tar xvfz suphp-0.7.1.tar.gz
cd suphp-0.7.1/
./configure --prefix=/usr --sysconfdir=/etc --with-apr=/usr/bin/apr-1-config --with-apxs=/usr/sbin/apxs --with-apache-user=apache --with-setid-mode=owner --with-php=/usr/bin/php-cgi --with-logfile=/var/log/httpd/suphp_log --enable-SUPHP_USE_USERGROUP=yes
make
make install
Then we add the suPHP module to our Apache configuration...
vi /etc/httpd/conf.d/suphp.conf
LoadModule suphp_module modules/mod_suphp.so |
... and create the file /etc/suphp.conf as follows:
vi /etc/suphp.conf
[global] ;Path to logfile logfile=/var/log/httpd/suphp.log ;Loglevel loglevel=info ;User Apache is running as webserver_user=apache ;Path all scripts have to be in docroot=/ ;Path to chroot() to before executing script ;chroot=/mychroot ; Security options allow_file_group_writeable=true allow_file_others_writeable=false allow_directory_group_writeable=true allow_directory_others_writeable=false ;Check wheter script is within DOCUMENT_ROOT check_vhost_docroot=true ;Send minor error messages to browser errors_to_browser=false ;PATH environment variable env_path=/bin:/usr/bin ;Umask to set, specify in octal notation umask=0077 ; Minimum UID min_uid=100 ; Minimum GID min_gid=100 [handlers] ;Handler for php-scripts x-httpd-suphp="php:/usr/bin/php-cgi" ;Handler for CGI-scripts x-suphp-cgi="execute:!self" |
Finally we restart Apache:
/etc/init.d/httpd restart
16.1 Ruby
Starting with version 3.0.3, ISPConfig 3 has built-in support for Ruby. Instead of using CGI/FastCGI, ISPConfig depends on mod_ruby being available in the server's Apache.
For Fedora 15, there's no mod_ruby package available, so we must compile it ourselves. First we install some prerequisites:
yum install ruby ruby-devel
Next we download and install mod_ruby as follows:
cd /tmp
wget http://modruby.net/archive/mod_ruby-1.3.0.tar.gz
tar zxvf mod_ruby-1.3.0.tar.gz
cd mod_ruby-1.3.0/
./configure.rb --with-apr-includes=/usr/include/apr-1
make
make install
Finally we must add the mod_ruby module to the Apache configuration, so we create the file /etc/httpd/conf.d/ruby.conf...
vi /etc/httpd/conf.d/ruby.conf
LoadModule ruby_module modules/mod_ruby.so RubyAddPath /1.8 |
... and restart Apache:
/etc/init.d/httpd restart
(If you leave out the RubyAddPath /1.8 directive, you will see errors like the following ones in Apache's error log when you call Ruby files:
[Thu May 26 02:05:05 2011] [error] mod_ruby:ruby:0:in `require':no such file to load -- apache/ruby-run (LoadError)
[Thu May 26 02:05:05 2011] [error] mod_ruby:failed to require apache/ruby-run
[Thu May 26 02:05:05 2011] [error] mod_ruby:error in ruby
)
16.2 WebDAV
WebDAV should already be enabled, but to check this, open /etc/httpd/conf/httpd.conf and make sure that the following three modules are active:
vi /etc/httpd/conf/httpd.conf
[...] LoadModule auth_digest_module modules/mod_auth_digest.so [...] LoadModule dav_module modules/mod_dav.so [...] LoadModule dav_fs_module modules/mod_dav_fs.so [...] |
If you have to modify /etc/httpd/conf/httpd.conf, don't forget to restart Apache afterwards:
/etc/init.d/httpd restart
17 Install PureFTPd
PureFTPd can be installed with the following command:
yum install pure-ftpd
Then create the system startup links and start PureFTPd:
chkconfig --levels 235 pure-ftpd on
/etc/init.d/pure-ftpd start
Now we configure PureFTPd to allow FTP and TLS sessions. FTP is a very insecure protocol because all passwords and all data are transferred in clear text. By using TLS, the whole communication can be encrypted, thus making FTP much more secure.
OpenSSL is needed by TLS; to install OpenSSL, we simply run:
yum install openssl
Open /etc/pure-ftpd/pure-ftpd.conf...
vi /etc/pure-ftpd/pure-ftpd.conf
If you want to allow FTP and TLS sessions, set TLS to 1:
[...] # This option can accept three values : # 0 : disable SSL/TLS encryption layer (default). # 1 : accept both traditional and encrypted sessions. # 2 : refuse connections that don't use SSL/TLS security mechanisms, # including anonymous sessions. # Do _not_ uncomment this blindly. Be sure that : # 1) Your server has been compiled with SSL/TLS support (--with-tls), # 2) A valid certificate is in place, # 3) Only compatible clients will log in. TLS 1 [...] |
In order to use TLS, we must create an SSL certificate. I create it in /etc/ssl/private/, therefore I create that directory first:
mkdir -p /etc/ssl/private/
Afterwards, we can generate the SSL certificate as follows:
openssl req -x509 -nodes -days 7300 -newkey rsa:2048 -keyout /etc/ssl/private/pure-ftpd.pem -out /etc/ssl/private/pure-ftpd.pem
Country Name (2 letter code) [XX]:<-- Enter your Country Name (e.g., "DE").
State or Province Name (full name) []:<-- Enter your State or Province Name.
Locality Name (eg, city) [Default City]:<-- Enter your City.
Organization Name (eg, company) [Default Company Ltd]:<-- Enter your Organization Name (e.g., the name of your company).
Organizational Unit Name (eg, section) []:<-- Enter your Organizational Unit Name (e.g. "IT Department").
Common Name (eg, your name or your server's hostname) []:<-- Enter the Fully Qualified Domain Name of the system (e.g. "server1.example.com").
Email Address []:<-- Enter your Email Address.
Change the permissions of the SSL certificate:
chmod 600 /etc/ssl/private/pure-ftpd.pem
Finally restart PureFTPd:
/etc/init.d/pure-ftpd restart
Das ist es. You can now try to connect using your FTP client; however, you should configure your FTP client to use TLS.
18 Install BIND
We can install BIND as follows:
yum install bind bind-utils
Next open /etc/sysconfig/named...
vi /etc/sysconfig/named
... and comment out the ROOTDIR=/var/named/chroot line:
# BIND named process options # ~~~~~~~~~~~~~~~~~~~~~~~~~~ # Currently, you can use the following options: # # ROOTDIR="/var/named/chroot" -- will run named in a chroot environment. # you must set up the chroot environment # (install the bind-chroot package) before # doing this. # NOTE: # Those directories are automatically mounted to chroot if they are # empty in the ROOTDIR directory. It will simplify maintenance of your # chroot environment. # - /var/named # - /etc/pki/dnssec-keys # - /etc/named # - /usr/lib64/bind or /usr/lib/bind (architecture dependent) # # Those files are mounted as well if target file doesn't exist in # chroot. # - /etc/named.conf # - /etc/rndc.conf # - /etc/rndc.key # - /etc/named.rfc1912.zones # - /etc/named.dnssec.keys # - /etc/named.iscdlv.key # # Don't forget to add "$AddUnixListenSocket /var/named/chroot/dev/log" # line to your /etc/rsyslog.conf file. Otherwise your logging becomes # broken when rsyslogd daemon is restarted (due update, for example). # # OPTIONS="whatever" -- These additional options will be passed to named # at startup. Don't add -t here, use ROOTDIR instead. # # KEYTAB_FILE="/dir/file" -- Specify named service keytab file (for GSS-TSIG) # # DISABLE_ZONE_CHECKING -- By default, initscript calls named-checkzone # utility for every zone to ensure all zones are # valid before named starts. If you set this option # to 'yes' then initscript doesn't perform those # checks. #ROOTDIR=/var/named/chroot |
Then we create the startup links:
chkconfig --levels 235 named on
We don't start BIND now because it must be configured first - this will be done automatically by the ISPConfig 3 installer later on.
19 Install Vlogger, Webalizer, And AWStats
Vlogger, webalizer, and AWStats can be installed as follows:
yum install webalizer awstats perl-DateTime-Format-HTTP perl-DateTime-Format-Builder
cd /tmp
wget http://n0rp.chemlab.org/vlogger/vlogger-1.3.tar.gz
tar xvfz vlogger-1.3.tar.gz
mv vlogger-1.3/vlogger /usr/sbin/
rm -rf vlogger*
20 Install Jailkit
Jailkit is needed only if you want to chroot SSH users. It can be installed as follows (important:Jailkit must be installed before ISPConfig - it cannot be installed afterwards!):
cd /tmp
wget http://olivier.sessink.nl/jailkit/jailkit-2.14.tar.gz
tar xvfz jailkit-2.14.tar.gz
cd jailkit-2.14
./configure
make
make install
cd ..
rm -rf jailkit-2.14*
21 Install fail2ban
This is optional but recommended, because the ISPConfig monitor tries to show the log:
yum install fail2ban
chkconfig --levels 235 fail2ban on
/etc/init.d/fail2ban start
22 Install rkhunter
rkhunter can be installed as follows:
yum install rkhunter
The Perfect Server - Fedora 15 x86_64 [ISPConfig 3] - Page 6
23 Install SquirrelMail
To install the SquirrelMail webmail client, run...
yum install squirrelmail
... and restart Apache:
/etc/init.d/httpd restart
Then configure SquirrelMail:
/usr/share/squirrelmail/config/conf.pl
We must tell SquirrelMail that we are using Courier-IMAP/-POP3:
SquirrelMail Configuration : Read: config.php (1.4.0)
---------------------------------------------------------
Main Menu --
1. Organization Preferences
2. Server Settings
3. Folder Defaults
4. General Options
5. Themes
6. Address Books
7. Message of the Day (MOTD)
8. Plugins
9. Database
10. Languages
D. Set pre-defined settings for specific IMAP servers
C Turn color off
S Save data
Q Quit
Command >> <-- D
SquirrelMail Configuration : Read: config.php
---------------------------------------------------------
While we have been building SquirrelMail, we have discovered some
preferences that work better with some servers that don't work so
well with others. If you select your IMAP server, this option will
set some pre-defined settings for that server.
Please note that you will still need to go through and make sure
everything is correct. This does not change everything. There are
only a few settings that this will change.
Please select your IMAP server:
bincimap = Binc IMAP server
courier = Courier IMAP server
cyrus = Cyrus IMAP server
dovecot = Dovecot Secure IMAP server
exchange = Microsoft Exchange IMAP server
hmailserver = hMailServer
macosx = Mac OS X Mailserver
mercury32 = Mercury/32
uw = University of Washington's IMAP server
gmail = IMAP access to Google mail (Gmail) accounts
quit = Do not change anything
Command >> <-- courier
SquirrelMail Configuration : Read: config.php
---------------------------------------------------------
While we have been building SquirrelMail, we have discovered some
preferences that work better with some servers that don't work so
well with others. If you select your IMAP server, this option will
set some pre-defined settings for that server.
Please note that you will still need to go through and make sure
everything is correct. This does not change everything. There are
only a few settings that this will change.
Please select your IMAP server:
bincimap = Binc IMAP server
courier = Courier IMAP server
cyrus = Cyrus IMAP server
dovecot = Dovecot Secure IMAP server
exchange = Microsoft Exchange IMAP server
hmailserver = hMailServer
macosx = Mac OS X Mailserver
mercury32 = Mercury/32
uw = University of Washington's IMAP server
gmail = IMAP access to Google mail (Gmail) accounts
quit = Do not change anything
Command >> courier
imap_server_type = courier
default_folder_prefix = INBOX.
trash_folder = Trash
sent_folder = Sent
draft_folder = Drafts
show_prefix_option = false
default_sub_of_inbox = false
show_contain_subfolders_option = false
optional_delimiter = .
delete_folder = true
Press any key to continue... <-- press ENTER
SquirrelMail Configuration : Read: config.php (1.4.0)
---------------------------------------------------------
Main Menu --
1. Organization Preferences
2. Server Settings
3. Folder Defaults
4. General Options
5. Themes
6. Address Books
7. Message of the Day (MOTD)
8. Plugins
9. Database
10. Languages
D. Set pre-defined settings for specific IMAP servers
C Turn color off
S Save data
Q Quit
Command >> <--S
SquirrelMail Configuration : Read: config.php (1.4.0)
---------------------------------------------------------
Main Menu --
1. Organization Preferences
2. Server Settings
3. Folder Defaults
4. General Options
5. Themes
6. Address Books
7. Message of the Day (MOTD)
8. Plugins
9. Database
10. Languages
D. Set pre-defined settings for specific IMAP servers
C Turn color off
S Save data
Q Quit
Command >> <--Q
One last thing we need to do is modify the file /etc/squirrelmail/config_local.php and comment out the $default_folder_prefix variable - if you don't do this, you will see the following error message in SquirrelMail after you've logged in:Query:CREATE "Sent" Reason Given:Invalid mailbox name.
vi /etc/squirrelmail/config_local.php
<?php /** * Local config overrides. * * You can override the config.php settings here. * Don't do it unless you know what you're doing. * Use standard PHP syntax, see config.php for examples. * * @copyright © 2002-2006 The SquirrelMail Project Team * @license http://opensource.org/licenses/gpl-license.php GNU Public License * @version $Id$ * @package squirrelmail * @subpackage config */ //$default_folder_prefix = ''; ?> |
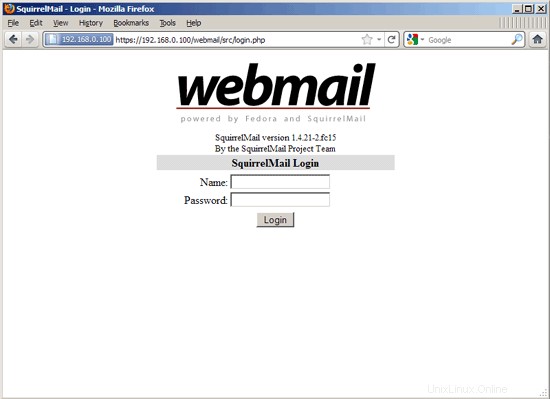
Now you can type in http://server1.example.com/webmail or http://192.168.0.100/webmail in your browser to access SquirrelMail.
24 Install ISPConfig 3
To install ISPConfig 3 from the latest released version, do this:
cd /tmp
wget http://www.ispconfig.org/downloads/ISPConfig-3-stable.tar.gz
tar xfz ISPConfig-3-stable.tar.gz
cd ispconfig3_install/install/
The next step is to run
php -q install.php
This will start the ISPConfig 3 installer:
[example@unixlinux.online install]# php -q install.php
--------------------------------------------------------------------------------
_____ ___________ _____ __ _ ____
|_ _/ ___| ___ \ / __ \ / _(_) /__ \
| | \ `--.| |_/ / | / \/ ___ _ __ | |_ _ __ _ _/ /
| | `--. \ __/ | | / _ \| '_ \| _| |/ _` | |_ |
_| |_/\__/ / | | \__/\ (_) | | | | | | | (_| | ___\ \
\___/\____/\_| \____/\___/|_| |_|_| |_|\__, | \____/
__/ |
|___/
--------------------------------------------------------------------------------
>> Initial configuration
Operating System: Redhat or compatible, unknown version.
Following will be a few questions for primary configuration so be careful.
Default values are in [brackets] and can be accepted with
Tap in "quit" (without the quotes) to stop the installer.
Select language (en,de) [en]: <-- ENTER
Installation mode (standard,expert) [standard]: <-- ENTER
Full qualified hostname (FQDN) of the server, eg server1.domain.tld [server1.example.com]: <-- ENTER
MySQL server hostname [localhost]: <-- ENTER
MySQL root username [root]: <-- ENTER
MySQL root password []: <-- yourrootsqlpassword
MySQL database to create [dbispconfig]: <-- ENTER
MySQL charset [utf8]: <-- ENTER
Generating a 2048 bit RSA private key
......+++
...............+++
writing new private key to 'smtpd.key'
-----
You are about to be asked to enter information that will be incorporated
into your certificate request.
What you are about to enter is what is called a Distinguished Name or a DN.
There are quite a few fields but you can leave some blank
For some fields there will be a default value,
If you enter '.', the field will be left blank.
-----
Country Name (2 letter code) [XX]: <-- ENTER
State or Province Name (full name) []: <-- ENTER
Locality Name (eg, city) [Default City]: <-- ENTER
Organization Name (eg, company) [Default Company Ltd]: <-- ENTER
Organizational Unit Name (eg, section) []: <-- ENTER
Common Name (eg, your name or your server's hostname) []: <-- E NTER
Email Address []: <-- ENTER
Configuring Jailkit
Configuring SASL
Configuring PAM
Configuring Courier
Configuring Spamassassin
Configuring Amavisd
Configuring Getmail
Configuring Pureftpd
Configuring BIND
Configuring Apache
Configuring Vlogger
Configuring Apps vhost
Configuring Firewall
Installing ISPConfig
ISPConfig Port [8080]: <-- ENTER
Configuring DBServer
Installing ISPConfig crontab
no crontab for root
no crontab for getmail
Restarting services ...
Restarting mysqld (via systemctl): [ OK ]
Restarting postfix (via systemctl): [ OK ]
Restarting saslauthd (via systemctl): [ OK ]
Restarting amavisd (via systemctl): [ OK ]
Restarting clamd.amavisd (via systemctl): [ OK ]
Stopping Courier authentication services: authdaemond
Starting Courier authentication services: authdaemond
Stopping Courier-IMAP server: imap imap-ssl pop3 pop3-ssl
Starting Courier-IMAP server: imap generating-SSL-certificate... imap-ssl pop3 generating-SSL-certificate... pop3-ssl
Stopping Courier-IMAP server: imap imap-ssl pop3 pop3-ssl
Starting Courier-IMAP server: imap imap-ssl pop3 pop3-ssl
Stopping Courier-IMAP server: imap imap-ssl pop3 pop3-ssl
Starting Courier-IMAP server: imap imap-ssl pop3 pop3-ssl
Stopping Courier-IMAP server: imap imap-ssl pop3 pop3-ssl
Starting Courier-IMAP server: imap imap-ssl pop3 pop3-ssl
Restarting httpd (via systemctl): [ OK ]
Restarting pure-ftpd (via systemctl): [ OK ]
Installation completed.
[example@unixlinux.online install]#
The installer automatically configures all underlying services, so no manual configuration is needed.
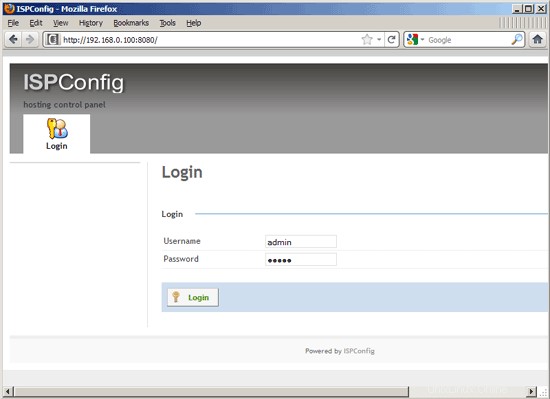
Afterwards you can access ISPConfig 3 under http://server1.example.com:8080/ or http://192.168.0.100:8080/. Log in with the username admin and the password admin (you should change the default password after your first login):
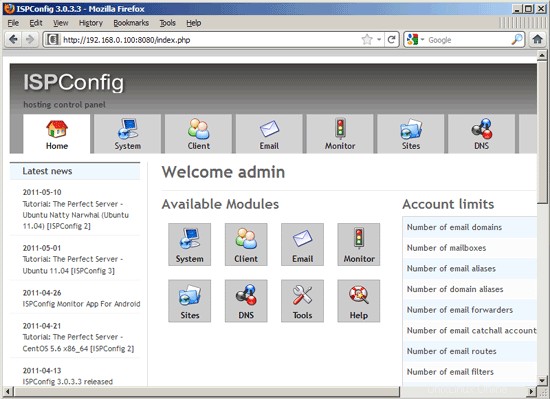
The system is now ready to be used.
24.1 ISPConfig 3 Manual
In order to learn how to use ISPConfig 3, I strongly recommend to download the ISPConfig 3 Manual.
On about 300 pages, it covers the concept behind ISPConfig (admin, resellers, clients), explains how to install and update ISPConfig 3, includes a reference for all forms and form fields in ISPConfig together with examples of valid inputs, and provides tutorials for the most common tasks in ISPConfig 3. It also lines out how to make your server more secure and comes with a troubleshooting section at the end.
24.2 ISPConfig Monitor App For Android
With the ISPConfig Monitor App, you can check your server status and find out if all services are running as expected. You can check TCP and UDP ports and ping your servers. In addition to that you can use this app to request details from servers that have ISPConfig installed (please note that the minimum installed ISPConfig 3 version with support for the ISPConfig Monitor App is 3.0.3.3! ); these details include everything you know from the Monitor module in the ISPConfig Control Panel (e.g. services, mail and system logs, mail queue, CPU and memory info, disk usage, quota, OS details, RKHunter log, etc.), and of course, as ISPConfig is multiserver-capable, you can check all servers that are controlled from your ISPConfig master server.
For download and usage instructions, please visit http://www.ispconfig.org/ispconfig-3/ispconfig-monitor-app-for-android/.
25 Links
- Fedora:http://fedoraproject.org/
- Network Device Naming:http://fedoraproject.org/wiki/Features/ConsistentNetworkDeviceNaming
- /run directory:https://docs.fedoraproject.org/en-US/Fedora/15/html/Release_Notes/sect-Release_Notes-Changes_for_SysAdmin.html
- tmpfiles.d:http://0pointer.de/public/systemd-man/tmpfiles.d.html
- ISPConfig:http://www.ispconfig.org/