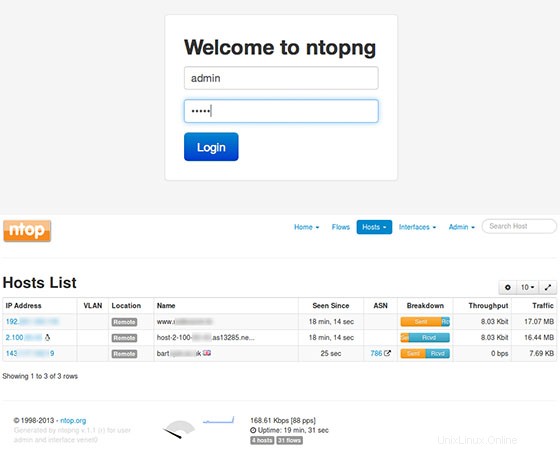
In diesem Tutorial zeigen wir Ihnen, wie Sie Ntopng auf Ubuntu 18.04 LTS installieren. Für diejenigen unter Ihnen, die es nicht wussten, ist Ntopng ein relativ nützliches Tool, wenn Sie andere überwachen möchten Netzwerkprotokolle auf Ihren Servern. Es bietet eine Reihe von Tools zur Überwachung verschiedener Protokolle, Verkehrsvarianten und ja, Bandbreite über mehrere Zeitrahmen hinweg. Ntopng basiert auf libpcap und wurde portabel geschrieben, um praktisch auf jedem zu laufen Unix-Plattform, Mac OS und auch auf Win32.
Dieser Artikel geht davon aus, dass Sie zumindest über Grundkenntnisse in Linux verfügen, wissen, wie man die Shell verwendet, und vor allem, dass Sie Ihre Website auf Ihrem eigenen VPS hosten. Die Installation ist recht einfach und setzt Sie voraus im Root-Konto ausgeführt werden, wenn nicht, müssen Sie möglicherweise 'sudo hinzufügen ‘ zu den Befehlen, um Root-Rechte zu erhalten. Ich zeige Ihnen Schritt für Schritt die Installation von Ntopng auf einem Ubuntu 18.04 LTS (Bionic Beaver) Server.
Voraussetzungen
- Ein Server, auf dem eines der folgenden Betriebssysteme ausgeführt wird:Ubuntu 18.04 und jede andere Debian-basierte Distribution wie Linux Mint.
- Es wird empfohlen, dass Sie eine neue Betriebssysteminstallation verwenden, um potenziellen Problemen vorzubeugen.
- SSH-Zugriff auf den Server (oder öffnen Sie einfach das Terminal, wenn Sie sich auf einem Desktop befinden).
- Ein
non-root sudo useroder Zugriff auf denroot user. Wir empfehlen, alsnon-root sudo userzu agieren , da Sie Ihr System beschädigen können, wenn Sie als Root nicht aufpassen.
Installieren Sie Ntopng auf Ubuntu 18.04 LTS Bionic Beaver
Schritt 1. Stellen Sie zunächst sicher, dass alle Ihre Systempakete auf dem neuesten Stand sind, indem Sie den folgenden apt-get ausführen Befehle im Terminal.
sudo apt-get update
sudo apt-get upgrade
Schritt 2. Installieren von Ntopng auf Ubuntu 18.04 LTS.
Um Ntopng zu installieren, führen Sie den folgenden Befehl als Root-Benutzer Ihres Servers aus:
wget http://apt.ntop.org/18.04/all/apt-ntop.deb
dpkg -i apt-ntop.deb
Führen Sie dann Folgendes aus:
apt-get update
apt-get install pfring-dkms nprobe ntopng n2disk cento
Schritt 3. Konfigurieren Sie Ntopng.
Erstellen Sie eine Ntopng-Konfigurationsdatei. In diesem Artikel verwenden wir nano als Texteditor. Sie können Ihren bevorzugten Texteditor verwenden, um Ntopng-Konfigurationsdateien zu erstellen:
sudo nano /etc/ntopng/ntopng.conf
# /etc/ntopng/ntopng.conf
#
#        The  configuration  file is similar to the command line, with the exception that an equal
#        sign '=' must be used between key and value. Example:  -i=p1p2  or  --interface=p1p2  For
#        options with no value (e.g. -v) the equal is also necessary. Example: "-v=" must be used.
#
#
#       -G|--pid-path
#        Specifies the path where the PID (process ID) is saved.
#
-G=/var/tmp/ntopng.pid
#
#       -e|--daemon
#        This  parameter  causes ntop to become a daemon, i.e. a task which runs in the background
#        without connection to a specific terminal. To use ntop other than as a casual  monitoring
#        tool, you probably will want to use this option.
#
-e=
#
#       -i|--interface
#        Specifies  the  network  interface or collector endpoint to be used by ntopng for network
#        monitoring. On Unix you can specify both the interface name  (e.g.  lo)  or  the  numeric
#        interface id as shown by ntopng -h. On Windows you must use the interface number instead.
#        Note that you can specify -i multiple times in order to instruct ntopng to create  multi‐
#        ple interfaces.
#
-i=1
#
#       -w|--http-port
#        Sets the HTTP port of the embedded web server.
#
-w=3000
#
#       -m|--local-networks
#        ntopng determines the ip addresses and netmasks for each active interface. Any traffic on
#        those  networks  is considered local. This parameter allows the user to define additional
#        networks and subnetworks whose traffic is also considered local in  ntopng  reports.  All
#        other hosts are considered remote. If not specified the default is set to 192.168.1.0/24.
#
#        Commas  separate  multiple  network  values.  Both netmask and CIDR notation may be used,
#        even mixed together, for instance "131.114.21.0/24,10.0.0.0/255.0.0.0".
#
-m=192.168.1.0/24
#
#       -n|--dns-mode
#        Sets the DNS address resolution mode: 0 - Decode DNS responses  and  resolve  only  local
#        (-m)  numeric  IPs  1  -  Decode DNS responses and resolve all numeric IPs 2 - Decode DNS
#        responses and don't resolve numeric IPs 3 - Don't decode DNS responses and don't  resolve
#
-n=1
#
#       -S|--sticky-hosts
#        ntopng  periodically purges idle hosts. With this option you can modify this behaviour by
#        telling ntopng not to purge the hosts specified by -S. This parameter requires  an  argu‐
#        ment  that  can  be  "all"  (Keep  all hosts in memory), "local" (Keep only local hosts),
#        "remote" (Keep only remote hosts), "none" (Flush hosts when idle).
#
-S=
#
#       -d|--data-dir
#        Specifies the data directory (it must be writable). Default directory is ./data
#
-d=/var/tmp/ntopng
#
#       -q|--disable-autologout
#        Disable web interface logout for inactivity.
#
-q=
Datei ntopng.start erstellen:
sudo nano /etc/ntopng/ntopng.start

##Add this line##

--local-networks "192.168.0.0/24"  ## give your local IP Ranges here.
--interface 1
Um alle verfügbaren Schnittstellen und Optionen anzuzeigen, verwenden Sie ntopng -h Möglichkeit:
sudo ntopng -h
Ntopng-Server-Daemon starten:
systemctl start ntopng.service
systemctl start redis-server.service
Schritt 4. Zugriff auf Ntopng.
Jetzt können Sie Ihre Ntopng-Anwendung testen, indem Sie http://your-server-ip-address:3000 eingeben . Sie sehen die Anmeldeseite von Ntopng. Zum ersten Mal können Sie den Benutzer „admin“ und das Passwort „admin“ verwenden.

Herzlichen Glückwunsch! Sie haben Ntopng erfolgreich installiert. Vielen Dank, dass Sie dieses Tutorial zur Installation der webbasierten Hochgeschwindigkeits-Verkehrsanalyse und Datenflusserfassung von Ntopng auf Ihrem Ubuntu 18.04 LTS Bionic Beaver-System verwendet haben. Für zusätzliche Hilfe oder nützliche Informationen, empfehlen wir Ihnen, die offizielle Ntopng-Website zu besuchen.