Dieses Tutorial zeigt, wie Sie die Dateisynchronisierung zwischen zwei Debian 10-Servern mit Unison einrichten. Unison ist ein Dateisynchronisierungstool ähnlich wie rsync, der große Unterschied besteht darin, dass es Änderungen in beide Richtungen verfolgt/synchronisiert, d. h. auf Server1 geänderte Dateien werden auf Server2 repliziert und umgekehrt.
1 Vorbemerkung
In diesem Tutorial werde ich die folgenden zwei Debian-Server verwenden:
- server1.example.com mit der IP-Adresse 192.168.0.100
- server2.example.com mit der IP-Adresse 192.168.0.101
Ich möchte das Verzeichnis /var/www zwischen den beiden Servern synchronisieren. Ich werde Unison in diesem Tutorial als Root-Benutzer ausführen, damit Unison über ausreichende Berechtigungen zum Synchronisieren von Benutzer- und Gruppenberechtigungen verfügt.
Alle Befehle in diesem Tutorial werden als Root-Benutzer ausgeführt. Melden Sie sich bei beiden Servern auf der Shell als root an und beginnen Sie mit Schritt 2 „Installieren von Unison ".
2 Installation von Unison
server1/server2:
Unison muss auf Server1 und Server2 installiert werden; Da wir uns per SSH von Server1 zu Server2 verbinden, brauchen wir auch die SSH-Pakete und ich installiere den Nano-Editor zur Dateibearbeitung auf der Shell. Dies kann wie folgt erreicht werden:
apt-get -y install unison openssh-server ssh nano
3 Erstellen eines privaten/öffentlichen Schlüsselpaars auf Server1
server1:
Jetzt erstellen wir ein privates/öffentliches Schlüsselpaar auf server1.example.com:
ssh-keygen -t dsa
[email protected]:~# ssh-keygen -t dsa
Generieren des öffentlichen/privaten dsa-Schlüsselpaars.
Geben Sie die Datei ein, in der der Schlüssel (/root/.ssh/id_dsa) gespeichert werden soll: <-- ENTER
Erstelltes Verzeichnis '/root/.ssh'.
Passphrase eingeben (leer für keine Passphrase): <-- ENTER
Geben dieselbe Passphrase erneut ein: <-- ENTER
Ihre Identifikation wurde in /root/.ssh/id_dsa gespeichert.
Ihr öffentlicher Schlüssel wurde in /root/.ssh/id_dsa.pub gespeichert.
Der Fingerabdruck des Schlüssels ist:
ba:82 :e1:a1:42:9b:d4:c8:99:c8:bd:8b:7d:4d:d4:66 [E-Mail-geschützt]
Das zufällige Bild des Schlüssels ist:
+--- [DSA 1024]----+
| |
| |
| . |
| . E |
|+ * . S |
|.Ooo o |
|ooo+. + |
|oo=... o |
|.. oo.. |
+-----------------+
[E-Mail-geschützt]:~#
Es ist wichtig, dass Sie keine Passphrase eingeben, sonst funktioniert die Spiegelung nicht ohne menschliches Eingreifen, also drücken Sie einfach die EINGABETASTE!
Als nächstes kopieren wir unseren öffentlichen Schlüssel nach server2.example.com:
ssh-copy-id -i $HOME/.ssh/id_dsa.pub [email protected]
# ssh-copy-id -i $HOME/.ssh/id_dsa.pub [email protected]
The authenticity of host '192.168.1.102 (192.168.0.101)' can't be established.
ECDSA key fingerprint is 2b:3c:35:ad:3d:e2:fc:16:2f:55:5c:e1:2c:d7:3d:a9.
Are you sure you want to continue connecting (yes/no)? <-- yes (you will see this only if this is the first time you connect to server2)
/usr/bin/ssh-copy-id: INFO: attempting to log in with the new key(s), to filter out any that are already installed
/usr/bin/ssh-copy-id: INFO: 1 key(s) remain to be installed -- if you are prompted now it is to install the new keys
[email protected]'s password: <-- server2 root password
Number of key(s) added: 1
Now try logging into the machine, with: "ssh '[email protected]'"
and check to make sure that only the key(s) you wanted were added.
Überprüfen Sie nun auf Server2, ob der öffentliche Schlüssel von Server1 korrekt übertragen wurde:
server2:
cat $HOME/.ssh/authorized_keys
[email protected]:/home/administrator# cat $HOME/.ssh/authorized_keys
ssh-dss AAAAB3NzaC1kc3MAAACBAKHLdAztIr8muZIlQYuE/4f75kmgTwWqJRZJ1dTqHDnHWsy48emDU8v85hxAPg43k9aF7/zAwpA0MNNNk5T9Tx/DyUkK/KcyVP2f4p8tvovrkUvoxsZACkTUmFqKdq2x6/AGfjsCRmkpLhZuad7r5rKEXHRh8KYGHqD1Id8wcpy5AAAAFQCww3OekKcKMshMAwBK3XQmmYEGUwAAAIEAgjztlwh8OFYxwQve/RrhI2sceCXwS/yjQyH7q0zdWB9Fr4s/16T2PLBT+7M3vb+JlPDO3JRqgaYbel1kS2F2iKrY0EX0FI3/9fVDfWoz3mhCscPLriqy5AcsHitxQNfiZgA5wDiSjWpk1v+FbIC+VuqbKdQuE4MBKj19N9YALIUAAACABQ4NDsa2UBc8jsxvghjoLhUWF7HChaCksXQcL6i98VNRcemtPC6wpIri75iR4Uhv1666bDOBAdmIBX9Qf7A/+czPKPaj4CGI1hVy1pgYMa3btnEvoSnH/ONtjpOz9q+3up1OOOn+5fud7xjJn+Fq8WoGROgarBpCbQU3w2GUUnM= [email protected]
4 Unisono laufen
server1:
Wir können jetzt zum ersten Mal Unison ausführen, um das Verzeichnis /var/www auf beiden Servern zu synchronisieren. Führen Sie auf server1 Folgendes aus:
unison /var/www ssh://192.168.0.101//var/www
Die Ausgabe wird dieser ähnlich sein - Sie müssen möglicherweise einige Fragen beantworten, da dies das erste Mal ist, dass Unison ausgeführt wird:
[email protected]:/var/www# unison /var/www ssh://192.168.0.101//var/www
Contacting server...
Connected [//server1//var/www -> //server2//var/www]
Looking for changes
Warning: No archive files were found for these roots, whose canonical names are:
/var/www
//server2//var/www
This can happen either
because this is the first time you have synchronized these roots,
or because you have upgraded Unison to a new version with a different
archive format.
Update detection may take a while on this run if the replicas are
large.
Unison will assume that the 'last synchronized state' of both replicas
was completely empty. This means that any files that are different
will be reported as conflicts, and any files that exist only on one
replica will be judged as new and propagated to the other replica.
If the two replicas are identical, then no changes will be reported.
If you see this message repeatedly, it may be because one of your machines
is getting its address from DHCP, which is causing its host name to change
between synchronizations. See the documentation for the UNISONLOCALHOSTNAME
environment variable for advice on how to correct this.
Donations to the Unison project are gratefully accepted:
http://www.cis.upenn.edu/~bcpierce/unison
Press return to continue.[<spc>] <-- Press Enter
Waiting for changes from server
Reconciling changes
local server2
dir ----> example.com [f] <-- Press Enter
dir ----> example.de [f] <-- Press Enter
Proceed with propagating updates? [] <-- Enter "y"
Propagating updates
UNISON 2.48.4 started propagating changes at 13:24:01.10 on 05 May 2020
[BGN] Copying example.com from /var/www to //server2//var/www
[BGN] Copying example.de from /var/www to //server2//var/www
Shortcut: copied /var/www/example.de/web/index.html from local file /var/www/.unison.example.com.d3783bddaaf59b9ba4d2ed0433f9db63.unison.tmp/web/index.html
[END] Copying example.de
[END] Copying example.com
UNISON 2.48.4 finished propagating changes at 13:24:01.98 on 05 May 2020
Saving synchronizer state
Synchronization complete at 13:24:01 (2 items transferred, 0 skipped, 0 failed)
Überprüfen Sie jetzt das /var/www-Verzeichnis auf Server1 und Server2, und Sie sollten feststellen, dass sie jetzt synchron sind.
Natürlich möchten wir Unison nicht interaktiv ausführen, daher können wir eine Einstellungsdatei (/root/.unison/default.prf) erstellen, die alle Einstellungen enthält, die wir sonst auf der Befehlszeile angeben müssten:
nano /root/.unison/default.prf
# Roots of the synchronization
root = /var/www
root = ssh://192.168.0.101//var/www

# Paths to synchronize
#path = current
#path = common
#path = .netscape/bookmarks.html

# Some regexps specifying names and paths to ignore
#ignore = Path stats    ## ignores /var/www/stats
#ignore = Path stats/*  ## ignores /var/www/stats/*
#ignore = Path */stats  ## ignores /var/www/somedir/stats, but not /var/www/a/b/c/stats
#ignore = Name *stats   ## ignores all files/directories that end with "stats"
#ignore = Name stats*   ## ignores all files/directories that begin with "stats"
#ignore = Name *.tmp    ## ignores all files with the extension .tmp

#          When set to true, this flag causes the user interface to skip
#          asking for confirmations on non-conflicting changes. (More
#          precisely, when the user interface is done setting the
#          propagation direction for one entry and is about to move to the
#          next, it will skip over all non-conflicting entries and go
#          directly to the next conflict.)
auto=true

#          When this is set to true, the user interface will ask no
#          questions at all. Non-conflicting changes will be propagated;
#          conflicts will be skipped.
batch=true

#          !When this is set to true, Unison will request an extra
#          confirmation if it appears that the entire replica has been
#          deleted, before propagating the change. If the batch flag is
#          also set, synchronization will be aborted. When the path
#          preference is used, the same confirmation will be requested for
#          top-level paths. (At the moment, this flag only affects the
#          text user interface.) See also the mountpoint preference.
confirmbigdel=true

#          When this preference is set to true, Unison will use the
#          modification time and length of a file as a `pseudo inode
#          number' when scanning replicas for updates, instead of reading
#          the full contents of every file. Under Windows, this may cause
#          Unison to miss propagating an update if the modification time
#          and length of the file are both unchanged by the update.
#          However, Unison will never overwrite such an update with a
#          change from the other replica, since it always does a safe
#          check for updates just before propagating a change. Thus, it is
#          reasonable to use this switch under Windows most of the time
#          and occasionally run Unison once with fastcheck set to false,
#          if you are worried that Unison may have overlooked an update.
#          The default value of the preference is auto, which causes
#          Unison to use fast checking on Unix replicas (where it is safe)
#          and slow checking on Windows replicas. For backward
#          compatibility, yes, no, and default can be used in place of
#          true, false, and auto. See the section "Fast Checking" for more
#          information.
fastcheck=true

#          When this flag is set to true, the group attributes of the
#          files are synchronized. Whether the group names or the group
#          identifiers are synchronizeddepends on the preference numerids.
group=true

#          When this flag is set to true, the owner attributes of the
#          files are synchronized. Whether the owner names or the owner
#          identifiers are synchronizeddepends on the preference
#          extttnumerids.
owner=true

#          Including the preference -prefer root causes Unison always to
#          resolve conflicts in favor of root, rather than asking for
#          guidance from the user. (The syntax of root is the same as for
#          the root preference, plus the special values newer and older.)
#          This preference is overridden by the preferpartial preference.
#          This preference should be used only if you are sure you know
#          what you are doing!
prefer=newer

#          When this preference is set to true, the textual user interface
#          will print nothing at all, except in the case of errors.
#          Setting silent to true automatically sets the batch preference
#          to true.
silent=true

#          When this flag is set to true, file modification times (but not
#          directory modtimes) are propagated.
times=true
Die Kommentare sollten die Datei bis auf die Pfadanweisungen selbsterklärend machen. Wenn Sie keine Pfadanweisungen angeben, werden die Verzeichnisse in den Stammanweisungen synchronisiert. Wenn Sie Pfadanweisungen angeben, sind die Pfade relativ zum Stammpfad (z. B. root =/var/www und path =current wird zu /var/www/current), und nur diese Unterverzeichnisse werden synchronisiert, nicht das gesamte angegebene Verzeichnis in der Root-Direktive.
Weitere Informationen zu den verfügbaren Optionen finden Sie auf der Manpage von Unison:
man unison
Nachdem wir nun alle Einstellungen in einer Einstellungsdatei abgelegt haben (insbesondere die Root- (und optional die Pfad-) Direktiven), können wir Unison ohne Argumente ausführen:
unison
5 Erstellen eines Cron-Jobs für Unison
server1:
Wir wollen die Synchronisation automatisieren, deshalb erstellen wir dafür einen Cron-Job auf server1.example.com:
crontab -e
*/5 * * * * /usr/bin/unison &> /dev/null
Dies würde Unison alle 5 Minuten ausführen; an Ihre Bedürfnisse anpassen (siehe
man 5 crontab
). Ich verwende hier den vollständigen Pfad zu unisono (/usr/bin/unison), nur um sicherzugehen, dass cron weiß, wo es unisono findet. Ihr Unisono-Standort kann abweichen. Ausführen
which unison
um herauszufinden, wo Ihres ist.
6 Test-Unison
Jetzt werde ich die 2-Wege-Synchronisation von Unison testen, um zu sehen, ob das Setup vollständig funktioniert.
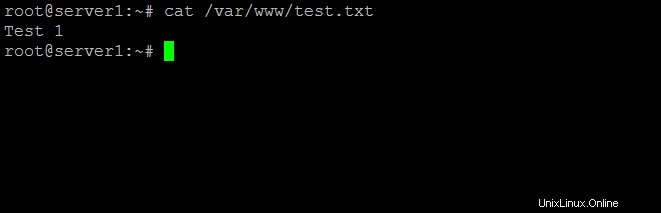
Führen Sie den folgenden Befehl auf server1 aus, um eine Testdatei mit dem Inhalt „Test 1“ zu erstellen:
Server1
echo "Test 1" > /var/www/test.txt
Warten Sie nun mindestens 5 Minuten (da wir einen Cronjob erstellt haben, der alle 5 Minuten ausgeführt wird). Dann auf server2 ausführen:
cat /var/www/test.txt
um den Inhalt der Datei test.txt auf dem Bildschirm anzuzeigen. Die Ausgabe sollte diesem Screenshot ähneln.
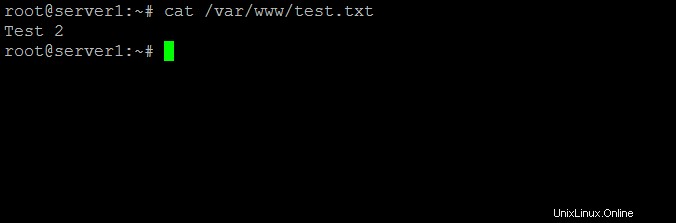
Führen Sie nun diesen Befehl auf server2 aus, der den Inhalt unserer Testdatei auf „Test 2“ aktualisiert:
Server2
echo "Test 2" > /var/www/test.txt
Und warten Sie mindestens 5 Minuten. Führen Sie dann den cat-Befehl auf server1 aus:
Server1
cat /var/www/test.txt
Die Ausgabe sollte sein:
7 Links
- Unison:http://www.cis.upenn.edu/~bcpierce/unison/
- Debian:http://www.debian.org/