Dies ist ein "Kopieren und Einfügen" Anleitung! Der einfachste Weg, diesem Tutorial zu folgen, besteht darin, einen Befehlszeilen-Client/SSH-Client (wie PuTTY für Windows) zu verwenden und die Befehle einfach zu kopieren und einzufügen (außer wenn Sie eigene Informationen wie IP-Adressen, Hostnamen, Passwörter usw. angeben müssen). ). Dies hilft, Tippfehler zu vermeiden.
Das perfekte Setup – Debian Woody (3.0)
Version 1.6
Autor:Falko Timme
Dies ist eine detaillierte Beschreibung der Schritte, die unternommen werden müssen, um ein Debian einzurichten basierter Server (Debian Woody alias Debian 3.0), der alle von ISPs und Hostern benötigten Dienste anbietet (Webserver (SSL-fähig), Mailserver (mit SMTP-AUTH und TLS!), DNSserver, FTP-Server, MySQL-Server, POP3/IMAP, Kontingent, Firewall usw.).
Ich werde die folgende Software verwenden:
- Webserver:Apache 1.3.x
- Mail-Server:Postfix (einfacher zu konfigurieren als sendmail; hat eine kürzere Historie von Sicherheitslücken als sendmail)
- DNS-Server:BIND9
- FTP-Server:proftpd (Sie können auch vsftpd verwenden)
- POP3/IMAP:In diesem Beispiel können Sie zwischen dem traditionellen UNIX-Postfachformat (wir verwenden dann qpopper/uw-imapd) oder dem Maildir-Format (in diesem Fall verwenden wir Courier-POP3/Courier-IMAP).
- Webalizer für Website-Statistiken
Am Ende sollten Sie ein System haben, das zuverlässig funktioniert und bereit ist für das kostenlose Webhosting-Control-Panel ISPConfig (d.h. ISPConfig läuft darauf aus dem Feld).
Ich möchte zuerst sagen, dass dies nicht die einzige Möglichkeit ist, ein solches System einzurichten. Es gibt viele Wege, dieses Ziel zu erreichen, aber ich gehe diesen Weg. Ich gebe keine Garantie dafür, dass dies bei Ihnen funktioniert!
Anforderungen
Um ein solches System zu installieren, benötigen Sie Folgendes:
- CD 1 der Veröffentlichung von Debian Woody (Debian 3.0) (erhältlich unter http://www.debian.org)
- CD 1 der neuesten Version von Mandrake Linux (9.2 zum Zeitpunkt der Erstellung dieses Dokuments) (erhältlich unter http://www.mandrake -linux.com) (Sie brauchen es nicht, wenn Sie keine Partitionen auf Ihrer Festplatte erstellen müssen)
- eine Internetverbindung, da ich in diesem Dokument eine Netzwerkinstallation beschreiben werde
1 TheBase-System
Wenn Sie eine ungenutzte Festplatte haben, müssen Sie zuerst Partitionen darauf erstellen (Sie können diesen Schritt überspringen, wenn Sie bereits Partitionen auf Ihrer Festplatte haben ). Sie können dafür den Debian-Installer verwenden, aber ich denke, es ist schwer zu benutzen (insbesondere für Neulinge). Hier schummele ich ein wenig:Ich lege die Mandrake-CD in mein CD-ROM ein und führe den Mandrake-Installer aus (kurz bis nach meinem Partitionen wurden mit dem Partitionierungstool von Mandrake erstellt, das meiner Meinung nach das beste in der Linux-Welt ist).
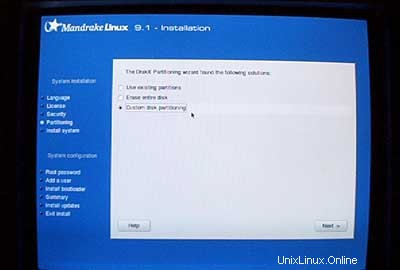
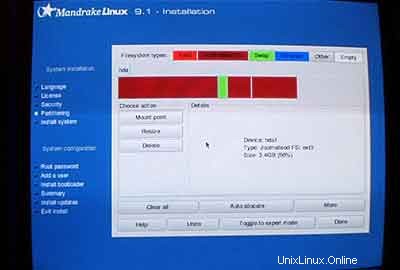
Ich erstelle zwei Partitionen:/dev/hda1 (mit /boot als Einhängepunkt) und /dev/hda6 (mit / als Einhängepunkt). Außerdem erstelle ich eine Swap-Partition (normalerweise auf /dev/hda5 ).Ich denke, 50 MB -100 MB ist eine gute Größe für /dev/hda1;500 MB sollten für die Swap-Partition ausreichen; der Rest ist für /dev/hda6 (wo die Websites der Benutzer usw. sein werden).
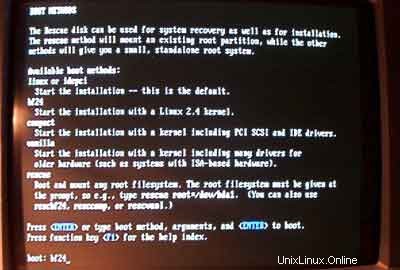
Nachdem die Partitionen erstellt wurden, beende ich die Mandrake-Installation, lege meine Debian-CD ein und starte das System neu.
Geben Sie am Boot-Prompt bf24 ein um Debian mit einem 2.4 Linux Kernel zu installieren:
Wählen Sie dann Ihre Sprache:
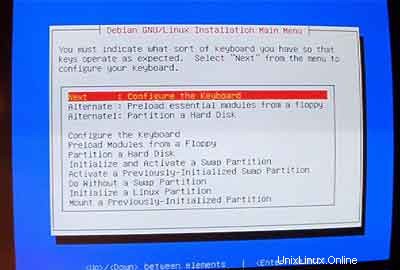
Danach gelangen Sie in das Hauptmenü des Debian-Installers. Konfigurieren Sie Ihre Tastatur:
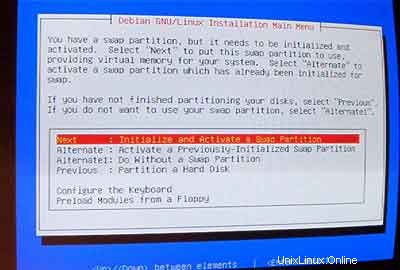
Initialisieren und aktivieren Sie eine Swap-Partition:
Auf Nachfrage Nach fehlerhaften Blöcken suchen? , wählen Sie Nein .
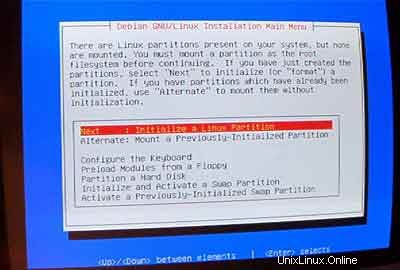
Initialisieren Sie dann eine Linux-Partition:
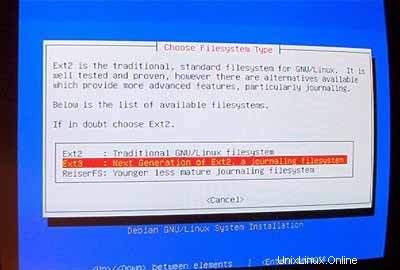
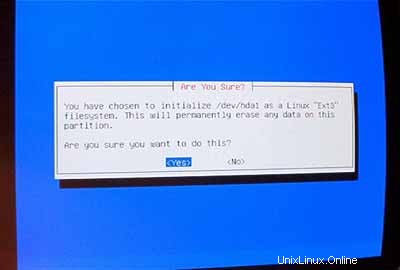
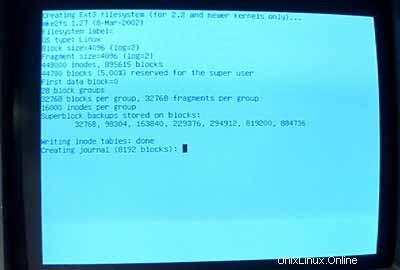
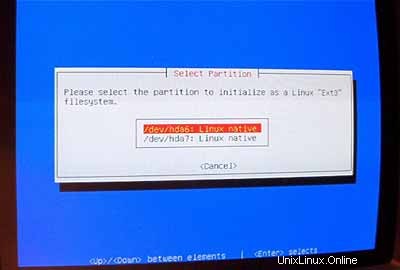
Wählen Sie das gewünschte Dateisystem aus. Ich nehme ext3 hier.
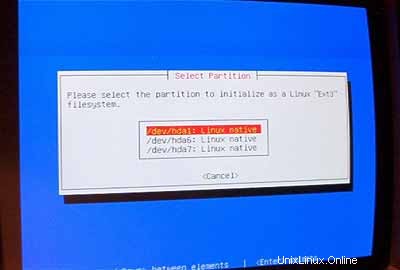
Wählen Sie /dev/hda1 aus als zu initialisierende Partition:
Auf Nachfrage Nach fehlerhaften Blöcken suchen? , geben Sie Nein ein .
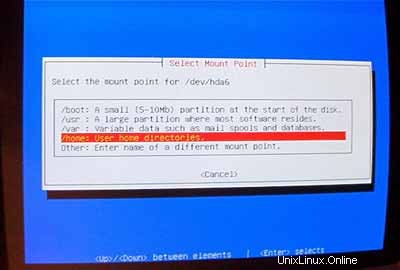
Wählen Sie /boot aus als Einhängepunkt für /dev/hda1 :
Jetzt müssen Sie Ihre zweite Linux-Partition initialisieren:
Wählen Sie Ihr bevorzugtes Dateisystem (wiederum nehme ich ext3 hier). Wählen Sie dann /dev/hda6 als zu initialisierende Partition:
Auf Nachfrage Nach fehlerhaften Blöcken suchen? , geben Sie Nein ein .
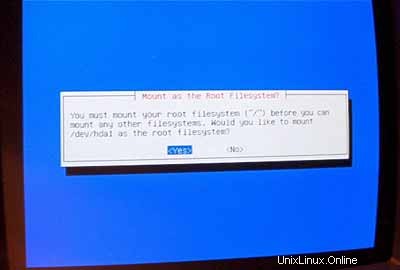
Wählen Sie / aus als Einhängepunkt für /dev/hda6 :
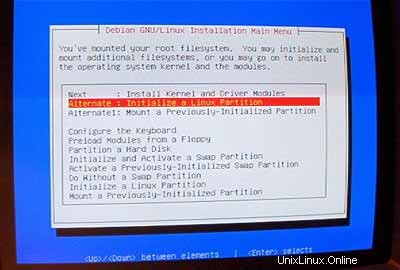
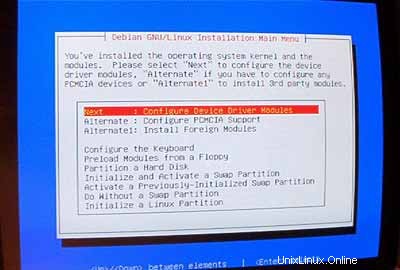
Nachdem Ihre Partitionen formatiert und initialisiert sind, wählen Sie Kernel und Treibermodule installieren aus dem Hauptmenü. Ich denke, das bedarf keiner weiteren Erklärung.
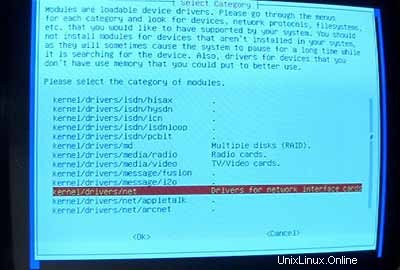
DeviceDriver-Module konfigurieren:
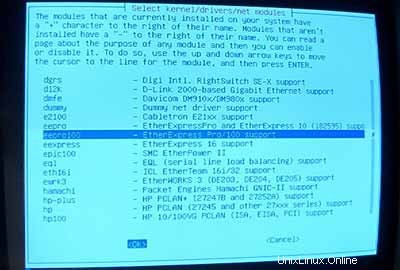
Stellen Sie sicher, dass Sie den Treiber für Ihre Netzwerkkarte installieren (wenn Sie den richtigen nicht kennen, können Sie problemlos mehrere Treiber installieren):
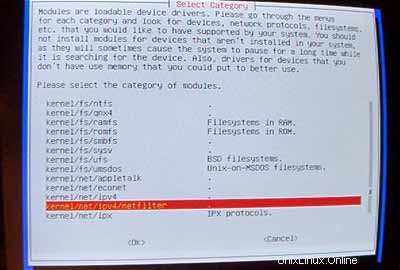
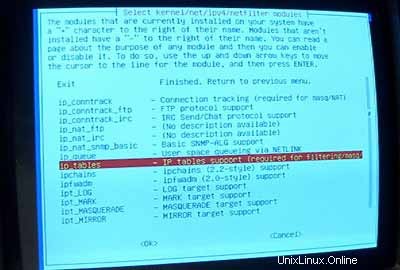
Stellen Sie jetzt sicher, dass Ihr Kernel iptables-Unterstützung (Firewall!) enthält:
Nachdem Sie das Treibermodulmenü verlassen haben, müssen Sie Ihr Netzwerk konfigurieren:
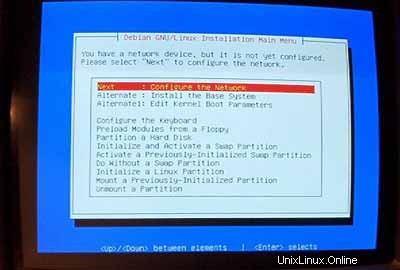
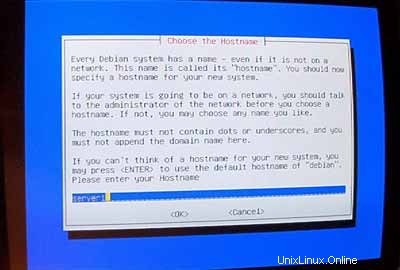
Für den Hostnamen empfehle ich dringend eine Subdomain, die später nicht für eine virtuelle Seite auf diesem Server verwendet wird. Etwas wie server1 ,server2 , ... wäre ziemlich praktisch, da es Ihnen erlaubt, Ihre Server zu unterscheiden, wenn Sie mehrere davon betreiben. Wenn Ihre Domain also example.com ist (empfohlen wird eine echte Domain!) Sie erreichen den Server unter server1.example.com (Vergessen Sie nicht, den DNS-Eintrag für example.com zu aktualisieren !).
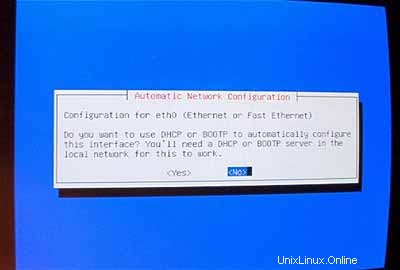
Wenn Sie zur automatischen Netzwerkkonfiguration aufgefordert werden , wählen Sie Nein .
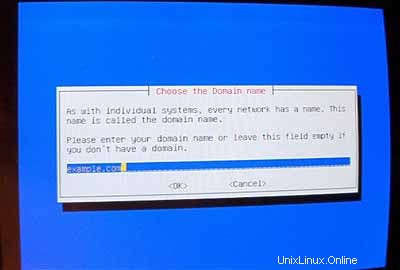
Geben Sie dann die Haupt-IP-Adresse des Systems, seine Netzwerkmaske, die Gateway-Adresse und die Domäne des Systems ein (hier:example.com ).
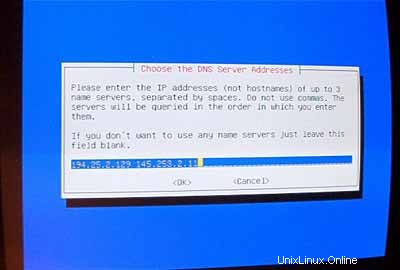
Geben Sie die DNS-Server an, die das System verwenden soll (z. B. 193.174.32.18 und 145.253.2.11 ).
Installieren Sie das Basissystem:

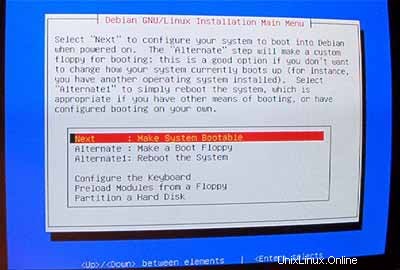
System bootfähig machen:
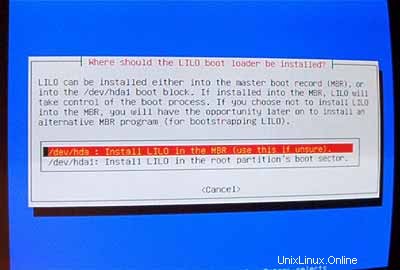
Wählen Sie LILO im MBR installieren :
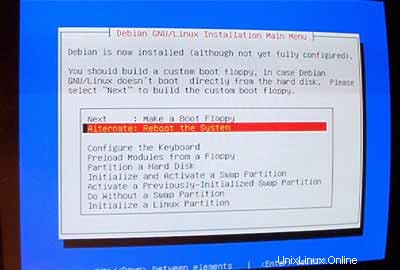
Starten Sie dann das System neu. Stellen Sie sicher, dass Sie die Debian-CD von Ihrer CD-ROM entfernen:
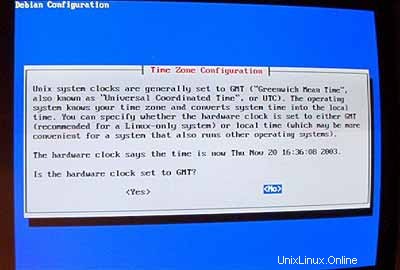
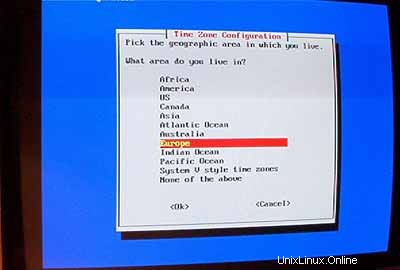
Konfigurieren Sie nach dem Neustart Ihre Zeitzone:

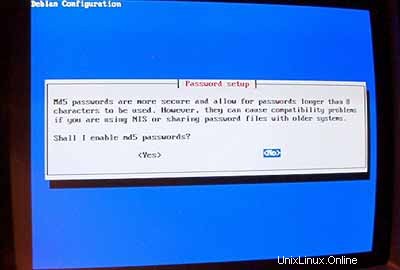
md5passwords nicht aktivieren:
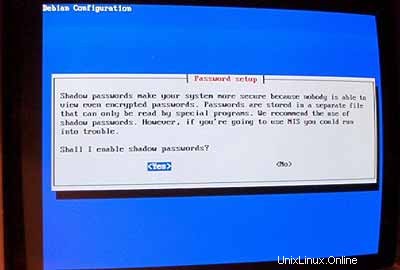
Shadow-Passwörter aktivieren:
Legen Sie dann das Root-Passwort fest , erstellen Sie den zusätzlichen Benutzer admin und geben Sie sein Passwort ein.
Wenn Sie pcmcia-Pakete nicht benötigen, entfernen Sie sie.
Verwenden Sie keine PPP-Verbindung, um das System zu installieren (ein Server sollte eine permanente Verbindung zum Internet haben):
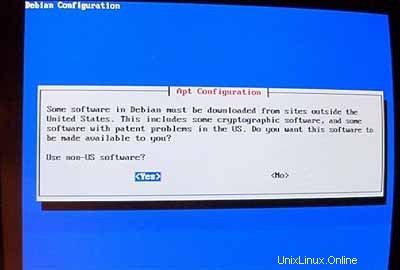
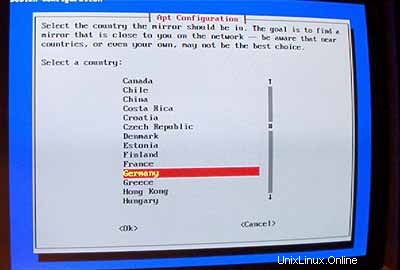
Ich möchte eine Netzwerkinstallation durchführen (daher brauche ich nur Diskette 1 der sieben Debian-CD-ROMs). Also wähle ich http als Methode für den Zugriff auf das Debian-Archiv unter AptConfiguration :

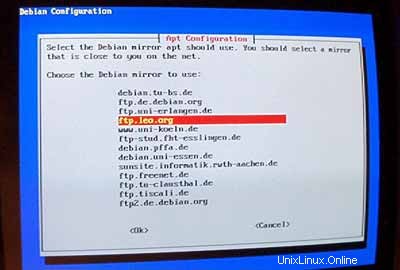
Wählen Sie einen Spiegel in Ihrer Nähe:
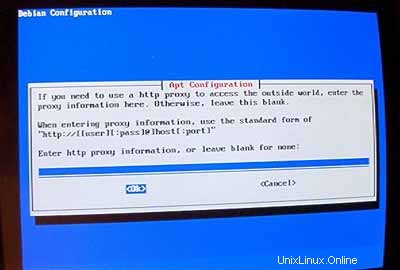
Normalerweise verwenden Sie keinen Proxy, also lassen Sie das Feld leer:
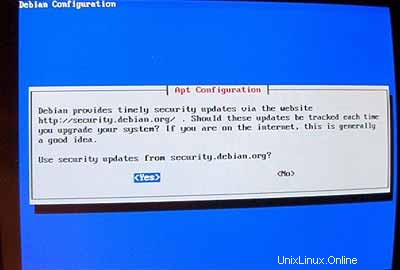
Auf die Frage Sicherheitsupdates von security.debian.org verwenden? antworten Sie mit Ja .
Wichtig: Seit Juni 2005 ist Debian Sarge (3.1) die stabile Veröffentlichung von Debian. Da wir hier statt Sarge Debian Woody (3.0) installieren wollen, müssen wir die Datei /etc/apt/sources.list ändern jetzt, bevor wir weitermachen! Der Woody-Installer denkt immer noch, dass Woody die stabile Version ist. Drücken Sie Strg + Alt + F2 auf deiner Tastatur. Sie befinden sich jetzt auf der Schale. Melden Sie sich als root an . Bearbeiten Sie dann /etc/apt/sources.list mit einem Texteditor (z.B. vi ) und ersetzen stable mit woody wo immer es erscheint. Danach ausführen
apt-getupdate
und drücken Sie Strg+Alt+F1 um zum Installationsbildschirm zurückzukehren.
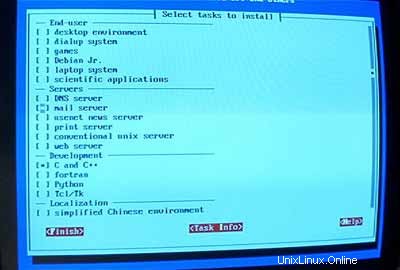
Führen Sie dann tasksel aus :
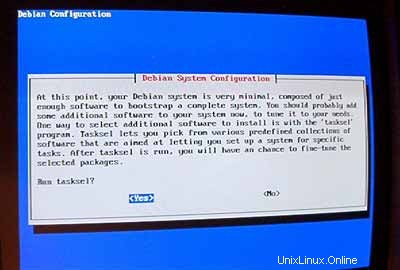
Ich möchte am Anfang ein minimales System haben, also wähle ich nur Mailserver und C und C++ (damit ich bei Bedarf Quellen kompilieren kann). Die andere Software wird später installiert.
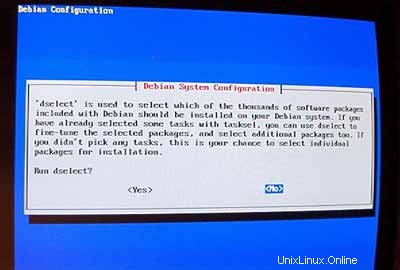
Führen Sie dselect nicht aus (Denken Sie nicht einmal daran, Sie werden verloren sein!):
Für die nächsten Schritte können Sie die Standardwerte übernehmen.
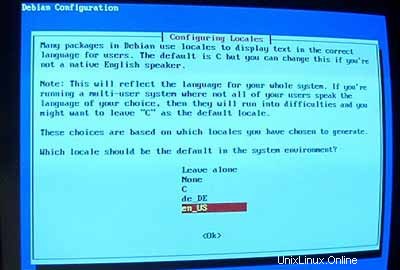
Konfigurieren Sie dann Ihre Gebietsschemata. Wählen Sie zumindest en_USISO-8859-1 :
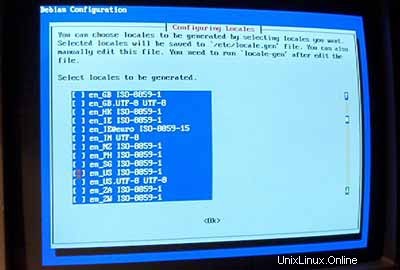
Als Standardgebietsschema wähle ich en_US :
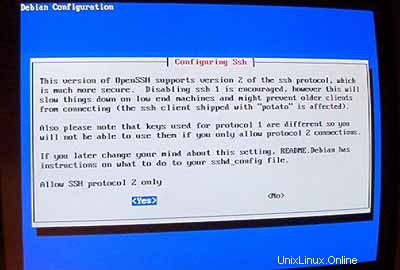
Richten Sie dann Ihren ssh-Server ein:
Die Installation beginnt. Am Ende werden Sie gefragt, ob Sie zuvor heruntergeladene.deb-Dateien löschen möchten. Sie können mit Y antworten hier.
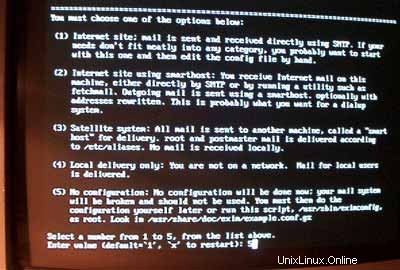
Wenn das Installationsprogramm exim konfigurieren möchte geben Sie 5 ein (keine Konfiguration), da wir postfix verwenden werden als unser Mailserver.
Jetzt ist das Basissystem fertig:
2 Installieren und Konfigurieren des restlichen Systems
Zusätzliche IP-Adressen konfigurieren
Wenn Sie mehr als eine IP-Adresse haben, können Sie Ihre zusätzlichen IP-Adressen hinzufügen, indem Sie /etc/network/interfaces .Es sieht ungefähr so aus:
# /etc/network/interfaces -- configuration file for ifup(8), ifdown(8) |
Wenn Sie die IP-Adresse hinzufügen möchten 192.168.0.101 an die Schnittstelle eth0 Sie sollten die Datei wie folgt ändern:
# /etc/network/interfaces -- configuration file for ifup(8), ifdown(8) |
Starten Sie dann Ihr Netzwerk neu:
/etc/init.d/networkingrestart
Festlegen des Hostnamens
echo server1.example.com> /etc/hostname
/bin/hostname -F /etc/hostname
Software installieren/entfernen
Hinzufügen
deb http://backports.debian.skynet.be woody cyrus-sasl2
an /etc/apt/sources.list und ausführen
apt-getupdate
apt-get install wgetbzip2 rdate fetchmail libdb3++-dev unzip zip ncftp xlispstat libarchive-zip-perlzlib1g-dev libpopt -dev nmap openssl (1 Zeile!)
apt-get remove lpr nfs-commonportmap pidentd pcmcia-cs pppoe pppoeconf ppp pppconfig
update-rc.d -f exim remove
update-inetd --removedaytime
update-inetd --telnet entfernen
update-inetd - - Zeit entfernen
update-inetd --finger entfernen
update-inetd --gespräch entfernen
update-inetd --ntalk entfernen
update-inetd --ftp entfernen
update-inetd --remove discard
<- Ja [y]
/etc/init.d/inetd reload
Quote
apt-get install quota quotatool
Bearbeiten Sie /etc/fstab so aussehen (ich habe ,usrquota,grpquota hinzugefügt um /dev/hda6 zu partitionieren ):
# /etc/fstab: static file system information. |
Führen Sie dann Folgendes aus:
berühre /quota.user /quota.group
chmod 600 /quota.*
mount -o remount /
quotacheck -avugm
quotaon -avug
DNS-Server
apt-getinstall bind9
Aus Sicherheitsgründen möchten wir BIND chroot ausführen, daher müssen wir die folgenden Schritte ausführen:
/etc/init.d/bind9 stop
Startskript bearbeiten /etc/init.d/bind9 sodass der Daemon als unprivilegierter Benutzer 'nobody ',gechrootet nach /var/lib/named .Ändern Sie die Zeile:OPTS="" sodass es lautet:OPTS="-u Nobody-t /var/lib/named" :
#!/bin/sh |
Create the necessarydirectories under /var/lib :
mkdir -p /var/lib/named/etc
mkdir /var/lib/named/dev
mkdir -p /var/lib/named/var/cache/bind
mkdir /var/lib/named/var/run
Then move the configdirectory from /etc to /var/lib/named/etc :
mv /etc/bind /var/lib/named/etc
Create a symlinkto the new config directory from the old location (to avoid problems when bindis upgraded in the future):
ln -s /var/lib/named/etc/bind/etc/bind
Make null and randomdevices, and fix permissions of the directories:
mknod /var/lib/named/dev/nullc 1 3
mknod /var/lib/named/dev/random c 1 8
chmod 666 /var/lib/named/dev/null /var/lib/named/dev/random
chown -R nobody:nogroup /var/lib/named/var/*
chown -R nobody:nogroup /var/lib/named/etc/bind
We need to modifythe startup script /etc/init.d/sysklogd of sysklogd so that wecan still get important messages logged to the system logs. Modify the line: SYSLOGD="" so that it reads:SYSLOGD="-a/var/lib/named/dev/log" :
#! /bin/sh |
Restart the loggingdaemon:
/etc/init.d/sysklogd restart
Start up BIND,and check /var/log/syslog for any errors:
/etc/init.d/bind9 start
MySQL
apt-getinstall mysql-server mysql-client libmysqlclient10-dev
<- No
<- Yes
mysqladmin -u root passwordyourrootsqlpassword
mysqladmin -h server1.example.com -u root password yourrootsqlpassword
In /etc/mysql/my.cnf comment out the following line:
skip-networking
It should now looksimilar to this:
# You can copy this to one of: |
Restart MySQL:
/etc/init.d/mysqlrestart
so that MySQL isaccessible on port 3306 (you can check that with netstat-tap ).
Postfix/Qpopper
addgroup sasl
apt-get install postfix-tlsqpopper sasl-bin libsasl-modules-plain libsasl2 libsasl-gssapi-mit libsasl-digestmd5-dessasl2-bin libsasl2-modules (1line!)
<- Kerberos:acceptdefault value (I don't want to use Kerberos so I don't really care about it)
<- Internetsite
<- Domainname
<- No
<- accept default values
<- Kerberos:accept default value
<- NONE
cd /etc/init.d/
wget http://hanselan.de/postfix/pwcheck
In case you cannotaccess http://hanselan.de/postfix/pwcheck here's the pwcheck script:
#! /bin/sh |
chmod 755 /etc/init.d/pwcheck
update-rc.d pwcheck defaults
mkdir -p /var/spool/postfix/var/run/pwcheck
chown postfix.root /var/spool/postfix/var/run/pwcheck/
chmod 700 /var/spool/postfix/var/run/pwcheck/
ln -s /var/spool/postfix/var/run/pwcheck /var/run/pwcheck
postconf -e 'smtpd_sasl_local_domain=$myhostname'
postconf -e 'smtpd_sasl_auth_enable =yes'
postconf -e 'smtpd_sasl_security_options =noanonymous'
postconf -e 'broken_sasl_auth_clients =yes'
postconf -e 'smtpd_recipient_restrictions =permit_sasl_authenticated,permit_mynetworks,check_relay_domains'
postconf -e 'inet_interfaces =all'
echo 'pwcheck_method:pwcheck'>> /etc/postfix/sasl/smtpd.conf
mkdir /etc/postfix/ssl
cd /etc/postfix/ssl/
openssl genrsa -des3 -rand /etc/hosts -out smtpd.key 1024
chmod 600 smtpd.key
openssl req -new -key smtpd.key -out smtpd.csr
openssl x509 -req -days 3650 -in smtpd.csr -signkey smtpd.key -out smtpd.crt
openssl rsa -in smtpd.key -out smtpd.key.unencrypted
mv -f smtpd.key.unencrypted smtpd.key
openssl req -new -x509 -extensions v3_ca -keyout cakey.pem -out cacert.pem -days3650
postconf -e 'smtpd_tls_auth_only=no'
postconf -e 'smtp_use_tls =yes'
postconf -e 'smtpd_use_tls =yes'
postconf -e 'smtp_tls_note_starttls_offer =yes'
postconf -e 'smtpd_tls_key_file =/etc/postfix/ssl/smtpd.key'
postconf -e 'smtpd_tls_cert_file =/etc/postfix/ssl/smtpd.crt'
postconf -e 'smtpd_tls_CAfile =/etc/postfix/ssl/cacert.pem'
postconf -e 'smtpd_tls_loglevel =1'
postconf -e 'smtpd_tls_received_header =yes'
postconf -e 'smtpd_tls_session_cache_timeout =3600s'
postconf -e 'tls_random_source =dev:/dev/urandom'
The file /etc/postfix/main.cf should now look like this:
# see /usr/share/postfix/main.cf.dist for a commented, fuller |
/etc/init.d/pwcheckstart
/etc/init.d/postfix restart
To see if SMTP-AUTHand TLS work properly now run the following command:
telnetlocalhost 25
After you haveestablished the connection to your postfix mail server type
ehlolocalhost
If you see thelines
250-STARTTLS
and
250-AUTH
everything is fine.
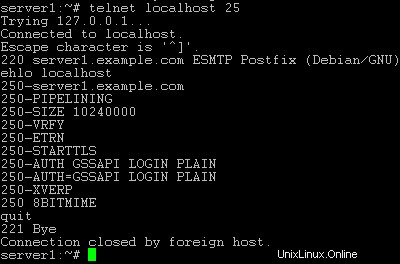
Type
quit
to return to thesystem's shell.
Courier-IMAP/Courier-POP3
If you want touse a POP3/IMAP daemon that has Maildir support (if you do not want to use thetraditional Unix mailbox format) you can install Courier-IMAP and Courier-POP3.Otherwise you can proceed with the Apache configuration.
apt-get install courier-imapcourier-pop
qpopper and UW-IMAPwill then be replaced.
Then configurePostfix to deliver emails to a user's Maildir*:
postconf -e 'home_mailbox=Maildir/'
postconf -e 'mailbox_command ='
/etc/init.d/postfix restart
*Please note:Youdo not have to do this if you intend to use ISPConfigon your system as ISPConfig does the necessary configuration using procmailrecipes. But please go sure to enable Maildir under Management -> Settings ->EMail in the ISPConfig web interface.
Apache
Add
deb http://packages.dotdeb.org ./
to /etc/apt/sources.list and run
apt-getupdate
apt-getinstall apache apache-doc libapache-mod-ssl libapache-mod-ssl-doc
apt-get install libapache-mod-php4php4 php4-cli php4-common php4-curl php4-dev php4-domxml php4-gd php4-gmp php4-imapphp4-ldap php4-mcal php4-mcrypt php4-mhash php4-ming php4-mysql php4-odbc php4-pearphp4-xslt curl libwww-perl imagemagick (1 line!)
Edit /etc/apache/httpd.conf .Under LoadModules add:
LoadModulephp4_module /usr/lib/apache/1.3/libphp4.so
LoadModule ssl_module /usr/lib/apache/1.3/mod_ssl.so
Under Listen add:
Listen80
Listen 443
Under "Addtypeapplication" insert:
AddType application/x-x509-ca-cert .crt
AddType application/x-pkcs7-crl .crl
Before "Section3 :Virtual Hosts" add:
SSLCACertificateFile /etc/apache/ssl.crt/ca-bundle.crt
SSLPassPhraseDialog builtin
SSLSessionCache dbm:/var/run/ssl_scache
SSLSessionCacheTimeout 300
SSLMutex file:/var/run/ssl_mutex
SSLRandomSeed startup builtin
SSLRandomSeed connect builtin
Change
DirectoryIndexindex.html index.htm index.shtml index.cgi
to
DirectoryIndexindex.html index.htm index.shtml index.cgi index.php index.php3 index.pl
Save /etc/apache/httpd.conf and run
/etc/init.d/apacherestart
Proftpd
apt-getinstall proftpd
<- No
For security reasonsyou can add the following lines to /etc/proftpd.conf (thanks to Reinaldo Carvalho; more information can be found here:http://proftpd.linux.co.uk/localsite/Userguide/linked/userguide.html):
DefaultRoot ~
IdentLookups off
ServerIdent on "FTP Server ready."
and restart Proftpd:
/etc/init.d/proftpd restart
Webalizer
apt-getinstall webalizer
<- accept default values
Synchronizethe System Clock
If you want tohave the system clock synchronized with an NTP server you can add the followinglines to /var/spool/cron/crontabs/root (if the file does not exist, create it by running
touch/var/spool/cron/crontabs/root ):
#update time with ntp server
0 3,9,15,21 * * * /usr/sbin/rdate time.nist.gov | logger -t NTP
Then run
chmod600 /var/spool/cron/crontabs/root
/etc/init.d/cronrestart
Install somePerl Modules needed by SpamAssassin (comes with ISPConfig)
Installationusing the Perl Shell
Login to your commandline as root and run the following command to start the Perl shell:
perl -MCPAN -e shell
If you run thePerl shell for the first time you will be asked some questions. In most casesthe default answers are ok.
Please note:Ifyou run a firewall on your system you might have to turn it off while workingon the Perl shell in order for the Perl shell to be able to fetch the neededmodules without a big delay. You can switch it on afterwards.
The big advantageof the Perl shell compared to the two other methods described here is that itcares about dependencies when installing new modules. I.e., if it turns outthat a prerequisite Perl module is missing when you install another module thePerl shell asks you if it should install the prerequisite module for you. Youshould answer that question with "Yes".
Run the followingcommands to install the modules needed by SpamAssassin:
install HTML::Parser
install DB_File
install Net::DNS (when prompted to enable tests, choose no)
install Digest::SHA1
q (to leave the Perl shell)
If a module isalready installed on your system you will get a message similar to this one:
HTML::Parseris up to date.
Successful installationof a module looks like this:
/usr/bin/makeinstall -- OK
Compile a CustomKernel
If you need tocompile a new kernel for some reason (e.g. because you want to use the latestbleeding-edge kernel or need a feature that the standard Debian kernel doesnot offer), you can find more information here:Debian-Kernel-Compile-Howto.
The End
The configurationof the server is now finished, and if you wish you can now install ISPConfigon it.
A Note On SuExec
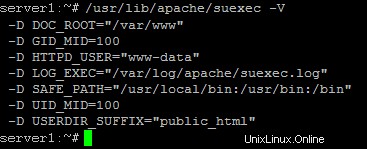
If you want torun CGI scripts under suExec, you should specify /var/www as the home directory for websites created by ISPConfig as Debian's suExec iscompiled with /var/www as Doc_Root .Run /usr/lib/apache/suexec -V ,and the output should look like this:
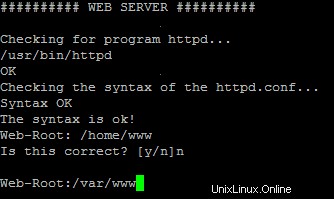
To select /var/www as the home directory for websites during the installation of ISPConfig do thefollowing:When you are asked for the installation mode, select the expertmode .
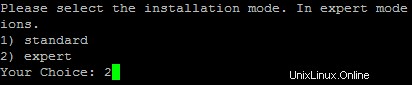
Later during theinstallation you are asked if the default directory /home/www should be the directory where ISPConfig will create websites in. Answer n and enter /var/www asthe home directory for websites.
Links
- http://www.debian.org
- http://www.debianplanet.org
- http://www.debianforum.de(German)
- http://www.debianhowto.de(German/English)
- http://www.ispconfig.org