Dieses Tutorial zeigt die Installation von ISPConfig 3.2 auf einem CentOS 8 (64Bit) Server. ISPConfig ist ein Webhosting-Bedienfeld, mit dem Sie die folgenden Dienste über einen Webbrowser konfigurieren können:Apache-Webserver, PHP, Postfix-Mailserver, MySQL, BIND-Nameserver, PureFTPd, SpamAssassin, ClamAV, Mailman und viele mehr.
1 Voraussetzungen
Um ein solches System zu installieren, benötigen Sie Folgendes:
- Ein Centos 8 minimales Serversystem. Dies kann ein Server sein, der von Grund auf neu installiert wurde, wie in unserem Centos 8-Minimalserver-Tutorial beschrieben, oder ein virtueller Server oder Root-Server von einem Hosting-Unternehmen, das ein minimales Centos 8-Setup installiert hat.
- Eine schnelle Internetverbindung.
2 Vorbemerkung
In diesem Tutorial verwende ich den Hostnamen server1.example.com mit der IP-Adresse 192.168.0.100 und dem Gateway 192.168.0.1. Diese Einstellungen können für Sie abweichen, daher müssen Sie sie gegebenenfalls ersetzen.
3 Server vorbereiten
Legen Sie das Tastaturlayout fest
Falls die Tastaturbelegung des Servers nicht zu Ihrer Tastatur passt, können Sie mit dem localectl-Befehl auf die richtige Tastatur (in meinem Fall "de" für eine deutsche Tastaturbelegung) wechseln:
localectl set-keymap de
Um eine Liste aller verfügbaren Tastenbelegungen zu erhalten, führen Sie Folgendes aus:
localectl list-keymaps
Ich möchte ISPConfig am Ende dieses Tutorials installieren, ISPConfig wird mit dem Bastille-Firewall-Skript geliefert, das ich als Firewall verwenden werde, daher deaktiviere ich jetzt die Standard-CentOS-Firewall. Natürlich steht es Ihnen frei, die CentOS-Firewall eingeschaltet zu lassen und nach Ihren Bedürfnissen zu konfigurieren (aber dann sollten Sie später keine andere Firewall verwenden, da diese höchstwahrscheinlich die CentOS-Firewall stört).
Lauf...
dnf -y install net-tools wget rsyslog curl
systemctl stop firewalld.service
systemctl disable firewalld.service
um die CentOS-Firewall zu stoppen und zu deaktivieren. Es ist in Ordnung, wenn Sie hier Fehler erhalten, dies zeigt nur an, dass die Firewall nicht installiert wurde.
Dann sollten Sie überprüfen, ob die Firewall wirklich deaktiviert wurde. Führen Sie dazu den folgenden Befehl aus:
iptables -L
Die Ausgabe sollte so aussehen:
[[email protected] ~]# iptables -L
Chain INPUT (policy ACCEPT)
target prot opt source destination
Chain FORWARD (policy ACCEPT)
target prot opt source destination
Chain OUTPUT (policy ACCEPT)
target prot opt source destination
Oder verwenden Sie den Befehl firewall-cmd:
firewall-cmd --state
[[email protected] ~]# firewall-cmd --state
not running
[[email protected] ~]#
Jetzt werde ich den Netzwerkkonfigurationseditor und den Shell-basierten Editor "nano" installieren, die ich in den nächsten Schritten verwenden werde, um die Konfigurationsdateien zu bearbeiten:
dnf -y install nano wget NetworkManager-tui yum-utils
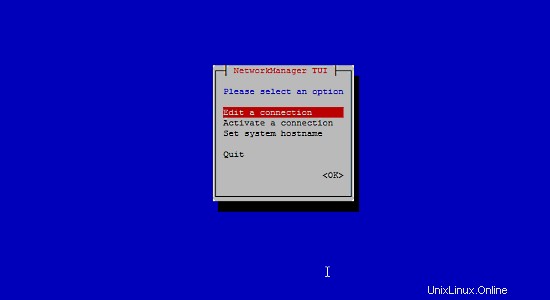
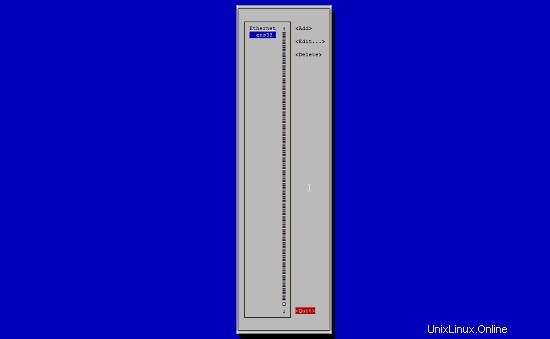
Wenn Sie Ihre Netzwerkkarte während der Installation nicht konfiguriert haben, können Sie dies jetzt tun. Lauf...
nmtui
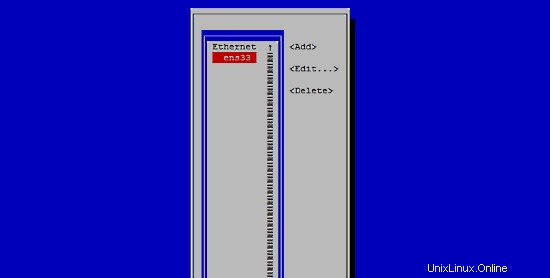
... und gehen Sie zu Verbindung bearbeiten:
Wählen Sie Ihre Netzwerkschnittstelle aus:
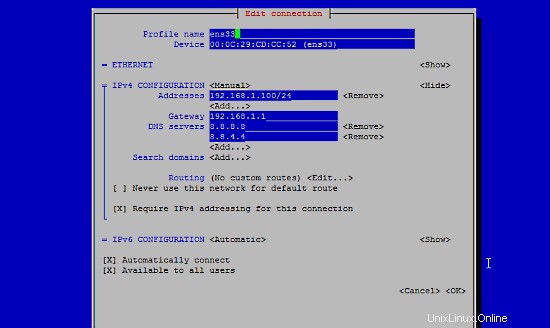
Geben Sie dann Ihre Netzwerkdetails ein - deaktivieren Sie DHCP und geben Sie eine statische IP-Adresse, eine Netzmaske, Ihr Gateway und einen oder zwei Nameserver ein, und klicken Sie dann auf Ok:
Wählen Sie als Nächstes OK, um die Änderungen zu bestätigen, die Sie in den Netzwerkeinstellungen vorgenommen haben
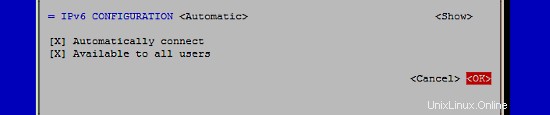
und Beenden, um das nmtui-Netzwerkkonfigurationstool zu schließen.
Du solltest laufen
ifconfig
Überprüfen Sie jetzt, ob der Installer Ihre IP-Adresse richtig verstanden hat:
[[email protected] ~]# ifconfig
ens33: flags=4163<UP,BROADCAST,RUNNING,MULTICAST>  mtu 1500
        inet 192.168.0.100  netmask 255.255.255.0  broadcast 192.168.0.255
        inet6 fe80::20c:29ff:feee:b665  prefixlen 64  scopeid 0x20<link>
        inet6 2003:e1:bf22:1b00:20c:29ff:feee:b665  prefixlen 64  scopeid 0x0<global>
        ether 00:0c:29:ee:b6:65  txqueuelen 1000  (Ethernet)
        RX packets 2874  bytes 1369892 (1.3 MiB)
        RX errors 0  dropped 546  overruns 0  frame 0
        TX packets 968  bytes 160901 (157.1 KiB)
        TX errors 0  dropped 0 overruns 0  carrier 0  collisions 0
lo: flags=73<UP,LOOPBACK,RUNNING>  mtu 65536
        inet 127.0.0.1  netmask 255.0.0.0
        inet6 ::1  prefixlen 128  scopeid 0x10<host>
        loop  txqueuelen 1000  (Local Loopback)
        RX packets 0  bytes 0 (0.0 B)
        RX errors 0  dropped 0  overruns 0  frame 0
        TX packets 0  bytes 0 (0.0 B)
        TX errors 0  dropped 0 overruns 0  carrier 0  collisions 0
Wenn Ihre Netzwerkkarte dort nicht angezeigt wird, wird sie beim Booten nicht aktiviert. Öffnen Sie in diesem Fall die Datei /etc/sysconfig/network-scripts/ifcfg-eth0
nano /etc/sysconfig/network-scripts/ifcfg-ens33
und setzen Sie ONBOOT auf yes:
[...]
ONBOOT=yes
[...]
und starten Sie den Server neu.
Überprüfen Sie Ihre /etc/resolv.conf, ob sie alle Nameserver auflistet, die Sie zuvor konfiguriert haben:
cat /etc/resolv.conf
Wenn Nameserver fehlen, führen Sie
ausnmtui
und fügen Sie die fehlenden Nameserver erneut hinzu.
Nun zur Konfiguration...
Anpassen von /etc/hosts und /etc/hostname
Als nächstes bearbeiten wir /etc/hosts. Lass es so aussehen:
nano /etc/hosts
127.0.0.1   localhost localhost.localdomain localhost4 localhost4.localdomain4
192.168.0.100   server1.example.com     server1

::1         localhost localhost.localdomain localhost6 localhost6.localdomain6
Legen Sie den Hostnamen in der Datei /etc/hostname fest. Die Datei muss den vollständig qualifizierten Domänennamen enthalten (z. B. server1.example.com in meinem Fall) und nicht nur den Kurznamen wie "server1". Öffnen Sie die Datei mit dem Nano-Editor:
nano /etc/hostname
Und legen Sie den Hostnamen in der Datei fest.
server1.example.com
Speichern Sie die Datei und beenden Sie nano.
Setzen Sie SELinux auf freizügig
SELinux ist eine Sicherheitserweiterung von CentOS, die erweiterte Sicherheit bieten soll. ISPConfig wird nicht mit einem SELinux-Regelsatz ausgeliefert, daher setze ich ihn auf permissiv (dies ist ein Muss, wenn Sie ISPConfig später installieren möchten).
Bearbeiten Sie /etc/selinux/config und setzen Sie SELINUX=permissive:
nano /etc/selinux/config
# This file controls the state of SELinux on the system.
# SELINUX= can take one of these three values:
#     enforcing - SELinux security policy is enforced.
#     permissive - SELinux prints warnings instead of enforcing.
#     disabled - No SELinux policy is loaded.
SELINUX=permissive
# SELINUXTYPE= can take one of these two values:
#     targeted - Targeted processes are protected,
#     mls - Multi Level Security protection.
SELINUXTYPE=targeted
Danach müssen wir das System neu starten:
reboot
4 Zusätzliche Repositories aktivieren und einige Software installieren
Zuerst importieren wir die GPG-Schlüssel für Softwarepakete:
rpm --import /etc/pki/rpm-gpg/RPM-GPG-KEY*
Dann aktivieren wir das EPEL-Repository auf unserem CentOS-System, da viele der Pakete, die wir im Laufe dieses Tutorials installieren werden, nicht im offiziellen CentOS 8-Repository verfügbar sind:
dnf -y install epel-release
Power Tools aktivieren:
dnf config-manager --set-enabled powertools
Dann aktualisieren wir unsere bestehenden Pakete auf dem System:
dnf -y update
Jetzt installieren wir einige Softwarepakete, die später benötigt werden:
dnf -y groupinstall 'Development Tools'
5-Quote
(Falls Sie ein anderes Partitionierungsschema gewählt haben als ich, müssen Sie dieses Kapitel anpassen, damit Quota für die Partitionen gilt, wo Sie es brauchen.)
Um Quota zu installieren, führen wir diesen Befehl aus:
dnf -y install quota
Jetzt prüfen wir, ob das Kontingent für das Dateisystem, in dem die Website (/var/www) und die Maildir-Daten (var/vmail) gespeichert sind, bereits aktiviert ist. In diesem Beispiel-Setup habe ich eine große Root-Partition, also suche ich nach ' / ':
mount | grep ' / '
[[email protected] ~]# mount | grep ' / '
/dev/mapper/centos-root on / type xfs (rw,relatime,attr2,inode64,noquota)
[[email protected] ~]#
Wenn Sie eine separate /var-Partition haben, verwenden Sie:
mount | grep ' /var '
stattdessen. Wenn die Zeile das Wort „noquota ", fahren Sie dann mit den folgenden Schritten fort, um das Kontingent zu aktivieren.
Kontingent auf der Partition / (Root) aktivieren
Normalerweise würden Sie Quota in der Datei /etc/fstab aktivieren, aber wenn das Dateisystem das Root-Dateisystem "/" ist, dann muss Quota durch einen Boot-Parameter des Linux-Kernels aktiviert werden.
Bearbeiten Sie die Grub-Konfigurationsdatei:
nano /etc/default/grub
Suchen Sie nach der Zeile, die mit GRUB_CMDLINE_LINUX beginnt, und fügen Sie rootflags=uquota,gquota zu den Befehlszeilenparametern hinzu, sodass die resultierende Zeile wie folgt aussieht:
GRUB_CMDLINE_LINUX="crashkernel=auto resume=/dev/mapper/cl-swap rd.lvm.lv=cl/root rd.lvm.lv=cl/swap rootflags=uquota,gquota"
und wenden Sie die Änderungen an, indem Sie den folgenden Befehl ausführen.
cp /boot/grub2/grub.cfg /boot/grub2/grub.cfg_bak
grub2-mkconfig -o /boot/grub2/grub.cfg
und starten Sie den Server neu.
reboot
Überprüfen Sie nun, ob Quota aktiviert ist:
mount | grep ' / '
[[email protected] ~]# mount | grep ' / '
/dev/mapper/centos-root on / type xfs (rw,relatime,attr2,inode64,usrquota,grpquota)
[[email protected] ~]#
Wenn das Kontingent aktiv ist, können wir "usrquota,grpquota sehen " in der Mount-Optionsliste.
Kontingent auf einer separaten /var-Partition aktivieren
Wenn Sie eine separate /var-Partition haben, bearbeiten Sie /etc/fstab und fügen Sie ,uquota,gquota zur /-Partition hinzu (/dev/mapper/centos-var):
nano /etc/fstab
#
# /etc/fstab
# Created by anaconda on Sun Sep 21 16:33:45 2014
#
# Accessible filesystems, by reference, are maintained under '/dev/disk'
# See man pages fstab(5), findfs(8), mount(8) and/or blkid(8) for more info
#
/dev/mapper/centos-root /                       xfs     defaults        1 1
/dev/mapper/centos-var /var                     xfs     defaults,uquota,gquota        1 2
UUID=9ac06939-7e43-4efd-957a-486775edd7b4 /boot                   xfs     defaults        1 3
/dev/mapper/centos-swap swap                    swap    defaults        0 0
Dann ausführen
mount -o remount /var
quotacheck -avugm
quotaon -avug
Kontingent zu aktivieren. Wenn Sie eine Fehlermeldung erhalten, dass keine Partition mit aktiviertem Kontingent vorhanden ist, starten Sie den Server neu, bevor Sie fortfahren.
6 Installieren Sie Apache, PHP, MySQL und phpMyAdmin
Aktivieren Sie das Remi-Repository, um neuere PHP-Versionen zu erhalten (derzeit PHP 7.4):
dnf install http://rpms.remirepo.net/enterprise/remi-release-8.rpm
dnf -y install yum-utils
dnf -y module reset php
dnf -y module install php:remi-7.4
dnf update
Wir können die benötigten Pakete mit einem einzigen Befehl installieren:
dnf -y install httpd mod_ssl mariadb-server php php-mysqlnd php-mbstring
Um sicherzustellen, dass der Server nicht über die HTTPOXY-Schwachstelle angegriffen werden kann, werden wir den HTTP_PROXY-Header in Apache global deaktivieren.
Fügen Sie die Apache-Header-Regel am Ende der httpd.conf-Datei hinzu:
echo "RequestHeader unset Proxy early" >> /etc/httpd/conf/httpd.conf
Und starten Sie httpd neu, um die Konfigurationsänderung zu übernehmen.
service httpd restart
Installieren Sie phpMyAdmin:
cd /tmp
wget https://files.phpmyadmin.net/phpMyAdmin/5.0.2/phpMyAdmin-5.0.2-all-languages.tar.gz
tar xzvf phpMyAdmin-5.0.2-all-languages.tar.gz
mkdir /usr/share/phpmyadmin
mv phpMyAdmin-5.0.2-all-languages/* /usr/share/phpmyadmin/
mkdir /usr/share/phpmyadmin/tmp
chown -R apache:apache /usr/share/phpmyadmin
chmod 777 /usr/share/phpmyadmin/tmp
Optional:Ändern Sie das Apache MPM-Modul
CentOS 8 verwendet standardmäßig das Apache MPM Event-Modul, das ist einerseits gut, da es Ihnen erlaubt, das HTTP/2-Protokoll zu verwenden. Andererseits erlaubt es Ihnen nicht, das Modul mod_php von Apache zu verwenden. Generell sollte man heute PHP-FPM als Standard verwenden und ISPConfig unterstützt das. Falls Sie aus Kompatibilitätsgründen den alten mod_php-Modus benötigen, können Sie das Apache MPM folgendermaßen umstellen:
nano /etc/httpd/conf.modules.d/00-mpm.conf
Fügen Sie vor der MPM-Ereigniszeile ein # hinzu, damit es so aussieht:
# LoadModule mpm_event_module modules/mod_mpm_event.so
Entfernen Sie dann das # in from der MPM-Prefork-Zeile, sodass es so aussieht:
LoadModule mpm_prefork_module modules/mod_mpm_prefork.so
Starten Sie dann httpd neu, um die Konfigurationsänderung zu übernehmen.
service httpd restart
7 Dovecot installieren
Dovecot kann wie folgt installiert werden:
dnf -y install dovecot dovecot-mysql dovecot-pigeonhole
Erstellen Sie eine leere dovecot-sql.conf-Datei und erstellen Sie symbolische Links:
touch /etc/dovecot/dovecot-sql.conf
ln -s /etc/dovecot/dovecot-sql.conf /etc/dovecot-sql.conf
ln -s /etc/dovecot/dovecot.conf /etc/dovecot.conf
Erstellen Sie nun die Systemstartlinks und starten Sie Dovecot:
systemctl enable dovecot
systemctl start dovecot
8 Postfix installieren
Postfix kann wie folgt installiert werden:
dnf -y install postfix postfix-mysql
Öffnen Sie als Nächstes die TLS/SSL- und Übermittlungsports in Postfix:
nano /etc/postfix/master.cf
Entkommentieren Sie die Abschnitte submission und smtps wie folgt und fügen Sie bei Bedarf Zeilen hinzu, damit dieser Abschnitt der Datei master.cf genauso aussieht wie der untenstehende. WICHTIG: Entfernen Sie auch das # vor den Zeilen, die mit smtps und Submission beginnen, und nicht nur aus den -o-Zeilen nach diesen Zeilen!
[...]
submission inet n - n - - smtpd
 -o syslog_name=postfix/submission
 -o smtpd_tls_security_level=encrypt
 -o smtpd_sasl_auth_enable=yes
 -o smtpd_client_restrictions=permit_sasl_authenticated,reject
# -o smtpd_reject_unlisted_recipient=no
# -o smtpd_client_restrictions=$mua_client_restrictions
# -o smtpd_helo_restrictions=$mua_helo_restrictions
# -o smtpd_sender_restrictions=$mua_sender_restrictions
# -o smtpd_recipient_restrictions=
# -o smtpd_relay_restrictions=permit_sasl_authenticated,reject
# -o milter_macro_daemon_name=ORIGINATING
smtps inet n - n - - smtpd
 -o syslog_name=postfix/smtps
 -o smtpd_tls_wrappermode=yes
 -o smtpd_sasl_auth_enable=yes
 -o smtpd_client_restrictions=permit_sasl_authenticated,reject
# -o smtpd_reject_unlisted_recipient=no
# -o smtpd_client_restrictions=$mua_client_restrictions
# -o smtpd_helo_restrictions=$mua_helo_restrictions
# -o smtpd_sender_restrictions=$mua_sender_restrictions
# -o smtpd_recipient_restrictions=
# -o smtpd_relay_restrictions=permit_sasl_authenticated,reject
# -o milter_macro_daemon_name=ORIGINATING
[...]
Deaktivieren Sie dann Sendmail und starten Sie Postfix und MariaDB (MySQL):
systemctl enable mariadb.service
systemctl start mariadb.service
systemctl enable postfix.service
systemctl restart postfix.service
Wir deaktivieren sendmail, um sicherzustellen, dass es nicht gestartet wird, falls es auf Ihrem Server installiert ist. Daher die Fehlermeldung "Methodenaufruf konnte nicht ausgegeben werden:Einheit sendmail.service nicht geladen." kann ignoriert werden.
Um die Unterstützung für alte/veraltete Geräte zu aktivieren, führen Sie diesen Befehl aus (optional, nur verwenden, wenn Sie möchten, dass alte E-Mail-Geräte eine Verbindung herstellen, da dies die SSL/TLS-Einrichtung schwächt, indem weniger sichere Verschlüsselungen zugelassen werden):
update-crypto-policies --set LEGACY
9 Getmail installieren
Getmail kann wie folgt installiert werden:
dnf install python2
cd /tmp
wget http://pyropus.ca/software/getmail/old-versions/getmail-5.14.tar.gz
tar xvfz getmail-5.14.tar.gz
cd getmail-5.14
python2 setup.py build
python2 setup.py install
10 Legen Sie MySQL-Passwörter fest und konfigurieren Sie phpMyAdmin
Legen Sie Passwörter für das MySQL-Root-Konto fest:
mysql_secure_installation
[[email protected] tmp]# mysql_secure_installation


NOTE: RUNNING ALL PARTS OF THIS SCRIPT IS RECOMMENDED FOR ALL MariaDB
SERVERS IN PRODUCTION USE! PLEASE READ EACH STEP CAREFULLY!
In order to log into MariaDB to secure it, we'll need the current
password for the root user. If you've just installed MariaDB, and
you haven't set the root password yet, the password will be blank,
so you should just press enter here.
Enter current password for root (enter for none):
OK, successfully used password, moving on...
Setting the root password ensures that nobody can log into the MariaDB
root user without the proper authorisation.

Set root password? [Y/n] <-- ENTER
New password: <-- yourrootsqlpassword
Re-enter new password: <-- yourrootsqlpassword
Password updated successfully!
Reloading privilege tables..
 ... Success!


By default, a MariaDB installation has an anonymous user, allowing anyone
to log into MariaDB without having to have a user account created for
them. This is intended only for testing, and to make the installation
go a bit smoother. You should remove them before moving into a
production environment.

Remove anonymous users? [Y/n] <-- ENTER
 ... Success!

Normally, root should only be allowed to connect from 'localhost'.  This
ensures that someone cannot guess at the root password from the network.

Disallow root login remotely? [Y/n] <-- ENTER
 ... Success!

By default, MariaDB comes with a database named 'test' that anyone can
access. This is also intended only for testing, and should be removed
before moving into a production environment.

Remove test database and access to it? [Y/n] <-- ENTER
 - Dropping test database...
 ... Success!
 - Removing privileges on test database...
 ... Success!

Reloading the privilege tables will ensure that all changes made so far
will take effect immediately.

Reload privilege tables now? [Y/n] <-- ENTER
 ... Success!

Cleaning up...


All done! If you've completed all of the above steps, your MariaDB
installation should now be secure.

Thanks for using MariaDB!

[[email protected] tmp]#
Jetzt konfigurieren wir phpMyAdmin. Erstellen Sie diese phpMyAdmin-Konfigurationsdatei:
nano /etc/httpd/conf.d/phpmyadmin.conf
Fügen Sie diesen Inhalt der Datei hinzu:
# phpMyAdmin - Web based MySQL browser written in php
#
# Allows only localhost by default
#
# But allowing phpMyAdmin to anyone other than localhost should be considered
# dangerous unless properly secured by SSL

Alias /phpMyAdmin /usr/share/phpmyadmin
Alias /phpmyadmin /usr/share/phpmyadmin

<Directory /usr/share/phpmyadmin/>
   <IfModule mod_authz_core.c>
     # Apache 2.4
  #  <RequireAny>
     #  Require ip 127.0.0.1
     #  Require ip ::1
  #  </RequireAny>
   </IfModule>
   <IfModule !mod_authz_core.c>
     # Apache 2.2
     Order Deny,Allow
     Deny from All
     Allow from 127.0.0.1
     Allow from ::1
   </IfModule>
</Directory>
Als nächstes ändern wir die Authentifizierung in phpMyAdmin von cookie auf http:
cp -pf /usr/share/phpmyadmin/config.sample.inc.php /usr/share/phpmyadmin/config.inc.php
nano /usr/share/phpmyadmin/config.inc.php
[...]
/* Authentication type */
$cfg['Servers'][$i]['auth_type'] = 'http';
[...]
Dann erstellen wir die Systemstartlinks für Apache und starten es:
systemctl enable httpd
systemctl restart httpd
Jetzt können Sie Ihren Browser auf http://server1.example.com/phpmyadmin/ oder http://192.168.0.100/phpmyadmin/ leiten und sich mit dem Benutzernamen root und Ihrem neuen root-MySQL-Passwort anmelden.
11 Installieren Sie Amavisd-new, SpamAssassin, ClamAV und Postgrey
Um amavisd-new, SpamAssassin und ClamAV zu installieren, führen Sie den folgenden Befehl aus:
dnf -y install amavisd-new spamassassin clamav-server clamav-data clamav-update clamav-filesystem clamav clamav-scanner-systemd clamav-devel clamav-lib clamav-server-systemd unzip bzip2 perl-DBD-mysql postgrey re2c
Dann starten wir freshclam, amavisd und clamd.amavisd:
sa-update
freshclam
systemctl enable amavisd.service
systemctl start amavisd.service
systemctl start [email protected]
systemctl enable postgrey.service
systemctl start postgrey.service
Im nächsten Schritt konfigurieren wir postgrey. Öffnen Sie die Datei /etc/sysconfig/postgrey in einem Editor:
nano /etc/sysconfig/postgrey
und ändern Sie die Zeile:
POSTGREY_TYPE="--unix=/var/spool/postfix/postgrey/socket"
zu
POSTGREY_TYPE="--inet=10023"
Speichern Sie die Datei und starten Sie postgrey neu:
service postgrey restart
Um amavisd zu konfigurieren, bearbeiten Sie die Datei /etc/clamd.d/amavisd.conf:
nano /etc/clamd.d/amavisd.conf
und ändern Sie die Zeile:
LocalSocket /run/clamd.amavisd/clamd.sock
zu
LocalSocket /var/spool/amavisd/clamd.sock
Speichern Sie die geänderte Konfigurationsdatei und starten Sie ClamAV neu:
systemctl restart [email protected]
Jetzt müssen wir eine Systemeinheit für den Dienst freshclam erstellen. Erstellen Sie eine neue Datei /usr/lib/systemd/system/freshclam.service:
nano /usr/lib/systemd/system/freshclam.service
und geben Sie den folgenden Inhalt in diese Datei ein:
[Unit]
Description = ClamAV Scanner
After = network.target

[Service]
Type = forking
# if you want to scan more than one in a day change the number 1 with your desired number in below line.
ExecStart = /usr/bin/freshclam -d -c 1
Restart = on-failure
PrivateTmp =true

[Install]
WantedBy=multi-user.target
Speichern Sie die Datei und aktivieren und starten Sie dann den Dienst.
systemctl enable freshclam.service
systemctl start freshclam.service
systemctl status freshclam.service
12 Installation von Apache mit mod_php, mod_fcgi/PHP, PHP-FPM
ISPConfig 3 ermöglicht Ihnen die Verwendung von mod_php, mod_fcgi/PHP, cgi/PHP und PHP-FPM pro Website.
Wir können Apache2 mit mod_php, mod_fcgid und PHP wie folgt installieren:
dnf -y install php php-devel php-gd php-imap php-ldap php-mysql php-odbc php-pear php-xml php-xmlrpc php-pecl-apc php-mbstring php-mcrypt php-snmp php-soap php-tidy curl curl-devel perl-libwww-perl ImageMagick libxml2 libxml2-devel mod_fcgid php-cli httpd-devel php-fpm php-intl php-imagick php-pspell wget
Als nächstes öffnen wir /etc/php.ini...
nano /etc/php.ini
... und ändere die Fehlerberichterstattung (sodass keine Hinweise mehr angezeigt werden), setze die Zeitzone und entkommentiere cgi.fix_pathinfo=1:
[...]
;error_reporting = E_ALL & ~E_DEPRECATED
error_reporting = E_ALL & ~E_NOTICE & ~E_DEPRECATED & ~E_STRICT
[...]
; cgi.fix_pathinfo provides *real* PATH_INFO/PATH_TRANSLATED support for CGI.  PHP's
; previous behaviour was to set PATH_TRANSLATED to SCRIPT_FILENAME, and to not grok
; what PATH_INFO is.  For more information on PAppp.tldTH_INFO, see the cgi specs.  Setting
; this to 1 will cause PHP CGI to fix its paths to conform to the spec.  A setting
; of zero causes PHP to behave as before.  Default is 1.  You should fix your scripts
; to use SCRIPT_FILENAME rather than PATH_TRANSLATED.
; http://www.php.net/manual/en/ini.core.php#ini.cgi.fix-pathinfo
cgi.fix_pathinfo=1
[...]
date.timezone = 'Europe/Berlin'
[...]
Aktivieren Sie httpd und PHP-FPM, um beim Booten loszulegen und den PHP-FPM-Dienst zu starten.
systemctl start php-fpm.service
systemctl enable php-fpm.service
systemctl enable httpd.service
Abschließend starten wir Apache neu:
systemctl restart httpd.service
Jetzt werden wir Unterstützung für Let's encrypt hinzufügen. ISPConfig verwendet jetzt acme.sh als Let's Encrypt-Client. Installieren Sie acme.sh mit dem folgenden Befehl:
curl https://get.acme.sh | sh -s
13 Installation von mod_python
Das Apache-Modul mod_python ist nicht als RPM-Paket verfügbar, daher werden wir es aus dem Quellcode kompilieren. Der erste Schritt besteht darin, die Python-Entwicklungsdateien zu installieren und die aktuelle mod_python-Version als .tar.gz-Datei herunterzuladen
dnf -y install python3-devel
cd /usr/local/src/
wget http://dist.modpython.org/dist/mod_python-3.5.0.tgz
tar xfz mod_python-3.5.0.tgz
cd mod_python-3.5.0
und dann das Modul konfigurieren und kompilieren.
./configure --with-python=/usr/bin/python3
make
Es gibt einen Fehler im kompilierten Modul, der dazu führt, dass die Installation mit dem Fehler "version ="fatal:Not a git repository (or any of the parent directorys):.git fehlschlägt ". Um das zu beheben, führen Sie diesen sed-Befehl aus (der Befehl besteht aus einer Zeile!).
sed -e 's/(git describe --always)/(git describe --always 2>\/dev\/null)/g' -e 's/`git describe --always`/`git describe --always 2>\/dev\/null`/g' -i $( find . -type f -name Makefile\* -o -name version.sh )
Dann installieren Sie das Modul mit diesem Befehl.
make install
und aktivieren Sie das Modul in Apache:
echo 'LoadModule python_module modules/mod_python.so' > /etc/httpd/conf.modules.d/10-python.conf
systemctl restart httpd.service
14 Installieren Sie PureFTPd
PureFTPd kann mit dem folgenden Befehl installiert werden:
dnf -y install pure-ftpd
Erstellen Sie dann die Systemstartlinks und starten Sie PureFTPd:
systemctl enable pure-ftpd.service
systemctl start pure-ftpd.service
Jetzt konfigurieren wir PureFTPd so, dass FTP- und TLS-Sitzungen zugelassen werden. FTP ist ein sehr unsicheres Protokoll, da alle Passwörter und alle Daten im Klartext übertragen werden. Durch die Verwendung von TLS kann die gesamte Kommunikation verschlüsselt werden, wodurch FTP viel sicherer wird.
OpenSSL wird von TLS benötigt; Um OpenSSL zu installieren, führen wir einfach Folgendes aus:
dnf install openssl
Öffnen Sie /etc/pure-ftpd/pure-ftpd.conf...
nano /etc/pure-ftpd/pure-ftpd.conf
Wenn Sie FTP- und TLS-Sitzungen zulassen möchten, setzen Sie TLS auf 1, indem Sie das # vor der TLS-Zeile entfernen. Es wird dringend empfohlen, TLS zu aktivieren.
[...]
# This option can accept three values :
# 0 : disable SSL/TLS encryption layer (default).
# 1 : accept both traditional and encrypted sessions.
# 2 : refuse connections that don't use SSL/TLS security mechanisms,
#     including anonymous sessions.
# Do _not_ uncomment this blindly. Be sure that :
# 1) Your server has been compiled with SSL/TLS support (--with-tls),
# 2) A valid certificate is in place,
# 3) Only compatible clients will log in.

TLS                      1
[...]
Um TLS verwenden zu können, müssen wir ein SSL-Zertifikat erstellen. Ich erstelle es in /etc/ssl/private/, also erstelle ich zuerst dieses Verzeichnis:
mkdir -p /etc/ssl/private/
Anschließend können wir das SSL-Zertifikat wie folgt generieren:
openssl req -x509 -nodes -days 7300 -newkey rsa:2048 -keyout /etc/ssl/private/pure-ftpd.pem -out /etc/ssl/private/pure-ftpd.pem
Ländername (2-Buchstaben-Code) [XX]:<-- Geben Sie Ihren Ländernamen ein (z. B. "DE").
Staats- oder Provinzname (vollständiger Name) []:<-- Geben Sie Ihren Staats- oder Provinznamen ein .
Ortsname (z. B. Stadt) [Standardstadt]:<-- Geben Sie Ihre Stadt ein.
Organisationsname (z. B. Firma) [Standardfirma GmbH]:<-- Geben Sie Ihren Organisationsnamen ein (z. B. , der Name Ihres Unternehmens).
Name der Organisationseinheit (z. B. Abschnitt) []:<-- Geben Sie den Namen Ihrer Organisationseinheit ein (z. B. "IT-Abteilung").
Allgemeiner Name (z. B. Ihr Name oder den Hostnamen Ihres Servers) []:<-- Geben Sie den vollständig qualifizierten Domänennamen des Systems ein (z. B. "server1.example.com").
E-Mail-Adresse []:<-- Geben Sie Ihre E-Mail-Adresse ein.
Ändern Sie die Berechtigungen des SSL-Zertifikats:
chmod 600 /etc/ssl/private/pure-ftpd.pem
Erstellen Sie eine DHParam-Datei:
openssl dhparam -out /etc/ssl/private/pure-ftpd-dhparams.pem 2048
Starten Sie abschließend PureFTPd neu:
systemctl restart pure-ftpd.service
Das ist es. Sie können jetzt versuchen, sich mit Ihrem FTP-Client zu verbinden; Sie sollten Ihren FTP-Client jedoch für die Verwendung von TLS konfigurieren.
15 BIND installieren
Wir können BIND wie folgt installieren:
dnf -y install bind bind-utils haveged
Erstellen Sie eine Sicherungskopie der vorhandenen /etc/named.conf-Datei und erstellen Sie eine neue wie folgt:
cp /etc/named.conf /etc/named.conf_bak
cat /dev/null > /etc/named.conf
nano /etc/named.conf
//
// named.conf
//
// Provided by Red Hat bind package to configure the ISC BIND named(8) DNS
// server as a caching only nameserver (as a localhost DNS resolver only).
//
// See /usr/share/doc/bind*/sample/ for example named configuration files.
//
options {
        listen-on port 53 { any; };
        listen-on-v6 port 53 { any; };
        directory       "/var/named";
        dump-file       "/var/named/data/cache_dump.db";
        statistics-file "/var/named/data/named_stats.txt";
        memstatistics-file "/var/named/data/named_mem_stats.txt";
        allow-query     { any; };
				allow-recursion {"none";};
        recursion no;
};
logging {
        channel default_debug {
                file "data/named.run";
                severity dynamic;
        };
};
zone "." IN {
        type hint;
        file "named.ca";
};
include "/etc/named.conf.local";
Erstellen Sie die Datei /etc/named.conf.local, die am Ende von /etc/named.conf enthalten ist (/etc/named.conf.local wird später von ISPConfig ausgefüllt, wenn Sie DNS-Zonen in ISPConfig erstellen):
touch /etc/named.conf.local
Dann erstellen wir die Startup-Links und starten BIND:
systemctl enable named.service
systemctl start named.service
systemctl enable haveged.service
systemctl start haveged.service
16 Installieren Sie AWStats
AWStats kann wie folgt installiert werden:
dnf -y install awstats perl-DateTime-Format-HTTP perl-DateTime-Format-Builder
Die alternative Webstatistikanwendung „webalizer“ ist für CentOS 8 nicht mehr verfügbar, sodass Sie nur noch AWStats verwenden können.
17 Jailkit installieren
Jailkit wird verwendet, um SSH-Benutzer und Cronjobs zu chrooten. Es kann wie folgt installiert werden:
ln -s /usr/bin/python2 /usr/bin/python
cd /tmp
wget http://olivier.sessink.nl/jailkit/jailkit-2.21.tar.gz
tar xvfz jailkit-2.21.tar.gz
cd jailkit-2.21
./configure
make
make install
cd ..
rm -rf jailkit-2.21*
18 Fail2Ban installieren
Dies ist optional, wird aber empfohlen, da der ISPConfig-Monitor versucht, das Protokoll anzuzeigen.
dnf -y install iptables-services fail2ban fail2ban-systemd
systemctl stop firewalld.service
systemctl mask firewalld.service
systemctl disable firewalld.service
Als Nächstes erstellen wir die Datei /etc/fail2ban/jail.local und aktivieren die Überwachung für SSH-, E-Mail- und FTP-Dienste.
nano /etc/fail2ban/jail.local
Fügen Sie der Datei jail.local folgenden Inhalt hinzu:
[sshd]
enabled = true
action = iptables[name=sshd, port=ssh, protocol=tcp]

[pure-ftpd]
enabled = true
action = iptables[name=FTP, port=ftp, protocol=tcp]
maxretry = 3

[dovecot]
enabled = true
action = iptables-multiport[name=dovecot, port="pop3,pop3s,imap,imaps", protocol=tcp]
maxretry = 5

[postfix-sasl]
enabled = true
action = iptables-multiport[name=postfix-sasl, port="smtp,smtps,submission", protocol=tcp]
maxretry = 3
Erstellen Sie dann die Systemstartlinks für fail2ban und starten Sie es:
systemctl enable fail2ban.service
systemctl start fail2ban.service
19 Installieren Sie rkhunter
rkhunter kann wie folgt installiert werden:
dnf -y install rkhunter
20 Mailman installieren
Wenn Sie Mailinglisten mit Mailman auf Ihrem Server verwalten möchten, dann installieren Sie mailman jetzt. Mailman is supported by ISPConfig, so you will be able to create new mailing lists trough ISPConfig later.
dnf -y install mailman
Bevor wir Mailman starten können, muss eine erste Mailingliste namens mailman erstellt werden:
touch /var/lib/mailman/data/aliases
postmap /var/lib/mailman/data/aliases
/usr/lib/mailman/bin/newlist mailman
ln -s /usr/lib/mailman/mail/mailman /usr/bin/mailman
[[email protected] tmp]# /usr/lib/mailman/bin/newlist mailman
Enter the email of the person running the list: <-- admin email address, e.g. [email protected]
Initial mailman password: <-- admin password for the mailman list
To finish creating your mailing list, you must edit your /etc/aliases (or
equivalent) file by adding the following lines, and possibly running the
`newaliases' program:
## mailman mailing list
mailman: "|/usr/lib/mailman/mail/mailman post mailman"
mailman-admin: "|/usr/lib/mailman/mail/mailman admin mailman"
mailman-bounces: "|/usr/lib/mailman/mail/mailman bounces mailman"
mailman-confirm: "|/usr/lib/mailman/mail/mailman confirm mailman"
mailman-join: "|/usr/lib/mailman/mail/mailman join mailman"
mailman-leave: "|/usr/lib/mailman/mail/mailman leave mailman"
mailman-owner: "|/usr/lib/mailman/mail/mailman owner mailman"
mailman-request: "|/usr/lib/mailman/mail/mailman request mailman"
mailman-subscribe: "|/usr/lib/mailman/mail/mailman subscribe mailman"
mailman-unsubscribe: "|/usr/lib/mailman/mail/mailman unsubscribe mailman"
Hit enter to notify mailman owner... <-- ENTER
[[email protected] tmp]#
Danach /etc/aliases öffnen...
nano /etc/aliases
... und fügen Sie die folgenden Zeilen hinzu:
[...]
mailman:              "|/usr/lib/mailman/mail/mailman post mailman"
mailman-admin:        "|/usr/lib/mailman/mail/mailman admin mailman"
mailman-bounces:      "|/usr/lib/mailman/mail/mailman bounces mailman"
mailman-confirm:      "|/usr/lib/mailman/mail/mailman confirm mailman"
mailman-join:         "|/usr/lib/mailman/mail/mailman join mailman"
mailman-leave:        "|/usr/lib/mailman/mail/mailman leave mailman"
mailman-owner:        "|/usr/lib/mailman/mail/mailman owner mailman"
mailman-request:      "|/usr/lib/mailman/mail/mailman request mailman"
mailman-subscribe:    "|/usr/lib/mailman/mail/mailman subscribe mailman"
mailman-unsubscribe:  "|/usr/lib/mailman/mail/mailman unsubscribe mailman"
Ausführen
newaliases
afterwards and restart Postfix:
systemctl restart postfix.service
Now open the Mailman Apache configuration file /etc/httpd/conf.d/mailman.conf...
nano /etc/httpd/conf.d/mailman.conf
... and add the line ScriptAlias /cgi-bin/mailman/ /usr/lib/mailman/cgi-bin/. Comment out Alias /pipermail/ /var/lib/mailman/archives/public/ and add the line Alias /pipermail /var/lib/mailman/archives/public/:
#
#  httpd configuration settings for use with mailman.
#

ScriptAlias /mailman/ /usr/lib/mailman/cgi-bin/
ScriptAlias /cgi-bin/mailman/ /usr/lib/mailman/cgi-bin/
<Directory /usr/lib/mailman/cgi-bin/>
    AllowOverride None
    Options ExecCGI
    Order allow,deny
    Allow from all
</Directory>


#Alias /pipermail/ /var/lib/mailman/archives/public/
Alias /pipermail /var/lib/mailman/archives/public/
<Directory /var/lib/mailman/archives/public>
    Options Indexes MultiViews FollowSymLinks
    AllowOverride None
    Order allow,deny
    Allow from all
    AddDefaultCharset Off
</Directory>

# Uncomment the following line, to redirect queries to /mailman to the
# listinfo page (recommended).

# RedirectMatch ^/mailman[/]*$ /mailman/listinfo
Starten Sie Apache neu:
systemctl restart httpd.service
Create the system startup links for Mailman and start it:
systemctl enable mailman.service
systemctl start mailman.service
After you have installed ISPConfig 3, you can access Mailman as follows:
You can use the alias /cgi-bin/mailman for all Apache vhosts (please note that suExec and CGI must be disabled for all vhosts from which you want to access Mailman!), which means you can access the Mailman admin interface for a list at http://
Under http://
21 Install Roundcube webmail
To install the RoundCube webmail client, download the latest version with wget to the /tmp folder:
cd /tmp
wget https://github.com/roundcube/roundcubemail/releases/download/1.4.3/roundcubemail-1.4.3-complete.tar.gz
Unpack the tar.gz archive and move the RoundCube source to /usr/share/roundcubemail
tar xfz roundcubemail-1.4.3-complete.tar.gz
mkdir /usr/share/roundcubemail
mv /tmp/roundcubemail-1.4.3/* /usr/share/roundcubemail/
chown -R root:root /usr/share/roundcubemail
chown apache /usr/share/roundcubemail/temp
chown apache /usr/share/roundcubemail/logs
Create a roundcubemail.conf configuration file with nano editor:
nano /etc/httpd/conf.d/roundcubemail.conf
And add the following content to that file:
#
# Round Cube Webmail is a browser-based multilingual IMAP client
#

Alias /roundcubemail /usr/share/roundcubemail
Alias /webmail /usr/share/roundcubemail

# Define who can access the Webmail
# You can enlarge permissions once configured

<Directory /usr/share/roundcubemail/>
        Options none
        AllowOverride Limit
        Require all granted
</Directory>

# Define who can access the installer
# keep this secured once configured

<Directory /usr/share/roundcubemail/installer>
        Options none
        AllowOverride Limit
        Require all granted
</Directory>


# Those directories should not be viewed by Web clients.
<Directory /usr/share/roundcubemail/bin/>
    Order Allow,Deny
    Deny from all
</Directory>
<Directory /usr/share/roundcubemail/plugins/enigma/home/>
    Order Allow,Deny
    Deny from all
</Directory>
Starten Sie Apache neu:
systemctl restart httpd.service
Now we need a database for RoundCube mail, we will initialize it as follows:
mysql -u root -p
At MariaDB prompt use:
CREATE DATABASE roundcubedb;
CREATE USER [email protected] IDENTIFIED BY 'roundcubepassword';
GRANT ALL PRIVILEGES on roundcubedb.* to [email protected] ;
FLUSH PRIVILEGES;
exit
I am using the details for the RoundCube database as an example, please replace the values as per your choice for security reasons.
Now we will install RoundCube in the browser at http://192.168.0.100/roundcubemail/installer
Now create the config.inc.php file:
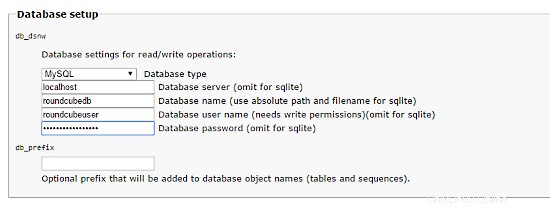
nano /usr/share/roundcubemail/config/config.inc.php
<?php

/* Local configuration for Roundcube Webmail */

// ----------------------------------
// SQL DATABASE
// ----------------------------------
// Database connection string (DSN) for read+write operations
// Format (compatible with PEAR MDB2): db_provider://user:[email protected]/database
// Currently supported db_providers: mysql, pgsql, sqlite, mssql, sqlsrv, oracle
// For examples see http://pear.php.net/manual/en/package.database.mdb2.intro-dsn.php
// NOTE: for SQLite use absolute path (Linux): 'sqlite:////full/path/to/sqlite.db?mode=0646'
// or (Windows): 'sqlite:///C:/full/path/to/sqlite.db'
$config['db_dsnw'] = 'mysql://roundcubeuser:[email protected]/roundcubedb';

// ----------------------------------
// IMAP
// ----------------------------------
// The IMAP host chosen to perform the log-in.
// Leave blank to show a textbox at login, give a list of hosts
// to display a pulldown menu or set one host as string.
// To use SSL/TLS connection, enter hostname with prefix ssl:// or tls://
// Supported replacement variables:
// %n - hostname ($_SERVER['SERVER_NAME'])
// %t - hostname without the first part
// %d - domain (http hostname $_SERVER['HTTP_HOST'] without the first part)
// %s - domain name after the '@' from e-mail address provided at login screen
// For example %n = mail.domain.tld, %t = domain.tld
// WARNING: After hostname change update of mail_host column in users table is
// required to match old user data records with the new host.
$config['default_host'] = 'localhost';
$config['smtp_server'] = 'localhost';
$config['smtp_port'] = 25;

// provide an URL where a user can get support for this Roundcube installation
// PLEASE DO NOT LINK TO THE ROUNDCUBE.NET WEBSITE HERE!
$config['support_url'] = '';

// This key is used for encrypting purposes, like storing of imap password
// in the session. For historical reasons it's called DES_key, but it's used
// with any configured cipher_method (see below).
$config['des_key'] = 'pb0UucO0eqjgvhrqYlFTBVjE';

// ----------------------------------
// PLUGINS
// ----------------------------------
// List of active plugins (in plugins/ directory)
$config['plugins'] = array();

// Set the spell checking engine. Possible values:
// - 'googie' - the default (also used for connecting to Nox Spell Server, see 'spellcheck_uri' setting)
// - 'pspell' - requires the PHP Pspell module and aspell installed
// - 'enchant' - requires the PHP Enchant module
// - 'atd' - install your own After the Deadline server or check with the people at http://www.afterthedeadline.com before using their API
// Since Google shut down their public spell checking service, the default settings
// connect to http://spell.roundcube.net which is a hosted service provided by Roundcube.
// You can connect to any other googie-compliant service by setting 'spellcheck_uri' accordingly.
$config['spellcheck_engine'] = 'pspell';
$config['enable_installer'] = true;
Then press "continue" in the web installer. On the following page, press on the button "Initialize database".
Finally, disable the Roundecubemail installer. Change the RoundCube config.inc.php configuration file
nano /usr/share/roundcubemail/config/config.inc.php
and change the line:
$config['enable_installer'] = true;
to:
$config['enable_installer'] = false;
Roundcube is available now under the aliases /webmail and /roundcubemail on your server:
http://192.168.0.100/webmail
The RoundCube login is the email address and password of an email account that you create later in ISPConfig.
22 Install ISPConfig 3.2
The ISPConfig installer will configure all services like Postfix, Dovecot, etc. for you.
You now also have the possibility to let the installer create an SSL vhost for the ISPConfig control panel so that ISPConfig can be accessed using https:// instead of http://. To achieve this, just press ENTER when you see this question:Do you want a secure (SSL) connection to the ISPConfig web interface (y,n) [y]:.
To install ISPConfig 3.2 nightly build, do this:
cd /tmp
wget -O ispconfig.tar.gz https://www.ispconfig.org/downloads/ISPConfig-3-stable.tar.gz
tar xfz ispconfig.tar.gz
cd ispconfig3*/install/
The next step is to run:
php -q install.php
Dadurch wird das ISPConfig 3-Installationsprogramm gestartet. Der Installer konfiguriert alle Dienste wie Postfix, Dovecot usw. für Sie.
[[email protected] install]# php install.php
--------------------------------------------------------------------------------
_____ ___________ _____ __ _ ____
|_ _/ ___| ___ \ / __ \ / _(_) /__ \
| | \ `--.| |_/ / | / \/ ___ _ __ | |_ _ __ _ _/ /
| | `--. \ __/ | | / _ \| '_ \| _| |/ _` | |_ |
_| |_/\__/ / | | \__/\ (_) | | | | | | | (_| | ___\ \
\___/\____/\_| \____/\___/|_| |_|_| |_|\__, | \____/
__/ |
|___/
--------------------------------------------------------------------------------
>> Initial configuration
Operating System: CentOS 8.2
Following will be a few questions for primary configuration so be careful.
Default values are in [brackets] and can be accepted with <ENTER>.
Tap in "quit" (without the quotes) to stop the installer.
Select language (en,de) [en]: <-- Hit Enter
Installation mode (standard,expert) [standard]: <-- Hit Enter
Full qualified hostname (FQDN) of the server, eg server1.domain.tld [server1.example.com]: <-- Hit Enter
MySQL server hostname [localhost]: <-- Hit Enter
MySQL server port [3306]: <-- Hit Enter
MySQL root username [root]: <-- Hit Enter
MySQL root password []: <-- Ente the MySQL root password here
MySQL database to create [dbispconfig]: <-- Hit Enter
MySQL charset [utf8]: <-- Hit Enter
Configuring Postgrey
Configuring Postfix
Generating a 4096 bit RSA private key
................................++
.....................................................................................................................................................................................................................................................................................................................................................++
writing new private key to 'smtpd.key'
-----
You are about to be asked to enter information that will be incorporated
into your certificate request.
What you are about to enter is what is called a Distinguished Name or a DN.
There are quite a few fields but you can leave some blank
For some fields there will be a default value,
If you enter '.', the field will be left blank.
-----
Country Name (2 letter code) [XX]: <-- Enter 2 Letter country code, e.g. US
State or Province Name (full name) []: <-- Enter anme of State or Province
Locality Name (eg, city) [Default City]: <-- Name of city
Organization Name (eg, company) [Default Company Ltd]: <-- Company name
Organizational Unit Name (eg, section) []: <-- Hit Enter
Common Name (eg, your name or your server's hostname) []: <-- Enter server hostname here, in my case: server1.example.com
Email Address []: <-- Enter Email address
Configuring mailman
Configuring Dovecot
Configuring Spamassassin
Configuring Amavisd
Configuring Getmail
Configuring Jailkit
Configuring Pureftpd
Configuring BIND
Configuring Apache
Configuring vlogger
[INFO] service OpenVZ not detected
Configuring Bastille Firewall
[INFO] service Metronome XMPP Server not detected
Configuring Fail2ban
Configuring Apps vhost
Installing ISPConfig
ISPConfig Port [8080]: <-- Hit Enter
Admin password [fad579a6]: <-- Enter new password for ISPConfig admin user
Re-enter admin password []: <-- Repeat the password
Do you want a secure (SSL) connection to the ISPConfig web interface (y,n) [y]: <-- Hit Enter
Generating RSA private key, 4096 bit long modulus
.................................................................................++
.....++
e is 65537 (0x10001)
You are about to be asked to enter information that will be incorporated
into your certificate request.
What you are about to enter is what is called a Distinguished Name or a DN.
There are quite a few fields but you can leave some blank
For some fields there will be a default value,
If you enter '.', the field will be left blank.
-----
Country Name (2 letter code) [XX]: <-- Enter 2 Letter country code, e.g. US
State or Province Name (full name) []: <-- Enter anme of State or Province
Locality Name (eg, city) [Default City]: <-- Name of city
Organization Name (eg, company) [Default Company Ltd]: <-- Company name
Organizational Unit Name (eg, section) []: <-- Hit Enter
Common Name (eg, your name or your server's hostname) []: <-- Enter server hostname here, in my case: server1.example.com
Email Address []: <-- Enter Email address
Please enter the following 'extra' attributes
to be sent with your certificate request
A challenge password []: <-- Hit Enter
An optional company name []: <-- Hit Enter
writing RSA key
Configuring DBServer
Installing ISPConfig crontab
Installing ISPConfig crontab
no crontab for root
no crontab for getmail
Detect IP addresses
Restarting services ...
Installation completed.
Das Installationsprogramm konfiguriert automatisch alle zugrunde liegenden Dienste, sodass keine manuelle Konfiguration erforderlich ist.
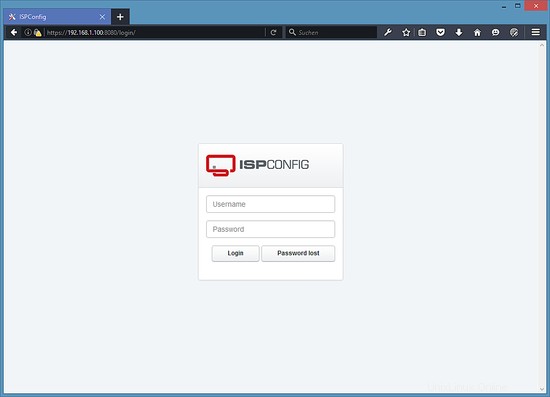
23 First ISPConfig Login
Afterwards you can access ISPConfig 3 under http(s)://server1.example.com:8080/ or http(s)://192.168.0.100:8080/ (http or https depends on what you chose during installation).
Log in with the username admin and the password admin (you should change the default password after your first login):
23.1 The ISPConfig 3 Manual
In order to learn how to use ISPConfig 3, I strongly recommend downloading the ISPConfig 3 Manual.
On more than 300 pages, it covers the concept behind ISPConfig (admin, resellers, clients), explains how to install and update ISPConfig 3, includes a reference for all forms and form fields in ISPConfig together with examples of valid inputs, and provides tutorials for the most common tasks in ISPConfig 3. It also lines out how to make your server more secure and comes with a troubleshooting section at the end.
24 Download as a virtual machine
Dieses Setup ist als Download einer virtuellen Maschine im ova/ovf-Format (kompatibel mit VMWare und Virtualbox) für howtoforge-Abonnenten verfügbar.
Anmeldedaten für die VM
- The root password is:howtoforge
- The password of the ISPConfig "admin" user is: howtoforge
- There is another shell user with the name "howtoforge" and password:howtoforge
Bitte ändern Sie beide Passwörter bei der ersten Anmeldung.
- The IP address of the VM is 192.168.0.100
25 Links
- CentOS:http://www.centos.org/
- ISPConfig:http://www.ispconfig.org/