
In diesem Tutorial zeigen wir Ihnen, wie Sie Sentora auf Ihrem Ubuntu 14.04 installieren und konfigurieren. Für diejenigen unter Ihnen, die es nicht wussten, Sentora ist ein Open-Source-Webhosting-Kontrollfeld speziell entwickelt, um auf einer Vielzahl von Linux-Distributionen zu funktionieren. Sentora ist ein voll ausgestattetes, kostenloses Hosting-Control-Panel, mit dem Sie Ihren Server über seine benutzerfreundliche Oberfläche einfach verwalten können. Es ist einfach zu installieren und enthält alle Software, die Sie benötigen um mehrere Websites und Clients auf einem einzigen Server zu verwalten.
In diesem Artikel wird davon ausgegangen, dass Sie zumindest über Grundkenntnisse in Linux verfügen, wissen, wie man die Shell verwendet, und vor allem, dass Sie Ihre Website auf Ihrem eigenen VPS hosten. Die Installation ist recht einfach. Das werde ich tun zeigen Ihnen die Schritt-für-Schritt-Installation des Sentora-Webhosting-Panels auf dem Ubuntu 14.04-Server.
Voraussetzungen
- Ein Server, auf dem eines der folgenden Betriebssysteme ausgeführt wird:Ubuntu 14.04 und jede andere Debian-basierte Distribution wie Linux Mint.
- Es wird empfohlen, dass Sie eine neue Betriebssysteminstallation verwenden, um potenziellen Problemen vorzubeugen.
- SSH-Zugriff auf den Server (oder öffnen Sie einfach das Terminal, wenn Sie sich auf einem Desktop befinden).
- Ein
non-root sudo useroder Zugriff auf denroot user. Wir empfehlen, alsnon-root sudo userzu agieren , da Sie Ihr System beschädigen können, wenn Sie als Root nicht aufpassen.
Installieren Sie Sentora auf Ubuntu 14.04
Schritt 1. Stellen Sie zunächst sicher, dass alle Pakete auf dem neuesten Stand sind.
apt-get update
apt-get upgrade
Schritt 2. Laden Sie das Installationsskript Sentora herunter.
Sentora befindet sich nicht im Repository und ist nicht für die Installation verfügbar, daher müssen wir das Installationsskript aus dem Internet herunterladen:
wget http://sentora.org/install
chmod +x install
Führen Sie das Installationsskript mit dem folgenden Befehl aus:
./install
############################################################
# Welcome to the Official Sentora Installer 1.0.1 #
############################################################
Checking that minimal requirements are ok
Detected : CentOs 7 x86_64
Ok.
DB server will be mariaDB
-- Installing wget and dns utils required to manage inputs
Loaded plugins: fastestmirror
Loading mirror speeds from cached hostfile
* base: mirrors.psychz.net
* extras: mirror.keystealth.org
* updates: mirrors.easynews.com
No packages marked for update
Package 32:bind-utils-9.9.4-14.el7_0.1.x86_64 already installed and latest version
Package wget-1.14-10.el7_0.1.x86_64 already installed and latest version
Preparing to select timezone, please wait a few seconds...
Package tzdata-2015a-1.el7_0.noarch already installed and latest version
Please identify a location so that time zone rules can be set correctly.
Please select a continent or ocean.
1) Africa
2) Americas
3) Antarctica
4) Arctic Ocean
5) Asia
6) Atlantic Ocean
7) Australia
8) Europe
9) Indian Ocean
10) Pacific Ocean
11) none - I want to specify the time zone using the Posix TZ format.
#? 2
Please select a country.
1) Anguilla
2) Antigua & Barbuda
3) Argentina
4) Aruba
5) Bahamas
6) Barbados
7) Belize
8) Bolivia
9) Brazil
10) Canada
11) Caribbean Netherlands
12) Cayman Islands
13) Chile
14) Colombia
15) Costa Rica
16) Cuba
17) Curacao
18) Dominica
19) Dominican Republic
20) Ecuador
21) El Salvador
22) French Guiana
23) Greenland
24) Grenada
25) Guadeloupe
26) Guatemala
27) Guyana
28) Haiti
29) Honduras
30) Jamaica
31) Martinique
32) Mexico
33) Montserrat
34) Nicaragua
35) Panama
36) Paraguay
37) Peru
38) Puerto Rico
39) St Barthelemy
40) St Kitts & Nevis
41) St Lucia
42) St Maarten (Dutch part)
43) St Martin (French part)
44) St Pierre & Miquelon
45) St Vincent
46) Suriname
47) Trinidad & Tobago
48) Turks & Caicos Is
49) United States
50) Uruguay
51) Venezuela
52) Virgin Islands (UK)
53) Virgin Islands (US)
#? 49
Please select one of the following time zone regions.
1) Eastern Time
2) Eastern Time - Michigan - most locations
3) Eastern Time - Kentucky - Louisville area
4) Eastern Time - Kentucky - Wayne County
5) Eastern Time - Indiana - most locations
6) Eastern Time - Indiana - Daviess, Dubois, Knox & Martin Counties
7) Eastern Time - Indiana - Pulaski County
8) Eastern Time - Indiana - Crawford County
9) Eastern Time - Indiana - Pike County
10) Eastern Time - Indiana - Switzerland County
11) Central Time
12) Central Time - Indiana - Perry County
13) Central Time - Indiana - Starke County
14) Central Time - Michigan - Dickinson, Gogebic, Iron & Menominee Counties
15) Central Time - North Dakota - Oliver County
16) Central Time - North Dakota - Morton County (except Mandan area)
17) Central Time - North Dakota - Mercer County
18) Mountain Time
19) Mountain Time - south Idaho & east Oregon
20) Mountain Standard Time - Arizona (except Navajo)
21) Pacific Time
22) Pacific Standard Time - Annette Island, Alaska
23) Alaska Time
24) Alaska Time - Alaska panhandle
25) Alaska Time - southeast Alaska panhandle
26) Alaska Time - Alaska panhandle neck
27) Alaska Time - west Alaska
28) Aleutian Islands
29) Hawaii
#? 1
The following information has been given:
United States
Eastern Time
Therefore TZ='America/New_York' will be used.
Local time is now: Mon May 4 10:00:00 EDT 2015.
Universal Time is now: Mon May 4 15:00:00 UTC 2015.
Is the above information OK?
1) Yes
2) No
#? 1
=== Informations required to build your server ===
The installer requires 2 pieces of information:
1) the sub-domain that you want to use to access Sentora panel,
- do not use your main domain (like domain.com)
- use a sub-domain, e.g panel.domain.com
- or use the server hostname, e.g server1.domain.com
- DNS must already be configured and pointing to the server IP
for this sub-domain
2) The public IP of the server.
Enter the sub-domain you want to access Sentora panel: sentora.lecturesnippets.com
Enter (or confirm) the public IP for this server: 192.168.8.323
OK: DNS successfully resolves sentora.lecturesnippets.com to 192.168.8.323
All is ok. Do you want to install Sentora now (y/n)? y
Daemon run complete! (10:10 4th May 2015 EDT)
Restarting mariadb
Restarting httpd
Restarting postfix
Restarting dovecot
Restarting crond
Restarting named
Restarting proftpd
Restarting atd
########################################################
Congratulations Sentora has now been installed on your
server. Please review the log file left in /root/ for
any errors encountered during installation.
Login to Sentora at http://yourdomain.com
Sentora Username : idroot
Sentora Password : idrootnet323
MySQL Root Password : asdf1234CHEDELICS
MySQL Postfix Password : OOIUERN5622MM44ES
MySQL ProFTPd Password : JJK98SXMN1F2KOPe
MySQL Roundcube Password : aQSGm105yPwTCOpD
(theses passwords are saved in /root/passwords.txt)
########################################################
Restart your server now to complete the install (y/n)? y
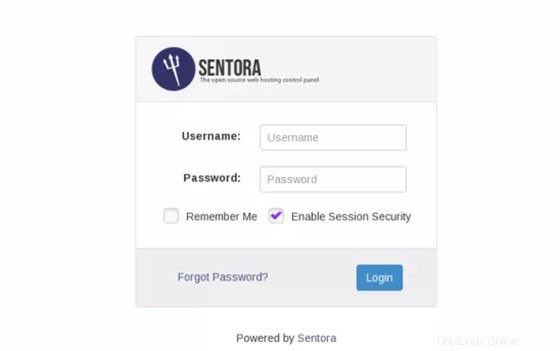
Schritt 3. Zugriff auf Sentora.
Sentora ist standardmäßig auf HTTP-Port 80 verfügbar. Öffnen Sie Ihren bevorzugten Browser und navigieren Sie zu http://yourdomain.com oder http://your-server-ip . Verwenden Sie den vom Installationsskript generierten Benutzernamen/Passwort, um sich anzumelden. Sobald Sie sich angemeldet haben, können Sie mit der Erstellung neuer Domains, Webhostings und E-Mail-Hostings beginnen. Wenn Sie eine Firewall verwenden, öffnen Sie bitte Port 80, um den Zugriff auf das Control Panel zu ermöglichen.
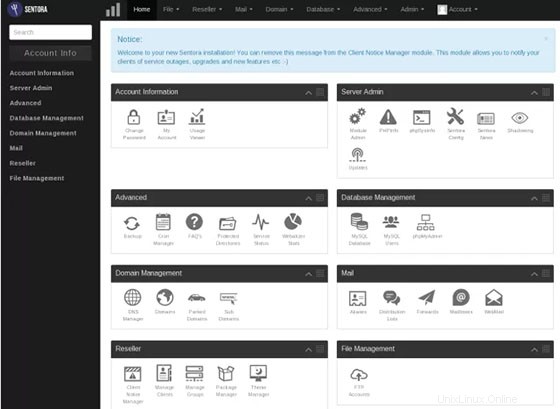
Herzlichen Glückwunsch! Sie haben Sentora erfolgreich installiert. Vielen Dank, dass Sie dieses Tutorial zur Installation des Sentora-Webhosting-Panels im Ubuntu 14.04-System verwendet haben. Für zusätzliche Hilfe oder nützliche Informationen empfehlen wir Ihnen, die offizielle Sentora-Website zu besuchen .