Auf dieser Seite das DNS-Protokoll und der BIND DNS-Server werden ebenso erklärt wie das Webmin-Modul zum Erstellen und Verwalten von DNS-Domains.
- Siehe Einführung in das Domain Name System
Inhalt
Das BIND-DNS-Servermodul
BIND (Berkeley Internet Name Domain) ist der gebräuchlichste DNS-Server für Unix-Systeme. Im Laufe der Jahre wurden mehrere Versionen veröffentlicht, die neueste war Version 9. Das BIND-DNS-Servermodul (zu finden in der Kategorie Server) unterstützt die Konfiguration der Versionen 8 und 9. Die ältere Version 4 hat ein anderes Konfigurationsdateiformat und kann dies mit dem BIND 4 DNS-Servermodul konfiguriert werden, das in einem späteren Abschnitt dieses Kapitels dokumentiert wird.
Da BIND für fast alle Unix-Systeme verfügbar ist und unabhängig vom Betriebssystem identisch funktioniert, gelten die Anweisungen in diesem Kapitel nicht nur für Linux, sondern auch für andere Unix-Versionen. Die meisten Versionen von Unix und Linux enthalten BIND 8 oder 9 als Standardpaket, sodass es selten notwendig ist, es zu installieren. Wenn das Modul den DNS-Server nicht finden kann, wird auf der Hauptseite eine Fehlermeldung angezeigt. Suchen Sie in diesem Fall auf Ihrer Betriebssystem-CD oder Website nach einem BIND-Paket oder laden Sie den Quellcode von http://www.isc herunter und kompilieren Sie ihn .org/.
Die primäre Konfigurationsdatei von BIND ist /etc/named.conf, die alle Zonen enthält, die der Server hostet, sowie globale Konfigurationseinstellungen, die für alle Zonen gelten. Die Datensätze in jeder Zone werden in separaten Dateien gespeichert, die normalerweise im Verzeichnis /var/named zu finden sind. Dieses Webmin-Modul aktualisiert alle diese Dateien immer direkt, anstatt mit dem laufenden BIND-Prozess zu kommunizieren. Das bedeutet, wenn Sie ein anderes Programm ausführen, das Zonen dynamisch aktualisiert, indem es mit BIND kommuniziert (z. B. ein DHCP-Server), dann sollte dieses Modul nicht verwendet werden, da es diese Änderungen stören könnte. Allerdings haben nur sehr wenige Systeme diese Art der dynamischen Aktualisierung aktiviert.
Version 9 von BIND hat einige Funktionen, die Version 8 nicht hat. Das wichtigste, das von diesem Webmin-Modul unterstützt wird, sind Ansichten. Eine Ansicht ist eine Gruppe von Zonen, die nur für einige DNS-Clients sichtbar sind. Normalerweise sehen alle Clients dieselben Zonen, aber mit BIND 9 können Sie die Sichtbarkeit einiger Domänen auf nur bestimmte Clients beschränken, die durch ihre IP-Adressen identifiziert werden. Dies kann nützlich sein, um Zonen zu erstellen, die nur für Systeme in einem internen Netzwerk sichtbar sind, selbst wenn Ihr DNS-Server mit dem Internet verbunden ist.
Wenn Sie BIND noch nie auf Ihrem System eingerichtet haben, zeigt die Hauptseite beim ersten Aufrufen des Moduls ein Formular zum Einrichten des DNS-Servers, wie unten gezeigt. Dieses Formular wird nur angezeigt, wenn Webmin feststellt, dass die Konfigurationsdatei named.conf nicht existiert, oder wenn das angegebene Zonendateiverzeichnis nicht existiert. Wenn Sie sicher sind, dass Ihre BIND-Konfiguration gültig ist und der DNS-Server bereits läuft, klicken Sie nicht auf Erstellen klicken, da Ihre named.conf-Datei überschrieben wird. Klicken Sie stattdessen auf Modulkonfiguration Link und überprüfen Sie, ob alle Pfade für Ihr System korrekt sind.
-
 Bind-Installation
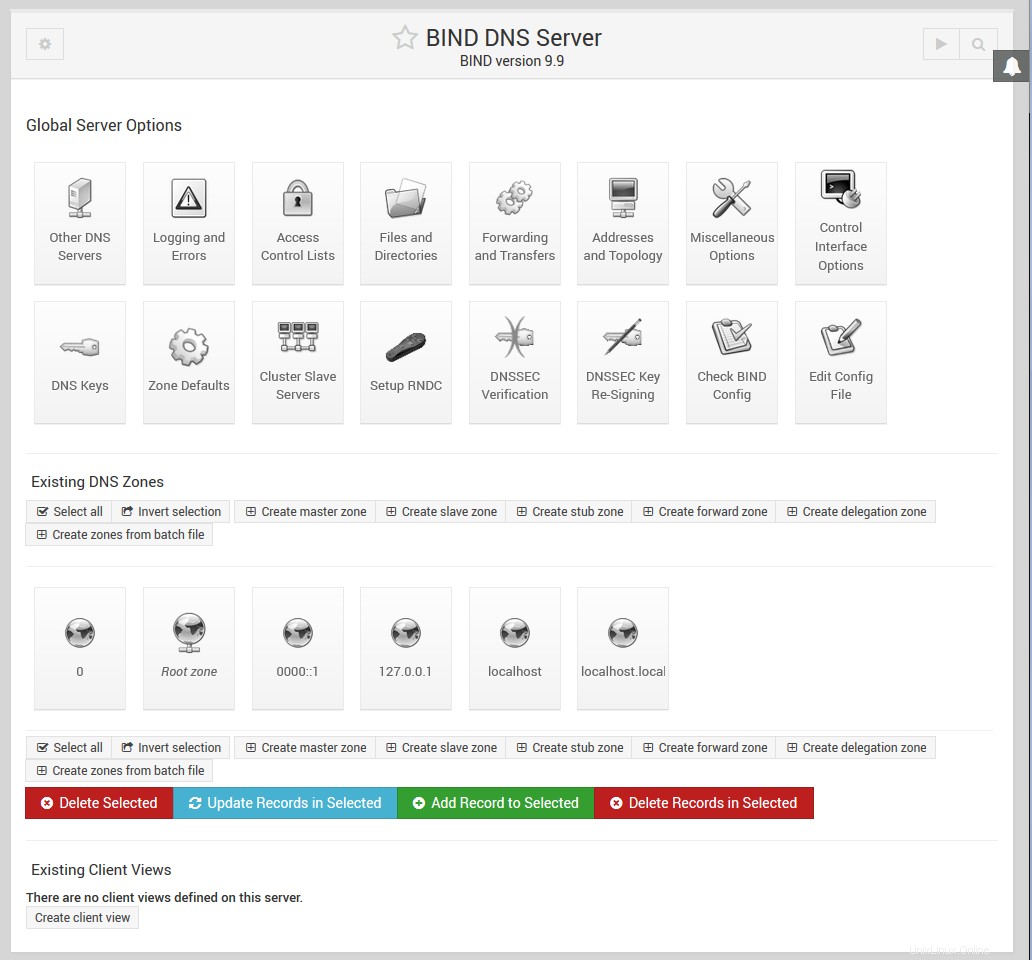
Wenn BIND auf Ihrem System eingerichtet wurde, erscheint die Hauptseite wie im Screenshot unten gezeigt. Oben befindet sich eine Tabelle mit Symbolen zum Einstellen globaler Optionen, die für Ihren gesamten DNS-Server gelten. Darunter befinden sich Symbole für jede der Zonen, die Ihr Server hostet, gefolgt von Symbolen für Ansichten, wenn Sie BIND Version 9 ausführen. Ganz unten befinden sich Schaltflächen zum Anwenden der aktuellen DNS-Konfiguration oder zum Starten des BIND-Servers.
Wenn Sie BIND gerade zum ersten Mal eingerichtet haben, wird es wahrscheinlich nur ein Zonensymbol geben - die Root-Zone. Einige Linux-Distributionen, die ein BIND-Paket enthalten, enthalten eine grundlegende Konfigurationsdatei, die Zonen wie localdomain und 127.0.0 definiert, die zum Auflösen des localhost- und 127.0.0.l-Loopback-Hostnamens und der IP-Adresse verwendet werden.
-
 Hauptseite des DNS-Servers binden
Erstellen einer neuen Masterzone
Eine Masterzone ist eine Zone, für die Ihr DNS-Server die maßgebliche Informationsquelle ist. Eine einzelne Zone kann von mehreren Servern gehostet werden, aber nur einer ist der Master – alle anderen sind Slaves. Wenn Sie Ihrer Serverkonfiguration eine neue Masterzone hinzufügen möchten, gehen Sie wie folgt vor:
- Legen Sie einen Namen für die neue Zone fest, z. B. example.com oder internal. Wenn dies eine Internetdomäne sein soll, die für alle anderen auf der Welt sichtbar sein wird, darf der Domänenname noch nicht von jemand anderem registriert worden sein. Sie können es jedoch normalerweise nicht selbst registrieren, bis Ihr DNS-Server dafür eingerichtet wurde, es zu hosten.
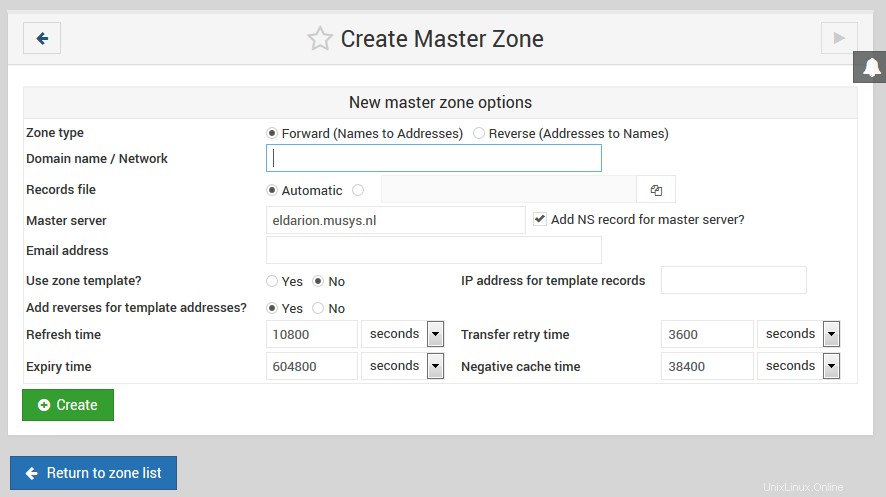
- Klicken Sie auf der Hauptseite des Moduls auf Neue Masterzone erstellen Link unter der Tabelle der bestehenden Zonen. Dadurch gelangen Sie auf die im Bild unten gezeigte Seite, auf der Sie die Details der neuen Zone eingeben können.
- Wenn dies eine Weiterleitungszone wie example.com oder foo.com.au sein soll, belassen Sie den Zonentyp Feld auf Weiterleiten gesetzt . Wenn es sich jedoch um eine Reverse-Zone zum Suchen von Hostnamen aus IP-Adressen handelt, setzen Sie das Feld auf Reverse .
- Im Bereich Domänenname / Netzwerk geben Sie den Namen der Zone ohne nachgestellten Punkt ein. Geben Sie für eine Reverse Zone einfach die Netzwerkadresse wie 192.168.1 ein. Webmin konvertiert diese automatisch für Sie in das in-addr.arpa-Format, wenn die Domain erstellt wird.
- Die Aufzeichnungsdatei Das Feld steuert, wo die Konfigurationsdatei mit den Datensätzen der Zone gespeichert wird. Wenn Sie es auf Automatisch eingestellt lassen , wird der Dateiname automatisch basierend auf der Konfiguration des Moduls und der Verzeichniseinstellung in der Datei named.conf bestimmt. Dies ist normalerweise die beste Option, da dies dazu führt, dass die Datensatzdatei im selben Verzeichnis wie alle vorhandenen Zonen erstellt wird, z. B. /var/named. Wenn Sie jedoch Automatisch deaktivieren Option auswählen und stattdessen einen Dateinamen eingeben, werden alle Datensätze für die Zone in diese Datei geschrieben. Wenn Sie den Namen einer bestehenden Datei eingeben, wird diese beim Erstellen der Domain überschrieben.
- Auf dem Master-Server Geben Sie im Feld den vollständigen Domänennamen des Master-DNS-Servers für diese Zone ein. Dies muss der kanonische Name Ihres Systems sein, z. B. server.example.com, kein Kurzname wie server. Dieser Server (und die Werte aus dem nächsten
- -Felder) werden verwendet, um den SOA-Eintrag der neuen Zone zu erstellen.
- In der E-Mail-Adresse Geben Sie im Feld die Adresse des Verantwortlichen für diese Zone ein. Sie können das @-Symbol in der Adresse verwenden, das Webmin automatisch in einen Punkt umwandelt, um es in den SOA-Eintrag aufzunehmen.
- Die Aktualisierungszeit Feld bestimmt, wie oft sekundäre Server bei diesem Masterserver nach Updates für die Zone suchen sollen. Der Standardwert ist angemessen, aber Sie können ihn für Zonen erhöhen, die sich selten ändern, oder ihn für Zonen verringern, die häufig aktualisiert werden.
- Die Wiederholungszeit für die Übertragung legt fest, wie lange ein sekundärer Server nach einer fehlgeschlagenen Zonenübertragung warten soll, bevor er es erneut versucht.
- Die Ablaufzeit Das Feld steuert die maximale Zeitspanne, für die ein sekundärer DNS-Server für die Zone Datensätze zwischenspeichern sollte, bevor er sie erneut vom Master überträgt.
- Die Standardgültigkeitsdauer -Feld bestimmt die TTL von Datensätzen in der Zone, die nicht explizit einen Satz haben.
- Klicken Sie auf Erstellen Schaltfläche unten auf der Seite. Sofern das Formular korrekt ausgefüllt wurde und die Zone noch nicht auf Ihrem Server existiert, gelangen Sie auf eine Seite zum Hinzufügen neuer Einträge zur Zone.
- Kehren Sie zur Hauptseite des Moduls zurück, die jetzt ein Symbol für Ihre neue Zone enthält, und klicken Sie auf Änderungen übernehmen Schaltfläche unten, um sie zu aktivieren.
- Masterzone erstellen.png
Eine neu erstellte Zone enthält nur einen Datensatz (es sei denn, Sie haben eine Vorlage eingerichtet). Um weitere hinzuzufügen, befolgen Sie die Anweisungen im nächsten Abschnitt. Nachdem Sie die grundlegenden Einträge in Ihrer Domain eingerichtet haben, können Sie sie bei der Behörde registrieren, die die übergeordnete Domain verwaltet, z. B. .com oder .com.au. Einige Domänenautoritäten erlauben Ihnen nicht, Zonen zu registrieren, die nicht mindestens zwei Server (einen Master und einen Slave) und Nameserver-Einträge in der Zone für diese Server haben.
Hinzufügen und Bearbeiten von Datensätzen
-
 Binden - Master-Zone bearbeiten
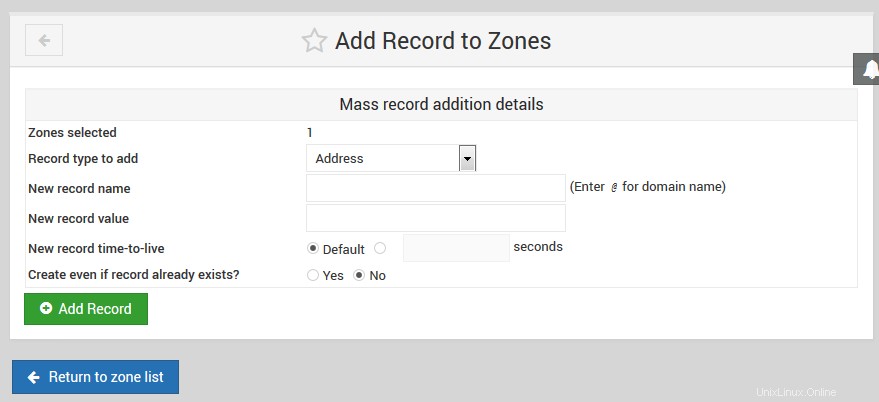
Die nützlichste Funktion des BIND-DNS-Servermoduls ist die Möglichkeit, Datensätze in den von Ihrem Server gehosteten Masterzonen hinzuzufügen, zu bearbeiten und zu löschen. Wenn Sie beispielsweise einen Webserver in Ihrer Domäne example.com einrichten möchten, müssen Sie einen Adressdatensatz für www.example.com mit der IP-Adresse des Servers hinzufügen. Um einen neuen Datensatz wie diesen hinzuzufügen, gehen Sie wie folgt vor:
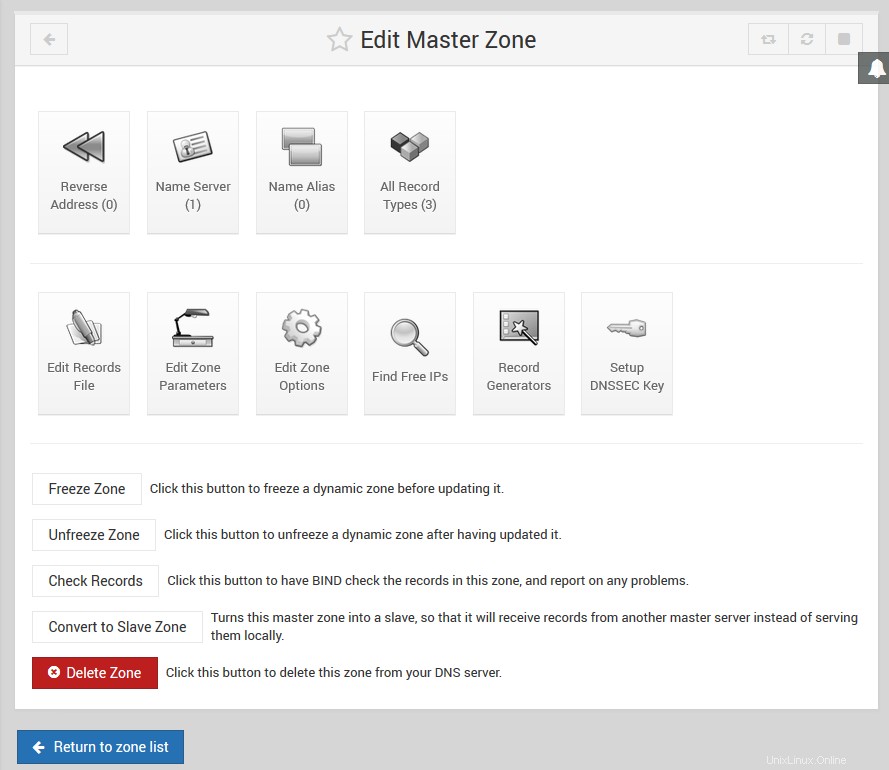
- Klicken Sie auf der Hauptseite des Moduls auf das Symbol für die Zone, der Sie etwas hinzufügen möchten. Dadurch wird die unten gezeigte Seite angezeigt, auf der sich oben eine Tabelle mit Symbolen befindet, eines für jeden Datensatztyp.
- Klicken Sie auf das Symbol für den Datensatztyp, den Sie hinzufügen möchten. Der gebräuchlichste Typ ist Adresse , das eine IP-Adresse mit einem Hostnamen verknüpft. Siehe #Datensatztypen Abschnitt unten für eine vollständige Liste aller unterstützten Datensatztypen.
- Wenn Sie auf das Symbol klicken, gelangen Sie zu einer Seite, auf der alle vorhandenen Datensätze dieses Typs aufgelistet sind. Oberhalb der Liste befindet sich ein Formular zur Eingabe eines neuen Datensatzes.
- Im Namen Geben Sie im Feld den Namen des neuen Datensatzes relativ zum Zonennamen ein. Wenn Sie beispielsweise den Eintrag www.example.com hinzufügen möchten, geben Sie einfach www ein . Es ist auch möglich, den vollständigen Datensatznamen einzugeben, solange er einen Punkt am Ende hat, um anzuzeigen, dass er nicht relativ zur Zone ist. Geben Sie nicht nur www.example.com ein , da es in www.example.com.example.com konvertiert wird, was wahrscheinlich nicht das ist, was Sie wollen.
- Wenn sich dieser Rekord häufiger als der Rest der Zone ändern wird, ändern Sie die Time-To-Live Feld von Standard auf die geschätzte Zeit zwischen Änderungen. Dies bestimmt, wie lange DNS-Clients und andere Server den Datensatz zwischenspeichern.
- Wenn Sie einen Adressdatensatz hinzufügen, geben Sie die vollständige IP-Adresse des Hosts in die Adresse ein Feld. In der folgenden Tabelle finden Sie eine Beschreibung der Felder, die beim Hinzufügen anderer Datensatztypen angezeigt werden, und deren Bedeutung.
- Das Feld Rückgängig aktualisieren? wird nur angezeigt, wenn ein Adressdatensatz hinzugefügt wird. Es steuert die automatische Erstellung eines entsprechenden Datensatzes in einer Rückwärtszone, der den Hostnamen mit der IP-Adresse verknüpft. Dies ist natürlich nur möglich, wenn sich die von Ihnen eingegebene IP in einem Netzwerk befindet, für das Ihr System der primäre Reverse-DNS-Server ist. Dadurch bleiben die Vorwärts- und Rückwärtszonen synchronisiert, was sehr nützlich sein kann. Wenn Ja ausgewählt ist, wird ein Reverse-Adressdatensatz hinzugefügt, sofern nicht bereits einer in der Reverse-Zone für dieselbe IP-Adresse vorhanden ist. Oft haben viele Hostnamen dieselbe IP, wie sie beispielsweise für namensbasiertes virtuelles Hosting verwendet werden. In solchen Fällen möchten Sie die umgekehrte Zuordnung nicht ändern, wenn bereits eine vorhanden ist. Die Option *Ja (und vorhandene ersetzen)* funktioniert genauso wie Ja , aber wenn bereits ein umgekehrter Datensatz für die IP-Adresse vorhanden ist, wird er mit dem neuen Hostnamen aktualisiert. Dies kann nützlich sein, wenn Sie wissen, dass Sie einen vorhandenen Datensatz ersetzen möchten. Wenn Nein ausgewählt ist, wird keine umgekehrte Adresse erstellt, auch wenn dies möglich ist.
- Wenn Sie das Formular ausgefüllt haben, klicken Sie auf Erstellen Knopf unten. Solange es korrekt ausgefüllt ist, wird der Datensatz der Liste unter dem Formular hinzugefügt. Beim Schreiben in die Datensatzdatei der Zone verwendet Webmin das vollständige kanonische Format für den Datensatznamen, z. B. www.example.com., selbst wenn Sie nur www eingeben.
- Um den neuen Eintrag zu aktivieren, damit er von DNS-Clients und anderen Servern nachgeschlagen werden kann, müssen Sie auf Änderungen übernehmen klicken Schaltfläche auf der Hauptseite des Moduls. Wenn Sie vorhaben, mehrere Datensätze hinzuzufügen oder zu bearbeiten, ist es normalerweise besser zu warten, bis alle Änderungen abgeschlossen sind, bevor Sie auf die Schaltfläche „Übernehmen“ klicken. Wenn es verfügbar ist, können Sie stattdessen Änderungen anwenden verwenden Schaltfläche unten auf der unten gezeigten Masterzonenseite. Dies verwendet den ndc-Befehl, um BIND anzuweisen, nur die Datei für diese Zone erneut zu lesen, was auf einem System, das eine große Anzahl von Domänen hostet, viel schneller sein kann.
-
 Binden – Datensatz zu Zonen hinzufügen
Obwohl sich die obigen Anweisungen auf das Hinzufügen eines Adressdatensatzes konzentrieren, ist der Prozess zum Hinzufügen anderer Datensatztypen zu einer Weiterleitungszone fast identisch. Die Aktualisierung umkehren? Feld existiert nicht, und die Adresse Feld wird durch ein oder mehrere andere Felder ersetzt. Die Datensatztypen Im folgenden Abschnitt wird detailliert erläutert, welche Felder für jeden Datensatztyp verfügbar sind, der Webmin bekannt ist.
Beim Hinzufügen eines Reverse Address-Datensatzes zu einer Reverse-Zone ist das Formular ganz anders. Die Adresse Feld erscheint vor dem Hostnamen , und der Hostname muss immer in kanonischer Form mit einem Punkt am Ende eingegeben werden, z. B. www.example.com. . Die Aktualisierung umkehren? Feld wird durch Update forward? ersetzt , der die automatische Erstellung eines Datensatzes in der entsprechenden Weiterleitungszone steuert. Es gibt jedoch keine Option zum Überschreiben eines bestehenden Weiterleitungsdatensatzes - wenn bereits einer mit demselben Namen existiert, wird er nicht berührt, selbst wenn Ja ist ausgewählt.
Jedes Mal, wenn ein Datensatz mit Webmin zu einer Zone hinzugefügt oder in einer Zone aktualisiert wird, wird seine Seriennummer automatisch erhöht. Dies gilt auch für Reverse-Zonen, die beim Hinzufügen eines Adressdatensatzes automatisch aktualisiert werden, und umgekehrt. Das bedeutet, dass andere DNS-Server beim Anwenden der Änderungen erkennen können, dass sich die Zone geändert hat, indem sie die neue Seriennummer mit der alten, die sie zwischengespeichert haben, vergleichen.
Gehen Sie wie folgt vor, um einen vorhandenen Datensatz in einer Zone zu bearbeiten:
- Klicken Sie auf der Hauptseite des Moduls auf das Symbol für die Zone, die Sie bearbeiten möchten, wodurch Sie zur oben gezeigten Seite gelangen.
- Klicken Sie auf das Symbol für den Datensatztyp, den Sie ändern möchten, wodurch eine Seite mit allen Datensätzen dieses Typs in der Zone angezeigt wird. Alternativ können Sie auf Alle Datensatztypen klicken Symbol, das eine Liste aller einzelnen Datensätze in der Zone unabhängig vom Typ anzeigt.
- Klicken Sie auf den Namen des Datensatzes, den Sie bearbeiten möchten. Ihr Browser zeigt ein ähnliches Formular wie das zum Hinzufügen eines Datensatzes verwendete Formular an, wobei die Felder jedoch bereits mit den Details der vorhandenen Adresse ausgefüllt sind.
- Um den Datensatz umzubenennen, bearbeiten Sie den Inhalt von Name Feld. Es wird zunächst in kanonischer Form mit einem Punkt am Ende angezeigt, aber Sie können es in einen Namen relativ zur Domäne ändern, wenn Sie dies wünschen.
- Passen Sie die Lebensdauer an Feld in Sie möchten, dass dieser Datensatz eine andere TTL hat, oder setzen Sie es auf Standard um es dem Rest der Zone gleich zu machen.
- Wenn dies ein Adressdatensatz ist, ändern Sie die IP in der Adresse Feld. Bei anderen Datensatztypen sind die Felder mit denen im Datensatzerstellungsformular identisch und haben dieselbe Bedeutung.
- Für Adressdatensätze wird das Feld Umgekehrt aktualisieren? angezeigt wird angezeigt. Wählen Sie Ja aus bewirkt, dass der Name und die Adresse des entsprechenden Datensatzes in der Rückwärtszone geändert werden, um mit diesem Vorwärtsdatensatz übereinzustimmen. Wenn Sie die IP ändern, sodass sich die Reverse-Adresse nicht mehr im selben Netzwerk befindet, wird sie aus der alten Reverse-Zone entfernt und der neuen Reverse-Zone hinzugefügt (sofern sie von Ihrem Server gehostet wird).
- Für Reverse-Address-Datensätze das Feld Forward aktualisieren? wird stattdessen angezeigt. Wenn Ja ausgewählt ist, wird der entsprechende Adressdatensatz in seiner Weiterleitungszone geändert, um mit allen Änderungen übereinzustimmen, die Sie in diesem Formular vornehmen.
- Klicken Sie auf Speichern Schaltfläche, um den Eintrag in der Zonendatei zu aktualisieren und zur Liste der Eintragstypen zurückzukehren.
- Um die Änderungen zu aktivieren, klicken Sie auf Änderungen übernehmen Schaltfläche zurück auf der Hauptseite des Moduls.
Um einen Datensatz aus einer Zone zu löschen, klicken Sie auf Löschen Schaltfläche auf dem Bearbeitungsformular anstelle von Speichern . Für Adressdatensätze, wenn Umgekehrt aktualisieren? Feld auf Ja gesetzt ist , wird der entsprechende Reverse Address-Datensatz ebenfalls gelöscht. Abgesehen davon ist der Vorgang zum Löschen eines Datensatzes unabhängig vom Typ identisch. Dasselbe passiert beim Löschen eines Reverse-Adressdatensatzes – der übereinstimmende Adressdatensatz wird ebenfalls gelöscht, solange die Weiterleitung aktualisieren? aktiviert ist Feld auf Ja gesetzt ist .
Die Liste der Datensätze in einer Zone ist anfänglich gemäß der Modulkonfiguration sortiert, was normalerweise bedeutet, dass Datensätze in der Reihenfolge angezeigt werden, in der sie hinzugefügt wurden. Um dies zu ändern, können Sie auf eine Spaltenüberschrift wie Name klicken , Adresse oder Echter Name um sie stattdessen nach dieser Spalte zu sortieren. Die Sortierung ist jedoch nur vorübergehend und geht verloren, wenn Sie zur Hauptseite zurückkehren und die Zone erneut öffnen. Um es dauerhaft zu ändern, siehe Reihenfolge zum Anzeigen von Datensätzen in Feld im Abschnitt Konfigurieren des BIND-DNS-Servermoduls .
Datensatztypen
Webmin unterstützt nicht alle Datensatztypen, die BIND kennt, sondern nur die am häufigsten verwendeten. Die folgende Liste deckt alle unterstützten Typen ab und erklärt, wofür sie verwendet werden und welche Felder verfügbar sind, wenn ein Datensatz dieses Typs in Webmin hinzugefügt oder bearbeitet wird. Neben jedem Typnamen steht der Kurzcode, der von BIND selbst verwendet wird, um den Typ in der Datensatzdatei zu identifizieren.
- Adresse (A)
- Ein Adressdatensatz verknüpft eine IPv4-Adresse mit einem Hostnamen. Jedes System, mit dem Sie sich über HTTP, Telnet oder ein anderes Protokoll über seinen Hostnamen verbinden möchten, muss über einen Adressdatensatz verfügen, damit Clients seine IP-Adresse nachschlagen können. Ein einzelner Hostname kann mehr als einen Adressdatensatz haben, was oft geschieht, um die Last für eine Website auf mehrere Server zu verteilen. Es ist auch zulässig, mehrere Datensätze dieses Typs mit unterschiedlichen Namen, aber derselben IP zu erstellen, z. B. beim Einrichten namensbasierter virtueller Apache-Server. Beim Erstellen oder Bearbeiten eines Adressdatensatzes wird das Feld Adresse wird zur Eingabe der mit dem Hostnamen verknüpften IP angezeigt. Ein Feld mit der Bezeichnung Umgekehrt aktualisieren? wird ebenfalls angezeigt, das die automatische Erstellung und Änderung eines Reverse Address-Datensatzes in der entsprechenden Reverse-Zone steuert. Siehe Hinzufügen und Bearbeiten von Datensätzen Abschnitt oben für weitere Details.
- IPv6-Adresse (AAAA)
- Ein IPv6-Adressdatensatz verknüpft eine IPv6-Adresse mit einem Hostnamen, ähnlich einem A-Datensatz.
- Nameserver (NS)
- Records dieses Typs definieren einen Nameserver, der für eine Zone zuständig ist. Jede Zone muss mindestens einen Namensserver-Eintrag für sich selbst haben und kann zusätzliche Einträge haben, die die DNS-Server angeben, die für Unterdomänen verantwortlich sind. Wenn Sie einen sekundären DNS-Server für eine Zone einrichten, stellen Sie sicher, dass Sie einen Namensservereintrag für die Zone auf dem Masterserver hinzufügen. In diesem Fall ist der Name des Datensatzes der kanonische Name der Zone, z. B. example.com. . Beim Erstellen oder Bearbeiten eines Datensatzes dieses Typs wird ein Feld mit der Bezeichnung Name Server angezeigt wird Angezeigt werden. Dieses muss mit der IP-Adresse oder dem Hostnamen des für die Zone zuständigen DNS-Servers ausgefüllt werden. Wenn Sie einen Hostnamen eingeben, muss dieser eine IP-Adresse haben, die durch einen Adressdatensatz in einer Zone auf Ihrem Server festgelegt wurde.
- Namensalias (CNAME)
- Dieser Datensatztyp erstellt einen zusätzlichen Namen für einen vorhandenen Adress- oder Reverse-Adress-Datensatz. Wenn ein DNS-Client die IP-Adresse eines Eintrags dieses Typs anfordert, erhält er stattdessen die IP des Eintrags, auf den der Namensalias verweist. Diese Art von Aufzeichnung kann nützlich sein, wenn Sie einen einzelnen Host haben, auf den unter mehreren verschiedenen Namen zugegriffen werden muss, z. B. ein Webserver, der namensbasiertes virtuelles Hosting durchführt. Obwohl dies auch durch Erstellen mehrerer Adressdatensätze erfolgen könnte, ist das Erstellen von nur einer einzigen Adresse und mehreren Namensaliasen flexibler, da es eine einfachere Aktualisierung ermöglicht, falls sich die IP-Adresse des Hosts jemals ändert. Die Formulare zum Bearbeiten und Erstellen von Namensaliasdatensätzen enthalten ein Feld mit der Bezeichnung Echter Name . Dies muss entweder mit dem kanonischen Namen des Datensatzes ausgefüllt werden, auf den der Alias verweist (z. B. webserver.example.com. ) oder mit einem kurzen Namen, der relativ zu der Zone ist, in der sich der Name Alias-Datensatz befindet.
- Mailserver (MX)
- Mail-Server-Einträge teilen Mail-Zustellprogrammen wie Sendmail und Qmail mit, welches System kontaktiert werden soll, wenn Mail an eine Domain oder einen Host zugestellt wird. Ohne einen Eintrag dieses Typs wird Mail für eine Domäne an das System zugestellt, dessen IP im Adresseintrag für die Zone selbst angegeben ist. Dies ist nicht immer wünschenswert, da Sie vielleicht möchten, dass diese IP die Adresse eines Webservers ist, damit Webbrowser eine Verbindung zu http://example.com/ sowie zu http://www.example.com/ herstellen können. Ein Mailserver-Eintrag kann dieses Problem lösen, indem nur E-Mails für example.com an andere Hosts gesendet werden und der gesamte andere Datenverkehr an den Webserver. Jeder Mail-Server-Datensatz hat eine Priorität, die Mail-Übermittlungsprogrammen mitteilt, welcher Mail-Server zuerst versucht werden soll. Der Eintrag mit der niedrigsten Priorität sollte auf das System verweisen, das tatsächlich E-Mails für die Domäne empfängt und speichert, während die mit höheren Prioritäten im Allgemeinen auf Systeme verweisen, die E-Mails einfach weiterleiten. Zustellprogramme versuchen es der Reihe nach, beginnend mit dem niedrigsten, so dass E-Mails, wenn der primäre Mailserver ausfällt, dennoch an ein Relais gesendet werden, das sie halten kann, bis der primäre wieder hochfährt.
- Beim Hinzufügen oder Bearbeiten eines Mailserver-Datensatzes werden zwei zusätzliche Felder angezeigt. Der erste trägt die Bezeichnung Mail-Server , und muss mit dem kanonischen oder relativen Hostnamen eines Systems ausgefüllt werden, das E-Mails für die Domäne oder den Hostnamen akzeptieren kann, der in Name eingegeben wurde Feld. Die zweite ist mit Priorität gekennzeichnet , und muss verwendet werden, um eine numerische Priorität für diesen bestimmten Mailserver anzugeben. Normalerweise wird eine Priorität von 5 für den primären Mailserver und 10 für Backup-Relays verwendet. Wenn Sie nur einen Mailserver für Ihre Domain haben, spielt es keine Rolle, welche Nummer in dieses Feld eingetragen wird. Es ist möglich, dass zwei Server die gleiche Priorität haben, in diesem Fall wird einer zufällig ausgewählt, an den die Zustellung erfolgt. Ein Mailserver-Eintrag kann den Platzhalter * in seinem Namen verwenden, der Mailprogrammen anzeigt, dass ein bestimmter Mailserver für alle Hosts in einer Domäne verantwortlich ist. Zum Beispiel ein Eintrag mit dem Namen *.example.com würde mit dem Hostnamen pc1.example.com und allen anderen Hosts in der Zone übereinstimmen. Dies kann nützlich sein, wenn Sie zwingen möchten, dass E-Mails, die sonst direkt an Arbeitsstationen in Ihrer Domäne zugestellt würden, stattdessen über einen zentralen Mailserver laufen. Webmin lässt Sie keine Platzhalter verwenden, außer Platzhalter zulassen Modulkonfigurationsoption ist auf Ja gesetzt jedoch, wie im Abschnitt *Konfigurieren des BIND-DNS-Servermoduls* erklärt.
- Host-Informationen (HINFO)
- Datensätze dieses Typs werden verwendet, um Informationen über die Hardware und das Betriebssystem eines bestimmten Hosts aufzuzeichnen. Beispielsweise könnten Sie eine erstellen, die besagt, dass server1.example.com ist ein x86-PC mit Linux. Sie werden jedoch sehr selten eingesetzt und gelten eher als Sicherheitsrisiko, da sie Informationen an potenzielle Angreifer weitergeben, die zur Übernahme eines Servers genutzt werden könnten. Beim Erstellen oder Bearbeiten eines Host-Informationsdatensatzes werden die Felder Hardware und Betriebssystem werden zur Eingabe der Architektur und des Betriebssystemtyps eines Hosts angezeigt. Die von Ihnen eingegebenen Werte dürfen keine Leerzeichen enthalten – normalerweise werden sie in den Zeichenfolgen für Hardwaretyp und Betriebssystem durch _-Zeichen ersetzt.
- Text (TXT)
- Ein Text-Datensatz verknüpft eine willkürliche Nachricht irgendeiner Art mit einem Namen. TXT-Datensätze können verwendet werden, um E-Mail-Einrichtungen wie SPF und DKIM Eigentumsinformationen bereitzustellen. Beachten Sie jedoch, dass solche Kommentare für jeden im Internet verfügbar sind, der Datensätze in Ihrer Domain nachschlagen kann, und daher keine vertraulichen Informationen enthalten sollten. Das Feld Nachricht wird angezeigt, wenn Sie einen Textdatensatz eingeben oder bearbeiten. Sie können beliebigen Text eingeben, einschließlich Leerzeichen.
- Bekannter Dienst (WKS)
- Ein Datensatz dieses Typs ordnet einem Namen einen Hostnamen, einen Port und ein Protokoll zu. Es kann als verallgemeinerte Variante des Mailserver-Datensatzes betrachtet werden, der Clients mitteilt, welcher Host einen bestimmten Dienst für eine bestimmte Domäne oder einen bestimmten Hostnamen bereitstellt. Allerdings schlagen fast keine Programme tatsächlich WKS-Einträge nach, sodass sie in der Praxis ziemlich nutzlos sind. Beim Hinzufügen oder Bearbeiten eines dieser Datensätze werden die Felder Adresse , Protokoll und Dienste stehen zur Verfügung. Die erste dient zur Eingabe der IP-Adresse eines Hosts, der die Dienste für den Host oder die Domäne bereitstellt, die in den Namen eingegeben wurde Feld. Die zweite dient der Auswahl des Netzwerkprotokolls, das die Dienste verwenden, entweder TCP oder UDP. Der letzte dient zur Eingabe einer Liste von Portnummern oder -namen (aus der Datei /etc/services) für Dienste, die der Host bereitstellt.
- Verantwortliche Person (PR)
- Diese Art von Aufzeichnung wird verwendet, um die Person oder Gruppe anzugeben, die für einen bestimmten Host verantwortlich ist. Jedem dieser Datensätze sind zwei Werte zugeordnet – eine E-Mail-Adresse und der Name des Textdatensatzes, der den Namen der Person enthält. Die Aufzeichnungen der verantwortlichen Person werden selten gesehen und werden von keinem E-Mail-Zustellprogramm oder Internet-Client verwendet. Die E-Mail-Adresse Das Feld, das beim Bearbeiten oder Hinzufügen eines dieser Datensätze angezeigt wird, dient zur Eingabe der vollständigen Adresse (z. B. [email protected] ) des Verantwortlichen des Gastgebers, dessen Name in Name eingetragen ist Feld. Der Name des Textdatensatzes Feld dient zur Eingabe des relativen oder kanonischen Namens eines Textdatensatzes, der den richtigen Namen der Person enthält.
- Standort (LOC)
- Standortdatensätze werden verwendet, um den physischen Standort in Breiten- und Längengrad eines Hosts anzugeben. Sie werden kaum jemals gesehen und daher von vielen Programmen nicht verwendet. Sie können jedoch in großen Organisationen nützlich sein, die Hosts in vielen Ländern haben. Beim Hinzufügen oder Bearbeiten eines Standortdatensatzes wird das Feld *Breiten- und Längengrad* angezeigt, um den Standort des Hosts im Namen einzugeben Feld. Es muss wie folgt formatiert sein:_42 21 43.528 N 71 05 06.284 W 12.00m 30.00m 10000.00m 10.00m_.
- Dienstadresse (SRV)
- Aufzeichnungen dieses Typs werden verwendet, um einem bestimmten Host einen Domänennamen, Dienstnamen und ein Protokoll zuzuordnen. Mit ihnen können Sie angeben, welchen Server ein Client für einen bestimmten Dienst und Hostnamen kontaktieren soll, anstatt sich nur mit dem Host zu verbinden. In gewisser Weise sind sie wie Mailserver-Datensätze, aber viel flexibler. Sie können beispielsweise angeben, dass der POP3-Server für example.com mail.example.com ist , aber der Webserver ist www.example.com . Zum Zeitpunkt des Schreibens werden SRV-Einträge hauptsächlich von Windows-Clientsystemen verwendet. Beim Hinzufügen oder Bearbeiten eines Serviceadressen-Datensatzes werden die Felder Protokoll und Dienstname werden neben dem Namen angezeigt Textfeld. Als Protokoll müssen Sie im Menü entweder TCP oder UDP auswählen. Als Dienstnamen müssen Sie einen bekannten Namen aus der Datei /etc/services eingeben, z. B. pop3 oder Telnet . Um einen SRV-Eintrag nachzuschlagen, kombiniert ein Client den Dienstnamen, das Protokoll und den Namen, um einen Eintragsnamen wie ___telnet.___tcp.example.com zu erhalten . Webmin erledigt dies automatisch für Sie, wenn Sie einen Serviceadressen-Datensatz bearbeiten oder hinzufügen, aber Sie können den kombinierten Namen auf der Seite sehen, die Datensätze dieses Typs auflistet. Webmin fügt auch automatisch die _s vor dem Dienst und dem Protokoll hinzu, blendet sie jedoch aus, wenn ein SRV-Eintrag angezeigt oder bearbeitet wird. Dies bedeutet, dass Sie beim Erstellen oder Bearbeiten eines Datensatzes dieses Typs dann nicht manuell eingeben müssen. Die Priorität muss verwendet werden, um eine numerische Priorität für diesen Server einzugeben, die dieselbe Bedeutung wie die Priorität in einem Mailserver-Datensatz hat. Das Gewicht Das Feld muss eine Gewichtung für diesen bestimmten Server oder Null enthalten, wenn es nur einen Datensatz mit demselben Namen, Protokoll und Dienstnamen gibt. Eine höhere Gewichtung weist Clients an, diesen Server öfter zu versuchen als einen mit einer niedrigeren Gewichtung. Der Hafen muss eine Portnummer enthalten, mit der sich Clients auf dem Server verbinden können, was nicht unbedingt der Standardport für den Dienst sein muss. Auf dem Server müssen Sie den Hostnamen oder die IP-Adresse des Systems eingeben, das den Dienst tatsächlich bereitstellt und mit dem Clients tatsächlich eine Verbindung herstellen.
Die von Webmin in Rückwärtszonen unterstützten Datensatztypen sind:
- Umgekehrte Adresse (PTR)
- Ein Reverse-Adressdatensatz ordnet einen Hostnamen einer IP-Adresse in einer Reverse-Zone zu. Damit DNS-Clients Hostnamen von IP-Adressen in Ihrem Netzwerk nachschlagen können, müssen Sie für jeden Host einen Eintrag dieses Typs erstellen. Meistens wird dies jedoch automatisch von Webmin beim Hinzufügen und Bearbeiten von Adressdatensätzen durchgeführt. Wenn Sie Ihre eigenen Reverse-Adressdatensätze erstellen, stellen Sie sicher, dass sie mit den übereinstimmenden Adressdatensätzen synchronisiert sind. Beim Hinzufügen oder Bearbeiten eines Datensatzes dieses Typs werden die Felder Adresse und Hostname sind angezeigt. Die erste dient zur Eingabe einer vollständigen IP-Adresse, z. B. 192.168.1.10 . Diese wird von Webmin automatisch in das in-addr.arpa-Format konvertiert, das intern vom DNS-System für umgekehrte Adressen verwendet wird. Das zweite Feld dient zur Eingabe eines Hostnamens in kanonischer Form, wie z. B. pc1.example.com. , stellen Sie sicher, dass Sie am Ende immer einen Punkt setzen, da sonst der Hostname relativ zur Reverse-Zone ist, was definitiv nicht das ist, was Sie wollen.
- Nameserver (NS)
- Nameserver-Einträge in einer Reverse-Zone haben denselben Zweck wie die in einer Forward-Domain – sie teilen anderen DNS-Servern die IP-Adresse oder den Hostnamen eines Servers mit, der für die Zone oder eine Subdomain verantwortlich ist. Das bedeutet, dass für jeden primären oder sekundären DNS-Server für die Zone einer hinzugefügt werden muss. Das Feld *Zonenname*, das beim Hinzufügen oder Bearbeiten eines Datensatzes dieses Typs angezeigt wird, dient zur Eingabe des Namens der Zone, für die der Server verantwortlich ist, was normalerweise die Zone ist, die den Datensatz enthält. Im Gegensatz zu Reverse Address-Datensätzen wird dieses Feld jedoch nicht automatisch in das in-addr.arpa-Format konvertiert. Stattdessen müssen Sie es in vollständig qualifizierter Form wie 1.168.192.in-addr.arpa. eingeben wenn ein Nameserver für 192.168.1 definiert wird Netzwerk. Im Feld *Name Server* müssen Sie eine IP-Adresse oder einen Hostnamen in kanonischer Form für den DNS-Server eingeben, z. B. ns1.example.com. .
- Namensalias (CNAME)
- Datensätze dieses Typs verhalten sich in Rückwärtszonen genauso wie in Vorwärtsdomänen. Sie müssen jedoch den Namen eingeben und Echter Name Felder mit umgekehrten Namen im in-addr.arpa-Format, da Webmin sie nicht für Sie konvertiert. Name Alias fields are most useful in reverse zones for doing partial subnet delegation, as covered in the *Partial reverse delegation* section below.
Editing a master zone
You can use Webmin to edit many of the settings that apply to an entire master zone, such as the expiry and retry times, and the clients that are allowed to query it. These settings effectively apply to all records in the zone, although some (such as the TTL) can be overridden on a per-record basis.
Webmin uses the term zone parameters to refer to all information stored in the domain's SOA record, including the primary nameserver, administrator email address and retry and expiry times. All of these are set when the zone is created, but you can edit them at any time by following these steps:
- On the module's main page, click on the icon for the zone that you want to edit.
- Click on the Zone Parameters icon, which will bring up a form for editing the parameters.
- The Master server field only needs to be edited if the Internet hostname of the DNS server has changed. Enter a fully-qualified hostname, with a dot at the end.
- To change the address of the person responsible for the zone, edit the Email address Feld. Any @ symbols that it contains will be automatically converted to dots for use in the SOA record, as BIND requires.
- The Refresh time , Transfer retry time , Expiry time and Default time-to-live fields all have the same meanings as explained in the section on Creating a new master zone . If records in your zone are going to be changing frequently in future, you may want to reduce some of these times. However, any changes, may not be detected by secondary servers and DNS clients until the old refresh or expiry time has elapsed, even if the new times are much lower. This is because they will wait for the old times to elapse before checking with the master server again to discovered the new ones.
- Click the Save button at the bottom of the page when you are done, and then the Apply Changes button back on the module's main page. The serial number in the SOA record will be automatically incremented when the form is saved, so that secondaries now that the zone has changed.
There is another set of options that you can edit for a master zone, stored in the named.conf file in the zone's section. These control which servers and clients are allowed to query records in the zone, do zone transfers and update records over the network. The most useful of these options specifies a list of slave DNS servers for the zone that should be notified when a change occurs, so that they can perform immediate zone transfers and thus remain synchronized.
To edit these master zone options, the process to follow is:
- On the module's main page, click on the icon for the zone that you want to edit. This will take you to the form shown in Figure 30-4.
- Click on the Edit Zone Options icon, which will bring up a form showing the existing settings.
- The Check names? field determines the level of checking that BIND performs on records in this zone when it reads the records file. The available options are :
- Warn
- If an invalid record is found, an error will be written to the system log file but processing of other records continues normally.
- Fail
- Invalid records cause the entire zone to be rejected, but other zones will still be processed normally.
- Ignore
- No checking is done at all.
- Default
- The global default from the Zone Defaults page is used. If it is not set, then the default complied into BIND will be used instead, which is to fail when invalid records are encounterd.
- To have secondary servers notified when records in the zone change, set the Notify slaves of changes? field to Yes . BIND works out which slaves will be notified by looking at the Name Server records for the zone, and the list of IP addresses in the Also notify slaves Feld. If your zone has an secondary servers, then you should definitely turn this option on.
- To allow some systems to update records in the zone dynamically, fill in the Allow updates from field with a list of IP addresses, IP networks (like 192.168.1.0/24) and BIND ACL names. Only those hosts that match will be able to modify records using commands like nsupdate, and if the list is left empty updates will not be allowed at all. You should be careful allowing the dynamic update of zones in which Webmin is also being used to edit records, as it is very likely that updates made dynamically will be overwritten by changes made in this module, or vice-versa.
- By default, all DNS clients and servers will be able to lookup records in the zone. This may not be what you want for a zone that is used only on an internal network, as it may give away sensitive information to potential attackers. To restrict queries, fill in the Allow queries from field with a list of IP addresses, IP networks and BIND ACL names. If the field is left empty, the field with the same name on the global Zone Defaults page determines which clients are allowed.
- To restrict the clients and servers that are allowed to perform zone transfers of all the records in this domain, fill in the Allow transfers from Feld. Often you will only want to allow secondary servers to perform transfers, especially if your zone is very large or contains records that you want to hide from attackers. Enter a list of IP addresses, IP networks and ACL names into the field to limit transfers to only matching clients. If it is left empty, the Allow transfers from field on the Zone Defaults page applies instead.
- To specify additional slave servers to be notified when the zone changes, fill in the Also notify slaves field with a list of IP addresses. BIND normally works out with addresses of all secondary servers for the zone from its Name Server records, but this may not always be complete.
- When you are done, click the Save button at the bottom of the page to update the BIND configuration file with your changes. You will need to use the Apply Changes button on the module's main page to make them active.
If a master zone is no longer needed, you can use this Webmin module to totally delete it along with all the records that it contains. To do this, the steps to follow are:
- On the module's main page, click on the icon for the zone that you want to edit.
- Click on the Delete Zone button at the bottom of the page.
- When deleting a forward zone, the field *Delete reverse records in other zones?* controls whether matching Reverse Address records in hosted reverse zones for all of the Address records in this one should be removed as well. This is generally safe to set to Yes , as only records with the exact same IP address and hostname will be deleted.
- Similarly, when deleting a reverse zone the field *Delete forward records in other zones?* determines whether matching forward records should be deleted too.
- Once you have made your selection and are sure you want to go ahead with the deletion, click the Delete Taste. The zone's entry in the named.conf file will be removed, and its records file deleted.
You can convert a master zone to a slave zone of the same name without needing to delete and re-create it. This can be useful if the new server is taking over as the master for some domain, or if the master and secondary servers are switching roles. The section on Editing a slave zone explains how to carry out the reverse action of converting a slave zone to a master, which may be useful in this situation.
To convert a zone, the steps to follow are:
- On the module's main page, click on the icon for the zone that you want to edit, then on the Edit Zone Options icon.
- When you click on the Convert to slave zone button , zone's entry in named.conf will be immediately updated to convert it to a slave zone. The browser will then return to the module's main page.
- Normally, every slave zone has a list of master server IP addresses that it can use to perform zone transfers from. In the case of converted zones, this list will be initially empty unless the Default master server(s) for slave zones module configuration option is set. Follow the instructions in the *Edit a slave zone* section to set the master servers addresses correctly.
- To activate the change, click on the Apply Changes button the module's main page.
Creating a new slave zone
A slave or secondary zone is one for which your DNS server gets the list of records from a master server for the zone. Generally, slave servers are used to reduce the load on the primary server, or act as a backup in case it goes down. For important zones (such as a company's Internet domain), you should always have at least one slave server so that your website is still accessible and email can still be delivered even if the primary goes down.
The secondary DNS server for a domain should not usually be located on the same network as the master, so that the failure of that network cannot take them both down. Many ISPs and hosting companies will host secondary zones for their customer's domains for free, on their own DNS servers. If your ISP provides this service and you want to set up a secondary server for an Internet domain, you should take advantage of it. If so, most of this section can be skipped. However, if you want to add a slave server for an internal domain or have a large company network with many connections to the Internet, then the instructions below explain how to set it up:
- On the main page of the BIND DNS Server module, click on the Create a new slave zone link above or below the list of existing zones. This will bring up the form shown below, for entering the details of the new domain.
- For a forward zone like example.com , set the Zone type field to Forward and enter the zone name into the *Domain name / Network* field. For a reverse zone that maps IP addresses to hostnames for a network, choose the Reverse option and enter the network address (like 192.168.1 ) into the *Domain name / Network* text field.
- The Records file field determines if BIND keeps a cache of the records in this zone in a file, and if so where that file is located. If the option None is chosen, records that the DNS server transfers from the master will be kept in memory only, and lost when the server is re-started. This should only be chosen if there is a good network connect between the master and slave servers, as it will increase the number of zone transfers that your server must perform. If you choose Automatic , Webmin will generate a filename in the zone files directory specified in the named.conf file (usually /var/named). Whenever your server does a zone transfer, all records will be written to this file in the standard format. If the final option is selected, you can enter the full path to a file in which records should be stored into the field next to. This can be useful if you want to separate the records files for master and slave zones.
- In the Master servers field, enter the IP addresses of the master DNS server and any other secondary servers for the zone. BIND will try these servers in order when doing a zone transfer, so the master should be first on the list. You must enter at least one address, so that your server knows where to get records from.
- Click the Create button to have the new slave zone added to your server's configuration. Your browser will be re-directed to a page for editing options for the zone.
- Return to the module's main page, and click the Apply Changes button on the main page to make the addition active.
- On the master server, add a new Name Server (NS) record for the zone with the IP address of the secondary server. This can be easily done in Webmin by following the instructions in the Adding and editing records section.
- Configure the master DNS server to notify this slave of any changes to records in the zone. The steps in the section on Editing a master zone explain how.
- If this is an Internet domain, notify the registrar for the parent zone of the new secondary server. Most provide online forms for editing the list of nameservers for a domain, to which you can add the secondary's IP. This is necessary so that other hosts on the Internet know to use the slave server is the master is down.

The slave zone creation form
Another type of zone that is closely related to the slave zone is the stub. They are like slave zones, but only contain Name Server records that have been transferred from a master server, instead of all the records. Stub zones are rarely used, but can be useful for ensuring that the Name Server records in a zone for its sub-domains are the same as those use in the sub-domain itself. The steps for creating one are almost identical to those above, but in step 1 you must use the Create a new stub zone link on the main page instead.
Editing a slave zone
After a slave zone has been created, it is still possible to edit several options that apply to it. Naturally there is no way to add or edit the actual records within the zone, but you can still change the list of master servers, the records file and the clients that allowed to query it. To change these setting, the steps to follow are:
- On the module's main page, click on the icon for the slave zone that you want to edit. Your browser will display the form shown in the screenshot below.
- Scroll down to the Zone Options form at the bottom of the page.
- To edit the list of other master and slave servers for this zone, change the IP addresses in the *Master servers *field. If a new secondary server has been added, it should be added to this list on all other secondaries so that they can do zone transfers from it. If the IP address of the master has changed, the list must be updated with the new address.
- To change the amount of time that the server will wait before giving up on a zone transfer, de-select Default for the Maximum transfer time field and enter a number of minutes into the text box next to it.
- If the Records file field is set to None , records transferred from the master server for this zone will be kept in memory only. However if a filename is entered, records will be written to that file instead in the standard format. This is the best option, as it minimizes zone transfers and allows you to view the records on the secondary server, as explained below.
- To have this DNS server notify others when the zone changes, change the Notify slaves of changes? field to Yes . This is only really useful if there are other secondary servers that perform zone transfers from this one, and may not be able to receive update notifications from the master server. The DNS servers to notify are determined from the Name Server records for the zone, and the contents of the *Also notify slaves* field.
- By default, all DNS clients and servers will be able to lookup records in the zone. To change this, fill in the *Allow queries from* field with a list of IP addresses, IP networks and BIND ACL names. If the field is left empty, the field with the same name on the global Zone Defaults page determines which clients are allowed.
- To restrict the clients and servers that are allowed to perform zone transfers of all the records in this domain, fill in the Allow transfers from field with a list of IP addresses, IP networks and ACL names. If it is left empty, the *Allow transfers from* field on the Zone Defaults page applies instead.
- The other fields on the form such as Check names? and *Allow updates from?* are not really used for slave zones, and so can be left unchanged.
- When you are done making changes, click the Save button. As long as there were no syntax errors in your input, you will be returned to the module's main page. Click the Apply Changes button there to make the modifications active. Note that this will not always force a re-transfer of the zone, even if the master servers have changed. For slave zones that use records files, BIND will only do a transfer when it the zone expires or the server receives notification of a change.

The slave zone editing form
When editing a slave zones that uses a records file, it is possible to browse the records in Webmin. At the top of the page that appears when you click on the slave zone's icon is a table of record types, just like the one that appears on the master zone form. Each can be clicked on to list the names and values of records of that type in the zone, as known to the secondary server. Editing or adding to them is impossible of course, as any changes must be made on the master server which is the authoritative source of records for the domain.
To stop your system acting as a slave server for a zone, you will need to delete it from the BIND configuration. This is generally a safe procedure, as the all the records in the zone have been copied from a master server and can be easily replaced. However, you should update the Name Server records in the zone and notify the parent domain's registrar that you system is no longer a secondary for the zone, so that other DNS servers do not waste time querying it.
To delete a slave zone, the steps to follow are:
- On the module's main page, click on the icon for the slave zone that you want to edit. This will take you to the form shown in the screenshot above.
- Click on the Delete button in the bottom right-hand corner of the page, which will display a confirmation form.
- Hit the Delete button if you are sure you want to delete the zone.
- After your browser returns to the module's main page, click on Apply Changes to make the deletion active.
- On the master server, remove the Name Server (NS) record for this secondary server from the zone.
- If this is an Internet domain, notify the parent zone registrar of the removal of this secondary server. Failure to do so could cause problems if other DNS servers attempt to query this one for records in the domain when it cannot provide answers.
The final thing that you can do to a slave zone is convert it to a master. This is only possible for zones that use a records file, so that Webmin can view and edit that file in future. If you do such a conversion, make sure that the original master server is changed to become a slave or stops hosting the zone altogether - the same domain cannot be served by two masters.
The steps to convert a zone are:
- Click on its icon on the module's main page.
- Scroll down to the bottom of the slave zone page, and hit the Convert to master zone Taste. This will immediately update the named.conf file to change the zone's type, but will not make any other changes.
- To make the conversion active, click on the Apply Changes button on the module's main page.
- You can now edit records in the domain just as you would with any normal master zone, by following the instructions in the section on Adding and editing records .
Creating and editing a forward zone
A forward zone is one for which your DNS server simply forwards queries to another server on behalf of whoever is making the request. They can be useful if the zone is actually hosted by another server that cannot be reached by clients of this server. It is possible to set up BIND to forward all requests for any non-hosted zones to another server, as explained in the *Configuring forwarding and transfers* section below. A forward zone entry does the same thing, but for just a single domain.
To set one up, the steps to follow are:
- On the module's main page, click on the *Create a new forward zone* link above or below the list of existing domain icons. This will take you to the zone creation form.
- Set the Zone type field to either Forward or Reverse , as when creating master and slave zones.
- For a forward zone, enter its full name (without a dot at the end) into the Domain name / Network Feld. For a reverse zone, enter its network (like 192.168.1 ) into the field instead - Webmin will automatically convert it to in-addr.arpa format when the zone is added.
- In the Master servers field, enter a list of IP addresses for the DNS servers that can be queried to lookup records in the zone. These must all be master, slave or forward hosts for the domain. If no addresses are entered at all, BIND will always perform normal lookups of records in the zone instead of forwarding requests to another server. This can be used to override the global forwarding settings on the Forwarding and Transfers page for a single zone.
- Click the Create button to have the zone added to BIND's configuration file. Your browser will be taken to a page for editing options in the new domain.
- Return to the module's main page, and hit the Apply Changes button to make it active.
After a forward zone has been created, you can delete it or edit the few settings that it has by following these steps :
- Click on the icon for the zone on the module's main page, which will bring your browser to a small form for editing its options.
- To change the list of DNS servers that requests are forwarded to, edit the IP addresses in the Master servers Feld. If none are entered, requests for records in this domain will be looked up directly.
- If the Try other servers? field is set to Yes , BIND will try a normal direct lookup for requests in this zone if it cannot contact any of the listed servers.
- Click the Save button to store your changes, and then Apply Changes back on the main page to activate them. Or to delete the forward zone, click on Delete and then Delete again on the confirmation page.
Creating a root zone
As the introduction explains, a root zone is one that contains the information that your DNS server needs to contain the Internet root servers. Without one, it is impossible to resolve records in domains other than those hosted by your server. Fortunately, one will almost always exist already in your BIND configuration, created either by Webmin or included as part of the default setup.
You may need to create a root zone if one does not exist yet because you selected the internal non-internet use only option when setting up the module for the first time, but have now connected your system to the Internet. Adding a second root zone can also be useful when views have been configured, as explained in the Using BIND views section.
Webmin will only allow you to create a root zone if none exists yet, or if a view exists that does not contain one, because there is no point having two such zones. To add one, the steps to follow are:
- On the module's main page, click on the Create a new root zone icon.
- Fill in the Store root servers in file field with a filename to use for the root zone file. If one already exists, then this field will already contain its path - otherwise, you should enter something like /var/named/db.cache.
- The Get root servers from field controls where Webmin copies the root file from. The choices are :*Download from root FTP server *This is the best option, as it tells the module to make an FTP connection to rs.internic.net and download the latest version of the file. However, this may not work if your system cannot make perform FTP downloads due to a firewall. *Use Webmin's older root server information *This option should be used if the first will not work. If selected, the module will use a copy of the root zone file that comes with Webmin, which will work but may not be up to date. *Existing root servers in file *If the file entered in step 2 already exists, then this option should be chosen. If you are adding a root zone to a view and one already exists in another view, it will be selected by default so that the file can be shared between both zones.
- Click the Create button to add the zone and return to the module's main page. Then hit Apply Changes to make it active.
Once a root zone has been added, an icon representing it will appear on the main page. You can delete it by clicking on the icon and hitting the Delete button - however, this may prevent the lookup of records in non-hosted Internet domains from working as explained above.
Editing zone defaults
Defaults for new master zones
If you add lots of zones that contain similar records, then it can be a lot of work to add them manually after creating each one. For example, in a web hosting company all of your domains might contain a www Address record for the IP address of your webserver, and an Mail Server record that directs mail to a central server. Fortunately, Webmin allows you to create a list of records that get added to all new domains, called a zone template.
A template consists of one or more records, each of which has a name, type and value. For Address records, the value can be option which indicates that it can be entered by the user at zone creation time. This is useful if one of the records (such as www) in the new domains does not have a fixed address, and you want to be able to easily set it when the zone is added. Templates can only be used when creating forward zones, as they do not make much sense for reverse zones.
It is also possible to edit the default expiry, refresh, TTL and retry times for new zones. Webmin's initial defaults are reasonable, but may not be appropriate for your network. To change these defaults and set up template records, the steps to follow are:
- On the module's main page, click on the Zone Defaults icon. The form at the top of the page labeled Defaults for new master zones contains all the fields that need to be edited.
- Edit the Refresh time , Transfer retry time , Expiry time and Default time-to-live fields if you want to change the defaults times for new zones. Existing master zones will not be effected by any changes you make here though.
- If all your new domains are managed by the same person, enter his address into the Default email address Feld. This will save you from having to type it in on the master zone creation page every time.
- In the Template records table, two blanks rows appear for entering new records. To add more than two, you will need to save this page and re-edit it. The records in existing rows can be edited by just changing their fields, or deleted by clearing out the record name. Under the Record name column you must enter the name of the record relative to the zone, such as www or ftp. To create a record for the zone itself (such as a Mail Server record for the domain), just enter a single dot. Under the Type column, select a type for the record from the list. See the #Record types section for more information on what each is used for. As its name suggests, the field under the Value column is for entering a value for the new record. For the Address type, you can select From form in which case you will be able to enter an address when creating a new domain, which will be used by all template records that have this option selected. For Mail Server records, both the priority and server name must be entered separated by a space, such as _5 mail.example.com._. Values for records of all other types should be entered in the same format as is used when adding a record to a zone.
- If you are familiar with the records file format used by BIND, you can create your own file of records to be included in new zones. If a filename is entered into the Additional template file field, its contents will be added to the zone file created by Webmin for new master domains.
- When you are done adding template records, click the Save button at the bottom of the page. The changes will apply to any new master zones created from now on.
Now that you have created a template, you can choose whether or not to use it for each new master zone that you create. On the creation form (explained in the Creating a new master zone section) is a field labeled Use zone template? , which is set to Yes by default if there are any template records. Next to it is a field named IP address for template records , which used for entering the IP for records for which the From form option is selected. If you chose to use a template and if there are any records that do not have an IP address specified, then this field must be filled in.
Default zone settings
At the bottom of the Zone Defaults page you will find several options that apply to all existing domains, but can all be set or overridden on a per-zone basis as explained in the Editing a master zone section. You can control which clients are allowed to query the server, and what kind of checking is done for the records of various domain types. Being able to limit the allowed client hosts is particularly useful, so that you can stop non-internal clients using your DNS server. However, you should make sure that master Internet zones hosted by your server are accessible to everyone, so that other DNS servers on the Internet can look them up.
To change these global options, the steps to follow are:
- On the module's main page, click on the Zone Defaults icon and scroll down to the Default zone settings section.
- To control which hosts are allowed to query your DNS server, change the Allow queries from field to Listed and enter a list of IP addresses, IP networks (like 192.168.1.0/24) and ACL names into the text box below. Clients that do not match any entry on the list will be denied, unless they are requesting a record in a zone which has its own separate settings allowing them.
- To control which hosts are allowed to perform zone transfers from your server, change the Allow transfers from field to Listed and fill in the text box below with a list of IP addresses, IP networks and ACL names. Only servers that are acting as secondaries for zones that this server hosts really need to be able to do transfers, so it is usually a good idea to enter just their IP addresses. If you are restricting queries, this field must be filled in so that hosts that cannot lookup records are not allowed to perform transfers either.
- The fields Check names in master zones? and Check names in slave zones? control the checking of records in all zone files for master and slave zones respectively. The available options for each are:
- Warn
- If an invalid record is found, an error will be written to the system log file but processing of other records continues normally.
- Fail
- Invalid records cause the entire zone to be rejected, but other zones will still be processed normally.
- Ignore
- No checking is done at all.
- Default
- The default checking level is used, which is Fail .
- To have BIND check responses that it receives from other DNS servers, set the Check names in responses? field to Warn or Fail . The default is simply to pass potentially erroneous responses on to clients.
- The Notify slaves of changes? field determines whether BIND sends a notification to all slaves of master zones hosted by this server when they change. To turn this on, select Yes - otherwise, select No or Default . Enabling notification is a good idea, as it ensures that secondary servers are kept in sync with the master.
- When done, click the Save button at the bottom of the page to update the BIND configuration file, and then the Apply Changes button on the module's main page to make the changes active. The new settings will apply to all zones that do not explicitly override them on their own options pages.
Configuring forwarding and transfers
BIND can be configured to forward all requests for zones that it is not the master or slave for to another DNS server. When doing this, it acts like a DNS client itself, accepting requests from real clients and then sending them off to another server or servers for resolution instead of carrying out the normal process of contacting the root zone servers and finding the correct server for the domain. This can be useful if your DNS server is unable to contact the rest of the Internet, but can still communicate with a DNS server that does have full network access. For example, it may be on an internal network behind a firewall that only allows connections to a limited set of destinations.
To set up forwarding, the steps to follow are:
- On the module's main page, click on the Forwarding and Transfers icon.
- In the form that appears, fill in the Servers to forward queries to field the IP addresses of DNS servers that requests should be sent to. BIND will try them in order until one returns a positive or negative a response. If the list is empty, the server will revert to the normal method of looking up records by contacting the root servers and so on.
- If you want your server to attempt to resolve a client's query directly when it cannot contact any of the forwarding servers, set the Lookup directly if no response from forwarder field to Yes . This is only useful if your server is actually capable of doing lookups.
- Click the Save button at the bottom of the page, and then hit Apply Changes back on the main page to make the new setting active. Assuming the forwarding list was filled in, your server will now send all client queries to the listed servers.
The same form also contains fields for configuring BIND's behavior when doing zone transfers. You can control how long it will wait for a transfer to complete, the protocol used for transfers and the number that can be active at the same time. To edit these settings, follow these steps:
- On the module's main page, click on the Forwarding and Transfers icon.
- By default, BIND will wait 120 minutes (2 hours) for a zone transfer from a master to complete. To change this, enter a different number of minutes into the *Maximum zone transfer time* field. This can also be set or overridden on a per-slave zone basis.
- BIND versions before 8.1 only support the transfer of a single zone at a time. Because this can be slow when transferring many zones from the same master server, the *Zone transfer format* field can be set to Many to use a new format that combines multiple domains into the same transfer. If One at a time or Default is chosen, then each zone will be transferred separately. This is the best choice unless you are sure that all slave servers are running BIND 8.1 or above.
- By default, your nameserver will not carry out more than 2 concurrent zone transfers from the same master server. To increase this limit, change the *Maximum concurrent zone transfers* field to something higher. This can speed up the process of transferring a large number of domains, but at the expense of putting a higher load on the master server.
- Click the Save button when you are done making changes, and then Apply Changes on the main page to activate them. The new settings will apply to all subsequent zone transfers.
Editing access control lists
An access control list (or ACL) is list of IP addresses, IP networks or other ACLs that are grouped together under a single name. The ACL name can then be used when specifying the list of clients allowed to query, update or perform zone transfers from a zone. This can make be used to reduce the amount of duplication in your BIND configuration, and to make it clearer. For example, the ACL corpnet might match the IP networks 192.168.1.0/24 , 192.168.2.0/24 and 1.2.3.0/24 , which are all part of your company's network. When configuring who can query a zone, you could just enter corpnet instead of that list of network addresses. To view and edit ACLs in Webmin, the steps to follow are :
- On the module's main page, click on the Access Control Lists icon. This will take you to a page listing existing ACLs and allowing the addition of one more. If you want to add more than one ACL, you will need to save the form and re-edit it to force the display of a new blank row.
- To add a new ACL, find the blank row at the bottom of the table and enter a short name consisting of only letters and numbers in the ACL Name column. Then in the field under *Matching addresses, networks and ACLs*, enter a list of IP addresses, IP networks and other ACL names that this new ACL will contain. IP addresses must be entered in their standard format like 192.168.1.1 , but hostnames are not allowed. IP networks must be entered in network/prefix format like 192.168.1.0/24 or 192.168.1/24 . You can also precede any address, network or ACL name with a ! to negate it, so for example the entry !192.168.1.0/24 would match all hosts outside the_ 192.168.1 _network.
- Existing entries in the list can be edited by changing their fields in the table, and ACLs can be deleted by clearing out the field containing their names.
- When you are done adding and editing ACLs, click the Save Taste. To activate the changes, hit Apply Changes back on the main page. As soon as an ACL is created, it can be used in other query, transfer and update restrictions of other zones.
BIND has four built-in ACLs that can be used in all the same places that user-defined ACLs can. They are:
- any
- Matches any client address.
- none
- Matches nothing.
- localhost
- Matches the IP addresses of all network interfaces on your system. Even though it is called localhost, it doesn't just match 127.0.0.1.
- localnets
- Matches all clients on all networks that your system is directly connected to. BIND works this out by looking at the IP addresses and netmasks of all network interfaces.
Setting up partial reverse delegation
Partial reverse zone delegation is method for transferring the management of a small set of reverse IP addresses to another DNS server. Normally, reverse zones cover an entire class C network containing 256 addresses. However, many organizations have networks much smaller than this, containing maybe 16 or 32 addresses. Normally, this would make it impossible for the organization to manage its own reverse address mappings, as the addresses come from a network that is owned by an ISP or hosting company.
Fortunately, there is a solution - the ISP can set up Name Alias (CNAME) records in the reverse zone for the parent network that point to Reverse Address records in a special zone on the organization's DNS server. The parent zone must also contain a Name Server (NS) record for the special sub-zone that points to the customer's server, so that other DNS clients know where to look when resolving the Name Alias records.
An example may make this clearer - imagine for example than an ISP had granted addresses in the range 192.168.1.100 to 192.168.1.110 to Example Corporation, which owns the example.com domain. The company already runs its own DNS server to host the example.com zone, but wants to control reverse address resolution for its IP range as well. The ISP would create Name Alias records in the 192.168.1 zone pointing to the special sub-zone 192.168.1.100-110, which will contain the actual Reverse Address records named like 192.168.1.100-100.101. The ISP also needs to create a Name Server record for 192.168.1.100-110 which tells other servers that Example Corporation's DNS server should be used to find records under that zone.
Webmin handles reverse address delegation well, and automatically converts special network zones like 192.168.1.100-110 to and from the real zone names used by BIND such as 100-110.1.168.192.in-addr.arpa. The exact steps to follow on both the server that hosts the actual class C network zone and the server that a subset of it is being delegated to are :
- Decide on the range of addresses that are being delegated, such as 192.168.1.100 to 192.168.1.110 . Typically, the sub-zone name is based on the range of addresses being delegated, but this does not have to be the case as long as it is under the parent network domain.
- On the server that hosts the class C network zone, add a Name Server record for 192.168.1.100-110 with the server set to the IP address or name of the sub-zone's DNS server.
- For each address in the range, add a Name Alias record to the reverse zone named like 101.1.168.192.in-addr.arpa. with the Real Name set like 101.100-110.1.168.192.in-addr.arpa . As you can see, the alias points to a record inside the zone for the sub-network.
- When all of the Name Alias records have been created, everything that needs to be done on this server is finished and you can hit Apply Changes .
- On the DNS server for the sub-network, create a new master zone for the reverse network 192.168.1.100-110 . Webmin will automatically convert this to the correct in-addr.arpa format for you.
- Add Reverse Address records to the new zone as normal for IP addresses like 192.168.1.100-110.101 . Adding a record for the IP 192.168.1.101 will not work.
- When you are done creating reverse records, click the *Apply Changes* button to make them active. You should now be able to look them up using a command like nslookup on the server for the parent network zone.
The instructions above can be used to delegate multiple ranges from a single class C network to several different DNS servers. There is no limit on the size of ranges, nor any requirement that they follow normal network block boundaries - however, for routing reasons most IP allocation is done in power-of-two sized blocks (like 4, 8, 16 and so on), which means that any sub-zone ranges will be the same size.
The only problem with reverse address delegation when using Webmin is that Reverse Address are not automatically created and updated when Address records are. This means that you will have to create all such records manually on the sub-zone server, as in the steps above.
One inconvenience in setting up partial reverse delegation is the number of similar Name Alias records that must be created on the parent network zone server. Fortunately, there is a simpler alternative - record generators. A generator is a special BIND configuration entry that creates multiple similar records using an incrementing counter. This module allows you to created and edit generators, by following these steps :
- On the module's main page, click on the icon for the reverse zone that you want to create records in. This will typically be a class C network domain that is going to have a range of addresses delegated to some other Server.
- Click on the Record Generators icon. This takes you to a page containing a table of existing generators, with a blank row for adding a new one.
- In the empty row, select CNAME from the menu under the Type column.
- Under the Range column, enter numbers for the start and end of the address range into the first two fields, such as 100 and 110 . The third field is for entering the gap between each step, and should be left blank. If you were to enter 2, then the range would go 100 , 102 , 104 and so on.
- In the Address pattern field, enter _$_ (a single dollar sign). When the records are created, the $ will be replaced with the number of each record, which will in turn resolve to an IP address in the range. You could also enter $.1.168.192.in-addr.arpa. , which makes things more obvious but is longer to type.
- In the Hostname pattern field, enter $.100-110 . Similarly, the $ will be replace with the number of each record, which will resolve to something like 101.100-110. 1.168.192.in-addr.arpa. .
- If you like, enter a comment that describes what this generator is for into the Comment Feld.
- Click the Save button, return to the module's main page and click on Apply Changes .
A generator can replace the Name Alias records that the first set of instructions in this section tell you to create, so there is no need for them anymore. Note that the automatically generated replacements will not be visible or editable in the normal way, only through the Record Generators page.
Using BIND views
BIND version 9 introduced the concept of views, which are groups of zones that are visible only to certain DNS clients. Views can be used to hide internal zones from the Internet, to present the same zone in two different ways, or to stop non-local clients resolving non-hosted domains through your server. Every view has a unique name, and a list of matching IPs addresses and IP networks that determines which clients and servers it is visible to.
When it detects that you are running BIND 9, several additional features are available in the module. You can create views, move zones from one view to another, and choose which view zones are created in. On the main page, each current view is represented by an icon under Existing Client Views heading, and each zone icon has a label that indicates which view it is in.
If any views exist, then every zone must be in a view. Only if none are defined will Webmin allow the creation of zones outside views, as this is not supported by BIND. This includes the root zone, which must be available to a client for DNS requests for records in domains not hosted by this server to succeed. For this reason, it often makes sense to put the root zone in a view that is available to all clients.
To add a new view to your BIND configuration, the steps to follow are:
- On the module's main page, click on the Create a new view link in the Existing Client Views section. This will take you to a form for entering its details.
- Enter a short alphanumeric name for the view (such as internal or everyone ) into the View name Feld. Each view must have a unique name.
- Leave the DNS records class field set to Default .
- If this zones in this view are to be visible to everyone, set the Apply this view to clients field to All clients . Otherwise, choose Selected addresses, networks and ACLs and enter a list of IP addresses, IP networks and BIND ACL names into the text box below. Only clients that match one of the entries in this list will have access to the view.
- Click the Create button at the bottom of the form. You will be returned to the main page, which will include an icon for your new view.
- Move any existing zones that you want to be in this view into it. A zone can be moved by clicking on its icon, then on *Edit Zone Options*, and then selecting the new view from the menu next to the Move to view button before clicking it. If this is your first view, all existing zones must be moved into it (or another view) before the new configuration will be accepted by BIND.
- When you are done moving zones, click the Apply Changes button on the main page.
Once a view has been created, you can change the list of addresses and networks that it matches by clicking on its icon on the main page and updating the Apply this view to clients Feld. Then hit the Save button followed by Apply Changes to make the new client list active.
A view can be deleted by clicking the Delete button on the same form. This will bring up a confirmation page that allows you to choose what should happen to the zones that it contains, if any. The available options are:
- Delete totally
- All zones in the view are deleted, along with their records files.
- Move out of views
- Zones in the view are moved out to the top level. This option should only be used when deleting the last view, for the reasons explained above.
- Move to view
- Zones are moved to a different existing view.
When one or more views have been defined on your system, you can choose which one to use when adding new zones. This is done using the Create in view field on the master, slave, forward and root zone creation forms, which allows you to select a view from its menu. Naturally, there is no option for creating a zone outside of any views as this is not allowed by BIND.
One common use of views is hiding internal zones from clients outside your internal network. This is a good way of hiding the structure of your network and the hosts on it from potential attackers. To set it up, the steps to follow are:
- Create a new view called internal that matches clients on your internal LAN.
- Create a second view called everyone that matches all clients.
- Move any zones that are for internal use only into the internal view. Zones for Internet domains such as example.com must not be put in this view, as that would make them inaccessible to the rest of the world.
- Move all other zones (including the root zone) to the everyone view.
Views can also be used to prevent clients outside your network looking up non-hosted domains on your server, as follows:
- Create a new view called internal that matches clients on your internal LAN.
- Create a second view called everyone that matches all clients.
- Move the root zone to the internal view, which will prevent the server from looking up records for non-local clients that require contact with the root servers.
- Move all other zones to the everyone view.
Module access control
Like others, the BIND DNS Server module allows you to control which of its features are available to a particular Webmin user or group. This can be useful for giving people the rights to manage only records in their own zones and nobody else's. Even though this would normally require root access to the records files, with Webmin it can be granted to people without giving them level of power that a root login would allow.
Once you have created a user with access to the module as explained on WebminUsers, the steps to limit his access to only certain zones are:
- Click on the BIND DNS Server next to the name of the user in the Webmin Users module. This will being up a page of access control options.
- Change the Can edit module configuration? field to No , so that the user is not allowed to change the paths that the module uses to named.conf and other files.
- For the *Domains this user can edit *field, choose *Selected zones* and select the ones that you want him to have access to from the list to its right. If you want him to be able to edit almost all zones, it may be better to choose All except selected and select only those that he should not be allowed to manage records in. If your DNS server uses views, you can use the *Zones in view* options to allow or deny access to all zones in a view as well.
- Change the fields Can create master zones? , *Can create slave/stub zones?*, Can create forward zones? and *Can edit global options?* to No .
- If you want Reverse Address records in zones that the user does not have access to to be updated by changes to Address records in zones that he does, set the *Can update reverse addresses in any domain?* field to Yes . This may not be a good idea from a security point of view though, as he would be able to change almost any existing Reverse Address record on your system. For that reason, I suggest that this field be set to No .
- To stop the user creating more than one Address record with the same IP, set the *Can multiple addresses have the same IP? field to *No . Even though creating multiple records is harmless, you may want to set this to No to prevent the user allocating the same IP twice.
- Leave the Read-only access mode? field set to No . If it is changed to Yes , the user will only be able to view zones and records using the module, and not change anything. This might be useful for creating a different kind of restricted user though - one who can see all settings, but not edit them.
- Leave the Can apply changes? field set to Yes , so that he can use the Apply Changes button to make his additions and modifications active.
- Unless you want the user to be able to edit his records file manually, change the Can edit records file? field to No . Most un-trusted users are not smart enough to perform manual editing.
- The Can edit zone parameters? field determines if the user can see and use the Edit Zone Parameters icon for his domains. Setting this to Yes is quite safe, as the user can only harm his own zones by setting the parameters to silly values.
- Similarly, the Can edit zone options? field determines if the Edit Zone Options icon is visible or not. You should set this to No , as it is possible for a user to create a syntax error in named.conf by improper use of the zone options form.
- Unless you want the user to be able to delete his own domains, change the Can delete zones? field to No . Users should contact the master administrator instead if they can to delete zones.
- The Can edit record generators? field can be left set to Yes , as it simply allows the creation of multiple records at once. However, some users may get confused by this feature so it might be a good idea to change the field to No .
- The Can lookup WHOIS information? And *Can search for free IP numbers?* fields can also be left on Yes , as those features mere display information to the user.
- Change the Can create and edit views? field to No , so that the user cannot manage BIND 9 views. If the user is allowed to create zones, you can use the *Views this user can edit and add zones to* field to limit those that he can create zones in.
- Can create slave zones on remote servers? should be set to No , but this doesn't really matter as the user is not going to be allowed to create master or slave zones anyway.
- Finally, click the Save button to make the new restrictions for the user active.
See also:
- Resolution for Virtual Hosts