Let’s Encrypt ist eine Zertifizierungsstelle, die kostenlose SSL-Zertifikate für Websites bereitstellt, um die TLS-Verschlüsselung zu ermöglichen. Es wurde im April 2016 gestartet.
Let’s Encrypt automatisiert den Prozess der Zertifikatserstellung, -validierung, -signierung, -implementierung und -erneuerung von Zertifikaten für sichere Websites.
Derzeit unterstützt Let’s encrypt die automatische Zertifizierungsausstellung für Apache, Nginx, Plex und Haproxy.
Voraussetzungen
Auf Ihrem RHEL-/CentOS-System sollte ein LEMP-Stack konfiguriert sein.
LESEN :So installieren Sie den LEMP-Stack auf CentOS 8 / RHEL 8
LESEN: So installieren Sie den LEMP-Stack auf CentOS 7 / RHEL 7
Certbot installieren
Um ein Let’s Encrypt-Zertifikat für Ihre Domain zu generieren, sollten Sie Terminalzugriff haben und der Certbot ACME-Client auf Ihrem System installiert sein. Es verarbeitet die Zertifikatsausstellung und aktualisiert die Nginx-Konfiguration, um das erstellte Zertifikat ohne Ausfallzeit zu verwenden.
Certbot ist im EPEL-Repository nur für CentOS 7 / RHEL 7 verfügbar. Daher müssen wir das Certbot-Installationsprogramm für CentOS 8 / RHEL 8 manuell von seiner offiziellen Website herunterladen.
### CentOS 8 / RHEL 8 ###

curl -O https://dl.eff.org/certbot-auto

mv certbot-auto /usr/local/bin/certbot-auto

chmod 0755 /usr/local/bin/certbot-auto

### CentOS 7 ###

rpm -ivh https://dl.fedoraproject.org/pub/epel/epel-release-latest-7.noarch.rpm

yum install -y certbot python2-certbot-nginx

### RHEL 7 ###

rpm -ivh https://dl.fedoraproject.org/pub/epel/epel-release-latest-7.noarch.rpm

subscription-manager repos --enable rhel-7-server-optional-rpms

yum install -y certbot python2-certbot-nginx
Virtualhost erstellen
Wir erstellen nun eine Konfigurationsdatei für den virtuellen Host (Serverblock) für die Domain www.itzgeek.net.
Dieser Serverblock bedient die HTTP-Version Ihrer Domain.vi /etc/nginx/conf.d/www.itzgeek.net.conf
Verwenden Sie die folgenden Informationen.
server {
   server_name www.itzgeek.net;
   root /opt/nginx/www.itzgeek.net;

   location / {
       index index.html index.htm index.php;
   }

   access_log /var/log/nginx/www.itzgeek.net.access.log;
   error_log /var/log/nginx/www.itzgeek.net.error.log;

   location ~ \.php$ {
      include /etc/nginx/fastcgi_params;
      fastcgi_pass 127.0.0.1:9000;
      fastcgi_index index.php;
      fastcgi_param SCRIPT_FILENAME $document_root$fastcgi_script_name;
   }
}
Erstellen Sie einen Dokumentenstamm, um Ihre HTML-Dateien zu platzieren.
mkdir -p /opt/nginx/www.itzgeek.net
Ändern Sie die Berechtigung des Verzeichnisses.
chown -R nginx:nginx /opt/nginx/www.itzgeek.net
Platzieren Sie die Test-HTML-Datei im Dokumentenstammverzeichnis Ihrer Webdomain.
echo "This is a test site @ www.itzgeek.net" > /opt/nginx/www.itzgeek.net/index.html
Starten Sie den Nginx-Dienst neu.
systemctl restart nginx
DNS-Eintrag erstellen/aktualisieren
Greifen Sie auf Ihr DNS-Verwaltungstool oder Ihren Domain-Registrar zu und erstellen Sie einen A/CNAME-Eintrag für die Domain. Beispiel:www.itzgeek.net.

Warten Sie einige Zeit, bis der Datensatz weitergegeben wird.
Überprüfen Sie die DNS-Weitergabe mit dem Dienstprogramm Nslookup yum install -y bind-utils.

Installieren Sie das Let’s Encrypt-Zertifikat
Verwenden Sie den Befehl certbot, um das Let’s Encrypt-Zertifikat zu erstellen und zu installieren.
### CentOS 8 / RHEL 8 ###

/usr/local/bin/certbot-auto --nginx

### CentOS 7 / RHEL 7 ###

certbot --nginx
Folgen Sie der interaktiven Eingabeaufforderung und generieren und installieren Sie das Zertifikat.
Saving debug log to /var/log/letsencrypt/letsencrypt.log
Plugins selected: Authenticator nginx, Installer nginx
Enter email address (used for urgent renewal and security notices) (Enter 'c' to
cancel): itzgeek.web@gmail.com  << Email Address to receive renewal/security notification

- - - - - - - - - - - - - - - - - - - - - - - - - - - - - - - - - - - - - - - -
Please read the Terms of Service at
https://letsencrypt.org/documents/LE-SA-v1.2-November-15-2017.pdf. You must
agree in order to register with the ACME server at
https://acme-v02.api.letsencrypt.org/directory
- - - - - - - - - - - - - - - - - - - - - - - - - - - - - - - - - - - - - - - -
(A)gree/(C)ancel: A  << Access Terms and Conditions

- - - - - - - - - - - - - - - - - - - - - - - - - - - - - - - - - - - - - - - -
Would you be willing to share your email address with the Electronic Frontier
Foundation, a founding partner of the Let's Encrypt project and the non-profit
organization that develops Certbot? We'd like to send you email about our work
encrypting the web, EFF news, campaigns, and ways to support digital freedom.
- - - - - - - - - - - - - - - - - - - - - - - - - - - - - - - - - - - - - - - -
(Y)es/(N)o: Y  << Subscribe to Newsletter

Which names would you like to activate HTTPS for?
- - - - - - - - - - - - - - - - - - - - - - - - - - - - - - - - - - - - - - - -
1: www.itzgeek.net
- - - - - - - - - - - - - - - - - - - - - - - - - - - - - - - - - - - - - - - -
Select the appropriate numbers separated by commas and/or spaces, or leave input
blank to select all options shown (Enter 'c' to cancel): 1  << Choose domain name to generate certificate
Obtaining a new certificate
Performing the following challenges:
http-01 challenge for www.itzgeek.net
Waiting for verification...
Cleaning up challenges
Deploying Certificate to VirtualHost /etc/nginx/conf.d/www.itzgeek.net.conf

Please choose whether or not to redirect HTTP traffic to HTTPS, removing HTTP access.
- - - - - - - - - - - - - - - - - - - - - - - - - - - - - - - - - - - - - - - -
1: No redirect - Make no further changes to the webserver configuration.
2: Redirect - Make all requests redirect to secure HTTPS access. Choose this for
new sites, or if you're confident your site works on HTTPS. You can undo this
change by editing your web server's configuration.
- - - - - - - - - - - - - - - - - - - - - - - - - - - - - - - - - - - - - - - -
Select the appropriate number [1-2] then [enter] (press 'c' to cancel): 2  << Redirect traffic from HTTP to HTTPS
Redirecting all traffic on port 80 to ssl in /etc/nginx/conf.d/www.itzgeek.net.conf

- - - - - - - - - - - - - - - - - - - - - - - - - - - - - - - - - - - - - - - -
Congratulations! You have successfully enabled https://www.itzgeek.net

You should test your configuration at:
https://www.ssllabs.com/ssltest/analyze.html?d=www.itzgeek.net
- - - - - - - - - - - - - - - - - - - - - - - - - - - - - - - - - - - - - - - -

IMPORTANT NOTES:
 - Congratulations! Your certificate and chain have been saved at:
   /etc/letsencrypt/live/www.itzgeek.net/fullchain.pem
   Your key file has been saved at:
   /etc/letsencrypt/live/www.itzgeek.net/privkey.pem
   Your cert will expire on 2019-11-02. To obtain a new or tweaked
   version of this certificate in the future, simply run certbot-auto
   again with the "certonly" option. To non-interactively renew *all*
   of your certificates, run "certbot-auto renew"
 - Your account credentials have been saved in your Certbot
   configuration directory at /etc/letsencrypt. You should make a
   secure backup of this folder now. This configuration directory will
   also contain certificates and private keys obtained by Certbot so
   making regular backups of this folder is ideal.
 - If you like Certbot, please consider supporting our work by:

   Donating to ISRG / Let's Encrypt:   https://letsencrypt.org/donate
   Donating to EFF:                    https://eff.org/donate-le
Nicht-www-HTTP-Anforderungen mit Nginx an www-HTTPS umleiten (optional)
Wir werden jetzt den Nginx-Server so konfigurieren, dass er den Datenverkehr von HTTP-Sites ohne www auf die WW-HTTPS-Site umleitet, d. h. http://itzgeek.net>> https://www.itzgeek.net .
Hier verwenden wir dieselbe Konfigurationsdatei, die wir für die HTTP-Version der Website erstellt haben, um die Nicht-www-HTTP-Website zu WW-HTTPS-Umleitung durchzuführen.
vi /etc/nginx/conf.d/www.itzgeek.net.conf
Fügen Sie die folgenden Informationen am Ende der Datei hinzu.
# Redirect NON-WWW HTTP to WWW HTTPS

server {
    if ($host = itzgeek.net) {
        return 301 https://www.itzgeek.net$request_uri;
    }


   server_name itzgeek.net;
    listen 80;
    return 404;

}
Starten Sie den Nginx-Dienst neu.
systemctl restart nginx
Firewall
Konfigurieren Sie die Firewall so, dass HTTPS-Anfragen zugelassen werden.
firewall-cmd --permanent --add-port=443/tcp

firewall-cmd --reload
Verifizieren Sie das Let’s Encrypt-Zertifikat
Überprüfen Sie die Details des Let’s Encrypt-Zertifikats, indem Sie zur HTTPS-Version Ihrer Website gehen.
http://Ihre-http-WebsiteODER
https://Ihre-https-Website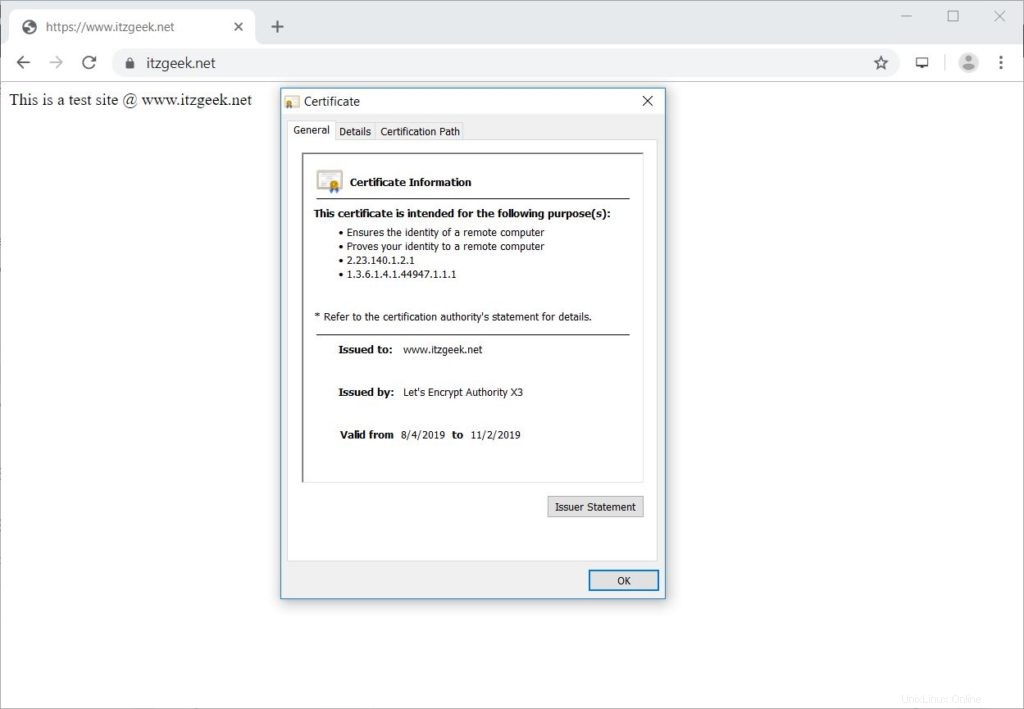
SSL-Zertifikat testen
Überprüfen Sie Ihr SSL-Zertifikat auf Probleme und seine Sicherheitsbewertungen, indem Sie die folgende URL aufrufen.
https://www.ssllabs.com/ssltest/analyze.html?d=www.itzgeek.net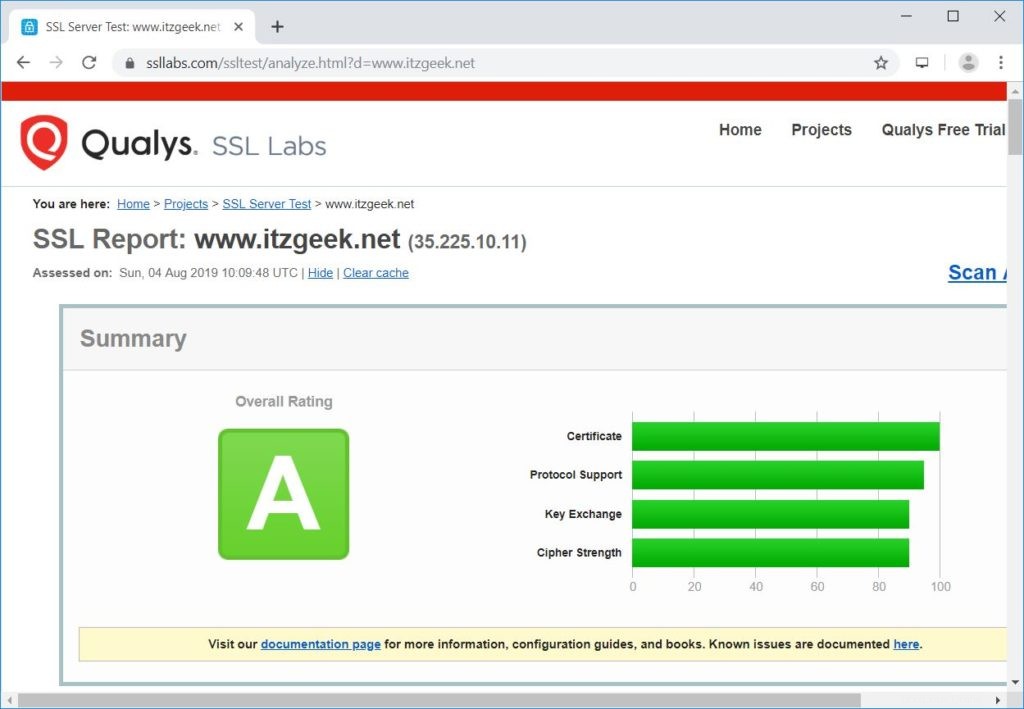
Erneuern Sie das Let’s Encrypt-Zertifikat
Das Let’s Encrypt-Zertifikat hat eine Gültigkeit von 90 Tagen und muss vor Ablauf erneuert werden.
Standardmäßig sind sowohl CentOS 7 als auch RHEL 7 mit einem Cron-Scheduler-Eintrag konfiguriert, der zweimal täglich ausgeführt wird, um das Let’s Encrypt-Zertifikat zu erneuern.
Leider müssen wir für CentOS 8 / RHEL 8 den Cron-Scheduler manuell konfigurieren.
echo "0 0,12 * * * root python -c 'import random; import time; time.sleep(random.random() * 3600)' && /usr/local/bin/certbot-auto renew" | sudo tee -a /etc/crontab > /dev/null
Sie können den Zertifikaterneuerungsprozess auch mit dem folgenden Befehl simulieren, um sicherzustellen, dass die Erneuerung reibungslos verläuft.
### CentOS 8 / RHEL 8 ###

/usr/local/bin/certbot-auto renew --dry-run

### CentOS 7 / RHEL 7 ###

certbot renew --dry-run
Ausgabe:
Saving debug log to /var/log/letsencrypt/letsencrypt.log

- - - - - - - - - - - - - - - - - - - - - - - - - - - - - - - - - - - - - - - -
Processing /etc/letsencrypt/renewal/www.itzgeek.net.conf
- - - - - - - - - - - - - - - - - - - - - - - - - - - - - - - - - - - - - - - -
Cert not due for renewal, but simulating renewal for dry run
Plugins selected: Authenticator nginx, Installer nginx
Renewing an existing certificate
Performing the following challenges:
http-01 challenge for www.itzgeek.net
Waiting for verification...
Cleaning up challenges

- - - - - - - - - - - - - - - - - - - - - - - - - - - - - - - - - - - - - - - -
new certificate deployed with reload of nginx server; fullchain is
/etc/letsencrypt/live/www.itzgeek.net/fullchain.pem
- - - - - - - - - - - - - - - - - - - - - - - - - - - - - - - - - - - - - - - -

- - - - - - - - - - - - - - - - - - - - - - - - - - - - - - - - - - - - - - - -
** DRY RUN: simulating 'certbot renew' close to cert expiry
**          (The test certificates below have not been saved.)

Congratulations, all renewals succeeded. The following certs have been renewed:
  /etc/letsencrypt/live/www.itzgeek.net/fullchain.pem (success)
** DRY RUN: simulating 'certbot renew' close to cert expiry
**          (The test certificates above have not been saved.)
- - - - - - - - - - - - - - - - - - - - - - - - - - - - - - - - - - - - - - - -

IMPORTANT NOTES:
 - Your account credentials have been saved in your Certbot
   configuration directory at /etc/letsencrypt. You should make a
   secure backup of this folder now. This configuration directory will
   also contain certificates and private keys obtained by Certbot so
   making regular backups of this folder is ideal.
Wenn die Ausgabe kein Problem meldet, funktioniert die Zertifikatserneuerung wie erwartet.
Schlussfolgerung
Das ist alles. Ich hoffe, Sie haben gelernt, wie Sie das SSL-Zertifikat Let’s Encrypt mit Nginx unter CentOS 8 / RHEL 8 und CentOS 7 / RHEL 7 einrichten. Teilen Sie Ihr Feedback im Kommentarbereich mit.