Vanilla ist eine kostenlose, quelloffene und flexible Community-Forum-Software, mit der Sie Ihre eigene Forum-Site erstellen können. Es ist eine leichtgewichtige und mehrsprachige Forenlösung, mit der Sie innerhalb weniger Minuten eine Online-Community aufbauen können. Es ist in PHP geschrieben und wird mit vielen Add-Ons und Themen geliefert. Es ist vollgepackt mit Premium-Funktionen und wird von Top-Marken verwendet, um Kunden zu binden, die Loyalität zu fördern und die Supportkosten zu senken.
In diesem Tutorial lernen wir, wie man das Vanilla-Forum auf CentOS 8 installiert und es mit Let’s Encrypt SSL sichert.
Voraussetzungen
- Ein Server mit CentOS 8.
- Ein Root-Passwort wird auf Ihrem Server eingerichtet.
LEMP-Server installieren
Zuerst müssen Sie den Nginx-Webserver, den MariaDB-Datenbankserver, PHP und andere erforderliche PHP-Erweiterungen in Ihrem System installieren. Sie können den folgenden Befehl ausführen, um alle zu installieren:
dnf install nginx mariadb-server php php php-mysqlnd php-opcache php-xml php-xmlrpc php-gd php-mbstring php-json php-fpm php-curl php-pear php-openssl php-intl unzip -y
Starten Sie nach der Installation aller Pakete den Nginx-, PHP-FPM- und MariaDB-Dienst und aktivieren Sie sie nach dem Systemneustart mit dem folgenden Befehl:
systemctl start nginx
 systemctl start php-fpm
 systemctl start mariadb
 systemctl enable nginx
 systemctl enable php-fpm
 systemctl enable mariadb
MariaDB-Datenbank konfigurieren
Bevor Sie beginnen, ist es eine gute Idee, Ihre MariaDB zu sichern. Sie können es mit dem folgenden Skript sichern:
mysql_secure_installation
Beantworten Sie alle Fragen wie unten gezeigt:
Enter current password for root (enter for none):
Set root password? [Y/n] Y
New password:
Re-enter new password:
Remove anonymous users? [Y/n] Y
Disallow root login remotely? [Y/n] Y
Remove test database and access to it? [Y/n] Y
Reload privilege tables now? [Y/n] Y
Melden Sie sich nach dem Sichern der MariaDB mit dem folgenden Befehl bei der MariaDB-Shell an:
mysql -u root -p
Geben Sie Ihr MariaDB-Root-Passwort ein und erstellen Sie mit dem folgenden Befehl eine Datenbank und einen Benutzer für Vanilla:
MariaDB [(none)]> CREATE DATABASE vanilladb CHARACTER SET utf8 COLLATE utf8_general_ci;
 MariaDB [(none)]> CREATE USER 'vanilla'@'localhost' IDENTIFIED BY 'password';
Als nächstes erteilen Sie der Vanilla-Datenbank alle Berechtigungen mit dem folgenden Befehl:
MariaDB [(none)]> GRANT ALL PRIVILEGES ON vanilladb.* TO 'vanilla'@'localhost';
Löschen Sie als Nächstes die Berechtigungen und verlassen Sie die MariaDB-Shell mit dem folgenden Befehl:
MariaDB [(none)]> FLUSH PRIVILEGES;
 MariaDB [(none)]> EXIT;
Vanilla-Forum herunterladen
Sie können die neueste stabile Version des Vanilla-Forums von seiner offiziellen Website mit dem folgenden Befehl herunterladen:
wget https://open.vanillaforums.com/get/vanilla-core-3.3.zip
Entpacken Sie die heruntergeladene Datei nach dem Herunterladen mit dem folgenden Befehl:
unzip vanilla-core-3.3.zip
Verschieben Sie als Nächstes das extrahierte Verzeichnis mit dem folgenden Befehl in das Nginx-Webstammverzeichnis:
mv package /var/www/html/vanilla
Als nächstes ändern Sie den Besitz des Vanilla-Verzeichnisses in Nginx:
chown -R nginx:nginx /var/www/html/vanilla
Sobald Sie fertig sind, können Sie mit dem nächsten Schritt fortfahren.
PHP-FPM-Pool konfigurieren
Standardmäßig ist PHP-FPM für Apache konfiguriert. Hier verwenden wir Nginx als Webserver. Sie müssen also PHP-FPM für Nginx konfigurieren. Sie können dies tun, indem Sie die Datei /etc/php-fpm.d/www.conf:
bearbeitennano /etc/php-fpm.d/www.conf
Ändern Sie die folgenden Zeilen:
user = nginx
group = nginx
Speichern und schließen Sie die Datei, wenn Sie fertig sind. Erstellen Sie dann ein Sitzungsverzeichnis für PHP und ändern Sie dessen Besitzer:
mkdir -p /var/lib/php/session
 chown -R nginx:nginx /var/lib/php/session
Starten Sie als Nächstes den PHP-FPM-Dienst neu, um die Änderungen zu übernehmen:
systemctl restart php-fpm
Nginx für Vanilla konfigurieren
Erstellen Sie als Nächstes eine neue virtuelle Nginx-Hostdatei für das Vanilla-Forum.
nano /etc/nginx/conf.d/vanilla.conf
Fügen Sie die folgenden Zeilen hinzu:
server {

  listen 80;
  server_name vanilla.linuxbuz.com;
  root /var/www/html/vanilla;
  index index.php;

  location ~* /\.git { deny all; return 403; }
  location /build/ { deny all; return 403; }
  location /cache/ { deny all; return 403; }
  location /cgi-bin/ { deny all; return 403; }
  location /uploads/import/ { deny all; return 403; }
  location /conf/ { deny all; return 403; }
  location /tests/ { deny all; return 403; }
  location /vendor/ { deny all; return 403; }

  location ~* ^/index\.php(/|$) {
    fastcgi_split_path_info ^(.+\.php)(/.+)$;
    try_files $fastcgi_script_name =404;
    set $path_info $fastcgi_path_info;
    fastcgi_param PATH_INFO $path_info;
    fastcgi_index index.php;
    include fastcgi.conf;
    fastcgi_param SCRIPT_NAME /index.php;
    fastcgi_param SCRIPT_FILENAME $realpath_root/index.php;
    fastcgi_param X_REWRITE 1;
    fastcgi_pass unix:/var/run/php-fpm/www.sock;
  }

  location ~* \.php(/|$) {
    rewrite ^ /index.php$uri last;
  }
  location / {
    try_files $uri $uri/ @vanilla;
  }

  location @vanilla {
    rewrite ^ /index.php$uri last;
  }

}
Speichern und schließen Sie die Datei, wenn Sie fertig sind. Starten Sie dann den Nginx-Dienst neu, um die Änderungen zu übernehmen:
systemctl restart nginx
Sichere Vanilla mit Let's Encrypt SSL
Als nächstes müssen Sie das Dienstprogramm Certbot auf Ihrem System installieren, um Let's Encrypt SSL für Ihre Vanilla-Website herunterzuladen und zu installieren.
Sie können den Certbot-Client mit dem folgenden Befehl installieren:
wget https://dl.eff.org/certbot-auto
 mv certbot-auto /usr/local/bin/certbot-auto
 chown root /usr/local/bin/certbot-auto
 chmod 0755 /usr/local/bin/certbot-auto
Rufen Sie als Nächstes mit dem folgenden Befehl ein SSL-Zertifikat für Ihre Vanilla-Website ab und installieren Sie es:
certbot-auto --nginx -d vanilla.linuxbuz.com
Der obige Befehl installiert zunächst alle erforderlichen Abhängigkeiten auf Ihrem Server. Nach der Installation werden Sie aufgefordert, eine E-Mail-Adresse anzugeben und die Nutzungsbedingungen wie unten gezeigt zu akzeptieren:
Saving debug log to /var/log/letsencrypt/letsencrypt.log
Plugins selected: Authenticator nginx, Installer nginx
Enter email address (used for urgent renewal and security notices) (Enter 'c' to

cancel): [email protected]

- - - - - - - - - - - - - - - - - - - - - - - - - - - - - - - - - - - - - - - -
Please read the Terms of Service at
https://letsencrypt.org/documents/LE-SA-v1.2-November-15-2017.pdf. You must
agree in order to register with the ACME server at
https://acme-v02.api.letsencrypt.org/directory
- - - - - - - - - - - - - - - - - - - - - - - - - - - - - - - - - - - - - - - -
(A)gree/(C)ancel: A

- - - - - - - - - - - - - - - - - - - - - - - - - - - - - - - - - - - - - - - -
Would you be willing to share your email address with the Electronic Frontier
Foundation, a founding partner of the Let's Encrypt project and the non-profit
organization that develops Certbot? We'd like to send you email about our work
encrypting the web, EFF news, campaigns, and ways to support digital freedom.
- - - - - - - - - - - - - - - - - - - - - - - - - - - - - - - - - - - - - - - -
(Y)es/(N)o: Y

Obtaining a new certificate
Performing the following challenges:
http-01 challenge for vanilla.linuxbuz.com
Waiting for verification...
Cleaning up challenges
Deploying Certificate to VirtualHost /etc/nginx/conf.d/vanilla.conf
Wählen Sie aus, ob Sie HTTP-Datenverkehr auf HTTPS umleiten möchten oder nicht, wie unten gezeigt:
Please choose whether or not to redirect HTTP traffic to HTTPS, removing HTTP access.
- - - - - - - - - - - - - - - - - - - - - - - - - - - - - - - - - - - - - - - -
1: No redirect - Make no further changes to the webserver configuration.
2: Redirect - Make all requests redirect to secure HTTPS access. Choose this for

new sites, or if you're confident your site works on HTTPS. You can undo this
change by editing your web server's configuration.
- - - - - - - - - - - - - - - - - - - - - - - - - - - - - - - - - - - - - - - -
Select the appropriate number [1-2] then [enter] (press 'c' to cancel): 2
Geben Sie 2 ein und drücken Sie Enter weitermachen. Nach erfolgreicher Installation sollten Sie folgende Ausgabe erhalten:
Redirecting all traffic on port 80 to ssl in /etc/nginx/conf.d/vanilla.conf

- - - - - - - - - - - - - - - - - - - - - - - - - - - - - - - - - - - - - - - -
Congratulations! You have successfully enabled https://vanilla.linuxbuz.com

You should test your configuration at:
https://www.ssllabs.com/ssltest/analyze.html?d=vanilla.linuxbuz.com
- - - - - - - - - - - - - - - - - - - - - - - - - - - - - - - - - - - - - - - -

IMPORTANT NOTES:
 - Congratulations! Your certificate and chain have been saved at:
   /etc/letsencrypt/live/vanilla.linuxbuz.com/fullchain.pem
   Your key file has been saved at:
   /etc/letsencrypt/live/vanilla.linuxbuz.com/privkey.pem
   Your cert will expire on 2020-06-11. To obtain a new or tweaked
   version of this certificate in the future, simply run certbot-auto
   again with the "certonly" option. To non-interactively renew *all*
   of your certificates, run "certbot-auto renew"
 - If you like Certbot, please consider supporting our work by:

   Donating to ISRG / Let's Encrypt:   https://letsencrypt.org/donate
   Donating to EFF:                    https://eff.org/donate-le
Konfigurieren Sie SELinux und die Firewall
Standardmäßig ist SELinux in CentOS 8 aktiviert. Sie müssen es also für Ihre Vanilla-Forum-Website konfigurieren.
Sie können SELinux mit dem folgenden Befehl konfigurieren:
setsebool httpd_can_network_connect on -P
 chcon -R -u system_u -t httpd_sys_rw_content_t -r object_r /var/www/html/vanilla
Lassen Sie als Nächstes Port 80 und 443 mit dem folgenden Befehl durch die Firewall:
firewall-cmd --permanent --add-service=http
firewall-cmd --permanent --add-service=https
 firewall-cmd --reload
Sobald Sie fertig sind, können Sie mit dem nächsten Schritt fortfahren.
Zugriff auf das Vanilla-Forum
Öffnen Sie Ihren Webbrowser und besuchen Sie die URL https://vanilla.linuxbuz.com. Sie werden auf die folgende Seite weitergeleitet:
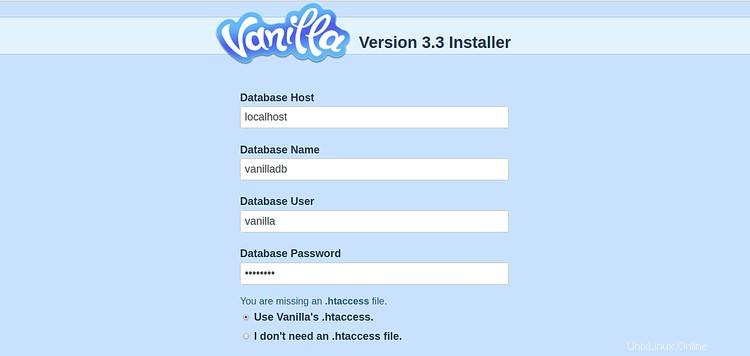
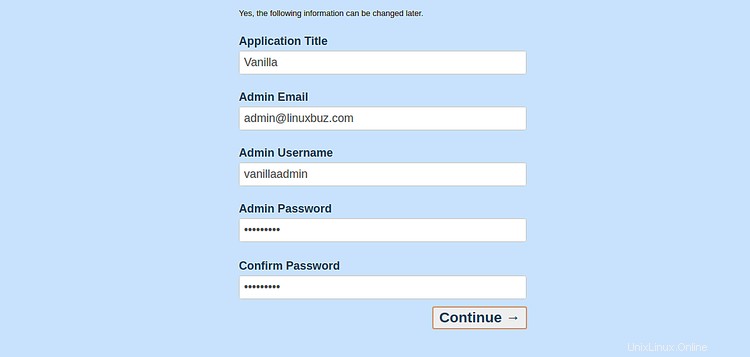
Geben Sie Ihre Datenbankdetails, Anwendungstitel, E-Mail, Admin-Benutzernamen und Passwort ein und klicken Sie auf Weiter Taste. Sobald die Installation abgeschlossen ist, sollten Sie das Vanilla-Dashboard auf der folgenden Seite sehen:

Schlussfolgerung
Herzliche Glückwünsche! Sie haben das Vanilla-Forum erfolgreich auf CentOS 8 mit Let's Encrypt SSL installiert. Sie können jetzt ganz einfach Ihre eigene Community-Forum-Website hosten. Fühlen Sie sich frei, mich zu fragen, wenn Sie irgendwelche Fragen haben.